In this Python web scraping tutorial, you’ll learn how to collect data from web pages with Python, parse the HTML, and turn the results into structured data you can use in scripts, reports, or applications.
We’ll start with the beginner-friendly stack: Requests for downloading pages and Beautiful Soup for extracting data from HTML. From there, we’ll look at when to move beyond simple scripts and use tools like Playwright for dynamic pages, Scrapy for larger crawling projects, and scraping APIs for harder targets.
The examples in this guide use Python 3 and focus on practical scraping workflows: sending requests, reading page structure, selecting elements, handling pagination, respecting rate limits, and saving scraped data.
TL;DR: Python Web Scraping Tutorial
Python web scraping usually follows five steps:
- Request the page.
- Read the HTML.
- Parse it with Beautiful Soup or another parser.
- Extract the fields you need.
- Save the data.
Start with Requests and Beautiful Soup when the data is already in the HTML.
Use Playwright when JavaScript renders the content after the page loads. Use Scrapy when you need a crawler that follows links, handles retries, and exports data across many pages.
Before scraping, check for an API. If one exists, it is often more reliable than parsing HTML.
What Web Scraping With Python Is
Web scraping with Python means writing a script that downloads a web page, reads its HTML, and extracts data such as product names, prices, article titles, links, tables, or job listings.
Most basic web scraping Python scripts have three parts:
- A request step that fetches the page.
- A parsing step that reads the HTML.
- An extraction step that selects and cleans the data.
For beginner Python web scraping, start with Requests and Beautiful Soup. Requests sends the HTTP request, while Beautiful Soup helps you search the HTML with simple selectors.
As the project gets more complex, you may need other tools:
- Playwright for JavaScript-rendered pages.
- Scrapy for larger crawlers that follow links and manage retries.
- pandas for cleaning tables or exporting scraped data.
- APIs when the site provides structured data directly.
If you need to send data, such as form submissions, check this guide on how to send Python POST requests.
The main rule is simple: choose the smallest tool that fits the page. If the data is in the HTML, web scraping with Python Requests and Beautiful Soup is usually enough. If JavaScript renders the data, use Playwright. If you need to crawl many pages, use Scrapy.
The Stack Used in This Tutorial
This web scraping Python tutorial starts with the beginner stack and then moves into more advanced tools only when they solve a specific problem.
| Tool | Used for |
|---|---|
| Requests | Downloading static HTML pages |
| Beautiful Soup | Parsing HTML and extracting data |
| lxml | Fast HTML parsing for Beautiful Soup |
| Playwright | Scraping JavaScript-rendered pages |
| Scrapy | Crawling many pages with a structured framework |
| ScrapingBee | Handling JavaScript rendering, proxies, screenshots, anti-bot issues, and structured extraction through an API |
| pandas | Cleaning, inspecting, and exporting scraped data |
When to Use Requests + Beautiful Soup, Playwright, or Scrapy
Most Python web scraping projects should start with the lightest tool that can get the data. For many static pages, that means Requests and Beautiful Soup. Move to Playwright or Scrapy only when the page or project needs them.
| Tool | Best for | Use it when | Avoid it when |
|---|---|---|---|
| Requests + Beautiful Soup | Static pages and basic web scraping Python scripts | The data is already in the server-rendered HTML | The page relies on JavaScript or browser actions |
| Playwright | Dynamic web scraping Python workflows | Data appears after JavaScript runs, scrolling, clicking, login, or UI changes | You only need simple static HTML |
| Scrapy | Larger crawling projects | You need pagination, link-following, retries, exports, and reusable spiders | You are building a small first scraper |
Learn more in our guide: How to scrape with Playwright.
- Requests and Beautiful Soup are the best starting point for learning how to web scrape with Python: request the page, parse the HTML, select elements, and clean the result.
- Use Playwright when a normal HTTP request does not return the data you see in the browser. This is common on pages where products, comments, prices, or search results are rendered after the initial load.
- Use Scrapy when the task becomes a crawler instead of a single-page scraper. Scrapy gives you spiders, retries, throttling, exports, and link-following in one framework.
A useful decision path:
- Check whether the site has an API.
- If the data is in the raw HTML, use Requests and Beautiful Soup.
- If JavaScript renders the data, use Playwright.
- If you need to crawl many pages, use Scrapy.
💡 Love Beautiful Soup? Check out our guide to improving scraping speed and performance with Beautiful Soup 4.
Build Your First Scraper With Requests + Beautiful Soup
The basic web scraping Python workflow is:
- Download the page HTML.
- Parse it.
- Select the data.
- Clean the values.
- Print or save the result.
For this first scraper, install three packages:
pip install requests beautifulsoup4 lxml
Here is the role of each one:
requestsfetches the web page.beautifulsoup4searches and extracts data from HTML.lxmlgives Beautiful Soup a faster parser.
You can also download images with Requests as explained in our tutorial.
In this example, we’ll scrape the first five stories from the Hacker News homepage. This is a good first example of web scraping with Python Requests because the data is already in the page HTML.
Before writing code, open Hacker News in your browser, right-click a story, and choose Inspect.
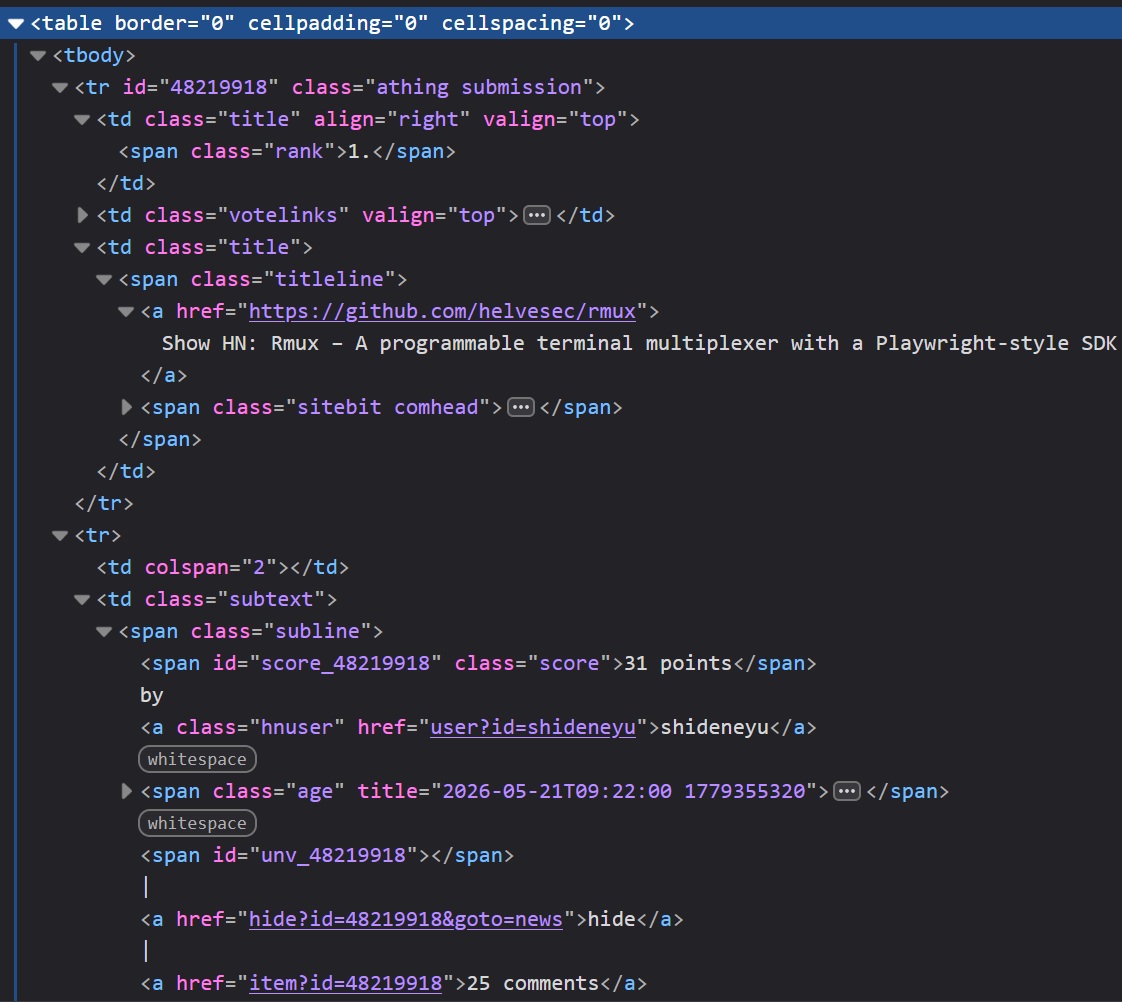
You should see this pattern:
- Each story row uses
tr.athing.submission. - The title link is inside
.titleline > a. - The next row contains the score, author, age, and comments inside
.subtext.
Those selectors are enough for the scraper.
from __future__ import annotations

import re
from dataclasses import dataclass
from urllib.parse import urljoin

import requests
from bs4 import BeautifulSoup
from requests import RequestException


HN_URL = "https://news.ycombinator.com/"
TIMEOUT_SECONDS = 10

HEADERS = {
    "User-Agent": "python-web-scraping-tutorial/1.0"
}


@dataclass
class Story:
    rank: int
    title: str
    url: str
    points: int
    author: str
    age: str
    comments: int


def extract_number(text: str | None) -> int:
    """Return the first integer in a string, or 0 if none exists."""
    if not text:
        return 0

    match = re.search(r"\d+", text.replace("\xa0", " "))
    return int(match.group()) if match else 0


def fetch_html(url: str) -> str:
    """Download a page and return its HTML."""
    try:
        response = requests.get(
            url,
            headers=HEADERS,
            timeout=TIMEOUT_SECONDS,
        )
        response.raise_for_status()
    except RequestException as exc:
        raise RuntimeError(f"Failed to fetch {url}: {exc}") from exc

    return response.text


def parse_hacker_news(html: str, limit: int = 5) -> list[Story]:
    """Extract Hacker News stories from HTML."""
    soup = BeautifulSoup(html, "lxml")
    stories: list[Story] = []

    for story_row in soup.select("tr.athing.submission")[:limit]:
        title_link = story_row.select_one(".titleline > a")

        if title_link is None:
            continue

        href = title_link.get("href")
        story_url = urljoin(HN_URL, href if isinstance(href, str) else "")

        subtext_row = story_row.find_next_sibling("tr")
        subtext = subtext_row.select_one(".subtext") if subtext_row else None

        rank_text = story_row.select_one(".rank")
        score_text = subtext.select_one(".score") if subtext else None
        author_link = subtext.select_one(".hnuser") if subtext else None
        age_link = subtext.select_one(".age a") if subtext else None

        comment_link = None
        if subtext:
            for link in subtext.select("a"):
                link_text = link.get_text(" ", strip=True).lower()
                if "comment" in link_text or link_text == "discuss":
                    comment_link = link
                    break

        stories.append(
            Story(
                rank=extract_number(rank_text.get_text() if rank_text else None),
                title=title_link.get_text(" ", strip=True),
                url=story_url,
                points=extract_number(score_text.get_text() if score_text else None),
                author=author_link.get_text(" ", strip=True) if author_link else "unknown",
                age=age_link.get_text(" ", strip=True) if age_link else "unknown",
                comments=extract_number(comment_link.get_text() if comment_link else None),
            )
        )

    return stories


def main() -> None:
    html = fetch_html(HN_URL)
    stories = parse_hacker_news(html)

    for story in stories:
        print(f"{story.rank}. {story.title}")
        print(f"   URL: {story.url}")
        print(f"   {story.points} points by {story.author} | {story.age} | {story.comments} comments")
        print()


if __name__ == "__main__":
    main()
The script keeps the first scraper small, but still handles the basics:
timeoutprevents the request from hanging.raise_for_status()catches HTTP errors.- Beautiful Soup parses the HTML instead of using string matching.
extract_number()turns text like31 pointsinto an integer.- Missing fields fall back to safe defaults instead of crashing the script.
Run the file and you should see output like this:
1. Show HN: Rmux – A programmable terminal multiplexer with a Playwright-style SDK
   URL: https://github.com/helvesec/rmux
   34 points by shideneyu | 1 hour ago | 25 comments

2. An OpenAI model has disproved a central conjecture in discrete geometry
   URL: https://openai.com/index/model-disproves-discrete-geometry-conjecture/
   1193 points by tedsanders | 15 hours ago | 869 comments
The exact stories will change because Hacker News updates throughout the day. The scraper should still return the same fields: rank, title, URL, points, author, age, and comment count.
Clean and Extract Structured Data
The scraper returns a list of Story objects:
stories = parse_hacker_news(html)
Each object uses the same fields:
Story(
    rank=1,
    title="Show HN: Rmux – A programmable terminal multiplexer with a Playwright-style SDK",
    url="https://github.com/helvesec/rmux",
    points=31,
    author="shideneyu",
    age="1 hour ago",
    comments=25,
)
This is easier to work with than raw scraped text. You can filter, sort, export, or store the records without parsing the same strings again.
For example, print only stories with at least 20 points:
popular_stories = [story for story in stories if story.points >= 20]

for story in popular_stories:
    print(f"{story.title} ({story.points} points)")
At this point, you have completed the basic Python web scraping flow:
- Fetch a real page.
- Inspect the HTML.
- Select story rows.
- Extract titles, URLs, scores, authors, ages, and comments.
- Convert numeric text into integers.
- Print the results.
This pattern works for many static pages. If the data is in the HTML response, Requests and Beautiful Soup are usually enough. If JavaScript adds the data later, move to a browser automation tool like Playwright.
Common Beginner Mistakes
Most beginner scraping bugs come from skipping checks or using the wrong tool for the page.
Parsing Before Checking the Response
Check the request before passing HTML to Beautiful Soup.
response = requests.get(HN_URL, headers=HEADERS, timeout=10)
response.raise_for_status()

soup = BeautifulSoup(response.text, "lxml")
Forgetting a Timeout
Requests has no default timeout. Add one so the scraper does not hang on a slow server.
response = requests.get(HN_URL, headers=HEADERS, timeout=10)
Expecting Beautiful Soup to Run JavaScript
Beautiful Soup parses HTML. It does not run JavaScript, click buttons, scroll, or wait for rendered content.
print(response.text[:500])
If the data appears in the browser but not in response.text, use Playwright or a scraping API with JavaScript rendering.
Using Fragile Selectors
Avoid selectors tied to exact layout positions. Prefer shorter selectors based on meaningful classes or elements.
# Better
soup.select("tr.athing.submission")

# More fragile
soup.select("body > center > table > tr > td > table > tr:nth-child(3)")
Keeping Messy Strings
Clean values you need for sorting, filtering, or storage.
points = extract_number("31 points")
comments = extract_number("25 comments")
Assuming the HTML Will Not Change
Websites change. Keep parsing logic small and easy to update.
Good habits:
- Check for missing elements.
- Keep extraction in separate functions.
- Save sample HTML when debugging.
- Test selectors after layout changes.
Sending Too Many Requests and Ignoring Site Rules
Do not run huge loops or high concurrency against a site without limits. You can overload the server or get blocked.
For small scripts, add a delay:
import time

for page_url in page_urls:
    html = fetch_html(page_url)
    time.sleep(2)
For larger crawlers, use rate limits, retry backoff, caching, and concurrency limits. Before scraping, check for an API, terms of service, robots.txt, and crawling guidance.
Ask:
- Is there an official API?
- Does the site allow automated access?
- Am I collecting only what I need?
- Am I sending requests at a reasonable rate?
- Am I allowed to store or republish this data?
Good scraping is respectful: fetch only what you need, slow down, and stop if the site blocks automated access.
When Static Scraping Stops Being Enough
Requests and Beautiful Soup work when the data is already in the HTML response. This covers many blogs, documentation pages, directories, tables, and server-rendered sites.
Static scraping stops being enough when the page depends on browser behavior.
Common signs:
- The data appears in the browser but not in
response.text. - The HTML contains empty containers filled later by JavaScript.
- Results load after clicking, scrolling, filtering, or typing.
- More items arrive through background API requests.
- Content changes after login, location selection, or session state.
Check the raw HTML first:
html = fetch_html("https://example.com")
print(html[:1000])
If the data is missing, Beautiful Soup has nothing to parse. Your next options are:
- Find the API or background request that returns the data.
- Use Playwright to load and interact with the page in a real browser.
The next section of our web scraping using Python tutorial covers dynamic web scraping Python workflows with Playwright.
Before switching to browser automation, check the Network tab in DevTools. Many dynamic pages load data from a JSON endpoint. If that endpoint is public and allowed to use, calling it directly is usually faster and more stable than rendering the full page.
Use Playwright for JavaScript-Heavy Pages
Requests and Beautiful Soup work when the data is already in the HTML. For dynamic web scraping Python workflows, you need a browser when JavaScript renders the content after the initial page load.
Playwright opens a real browser, waits for the page to render, and lets you extract the final HTML or page elements.
Use Playwright when:
- Data appears in the browser but not in
response.text. - Content loads after JavaScript runs.
- You need to click, scroll, type, or wait for UI changes.
- Results come from client-side rendering.
Do not use Playwright for every scraper. It is slower than Requests because it runs a browser. Start with Requests, then switch when the page requires rendering or interaction.
Install Playwright
pip install playwright
playwright install chromium
This example uses Chromium, but Playwright can also automate Firefox and WebKit.
Scrape a JavaScript-Rendered Page
We’ll scrape quotes from https://quotes.toscrape.com/js-delayed/. The quotes appear after a short JavaScript delay, so a basic Requests scraper may miss them.
from __future__ import annotations

from dataclasses import dataclass

from playwright.sync_api import (
    Error as PlaywrightError,
    TimeoutError as PlaywrightTimeoutError,
    sync_playwright,
)


URL = "https://quotes.toscrape.com/js-delayed/"
TIMEOUT_MS = 15_000


@dataclass
class Quote:
    text: str
    author: str
    tags: list[str]


def scrape_quotes(limit: int = 5) -> list[Quote]:
    """Scrape quotes from a JavaScript-rendered page."""
    try:
        with sync_playwright() as p:
            browser = p.chromium.launch(headless=True)
            page = browser.new_page(
                user_agent="python-web-scraping-tutorial/1.0"
            )

            try:
                page.goto(URL, wait_until="domcontentloaded", timeout=TIMEOUT_MS)
                page.wait_for_selector(".quote", timeout=TIMEOUT_MS)

                quote_cards = page.locator(".quote")
                quote_count = min(quote_cards.count(), limit)
                quotes: list[Quote] = []

                for index in range(quote_count):
                    card = quote_cards.nth(index)

                    quotes.append(
                        Quote(
                            text=card.locator(".text").inner_text().strip(),
                            author=card.locator(".author").inner_text().strip(),
                            tags=[
                                tag.strip()
                                for tag in card.locator(".tag").all_inner_texts()
                            ],
                        )
                    )

                return quotes

            finally:
                browser.close()

    except PlaywrightTimeoutError as exc:
        raise RuntimeError("Timed out waiting for quote content.") from exc
    except PlaywrightError as exc:
        raise RuntimeError(f"Playwright failed: {exc}") from exc


def main() -> None:
    quotes = scrape_quotes()

    for quote in quotes:
        print(quote.text)
        print(f"Author: {quote.author}")
        print(f"Tags: {', '.join(quote.tags) if quote.tags else 'none'}")
        print()


if __name__ == "__main__":
    main()
Example output:
“The world as we have created it is a process of our thinking. It cannot be changed without changing our thinking.”
Author: Albert Einstein
Tags: change, deep-thoughts, thinking, world

“It is our choices, Harry, that show what we truly are, far more than our abilities.”
Author: J.K. Rowling
Tags: abilities, choices
What This Script Does
This Playwright scraper follows the same flow as the Requests example, but uses a browser instead of a plain HTTP request:
- Start Chromium.
- Open the page.
- Wait for
.quoteelements. - Extract text, author, and tags.
- Return structured
Quoteobjects.
The key line is:
page.wait_for_selector(".quote", timeout=TIMEOUT_MS)
This waits for the JavaScript-rendered content to appear. It is better than time.sleep() because the script waits for a real page condition, not a guessed delay.
When Playwright Is the Right Tool
Use Playwright when browser behavior is part of the scraping task:
- Waiting for JavaScript-rendered data.
- Clicking a “Load more” button.
- Scrolling to trigger lazy loading.
- Filling out a search form.
- Handling pages that depend on session or UI state.
For static pages, Requests and Beautiful Soup are still faster and simpler. Use Playwright only when the page needs a browser.
Use Scrapy When You Need to Crawl at Scale
Requests and Beautiful Soup are good for small static scrapers. Playwright helps when a page needs browser rendering. Scrapy is for crawling: many pages, repeated jobs, link-following, exports, retries, and project structure.
Use Scrapy when you need to:
- Crawl many pages.
- Follow links automatically.
- Export data to JSON, CSV, or JSON Lines.
- Reuse spider settings.
- Add retries, throttling, middleware, or pipelines.
- Run the scraper as a repeatable job.
Scrapy is usually too much for one page. It becomes useful when a scraper turns into a crawler.
Check out our comprehensive guide on how to find all URLs on a domain's website.
Install Scrapy
Install Scrapy in a virtual environment:
pip install scrapy
Create a project:
scrapy startproject bookcrawler
cd bookcrawler
For this Scrapy web scraping Python example, we’ll crawl a few pages from https://books.toscrape.com/. Generate a spider:
scrapy genspider books books.toscrape.com
This creates:
bookcrawler/spiders/books.py
Scrape Books to Scrape With Scrapy
Books to Scrape is a practice site with product cards, prices, ratings, availability text, and pagination.
Replace the generated code in bookcrawler/spiders/books.py with this spider:
from __future__ import annotations

from collections.abc import Iterable
from typing import Any

import scrapy
from scrapy.http import Response


class BooksSpider(scrapy.Spider):
    name = "books"
    allowed_domains = ["books.toscrape.com"]
    start_urls = ["https://books.toscrape.com/"]

    max_pages = 3

    custom_settings = {
        "DOWNLOAD_DELAY": 1,
        "CONCURRENT_REQUESTS_PER_DOMAIN": 2,
    }

    def parse(self, response: Response) -> Iterable[dict[str, Any] | scrapy.Request]:
        current_page = response.meta.get("page", 1)

        for book in response.css("article.product_pod"):
            title = book.css("h3 a::attr(title)").get(default="").strip()
            relative_url = book.css("h3 a::attr(href)").get(default="")
            price = book.css(".price_color::text").get(default="").strip()
            availability = " ".join(
                book.css(".availability::text").getall()
            ).strip()

            rating_class = book.css("p.star-rating::attr(class)").get(default="")
            rating = rating_class.replace("star-rating", "").strip()

            yield {
                "title": title,
                "url": response.urljoin(relative_url),
                "price": price,
                "availability": availability,
                "rating": rating,
                "page": current_page,
            }

        next_page = response.css("li.next a::attr(href)").get()

        if next_page and current_page < self.max_pages:
            yield response.follow(
                next_page,
                callback=self.parse,
                meta={"page": current_page + 1},
            )
Run the spider and save the results:
scrapy crawl books -O books.json
Or export CSV:
scrapy crawl books -O books.csv
Example record:
{
  "title": "A Light in the Attic",
  "url": "https://books.toscrape.com/catalogue/a-light-in-the-attic_1000/index.html",
  "price": "£51.77",
  "availability": "In stock",
  "rating": "Three",
  "page": 1
}
What This Spider Does
This web scraping using Scrapy Python example is still about extracting data, but Scrapy handles the crawl loop for you:
start_urlssets the first page.parse()receives each response.- CSS selectors extract book data.
yieldreturns structured records.response.follow()moves to the next page.max_pageskeeps the tutorial crawl small.
With Requests, you usually write the URL loop yourself. With Scrapy, the framework manages requests, callbacks, and exports.
If you want to dive deeper, check this guide on how to scrape with Scrapy.
When Scrapy Is Worth It
Use Scrapy when the project needs crawler behavior, not just page parsing.
Good use cases:
- Product listings across many pages.
- Category or pagination crawling.
- Scheduled scraping jobs.
- JSON, CSV, or JSON Lines exports.
- Retry rules, rate limits, and custom headers.
- Data cleanup through item pipelines.
- A maintainable project structure.
For a small static page, Scrapy is more structure than you need. For a crawler that must run repeatedly and export consistent data, that structure pays off.
Learn about a Scrapy competitor: Crawlee for Python Tutorial with Examples.
Use a Python Web Scraping API When You Do Not Want to Manage Browsers and Proxies Yourself
Local tools give you control, but they also make you manage browser setup, proxy rotation, retries, blocks, JavaScript rendering, and scaling.
A scraping API helps when the hard part is not parsing HTML anymore, but getting reliable page responses at volume.
Use a scraping API when you need:
- JavaScript rendering without running Playwright or Selenium locally.
- Proxy rotation or country-specific requests.
- Better handling for sites that block basic scripts.
- Higher-volume scraping without browser workers.
- Dedicated endpoints for sources like Google, Amazon, or Walmart.
- Structured extraction without building a parser for every page.
For this web scraping using API in Python example, we’ll use ScrapingBee. Create a free account, get your API key, and start with 1,000 free credits.
Scrape a JavaScript Page With ScrapingBee
We’ll use the same delayed JavaScript page https://quotes.toscrape.com/js-delayed/. Instead of installing Chromium or running Playwright, send the URL to ScrapingBee with JavaScript rendering enabled.
Install Requests:
pip install requests
Set your API key:
export SCRAPINGBEE_API_KEY="your-api-key"
On Windows PowerShell:
setx SCRAPINGBEE_API_KEY "your-api-key"
Now request the rendered page:
from __future__ import annotations

import os

import requests
from requests import RequestException


SCRAPINGBEE_API_URL = "https://app.scrapingbee.com/api/v1"
TARGET_URL = "https://quotes.toscrape.com/js-delayed/"
TIMEOUT_SECONDS = 30


def fetch_with_scrapingbee(url: str) -> str:
    api_key = os.getenv("SCRAPINGBEE_API_KEY")

    if not api_key:
        raise RuntimeError("Missing SCRAPINGBEE_API_KEY environment variable.")

    try:
        response = requests.get(
            SCRAPINGBEE_API_URL,
            params={
                "api_key": api_key,
                "url": url,
                "render_js": "True",
                "wait_for": ".quote",

                # Optional. Use only when the target needs it.
                # "premium_proxy": "True",
                # "country_code": "us",
            },
            timeout=TIMEOUT_SECONDS,
        )
        response.raise_for_status()
    except RequestException as exc:
        raise RuntimeError(f"ScrapingBee request failed: {exc}") from exc

    return response.text


def main() -> None:
    html = fetch_with_scrapingbee(TARGET_URL)
    print(html[:1000])


if __name__ == "__main__":
    main()
This returns rendered HTML after JavaScript has run. You can parse it with Beautiful Soup, or use ScrapingBee extraction rules to get structured data directly from the API.
💡 To learn web scraping with Python across more tools, check out our expert list of the best Python web scraping libraries.
Extract Structured Data Without Beautiful Soup
If you know the page structure, use extract_rules to return JSON directly from ScrapingBee. This lets you skip local parsing with Beautiful Soup.
from __future__ import annotations

import json
import os
from pprint import pprint

import requests
from requests import RequestException


SCRAPINGBEE_API_URL = "https://app.scrapingbee.com/api/v1"
TARGET_URL = "https://quotes.toscrape.com/js-delayed/"
TIMEOUT_SECONDS = 45


EXTRACT_RULES = {
    "quotes": {
        "selector": ".quote",
        "type": "list",
        "output": {
            "text": ".text",
            "author": ".author",
            "tags": {
                "selector": ".tag",
                "type": "list",
            },
        },
    }
}


def scrape_quotes_with_extract_rules() -> dict:
    api_key = os.getenv("SCRAPINGBEE_API_KEY")

    if not api_key:
        raise RuntimeError("Missing SCRAPINGBEE_API_KEY environment variable.")

    try:
        response = requests.get(
            SCRAPINGBEE_API_URL,
            params={
                "api_key": api_key,
                "url": TARGET_URL,
                "render_js": "True",
                "wait_for": ".quote",
                "extract_rules": json.dumps(EXTRACT_RULES),
            },
            timeout=TIMEOUT_SECONDS,
        )
        response.raise_for_status()
    except RequestException as exc:
        raise RuntimeError(f"ScrapingBee request failed: {exc}") from exc

    return response.json()


def main() -> None:
    data = scrape_quotes_with_extract_rules()
    pprint(data)


if __name__ == "__main__":
    main()
Example response:
{
  "quotes": [
    {
      "text": "“The world as we have created it is a process of our thinking. It cannot be changed without changing our thinking.”",
      "author": "Albert Einstein",
      "tags": ["change", "deep-thoughts", "thinking", "world"]
    },
    {
      "text": "“It is our choices, Harry, that show what we truly are, far more than our abilities.”",
      "author": "J.K. Rowling",
      "tags": ["abilities", "choices"]
    }
  ]
}
This web scraping using API in Python example renders the page, waits for .quote, applies the extraction rules, and returns structured JSON.
Use AI Extraction When Selectors Are Not Worth Maintaining
CSS selectors are best when the layout is stable. If the page is messy, changes often, or is easier to describe than select, use ai_extract_rules.
from __future__ import annotations

import json
import os
from pprint import pprint

import requests
from requests import RequestException


SCRAPINGBEE_API_URL = "https://app.scrapingbee.com/api/v1"
TARGET_URL = "https://quotes.toscrape.com/js-delayed/"
TIMEOUT_SECONDS = 45


AI_EXTRACT_RULES = {
    "quotes": {
        "description": "all quotes on the page, including quote text, author name, and the list of tags",
        "type": "list",
    }
}


def scrape_quotes_with_ai_extraction() -> dict:
    api_key = os.getenv("SCRAPINGBEE_API_KEY")

    if not api_key:
        raise RuntimeError("Missing SCRAPINGBEE_API_KEY environment variable.")

    try:
        response = requests.get(
            SCRAPINGBEE_API_URL,
            params={
                "api_key": api_key,
                "url": TARGET_URL,
                "render_js": "True",
                "wait_for": ".quote",
                "ai_extract_rules": json.dumps(AI_EXTRACT_RULES),

                # Optional: focus extraction on the block containing quotes.
                "ai_selector": "#quotesPlaceholder",
            },
            timeout=TIMEOUT_SECONDS,
        )
        response.raise_for_status()
    except RequestException as exc:
        raise RuntimeError(f"ScrapingBee request failed: {exc}") from exc

    return response.json()


def main() -> None:
    data = scrape_quotes_with_ai_extraction()
    pprint(data)


if __name__ == "__main__":
    main()
Use AI extraction when you want structured output without maintaining CSS or XPath selectors for every field. For stable pages, normal extraction rules are usually more predictable. For simple static pages, Requests and Beautiful Soup may still be enough.
Note that AI extraction can cost additional API credits, so use it when selector maintenance is more expensive than the extra API cost.
Further reading on AI web scraping:
- How to Easily Scrape Any Shopify Store With AI
- Free AI Powered Proxy Scraper for Getting Fresh Public Proxies
- BrowserUse: How to use AI Browser Automation to Scrape
- Crawl4AI web scraping: AI-friendly web crawling
When ScrapingBee Is Worth It
ScrapingBee is useful when scraping infrastructure becomes the hard part.
Use it when:
- Playwright works locally, but scaling browsers is painful.
- You need proxy rotation or geotargeting.
- You want rendered HTML without managing Chromium.
- You need JSON from extraction rules or AI extraction.
- Basic scripts hit frequent blocks.
- You want dedicated scraping APIs for Google, Amazon, Walmart, or similar targets.
Do not add a scraping API too early. If a page is static, use Requests and Beautiful Soup. If browsers, proxies, or anti-bot issues start taking over the project, ScrapingBee is the next step.
Handle Retries, Timeouts, and Reliability
A scraper should fail clearly instead of hanging forever or returning broken data. You do not need a complex reliability setup for every script, but a few safeguards help a lot.
Always Set Timeouts
Requests has no default timeout. Add one to every request.
import requests

response = requests.get(
    "https://news.ycombinator.com/",
    timeout=(5, 15),
)

response.raise_for_status()
The tuple means:
5seconds to connect.15seconds to wait for a response.
For small scripts, a single value is fine:
response = requests.get(url, timeout=10)
Retry Temporary Failures
Some failures are temporary, such as 429 Too Many Requests, 502 Bad Gateway, or 503 Service Unavailable. Retry them carefully, with limits and backoff.
from __future__ import annotations

import requests
from requests.adapters import HTTPAdapter
from urllib3.util.retry import Retry


def create_session() -> requests.Session:
    retry_strategy = Retry(
        total=3,
        backoff_factor=1,
        status_forcelist=[429, 500, 502, 503, 504],
        allowed_methods=["GET"],
    )

    adapter = HTTPAdapter(max_retries=retry_strategy)

    session = requests.Session()
    session.headers.update({
        "User-Agent": "python-web-scraping-tutorial/1.0"
    })
    session.mount("https://", adapter)
    session.mount("http://", adapter)

    return session


session = create_session()

response = session.get(
    "https://news.ycombinator.com/",
    timeout=(5, 15),
)

response.raise_for_status()
This retries a few failed GET requests and waits between attempts. Do not retry forever, and do not use retries to push through blocking.
Make Failures Easy to Debug
When a scraper fails, you need to know whether the problem is the request, selector, parser, or page layout.
Save the HTML you received and raise clear errors when required elements are missing:
from pathlib import Path

Path("debug_page.html").write_text(response.text, encoding="utf-8")

title = soup.select_one(".titleline > a")

if title is None:
    raise RuntimeError("Could not find story title. The page layout may have changed.")
Useful habits:
- Save sample HTML when debugging selectors.
- Log the failed URL.
- Keep retries limited.
- Slow down after
429responses. - Treat repeated blocking as a signal to stop and reassess.
Reliability is not about forcing a scraper through every failure. It is about making failures clear, limited, and easy to fix.
Store Scraped Data in the Right Format
So far, you have learned how to fetch pages, parse HTML, and extract structured data. The next step is deciding where to store the results.
Choose a format based on how you will use the data. You do not always need a database. For many Python web scraping projects, CSV, JSON, or JSON Lines is easier to inspect and debug.
A quick rule:
- Use lists or dictionaries while the scraper runs.
- Use pandas for cleaning and inspecting tables.
- Use CSV for spreadsheet-friendly data.
- Use JSON for nested records.
- Use JSON Lines for larger crawls.
- Use a database for queries, updates, deduplication, or long-term storage.
Keep Data in Memory First
For small scrapers, a list of dictionaries is enough:
stories = [
    {
        "title": "Example story",
        "url": "https://example.com/story",
        "points": 42,
        "comments": 10,
    }
]
This structure works with CSV, JSON, pandas, APIs, and databases.
Use pandas when you want to inspect or clean the results:
import pandas as pd

df = pd.DataFrame(stories)
df = df.sort_values("points", ascending=False)

print(df.head())
Save Data to Files
Use CSV for flat records:
df.to_csv("stories.csv", index=False)
Use JSON for nested data:
df.to_json("stories.json", orient="records", indent=2)
Use JSON Lines when each scraped record should be stored as one line:
df.to_json("stories.jsonl", orient="records", lines=True)
JSON Lines is useful for larger crawls because you can process records one at a time.
Use a Database Only When Needed
A database helps when scraped data must be queried, updated, joined, deduplicated, or stored over time.
For a small local project, SQLite is often enough:
import sqlite3

with sqlite3.connect("scraped_data.db") as connection:
    df.to_sql("stories", connection, if_exists="replace", index=False)
Use PostgreSQL, MySQL, or another server database when the scraper feeds an application or data pipeline.
Do not add a database just to make the project feel serious. If CSV or JSON solves the problem, start there.
Store Data for AI Agents and LLM Workflows
If scraped data will be used by an AI agent or LLM workflow, keep it easy to retrieve, trace, and cite.
Useful formats include:
- Markdown for cleaned articles and documentation.
- JSON for structured records.
- JSON Lines for large document collections.
- CSV for simple tables.
- A vector database for semantic search.
Keep source metadata with every record:
{
  "title": "Example page",
  "url": "https://example.com/page",
  "scraped_at": "2026-05-21T12:00:00Z",
  "content": "Cleaned page text goes here."
}
Metadata helps you refresh stale pages, remove duplicates, and trace where each result came from.
Common Scraping Errors and Debugging
Most Python web scraping errors come from four places: the request failed, the HTML is different than expected, the selector no longer matches, or JavaScript loads the data later.
Debug one step at a time instead of guessing.
Request and HTTP Errors
First, check whether the page was downloaded.
response = requests.get(url, headers=HEADERS, timeout=10)

print(response.status_code)
print(response.url)
print(response.text[:500])

response.raise_for_status()
Common status codes:
200: request worked.301/302: page redirected.403: access is forbidden or blocked.404: page not found.429: too many requests.500/502/503: server error.
If you get 403 or 429, do not just increase retries. Slow down, check the site’s rules, reduce request volume, or use an API if one exists.
For a deep dive, check out our detailed article on how to not get blocked while web scraping.
Selector Errors
This error usually means your selector found nothing:
AttributeError: 'NoneType' object has no attribute 'get_text'
Instead of chaining methods immediately:
title = soup.select_one(".titleline > a").get_text(strip=True)
check the element first:
title_element = soup.select_one(".titleline > a")

if title_element is None:
    raise RuntimeError("Could not find title element. The page layout may have changed.")

title = title_element.get_text(strip=True)
When selectors fail, save the HTML you actually received:
from pathlib import Path

Path("debug_page.html").write_text(response.text, encoding="utf-8")
Open the file and check whether the expected elements are really there.
JavaScript and Missing Content
Sometimes the browser shows data that is missing from response.text. That usually means JavaScript loads the content after the initial HTML response.
Check before rewriting selectors:
html = response.text

if "Expected text from the page" not in html:
    print("The data may be loaded by JavaScript.")
If the data is not in the raw HTML, Beautiful Soup cannot extract it. Your options are:
- Find the background API request.
- Use Playwright or Selenium.
- Use a scraping API with JavaScript rendering.
Encoding and Text Cleanup Issues
If scraped text has strange spacing or non-breaking spaces, normalize it before storage.
text = element.get_text(" ", strip=True)
text = text.replace("\xa0", " ")
For numbers, avoid storing raw strings when you need sorting or filtering:
import re

def extract_number(text: str) -> int:
    match = re.search(r"\d+", text.replace("\xa0", " "))
    return int(match.group()) if match else 0
Check What Actually Rendered
For dynamic pages, raw HTML is not always enough. A screenshot can show what the browser or scraping API actually rendered.
With ScrapingBee, request a rendered screenshot:
from pathlib import Path
import requests

response = requests.get(
    SCRAPINGBEE_API_URL,
    params={
        "api_key": api_key,
        "url": TARGET_URL,
        "render_js": "True",
        "screenshot": "True",
    }
)

Path("debug_screenshot.png").write_bytes(response.content)
Open debug_screenshot.png to check whether the page loaded, the expected content appeared, or a banner/blocking page got in the way.
With Playwright, run the browser in visible mode:
browser = p.chromium.launch(
    headless=False,
    slow_mo=100,
)
headless=False opens the browser window, and slow_mo slows actions down so you can watch clicks, redirects, waits, and rendering issues.
Debugging gets easier when every scraper has a simple shape: fetch the page, inspect the HTML or screenshot, test selectors, clean values, and only then scale to more pages.
Legal, Ethical, and Maintenance Considerations
Web scraping is not only technical. A scraper can affect servers, users, business rules, and data rights. Before scaling a Python scraping project, check whether the collection is allowed, necessary, and maintainable.
This is not legal advice, but these rules help avoid common problems.
Check the Site’s Rules First
Before scraping, check for an official API, terms of service, robots.txt, data usage rules, rate limits, crawler guidance, and copyright or licensing notes.
Use an API when one exists. It is usually more stable than scraping HTML and less likely to break when the site changes.
robots.txt is useful, but limited. It shows which paths the site asks crawlers not to access, but it does not automatically make other URLs safe to scrape, store, reuse, or republish.
Collect Only What You Need
A responsible scraper collects the minimum data required for the task.
Be careful with personal data, user profiles, contact information, private or semi-private content, reviews, comments, social posts, copyrighted text or media, and data behind logins or paywalls.
If you do not need a field, skip it. For many projects, metadata is enough:
{
  "title": "Example page",
  "url": "https://example.com/page",
  "price": "29.99",
  "scraped_at": "2026-05-21T12:00:00Z"
}
This is often safer and easier to maintain than copying full pages.
Build for Maintenance
Scrapers break when sites rename classes, move data into JavaScript, add cookie banners, change pagination, or block automated traffic.
Plan for that:
- Keep selectors readable.
- Put parsing logic in separate functions.
- Log failed URLs and store
scraped_attimestamps. - Save debug HTML or screenshots when selectors fail.
- Add small tests for important parsers.
- Review the scraper when the target site changes.
Treat scraping as a small integration, not a one-time script, if the data matters.
Scrape Respectfully
Respectful scraping is slower, smaller, and easier to defend.
Good habits:
- Send only the requests you need.
- Add delays, rate limits, and concurrency limits.
- Stop after repeated
403,429, or CAPTCHA responses. - Identify your scraper when appropriate.
- Prefer APIs or exports when available.
- Do not republish scraped content unless you have the right to do so.
The goal is not to bypass every restriction. The goal is to collect useful data without harming the site, violating rules, or creating maintenance problems later.
Conclusion: How to Choose the Right Approach
The best Python web scraping setup is the simplest one that gets the data reliably.
Use Requests and Beautiful Soup when the data is already in the HTML. Use Playwright for JavaScript-rendered pages, clicks, scrolling, or dynamic content. Use Selenium only when you need WebDriver compatibility or maintain an existing Selenium scraper. Use Scrapy when the project becomes a crawler with many pages, retries, exports, and link-following.
If browsers, proxies, geotargeting, screenshots, or anti-bot issues become the main problem, try a scraping API like ScrapingBee instead of managing that infrastructure yourself.
A practical path:
- Check for an API.
- Use Requests and Beautiful Soup for static HTML.
- Use Playwright for dynamic pages.
- Use Scrapy for larger crawls.
- Use ScrapingBee when infrastructure slows you down.
Keep the scraper respectful, easy to debug, and only as complex as the page requires.
Python Web Scraping FAQs
What is web scraping in Python?
Web scraping in Python means writing code that visits web pages, downloads their HTML, and extracts the data you need.
Common use cases include:
- Tracking product prices.
- Collecting job listings.
- Gathering article metadata.
- Monitoring page changes.
- Extracting tables or links.
Instead of copying data by hand, your script handles the collection and cleanup.
Why use Python for web scraping?
Python is a strong choice for web scraping because it has mature libraries for each part of the workflow:
- Requests for downloading pages.
- Beautiful Soup and lxml for parsing HTML.
- Playwright and Selenium for browser automation.
- Scrapy for larger crawling projects.
- pandas for cleaning and exporting scraped data.
That means you can start with a small script and later move to a crawler, scraping API, or data pipeline without switching languages.
What is the difference between static and dynamic scraping?
Static pages send the data in the initial HTML response. You can usually scrape them with Requests and Beautiful Soup.
Dynamic pages load content with JavaScript after the page opens. If the data is visible in the browser but missing from response.text, you may need Playwright, Selenium, or a scraping API with JavaScript rendering.
This is where dynamic web scraping Python tools become useful.
If you want a deeper breakdown, check our guide: How to scrape dynamic websites.
Is web scraping with Python legal?
Web scraping is not illegal by default, but it depends on the website, the data, and how you use it.
Before scraping, check the site’s terms of service, robots.txt, API options, and data usage rules. Avoid collecting sensitive data, bypassing access controls, or republishing content you do not have the right to use.
How do I avoid getting blocked while web scraping?
To reduce blocking:
- Add a clear User-Agent.
- Slow down requests.
- Avoid aggressive concurrency.
- Respect rate limits.
- Use retries with backoff.
- Check whether an API is available.
- Use proxies or a scraping API when needed.
- Stop if the site repeatedly returns
403,429, or CAPTCHA pages.
Do not treat blocking as a challenge to bypass at any cost. It is often a signal to slow down or use a different data source.
How can I speed up my Python web scraper?
Start by removing unnecessary work:
- Avoid downloading pages you do not need.
- Reuse sessions where possible.
- Keep selectors simple.
- Parse only the fields you need.
- Cache pages during development.
- Use Scrapy for larger crawls.
- Use
asyncioandaiohttpfor static pages when network waiting is the bottleneck.
Python asyncio web scraping can help with many static pages, but it will not render JavaScript. For dynamic pages, use Playwright or a scraping API instead.

Kevin worked in the web scraping industry for 10 years before co-founding ScrapingBee. He is also the author of the Java Web Scraping Handbook.