Selenium drives a real browser from Python, so it can render JavaScript, click, scroll, and log in on pages that a requests script can only ever see as an empty shell. That single capability is why it survives every "is Selenium dead yet?" think-piece.
Selenium has been the most portable way to run anything in a browser with Python for over a decade. I've used Selenium for everything from a five-line screenshot script to a proxy-rotated scraper running across a Docker grid.
In this guide, we explore the full Selenium web scraping path, from your first driver.get() to scaling with proxies. Every snippet is written for the Selenium that ships today (4.45+), not the one Stack Overflow remembers.
We'll cover setup with the modern driver story, locating and extracting data, waiting for JavaScript, exporting clean CSV and JSON, avoiding detection, and the honest point where a managed API is the cheaper answer.
Key takeaways
- Selenium drives a real browser from Python, so it can scrape JavaScript-heavy sites that requests and BeautifulSoup cannot access.
- Since Selenium 4.6, Selenium Manager automatically downloads the correct driver, so manual ChromeDriver setup is no longer needed.
- Use --headless=new with --window-size=1920,1080 for production runs. The default headless window is 800x600, which quietly breaks responsive layouts and screenshots.
- Render with Selenium, parse with BeautifulSoup, and switch to a managed API when blocks and scale outweigh the maintenance.
What is Selenium?
Selenium is a browser-automation framework that drives a real browser, Chrome, Firefox, or Edge, from your Python code through the WebDriver protocol. It was built for testing web apps, which means it can do anything a user can do in a browser: navigate, click, type, scroll, wait for elements, and read whatever the page renders.
For web scraping, that testing heritage is exactly the point. If a human can see the data in a browser, Selenium can reach it, because it is a browser.
However, the catch is that a browser is heavy. Selenium spins up a full Chrome or Firefox process, which is slower and more resource-hungry than firing an HTTP request with requests.
That trade is worth it when the content is rendered by JavaScript and worth avoiding when it isn't. The rest of this section is about telling those two cases apart before you commit to the heavier tool.
Key features of Selenium
A few capabilities are what make Selenium the default choice for browser-driven scraping in Python.
Here's what you're getting when you pip install selenium:
- Real browser rendering: Selenium runs an actual browser engine, so JavaScript executes, single-page apps hydrate, and lazy-loaded content appears exactly as it would for a human visitor.
- Cross-browser and cross-language support: The same WebDriver commands drive Chrome, Firefox, Edge, and Safari, and the protocol has bindings in Python, Java, C#, Ruby, and JavaScript. Nothing else in the space matches that breadth, which matters when you inherit a codebase or need a specific browser's quirks.
- A full interaction API: Clicks, form fills, key presses, drag-and-drop, scrolling, alerts, iframe switching, and cookie handling are all first-class. If a user can do it, there's a method for it.
- Explicit waiting for dynamic content: WebDriverWait with expected conditions lets you wait for a specific element or state instead of guessing with time.sleep(), which is the difference between a scraper that survives a slow network and one that flakes.
- Selenium Grid for scale: The same script that runs one browser locally can fan out across dozens of browsers on remote machines, enabling you to take a working scraper from your laptop to a real throughput target.
Put together, those features make Selenium the most flexible option when you genuinely need a browser. The question is whether you do, and that's a choice between three tools, not one.
What is the difference between Selenium, Playwright and BeautifulSoup?
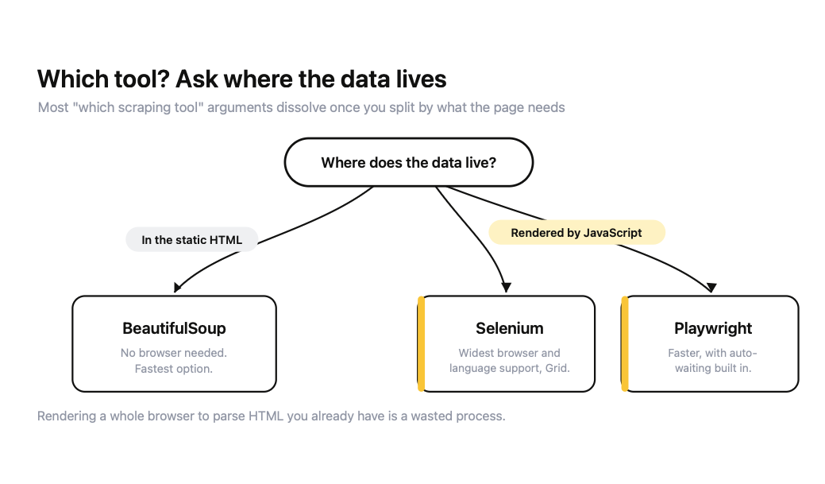
BeautifulSoup parses HTML you already have, Selenium and Playwright drive a browser to generate HTML that doesn't exist until JavaScript runs. Most "which scraping tool" arguments dissolve once you split them by what the page needs.
Here's the honest comparison on the axes that decide the pick:
| Selenium | Playwright | BeautifulSoup | |
|---|---|---|---|
| Renders JavaScript | Yes (real browser) | Yes (real browser) | No (parser only) |
| Speed | Slowest (browser overhead) | Faster than Selenium | Fastest (no browser) |
| Auto-waiting | No (explicit WebDriverWait) | Yes (built in) | Not applicable |
| Async support | Sync (async via wrappers) | Native async and sync | Not applicable |
| Browser and language support | Widest (all major browsers, 5+ languages, Grid) | Chromium, Firefox, WebKit | Not applicable |
| Ecosystem and age | Largest, oldest, most Q&A | Newer, growing fast | Huge for parsing |
The guidance that comes from that table is brief:
- Reach for Playwright for a new project that wants speed and out-of-the-box auto-waiting
- Use Selenium when you have existing Selenium code, need the broadest browser or language coverage, or want Grid for distributed runs
- Stick with BeautifulSoup whenever the data is already in the static HTML, because rendering a whole browser to parse markup you already have is a waste of a process
We keep a fuller Playwright vs Selenium breakdown and a Playwright web scraping guide if you want to go deeper on the alternative.
For the rest of this article, we're assuming you've landed on Selenium, and you want it working. The next step is getting it installed.
How to install Selenium, set up WebDriver and launch a script
If your mental model of Selenium setup involves downloading a chromedriver.exe, matching its version to your browser, and dropping it somewhere on your PATH, throw that model out.
Modern Selenium handles the driver for you, and the entire setup is two commands and a five-line script. Let's look at the process.
1. Install Selenium and start a project
Selenium is one pip install away, but do it inside a virtual environment so the browser-automation dependencies don't leak into the rest of your system:
python -m venv venv
source venv/bin/activate      # on Windows: venv\Scripts\activate
pip install selenium
The current Selenium (4.45 and later) requires Python 3.10 or newer. If you're on an older Python, the install will either fail outright or pull an ancient Selenium that behaves nothing like this guide.
You can check with python --version before you start, and upgrade if you're below 3.10. It installed cleanly and pulled Selenium 4.45 on both Python 3.10 and 3.14 when I tested it, so anything in that range is safe.
You also need a browser installed, Chrome, Firefox, or Edge, the desktop application. That's it for prerequisites. You do not need to download a driver.
2. Launch Chrome or Firefox with WebDriver
Since Selenium 4.6, a component called Selenium Manager ships with Selenium itself and automatically finds your installed browser, downloads the corresponding driver, and caches it.
No manual chromedriver download, PATH editing, or webdriver-manager third-party package. You write webdriver.Chrome() and it just resolves the driver behind the scenes on the first run.
Launching Chrome
Here's a Chrome launch with the options I'd use for scraping:
from selenium import webdriver
from selenium.webdriver.chrome.options import Options

options = Options()
options.add_argument("--headless=new")            # modern headless mode
options.add_argument("--window-size=1920,1080")   # real desktop viewport
options.add_argument("--no-sandbox")              # needed in many containers
options.add_argument("--disable-dev-shm-usage")   # avoid /dev/shm crashes in Docker

driver = webdriver.Chrome(options=options)
driver.get("https://books.toscrape.com/")
print(driver.title)
driver.quit()
Two of those flags matter more than they look.
- --headless=new is the modern headless mode (the old --headless is deprecated and, since Chrome 132, only ships as a separate chrome-headless-shell binary)
- --window-size=1920,1080 overrides the headless default of 800x600, which otherwise silently breaks responsive layouts and gives you screenshots of a phone-width page.
We'll come back to both in the headless section, because they're the single most common reason a "working" Selenium script produces wrong output.
Launching Firefox
Firefox is the same shape if you prefer it, or need it for a site that fingerprints Chrome:
from selenium import webdriver
from selenium.webdriver.firefox.options import Options

options = Options()
options.add_argument("--headless")                # Firefox headless flag
driver = webdriver.Firefox(options=options)
driver.get("https://books.toscrape.com/")
print(driver.title)
driver.quit()
Selenium Manager resolves the Firefox driver (geckodriver) in the same automatic way it does for Chrome.
I ran both of these end-to-end before writing this, and the part worth calling out is the window size.
Here's the console output:
CHROME (headless=new, 1920x1080)
Title: All products | Books to Scrape - Sandbox
Window size: {'width': 1920, 'height': 1080}
Browser version: 150.0.7871.47
Driver version: 150.0.7871.46

FIREFOX (headless)
Title: All products | Books to Scrape - Sandbox
Browser version: 152.0.4
Notice that Window size came back 1920x1080, not the 800x600 you'd get if you dropped the --window-size flag. Notice also that I never downloaded a driver. The Driver version line is Selenium Manager reporting the chromedriver it fetched and cached on its own. That's the modern setup working exactly as advertised.
3. Verify your setup and fix common issues
The fastest way to know your setup works is to print the page title and the browser's resolved window size, then quit cleanly:
from selenium import webdriver
from selenium.webdriver.chrome.options import Options

options = Options()
options.add_argument("--headless=new")
options.add_argument("--window-size=1920,1080")

driver = webdriver.Chrome(options=options)
driver.get("https://books.toscrape.com/")

print("Title:", driver.title)
print("Window size:", driver.get_window_size())
driver.quit()
If that prints a title and a {'width': 1920, 'height': 1080} size, you're done, the driver resolved, the browser launched, and the page loaded.
The setup problems that used to fill Stack Overflow threads are mostly extinct now that Selenium Manager owns driver resolution, but a few still show up:
- SessionNotCreatedException due to version mismatch: Almost always an old manually installed driver on your PATH shadowing Selenium Manager's cached one. Delete the old driver and let Selenium Manager handle it.
- --no-sandbox needed in Docker or CI: Headless Chrome refuses to run as root without it. It's in the launch snippet above for exactly this reason.
- Timeouts on driver.get() in a container: Usually /dev/shm being too small, which --disable-dev-shm-usage fixes by using disk instead of shared memory.
With a browser launched and the setup verified, you're ready to write a scraper that does something.
4. Open a webpage with driver.get()
Let's now build your first real script.
We start with driver.get(url), which navigates the browser to a URL and, importantly, blocks until the browser fires its load event. That means that by the time the next line runs, the initial HTML has been loaded and parsed.
Here's the minimal version:
from selenium import webdriver

driver = webdriver.Chrome()
driver.get("https://books.toscrape.com/")

print("Title:", driver.title)
print("Current URL:", driver.current_url)

driver.quit()
The one thing to understand early, because it explains half the "why is my scraper empty" questions online, is what get() waits for. It waits for the page's load event, not for JavaScript to finish rendering content afterward.
On a static site like books.toscrape.com, the two happen together, and you're fine. On a React or Vue app, get() returns while the page is still an empty shell, and driver.title might read correctly while driver.page_source has none of the data you came for. That gap is exactly what the waits section later solves, so file it away for now.
And always call driver.quit() when you're done. It closes the browser and kills the background driver process. Skip it in a loop, and you'll leak browser processes until your machine runs out of memory.
5. Run a browser in headless mode with Options()
Headless mode runs the browser without a visible window, which is ideal for any scraper that runs on a schedule, in a container, or on a server with no display. You configure it through an Options object, and this is where the single most important technical detail in this whole article lives.
Let me show you how:
from selenium import webdriver
from selenium.webdriver.chrome.options import Options

options = Options()
options.add_argument("--headless=new")
options.add_argument("--window-size=1920,1080")

driver = webdriver.Chrome(options=options)
driver.get("https://books.toscrape.com/")
print("Window size:", driver.get_window_size())
driver.quit()
Two arguments, both non-negotiable for real work:
(1) --headless=new, not --headless: The old headless mode was a separate, subtly-different browser engine. The =new mode runs the same Chrome you'd see with a window, just without the window, so what you scrape matches what a real user sees.
As of Chrome 132, the legacy mode no longer ships in the main binary; it's moved to a separate chrome-headless-shell download, so --headless=new is the only version worth writing.
(2) window-size=1920,1080: Headless Chrome defaults to an 800x600 window. That's the size of a small tablet, and on a responsive site, it triggers the mobile layout, hides elements behind hamburger menus, and gives you screenshots of a cramped phone-width page.
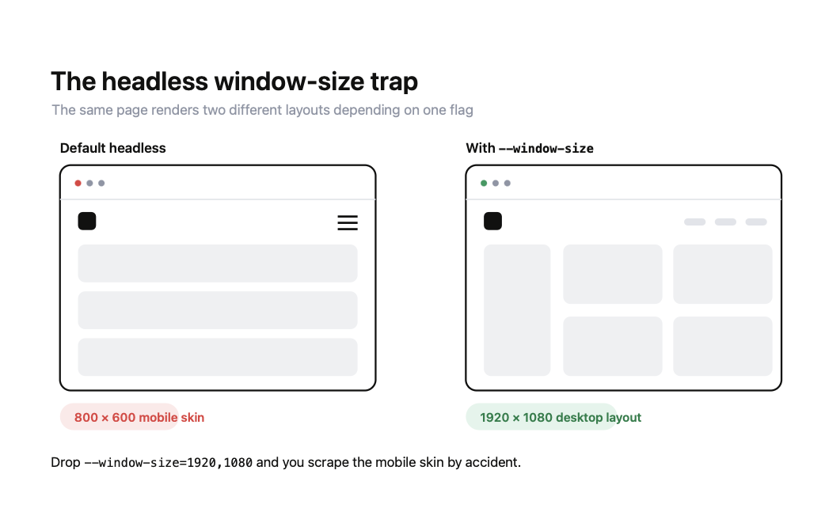
Setting a real desktop viewport is the difference between scraping the site you think you're scraping and scraping its mobile skin by accident.
6. Save a screenshot with driver.save_screenshot()
Screenshots are the fastest way to see what your headless browser rendered, which makes them the debugging tool you'll reach for constantly.
save_screenshot() writes a PNG of the current viewport:
from selenium import webdriver
from selenium.webdriver.chrome.options import Options

options = Options()
options.add_argument("--headless=new")
options.add_argument("--window-size=1920,1080")

driver = webdriver.Chrome(options=options)
driver.get("https://books.toscrape.com/")

driver.save_screenshot("books.png")
driver.quit()
This is where the window-size fix pays off visibly.
With --window-size=1920,1080 set, books.png comes out as a full 1920-pixel-wide desktop screenshot. Drop the flag, and the same code writes an 800x600 image of the mobile layout.
The screenshot is the proof, which is why it's worth generating one the first time you set up any scraper. If the screenshot looks wrong, your selectors are about to fail for reasons unrelated to them.
Here's the output when I ran the script above:
Title: All products | Books to Scrape - Sandbox
Current URL: https://books.toscrape.com/
Window size (driver): {'width': 1920, 'height': 1080}
Screenshot file: books.png (246507 bytes)
Screenshot PNG dimensions: (1920, 937)
And here's books.png itself:
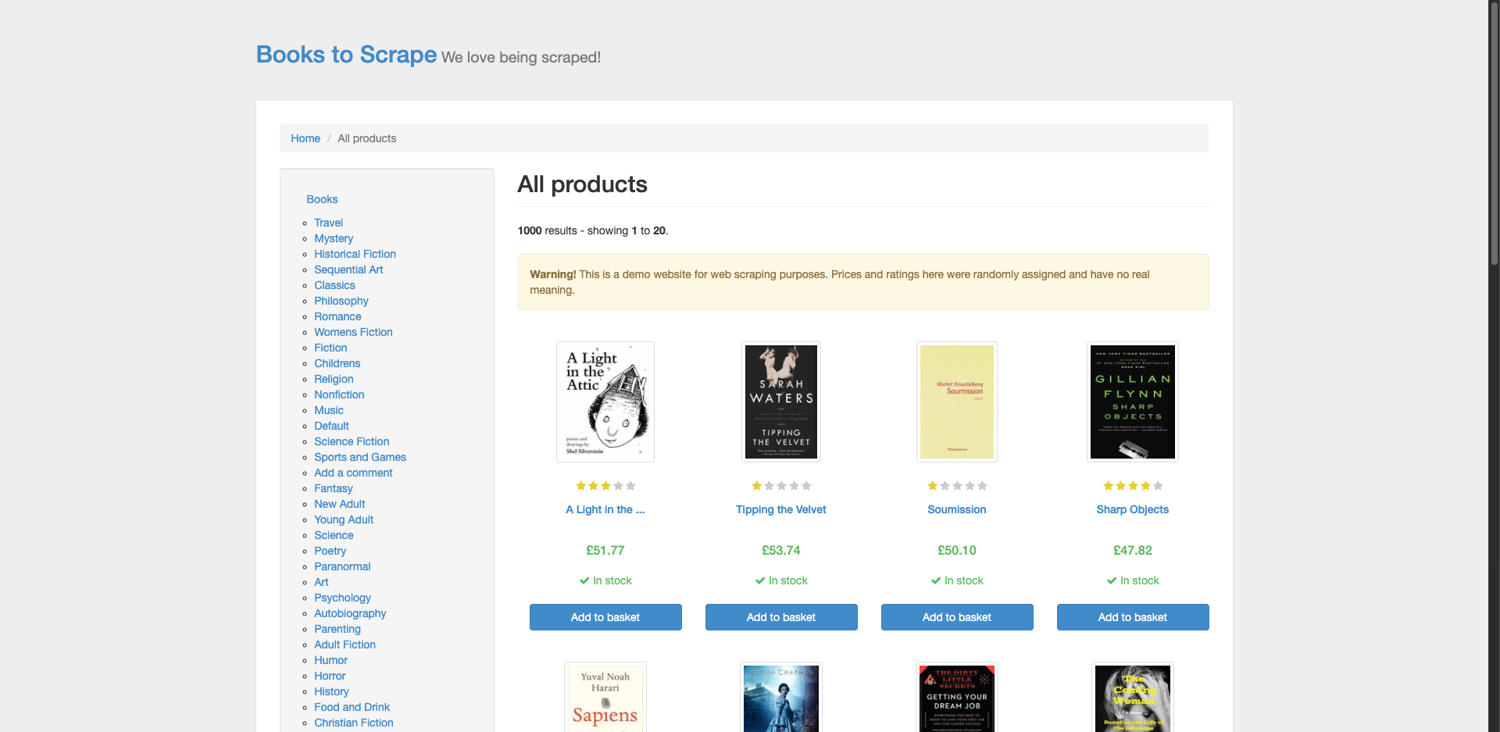
This is the screenshot Selenium saved for me. The full desktop layout, sidebar and all, at 1920px wide. This is what --window-size=1920,1080 buys you. Without it, the same code captures the 800x600 mobile skin with the sidebar collapsed.
One honest detail in those numbers is that the PNG came back 1920 wide but 937 tall, not 1080. That's expected. save_screenshot() captures the content viewport, which is the window height minus the browser's own UI, so the width is your full 1920 while the height is a little short of the window. The width is what matters for triggering the desktop layout, and 1920 is exactly what we asked for.
Also, a limitation is that save_screenshot() captures the visible viewport, not the full scrollable page. Chrome has no native full-page screenshot in Selenium's API (you'd drop to the DevTools protocol for that), though Firefox does expose driver.save_full_page_screenshot() if full-page capture is something you need.
With a script that opens a page, runs headless at the correct size, and can take a screenshot of what it sees, the next step is to tell Selenium which elements on that page you want. That's locating elements.
How to locate elements with XPath, CSS, and ID in Selenium
Locating elements is how you point Selenium to the exact part of a page you want, and it comes down to choosing the right strategy (ID, CSS selector, or XPath) for the job.
Selenium exposes a single find_element method plus a By class that names the strategy, and getting fluent with just three of them covers almost every page you'll scrape. Before the syntax, though, there's one migration gotcha that trips up anyone pasting in older code.
1. Avoid the removed find_element_by_* methods
Before any of the locator syntax, one migration note that will save you some time.
If you copy a snippet from a tutorial written before mid-2022 that uses driver.find_element_by_id("...") or driver.find_element_by_class_name("..."), it will not run.
Selenium removed every find_element_by_* and find_elements_by_* method in version 4.3.0.
Paste that code into modern Selenium, and you get:
AttributeError: 'WebDriver' object has no attribute 'find_element_by_id'
I confirmed the methods are gone from the current library while writing this.
The replacement is a single unified method that takes a By strategy as its first argument.
Import By, then call find_element(By.SOMETHING, "value"):
from selenium.webdriver.common.by import By

# Old (removed in 4.3.0, raises AttributeError):
# driver.find_element_by_id("search")

# New (current):
driver.find_element(By.ID, "search")
That's the whole migration. Every old find_element_by_x("v") becomes find_element(By.X, "v"). Make sure that you internalize that one substitution.
Now, let's look at the right process.
2. Use find_element() or find_elements()
The two methods differ in one important way, and getting it wrong is a common source of crashes:
- find_element (singular) returns the first match and raises NoSuchElementException if nothing matches
- find_elements (plural) returns a list of all matches and returns an empty list if nothing matches, no exception.
Here's an example:
from selenium.webdriver.common.by import By

# Singular: first match, or raises NoSuchElementException
title = driver.find_element(By.TAG_NAME, "h1")
print(title.text)

# Plural: list of all matches, or [] if none
books = driver.find_elements(By.CLASS_NAME, "product_pod")
print(f"found {len(books)} books")
The practical rule I follow is to use find_elements (plural) whenever an element might be absent, and check the list length instead of wrapping a singular call in try/except. It reads cleaner, and it's how you handle "this page has zero results" without treating it as an error. Save the singular find_element for elements you're certain exist, like a page's single h1.
3. Locate by ID, class name, and XPath
Selenium supports eight locator strategies through:
- By: ID
- CLASS_NAME
- CSS_SELECTOR
- XPATH
- NAME
- TAG_NAME
- LINK_TEXT
- PARTIAL_LINK_TEXT
In practice, you'll use three of them for almost everything.
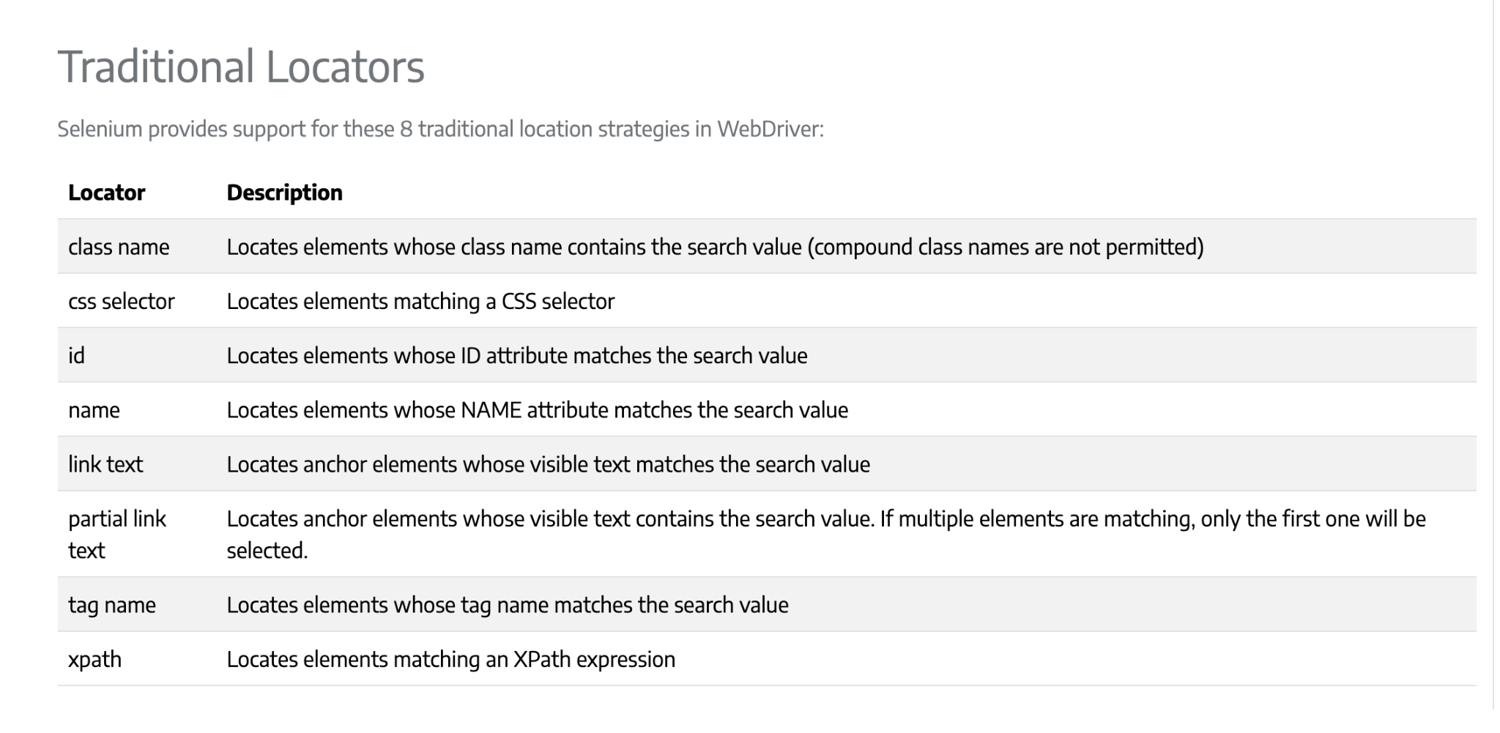
Here they are against real elements on books.toscrape.com:
from selenium.webdriver.common.by import By

# By.ID: fastest and most stable when the element has a unique id
container = driver.find_element(By.ID, "promotions")

# By.CLASS_NAME: good for repeated components (one class name, no spaces)
books = driver.find_elements(By.CLASS_NAME, "product_pod")   # 20 book cards

# By.CSS_SELECTOR: the workhorse; combine tags, classes, and hierarchy
first_title = driver.find_element(
    By.CSS_SELECTOR, "article.product_pod h3 a"
).get_attribute("title")

# By.XPATH: when you need structure CSS can't express (text, axes, parents)
first_price = driver.find_element(
    By.XPATH, "//p[@class='price_color']"
).text
A few honest preferences from doing this a lot:
- Use By.ID first when a stable id exists, because it's the fastest and least brittle
- Reach for By.CSS_SELECTOR for almost everything else, since it expresses tag, class, and hierarchy in a compact syntax that most web developers already know
- Reserve By.XPATH for the cases CSS genuinely can't handle: selecting by an element's text, walking up the parent chain, or navigating sibling relationships. XPath is more capable and more brittle in equal measure, so it's the tool of last resort, not first.
By.CLASS_NAME only accepts a single class name, not a compound one. find_element(By.CLASS_NAME, "instock availability") throws an error because of the space.
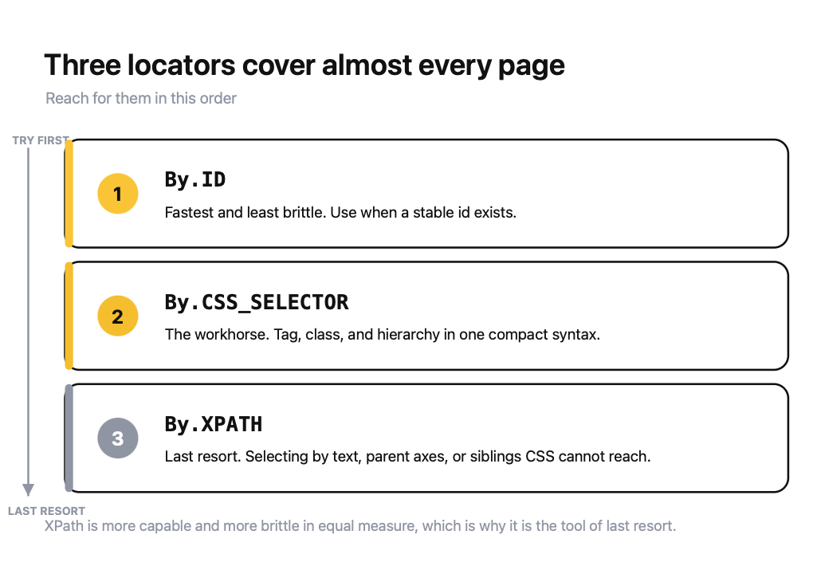
When you need to match multiple classes, use By.CSS_SELECTOR with dot notation instead: find_element(By.CSS_SELECTOR, ".instock.availability").
4. Inspect elements with browser DevTools
You don't guess selectors, you read them off the page.
Right-click any element in Chrome or Firefox and click Inspect to open DevTools with that element highlighted in the Elements panel.
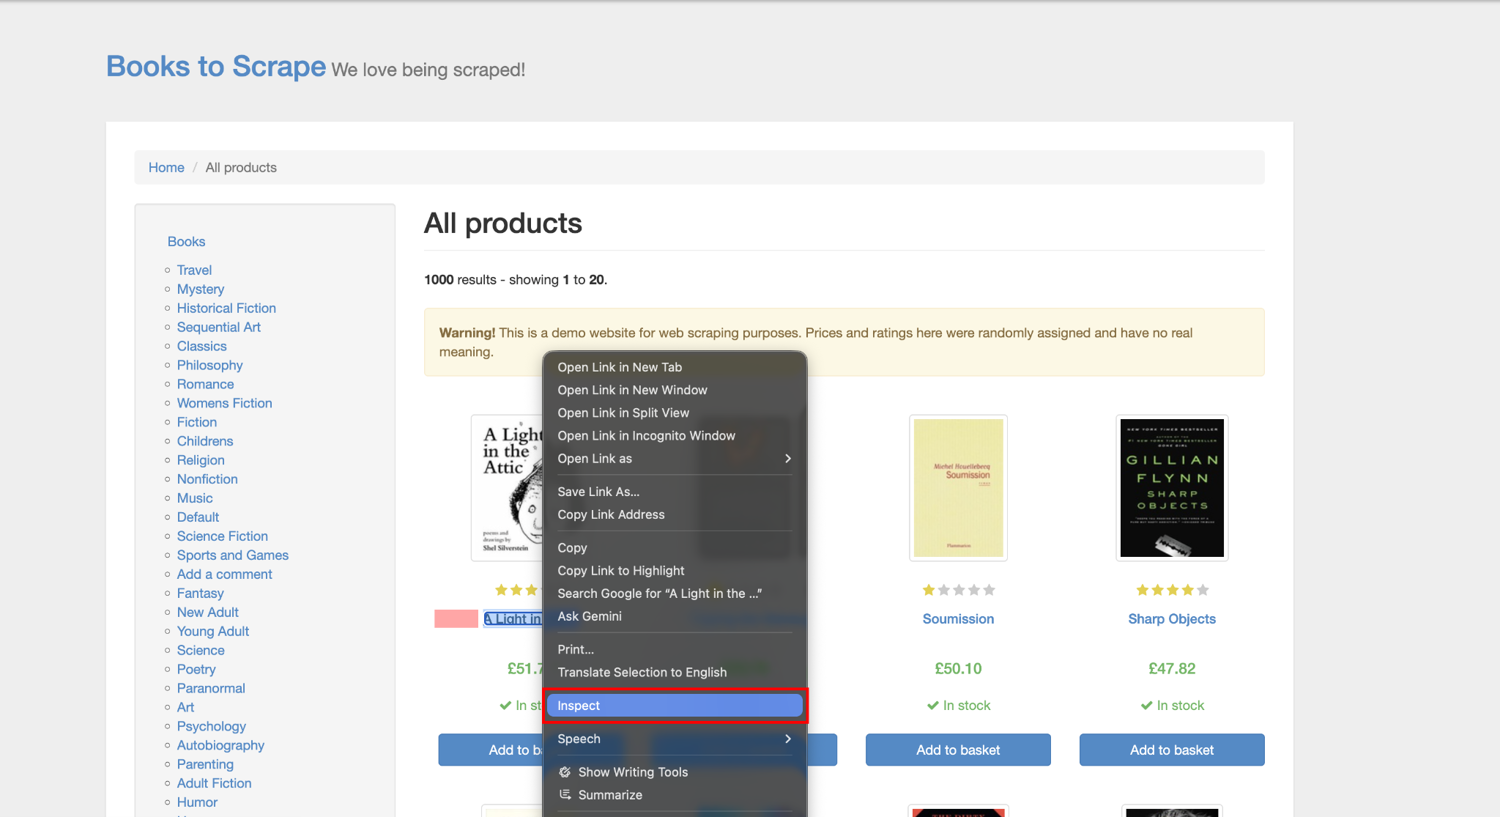
From there, you can read its tag, id, classes, and attributes directly.
The move that saves the most time is testing a selector before you put it in Python.
In the DevTools Console, document.querySelectorAll("article.product_pod") returns everything your CSS selector would match, and the count tells you instantly whether the selector is right.
If the console says 20 and you expected 20, the selector is good. If it says 0, you're either looking at a JavaScript-rendered element that hasn't loaded yet or your selector is wrong, and it's far better to learn that in the console than after a failed scrape. I test every non-trivial selector this way before it goes near Selenium.
Here's every locator in this section run against the live page, so you can see the exact values each strategy returns:
By.TAG_NAME h1        -> 'All products'
By.CLASS_NAME pod cnt -> 20
By.ID promotions      -> found
By.CSS title          -> 'A Light in the Attic'
By.XPATH price        -> '£51.77'
find_elements(no match) -> []
find_element(no match)  -> raised NoSuchElementException (as expected)
By.CLASS_NAME 'instock availability' -> InvalidSelectorException (compound class gotcha, as expected)
Those last two lines are the behaviors worth committing to memory: find_elements hands you an empty list for a missing element, while find_element raises an exception, and a space in a By.CLASS_NAME value is an error, not a multi-class match.
With a reliable way to find elements on the page, the next step is to do something with them: read their text, click them, and pull their attributes. That's interacting with elements, and it's where scraping starts to feel like scraping.
How to interact with web elements for data extraction in Selenium
Once you've located an element, Selenium hands you a WebElement object, and everything you do to extract or interact with the page happens through its methods.
Let's cover the five you'll use constantly:
- Reading text
- Clicking
- Pulling attributes
- Filling in and submitting a form
Start with the object itself.
1. Understand the Selenium WebElement
Every find_element call returns a WebElement, which is Selenium's handle to one node in the live page. It isn't a copy of the HTML; it's a live reference to the actual element in the running browser, which is why reading .text gives you what's rendered right now, not what was in the original source.
That distinction matters for scraping. If JavaScript updates an element after the page loads, the WebElement reflects the update.
The methods you'll reach for most are a small set:
- .text to read visible text
- .get_attribute() to read any HTML attribute
- .click() to click
- .send_keys() to type
- .is_displayed() to check visibility (which becomes important in the honeypot section later)
Everything below is one of these in practice.
One thing worth knowing early is that a WebElement can go stale. If the page reloads or the DOM changes after you grabbed the element, using it later raises StaleElementReferenceException.
When that happens, the fix is to locate the element again rather than reuse the old handle. It's a common gotcha on dynamic pages, and it's not a bug in your selector; it's the page having moved on.
2. Extract text with element.text
.text returns the visible, rendered text of an element and its children, with the whitespace trimmed the way a user would see it.
This is the workhorse of data extraction:
from selenium.webdriver.common.by import By

# The page heading
heading = driver.find_element(By.TAG_NAME, "h1").text        # "All products"

# The first book's price
price = driver.find_element(By.CSS_SELECTOR, ".price_color").text   # "£51.77"
.text only returns text that's visible. If an element is hidden with display: none, .text returns an empty string even though the text exists in the HTML. When you need the raw text regardless of visibility, use .get_attribute("textContent") instead, which reads it directly from the DOM.
3. Click buttons with element.click()
.click() clicks an element the way a user would, which triggers whatever JavaScript is bound to it: navigation, expanding a section, loading more results or opening a modal.
Here's clicking a book to navigate to its detail page:
from selenium.webdriver.common.by import By

# Click the first book's title link
driver.find_element(By.CSS_SELECTOR, "article.product_pod h3 a").click()

# The browser has navigated; the URL and title now reflect the detail page
print(driver.current_url)
print(driver.title)
The catch with .click() is that it fails if the element isn't clickable yet, either because it hasn't rendered, another element covers it, or it's off-screen. On a static page, you rarely hit this.
On a dynamic page, you hit it constantly, and the answer is to wait for the element to be clickable before clicking, which is exactly what the waits section covers next. If you ever see ElementClickInterceptedException, that's this problem. Something is covering the element you're trying to click.
4. Get attributes with get_attribute()
Plenty of the data you want lives in attributes, not visible text: a link's href, an image's src, a product's data-id, the full title behind a truncated label. .get_attribute() reads any of them:
from selenium.webdriver.common.by import By

link = driver.find_element(By.CSS_SELECTOR, "article.product_pod h3 a")

full_title = link.get_attribute("title")   # "A Light in the Attic" (full, untruncated)
href = link.get_attribute("href")          # the absolute URL to the book's page
The title example is a real scraping pattern.
On books.toscrape.com, the visible link text is truncated ("A Light in the ...") while the full title lives in the title attribute. Reading .text gives you the cut-off version; reading .get_attribute("title") gives you the whole thing.
Whenever visible text looks truncated, check whether the full value is sitting in an attribute, because it usually is.
5. Log in to a website with Selenium
Filling a form ties send_keys and click together into a single workflow; every interaction section needs to cover both. The pattern is to find the input, type into it, find the next input, type into it, then click submit.
Here it is against a public practice login (the-internet.herokuapp.com, a site built specifically for automation practice), demonstrating the mechanics without scraping anything behind the login:
from selenium.webdriver.common.by import By
from selenium.webdriver.support.ui import WebDriverWait
from selenium.webdriver.support import expected_conditions as EC

driver.get("https://the-internet.herokuapp.com/login")

driver.find_element(By.ID, "username").send_keys("tomsmith")
driver.find_element(By.ID, "password").send_keys("SuperSecretPassword!")
driver.find_element(By.CSS_SELECTOR, "button[type='submit']").click()

# Submitting redirects to a new page. Wait for the result element to appear
# before reading it. (Full explanation of WebDriverWait is the next section.)
message = WebDriverWait(driver, 10).until(
    EC.presence_of_element_located((By.ID, "flash"))
).text
print(message)   # "You logged into a secure area! ..."
That WebDriverWait line is not an optional decoration, and I know because the first version of this script left it out. Clicking submit fires a form POST that redirects to a new page, and reading #flash immediately afterward raised NoSuchElementException, the element genuinely wasn't there yet because the redirect hadn't finished loading.
This is the single most common bug in Selenium scraping, and it's exactly why the next section exists. For now, take the pattern on faith: after any action that loads a new page or new content, wait for the thing you want before you read it.
Three notes before you point this at a real site
Three more practical notes from doing this on real sites:
(1) First, always confirm the login worked by checking for a post-login element or message rather than assuming the click succeeded, because a wrong password fails silently as far as your script is concerned.
(2) Second, real login forms often load their fields via JavaScript too, so in production, you'd wait for the inputs before typing into them, not just for the result.
(3) Third, a note on ethics and terms of service: this example demonstrates the login mechanics on a site built for practice, and you should not use it to scrape content behind logins on sites whose terms prohibit it. The mechanics are the same; the responsibility for where you point them lies with you.
Here's the whole section run end to end, text extraction, attribute reads, a real click that navigates, and the waited login:
=== text + attributes (books.toscrape.com) ===
h1 .text            -> 'All products'
price .text         -> '£51.77'
get_attribute title -> 'A Light in the Attic'
get_attribute href  -> 'https://books.toscrape.com/catalogue/a-light-in-the-attic_1000/index.html'

=== click() navigation ===
before click  url   -> https://books.toscrape.com/
after click   url   -> https://books.toscrape.com/catalogue/a-light-in-the-attic_1000/index.html
after click   title -> 'A Light in the Attic | Books to Scrape - Sandbox'

=== login flow (the-internet.herokuapp.com) ===
post-login url      -> https://the-internet.herokuapp.com/secure
flash message       -> 'You logged into a secure area! ×'
Notice the click moved the browser from the listing to the book's detail page (the URL and title both changed), and the login landed on /secure with the success flash.
Every method in this section assumes the element was already there when you asked for it. On JavaScript-heavy sites, that assumption breaks constantly, and the fix is knowing how to wait. That's the next section.
How to handle JavaScript-rendered content and infinite scroll with Selenium
Modern sites load content asynchronously. The initial HTML arrives, then JavaScript fetches data and injects it a few hundred milliseconds later. If your script reads the page in that gap, it finds nothing.
The fix is to wait for the content to load properly, and then to handle the pages that keep loading more as you scroll.
1. Wait for elements with WebDriverWait and expected conditions
The wrong way to wait is time.sleep(3). It's the reflex most devs reach for first, and it's wrong in both directions. With a fast response, you waste three seconds doing nothing; with a slow one, three seconds isn't enough, and you fail anyway. A fixed sleep bet on a number you can't know in advance.
The right way is to use WebDriverWait, which polls the page until a condition is met or a timeout expires, whichever comes first.
It returns the instant the element is ready, so it's both faster and more reliable than a sleep:
from selenium.webdriver.common.by import By
from selenium.webdriver.support.ui import WebDriverWait
from selenium.webdriver.support import expected_conditions as EC

driver.get("https://quotes.toscrape.com/scroll")

# Wait up to 10 seconds for the first quote to appear, then read it
first_quote = WebDriverWait(driver, 10).until(
    EC.presence_of_element_located((By.CSS_SELECTOR, ".quote .text"))
)
print(first_quote.text)
The structure is always the same: WebDriverWait(driver, timeout).until(condition). The condition is an expected-conditions object (imported as EC) that describes what you're waiting for.
Selenium polls every 500 milliseconds by default, returns the element the moment the condition is met, and raises a TimeoutException if the timeout is reached first. That timeout is a feature that turns "the page never loaded the thing I wanted" from a silent hang into a clear, catchable error.
This is called an explicit wait because you're explicitly stating what to wait for.
Selenium also has implicit waits (driver.implicitly_wait(10)), which apply a blanket wait to every find_element call. Pick explicit waits and use them deliberately; they're worth the extra line.
2. Use the common expected conditions
The expected_conditions module covers the situations you'd hit while scraping.
You don't need to memorize all of them, but these are the ones I use often:
- presence_of_element_located: The element exists in the DOM. Use it when you just need the element to be there, visible or not.
- visibility_of_element_located: The element exists and is visible (not display: none, non-zero size). Use it when you're about to read text a user would see.
- element_to_be_clickable: The element is visible and enabled. Use it before .click() to avoid the ElementClickInterceptedException from the last section.
- text_to_be_present_in_element: A specific string has appeared in an element. Use it when content updates are in place, like a status changing from "Loading" to a result.
- presence_of_all_elements_located: Returns the full list of matches once at least one is present. Use it when you're waiting for a set of results, like search hits or product cards.
Each one takes a (By, "selector") locator tuple, the same tuples you've been using with find_element. Match the condition to what you need. Waiting for mere presence when you're about to click will still fail, because presence isn't clickability. Choosing the right condition is most of getting it right.
3. Scroll with execute_script() and detect new content
Infinite-scroll pages load more content each time you reach the bottom, which means there's no "next page" button to click, only a scroll position to reach.
Selenium can't scroll the way a mouse wheel does, but it can run JavaScript in the page through execute_script(), and scrolling is just a one-line script:
driver.execute_script("window.scrollTo(0, document.body.scrollHeight);")
The pattern for scraping a full infinite-scroll page is a loop: scroll to the bottom, wait for the new content to load, and check whether the page grew. When the page height no longer changes, you've reached the end.
Here it is against quotes.toscrape.com/scroll, a demo that loads ten quotes per scroll:
import time
from selenium.webdriver.common.by import By

driver.get("https://quotes.toscrape.com/scroll")

last_height = driver.execute_script("return document.body.scrollHeight")
while True:
    # Scroll to the bottom to trigger the next batch
    driver.execute_script("window.scrollTo(0, document.body.scrollHeight);")
    time.sleep(1)  # give the AJAX request time to load and render

    new_height = driver.execute_script("return document.body.scrollHeight")
    if new_height == last_height:
        break  # height didn't change, so no new content loaded, we're done
    last_height = new_height

quotes = driver.find_elements(By.CLASS_NAME, "quote")
print(f"loaded {len(quotes)} quotes total")
This is the one place I'll defend a time.sleep().
After scrolling, you're waiting for a network request whose completion isn't tied to a single predictable element, and a short fixed pause is the pragmatic tool. If you want to be stricter, you can wait for the quote count to increase using a custom expected condition, but for most infinite-scroll scraping, the sleep-and-check-height loop is honest and works.
The important part is the exit condition. Comparing scrollHeight before and after tells you when the page has stopped growing, which is how you know you've collected everything without hardcoding a page count you don't know.
4. Run asynchronous JavaScript with execute_async_script()
execute_script() runs synchronous JavaScript and returns immediately.
Its sibling execute_async_script() is for JavaScript that finishes later, a fetch, a timer, or a promise, and it waits for you to signal completion.
Selenium injects a callback as the last argument, and your script calls it when the async work is done:
# Run async JS and wait for its callback before continuing
result = driver.execute_async_script("""
    const callback = arguments[arguments.length - 1];
    fetch('https://quotes.toscrape.com/api/quotes?page=1')
        .then(response => response.json())
        .then(data => callback(data.quotes.length));
""")
print(f"the page's own API returned {result} quotes")
The key detail is arguments[arguments.length - 1], which is the callback Selenium appends. Nothing after your callback(...) call matters; Selenium resumes your Python the moment the callback fires, handing back whatever you passed it.
In practice, I reach for this rarely. Most dynamic content is better handled by waiting for the rendered element than by directly interacting with the page's API. But it's the right tool when you need a value that only exists after an in-page async call resolves, and it beats scraping a result you could just ask the page's own JavaScript to compute.
Here's the whole section run against the demo, the wait, the scroll loop, and the async call:
=== WebDriverWait (first quote) ===
first quote .text -> '"The world as we have created it is a process of o...'

=== Infinite scroll (scrollHeight loop) ===
quotes before scrolling -> 10
scroll iterations       -> 10
quotes after scrolling  -> 100

=== execute_async_script (page's own /api/quotes) ===
api page-1 quote count  -> 10
The scroll loop is the number that matters: the page started with 10 quotes, and the height-comparison loop pulled it all the way to 100, ten scrolls of ten quotes each, stopping on its own when the height stopped growing.
Waiting and scrolling get the content onto the page.
The next question is what to parse it with, and while Selenium can extract everything itself, there's a faster, cleaner way to pull structured data from a fully rendered page: you hand it to BeautifulSoup.
How to combine Selenium with BeautifulSoup for efficient parsing
Selenium can extract data on its own with find_elements, but once a page is fully rendered, it's often faster and cleaner to hand the HTML to BeautifulSoup and parse it there.
Every Selenium find_element call is a round trip to the browser process, so pulling fifty fields means fifty round-trip calls. BeautifulSoup parses a snapshot of the HTML in memory, in Python, with no browser involved, so extracting the same fifty fields is near-instant.
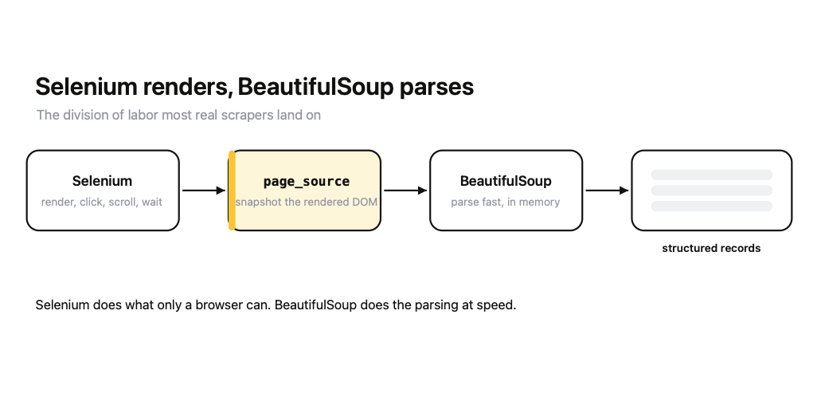
The division of labor that works best is simple. Let Selenium do what only a browser can (render JavaScript, click, scroll, wait), then let BeautifulSoup do what it's best at (fast, expressive parsing).
1. Extract page_source and parse with BeautifulSoup
The bridge between the two tools is one attribute: driver.page_source.
It returns the browser's current HTML as a string, including everything rendered by JavaScript up to that point.
You pass that string to BeautifulSoup, and you're parsing the fully-rendered page:
from bs4 import BeautifulSoup

driver.get("https://books.toscrape.com/")

# Hand the rendered HTML to BeautifulSoup
soup = BeautifulSoup(driver.page_source, "html.parser")

# Now parse with BeautifulSoup's API instead of Selenium's
title = soup.find("h1").get_text(strip=True)
print(title)   # "All products"
The critical word is rendered. driver.page_source is not the raw HTML the server sent; it's the current state of the DOM, after JavaScript has run and after any scrolling or clicking you did. That's the whole point of the handoff.
You use Selenium to get the page into the state you want, then snapshot it with page_source and let BeautifulSoup take over. Install BeautifulSoup with pip install beautifulsoup4 if you haven't already.
2. Use soup.find_all() to extract structured data
find_all() is where BeautifulSoup earns its place. It returns every element matching a tag and attributes, and iterating over the results to build structured records is the core loop of most scrapers.
Here's the full extraction of every book on the page:
from bs4 import BeautifulSoup

soup = BeautifulSoup(driver.page_source, "html.parser")

RATING_MAP = {"One": 1, "Two": 2, "Three": 3, "Four": 4, "Five": 5}

books = []
for card in soup.find_all("article", class_="product_pod"):
    rating_word = [c for c in card.find("p", class_="star-rating")["class"]
                   if c != "star-rating"][0]
    books.append({
        "title": card.h3.a["title"],
        "price": card.find("p", class_="price_color").get_text(strip=True),
        "in_stock": card.find("p", class_="instock availability") is not None,
        "rating": RATING_MAP.get(rating_word),
    })

print(f"parsed {len(books)} books")
print(books[0])
A couple of BeautifulSoup patterns worth knowing from that snippet:
card.h3.a is dot-notation navigation, it walks to the first h3, then the first a inside it, which reads cleaner than nested find calls for a known structure. The rating is stored as a class name (star-rating Three), so I split the class list and map the word to a number, the same encoding quirk that shows up on a lot of real e-commerce sites.
And card.find(...) is not None is how you turn "does this element exist" into a clean boolean, which is exactly what you want for an in-stock flag.
If you prefer CSS selectors, BeautifulSoup's select() and select_one() take the same selectors you'd use in Selenium or DevTools, so soup.select("article.product_pod") does the same job as the find_all above.
3. Know when to use Selenium or BeautifulSoup
The two tools solve different parts of the problem, and choosing the wrong one is a common cause of slow or broken scrapers.
The rule is about where the data lives:
- BeautifulSoup alone, when the data is in the HTML that the server sends. If you can fetch the page with requests and see your data in the response, you don't need a browser at all. Skip Selenium entirely; it's pure overhead here.
- Selenium alone, when you need to interact but not parse much, a few clicks, a login, a scroll, then reading one or two values.
- Both together, when JavaScript renders the data, and there's a lot of it to extract. Selenium renders and drives, page_source snapshots, BeautifulSoup parses at speed. This is the combination most real scrapers land on.
Always check whether requests plus BeautifulSoup can see your data before you spin up a browser. A browser is a heavy tool, and half the time, you don't need it.
4. Consider using Selenium and BeautifulSoup in one pipeline
Putting the two together gives you the pipeline that handles the hard case: a JavaScript page with lots of data.
Render and drive with Selenium, snapshot and parse with BeautifulSoup:
from selenium import webdriver
from selenium.webdriver.chrome.options import Options
from bs4 import BeautifulSoup

options = Options()
options.add_argument("--headless=new")
options.add_argument("--window-size=1920,1080")

driver = webdriver.Chrome(options=options)
driver.get("https://books.toscrape.com/")

# 1. Selenium got the page into the state we want (rendered, scrolled, whatever).
# 2. Snapshot the rendered HTML.
soup = BeautifulSoup(driver.page_source, "html.parser")
driver.quit()

# 3. Parse fast with BeautifulSoup, no more browser round trips.
titles = [a["title"] for a in soup.select("article.product_pod h3 a")]
print(f"{len(titles)} titles, first is {titles[0]!r}")
Notice driver.quit() comes right after the snapshot, before the parsing. Once you have page_source, you don't need the browser anymore, so you free it immediately and do the slow, methodical parsing work in pure Python.
On a big scrape, that frees a browser process while you crunch data, which matters when you're running many scrapers at once.
Let's see a full pipeline run.
Selenium rendered the page, page_source snapshotted it, and BeautifulSoup parsed every book into a structured record:
books parsed        -> 20
first record        -> {'title': 'A Light in the Attic', 'price': '£51.77', 'in_stock': True, 'rating': 3}
last record         -> {'title': "It's Only the Himalayas", 'price': '£45.17', 'in_stock': True, 'rating': 2}
select() titles     -> 20 (first: 'A Light in the Attic')
Twenty clean dictionaries, each with a title, a price, a stock flag, and a numeric rating, out of a rendered page that started as a browser tab. That's the whole handoff working: Selenium for the browser, BeautifulSoup for the parse.
Now you can render a page and extract clean, structured records from it. The last mile is saving those records somewhere useful, as a CSV your team can open or JSON your code can load, and cleaning them up on the way out. That's next.
How to export and clean Selenium scraped data (CSV, JSON + using pandas)
Let's look into how to write our records to the two formats you'll use, clean them so they're analysis-ready, and handle the one structure that needs its own approach: paginated HTML tables.
We'll keep using the twenty book records from the last section as the input.
Method #1: Export scraped data to CSV
CSV is the format to use when a human will open the data in Excel, Google Sheets, or any spreadsheet tool.
With Python's built-in csv module, you can write a list of dictionaries straight to a file with DictWriter:
import csv

# books = the list of dicts from the previous section

with open("books.csv", "w", newline="", encoding="utf-8") as f:
    writer = csv.DictWriter(f, fieldnames=["title", "price", "in_stock", "rating"])
    writer.writeheader()
    writer.writerows(books)
Two arguments earn their place here:
- newline="" prevents the blank-line-between-rows bug you get on Windows if you omit it; it's not optional, it's a correctness fix
- encoding="utf-8" makes sure characters like the £ in the prices survive the write; without it, you can get mangled output or an encoding error on some systems.
One thing you don't have to worry about is escaping. The csv module automatically quotes any field containing a comma, a double quote, or a newline, so a book title with a comma in it won't break your columns. You don't hand-roll that logic, and you shouldn't.
Method #2: Export scraped data to JSON
JSON is the format to reach for when code will consume the data, another script, an API or a database loader. It preserves types (a boolean stays a boolean, a number stays a number) in a way CSV can't, since CSV is all strings.
With Python, json.dump writes it:
import json

with open("books.json", "w", encoding="utf-8") as f:
    json.dump(books, f, indent=2, ensure_ascii=False)
indent=2 makes the file human-readable, worth it for anything you'll eyeball. The argument that matters more than it looks is ensure_ascii=False. By default, json.dump escapes non-ASCII characters, so £51.77 becomes £51.77 in the file, technically valid but unreadable.
Setting ensure_ascii=False writes the actual £, which is what you want nine times out of ten. This is the JSON equivalent of the CSV encoding fix, and it trips up the same people.
Clean scraped data with pandas
Raw scraped data is rarely analysis-ready. Prices come out as strings with currency symbols, numbers arrive as text, and duplicates sneak in across pages. pandas is the fastest way to fix all of that at once, and it's one pip install pandas away.
You can load your records into a DataFrame and clean in a few lines:
import pandas as pd

df = pd.DataFrame(books)

# "£51.77" (string) -> 51.77 (float) so you can do math on it
df["price_gbp"] = df["price"].str.replace("£", "", regex=False).astype(float)

# Drop any duplicate rows that crept in across pages
df = df.drop_duplicates()

print(df["price_gbp"].mean())          # average price as a real number
print(df["rating"].value_counts())     # how many books at each star rating
The single most common cleaning step in scraping is exactly the price one: turning "£51.77" into the float 51.77 so you can average, sort, and filter on it. Strip the currency symbol, cast to float, done.
From there, drop_duplicates() handles the near-inevitable repeats you get when pagination overlaps, and pandas gives you .mean(), .value_counts(), .sort_values(), and the rest of the analysis toolkit for free.
Once your data is a clean DataFrame, exporting is also a one-liner in either direction: df.to_csv("books.csv", index=False) and df.to_json("books.json", orient="records") do the same job as the manual versions above, with less code, which is why I reach for pandas the moment cleaning is involved anyway.
Scrape an HTML table across paginated pages
Tables are their own scraping shape. A <table> has a fixed structure: header cells in <th>, data cells in <td>, one row per <tr>. When the data spans multiple pages, loop over the page URLs and accumulate rows.
Here's the pattern against a paginated table of hockey teams, walking three pages:
from selenium import webdriver
from selenium.webdriver.chrome.options import Options
from bs4 import BeautifulSoup

options = Options()
options.add_argument("--headless=new")
options.add_argument("--window-size=1920,1080")
driver = webdriver.Chrome(options=options)

all_rows = []
for page in range(1, 4):   # pages 1, 2, 3
    driver.get(f"https://www.scrapethissite.com/pages/forms/?page_num={page}")
    soup = BeautifulSoup(driver.page_source, "html.parser")

    for tr in soup.select("tr.team"):
        cells = tr.find_all("td")
        all_rows.append({
            "team": cells[0].get_text(strip=True),
            "year": cells[1].get_text(strip=True),
            "wins": cells[2].get_text(strip=True),
            "losses": cells[3].get_text(strip=True),
        })

driver.quit()
print(f"scraped {len(all_rows)} rows across 3 pages")
print(all_rows[0])
One honest note on this example, because it's the exact judgment call this whole article keeps coming back to. The hockey-teams table is static HTML, which means you could scrape it with requests plus BeautifulSoup and skip the browser entirely, and for this specific page, you should.
I'm showing the Selenium version because the pattern is identical when the table is rendered by JavaScript, which is when you genuinely need Selenium. Swap the URL for a table that only appears after scripts run, and this exact loop still works, whereas requests would come back empty.
The structure, extract cells per row, accumulate across pages, is the reusable part; whether you need a browser to get the HTML is the question you answer per site.
Here's the full section run end to end: the twenty books exported to both formats, cleaned in pandas, and a paginated table scraped across three pages:
=== EXPORT (books) ===
books.csv  written -> 1082 bytes, 21 lines (incl header)
books.json written -> 2469 bytes

=== CLEAN (pandas) ===
price_gbp dtype    -> float64
mean price (GBP)   -> 38.05
rating counts      -> {1: 6, 2: 3, 3: 3, 4: 4, 5: 4}

=== PAGINATED TABLE (hockey teams, 3 pages) ===
rows scraped       -> 75
first row          -> {'team': 'Boston Bruins', 'year': '1990', 'wins': '44', 'losses': '24'}
last row           -> {'team': 'Edmonton Oilers', 'year': '1993', 'wins': '25', 'losses': '45'}
The price column came out of pandas as a real float64, which is the whole point of the cleaning step. You can now average it (£38.05 across these twenty) or sort on it. And the table loop pulled 75 rows across three pages of 25 each, accumulating cleanly as it walked through the pagination. That's a full scrape-to-saved-data pipeline.
At this point, you can scrape a page, wait for its content to load, parse it, clean it, and save it. That's a complete scraper. What it isn't yet is a scraper that survives contact with a site that doesn't want to be scraped, and that's the next problem: avoiding detection.
How to avoid detection with Selenium (honeypots, CAPTCHAs, and headless browsing)
Sites defend against scrapers in layers, and it helps to be honest about where Selenium sits in that fight. Basic defenses, hidden honeypot traps, and obviously automated behavior are easy to handle.
Serious anti-bot systems like Cloudflare, DataDome, and PerimeterX are not, and no amount of Selenium configuration reliably beats them, because they fingerprint the browser at a level below what your script controls.
This section covers what you can do yourself, points you at the specialized tools for when you need more, and is upfront about the ceiling.
1. Know the anti-detection tooling and its ceiling
Regarding the tooling, a small ecosystem exists specifically to make Selenium harder to detect:
- undetected-chromedriver was the go-to for years, but it's increasingly caught by Cloudflare and DataDome now that they fingerprint for it directly
- nodriver is the same author's official successor, an async-first rewrite that doesn't depend on Selenium at all
- SeleniumBase includes a "UC Mode" that wraps these evasions in a maintained testing framework
- selenium-stealth patches the most obvious headless tells, but is less actively maintained
The honest caveat that applies to all of them is that they raise the bar, they don't clear it, and a determined anti-bot system still catches every one.
2. Detect honeypots with is_displayed()
Honeypots are traps: links or form fields that a human never sees because they're hidden with CSS, but that a naive scraper follows or fills because they're right there in the HTML.
Interacting with one instantly flags you as a bot, since only automation would touch an invisible element. The defense is simple and built into Selenium.
Check is_displayed() before you interact with anything:
from selenium.webdriver.common.by import By

# Only follow links a human could actually see
for link in driver.find_elements(By.TAG_NAME, "a"):
    if link.is_displayed():
        href = link.get_attribute("href")
        # ...process the visible link
    # invisible links are honeypots; skip them
is_displayed() returns True only if the element is genuinely visible: not display: none, not visibility: hidden, not sized to zero pixels.
Filtering your element list through it is the single cheapest anti-detection habit you can build, and it costs one method call. The same logic applies to forms. Before filling a field, confirm it's visible, because a hidden input in a login or search form is almost always a honeypot waiting for a bot to fill it.
Beyond honeypots, a few habits keep you off the easy blocklists:
- Set a real User-Agent (the default flags you)
- Add small randomized delays between actions instead of hammering at machine speed
- Reuse cookies and sessions rather than logging in fresh every run
None of these beat a serious anti-bot system, but together they get you past the ones that are just filtering out the laziest scrapers.
3. Handle CAPTCHAs (manual or third-party services)
When a CAPTCHA appears, you have three real options, and the order I'd try them in matters:
(1) First, avoid triggering it at all, because most CAPTCHAs fire in response to a bot signal you can remove: a datacenter IP, a missing User-Agent, or a too-fast request rate. Fix the upstream signal, and the CAPTCHA often stops appearing, which is cheaper and more reliable than solving it.
(2) Second, if you genuinely need to get past one, third-party solver services (2Captcha, Anti-Captcha, and similar) accept the challenge through an API and return a solution token for a few dollars per thousand solves, which you then submit through Selenium.
(3) Third, manual solving, pausing the script for a human to solve the challenge in a visible browser window, works for a one-off scrape but doesn't scale to anything automated.
The honest framing is that if you're hitting CAPTCHAs constantly, that's a signal your scraper looks too much like a bot, and the durable fix is upstream, better proxies and more human-like behavior, not a bigger solver budget.
4. Disable images and JavaScript to speed up scraping
When you're scraping text and don't need the page to look right, telling Chrome not to load images reduces bandwidth usage and speeds up page loads, sometimes dramatically on image-heavy sites.
You set it through a Chrome preference:
from selenium import webdriver
from selenium.webdriver.chrome.options import Options

options = Options()
options.add_argument("--headless=new")
options.add_argument("--window-size=1920,1080")

# Don't download images
options.add_experimental_option(
    "prefs", {"profile.managed_default_content_settings.images": 2}
)

driver = webdriver.Chrome(options=options)
The 2 means "block" for that content setting. This is safe when you're only extracting text or attributes, since the HTML and data are still there; you've just skipped downloading the images.
Be careful with the equivalent trick for disabling JavaScript, though. It speeds things up the same way, but on a JavaScript-rendered site, it defeats the entire purpose of using Selenium because the content you came for never renders.
Disable images freely; disable JavaScript only on pages you've confirmed are static, at which point you probably didn't need Selenium anyway.
Here's the honeypot filter and the image-blocking pref, both run:
=== HONEYPOT is_displayed() ===
visible link  is_displayed() -> True
honeypot link is_displayed() -> False
links kept after filter      -> ['real']

=== DISABLE IMAGES (page still loads) ===
title with images blocked    -> 'All products | Books to Scrape - Sandbox'
books still parseable        -> 20 product_pod elements
The filter did exactly its job: of the two links, is_displayed() kept the visible one and dropped the hidden honeypot. And with images blocked, the page still loaded, and all twenty book records were fully parseable. The data was never in the images.
Avoiding detection keeps a single scraper alive. The next problem is a different kind of scale: running many browsers at once, across machines, behind rotating proxies, which is where Selenium Grid comes in.
Scaling Selenium web scraping with Grid and proxies
When you need to scrape thousands of pages on a schedule, or run the same scraper across Chrome and Firefox at once, or spread the load across several machines, you've outgrown a single local driver.
Selenium Grid and proxy rotation are the two tools for that scale, and this section covers both, plus the honest point where building the infrastructure yourself stops being worth it.
When to use Selenium Grid
Selenium Grid lets one script control browsers running on other machines. You point your code at a central hub, and the hub distributes your browser sessions across connected worker nodes.
That buys you three things worth having:
- Parallelism: Many browsers are running at once instead of one after another
- Cross-browser coverage: Chrome, Firefox, and Edge sessions from the same script
- Distribution: Spreading load across hardware so no single machine is the bottleneck
If you're scraping a few hundred pages, a single driver with a sensible wait strategy is simpler and fast enough. Grid earns its complexity when you're running at real volume, thousands of pages where sequential scraping would take hours, or when you specifically need parallel cross-browser runs.
Below that threshold, Grid is infrastructure you're maintaining for no payoff. Reach for it when single-machine throughput is genuinely your bottleneck, not before.
Running Selenium Grid with Docker
The fastest way to a working Grid is to use Docker because the Selenium project publishes ready-made images.
A single standalone container gives you a hub and a Chrome node in one:
docker run -d -p 4444:4444 -p 7900:7900 --shm-size=2g selenium/standalone-chrome
That starts a Grid listening on port 4444. The --shm-size=2g flag is the one that also matters: Chrome crashes in containers with the default shared-memory size, the same reason we passed --disable-dev-shm-usage earlier.
Once it's running, you connect with webdriver.Remote instead of webdriver.Chrome, pointing it at the container:
from selenium import webdriver
from selenium.webdriver.chrome.options import Options

options = Options()
options.add_argument("--headless=new")
options.add_argument("--window-size=1920,1080")

# Connect to the Grid instead of launching a local browser
driver = webdriver.Remote(
    command_executor="http://localhost:4444",
    options=options,
)
driver.get("https://books.toscrape.com/")
print(driver.title)
driver.quit()
The only change from all previous scripts is webdriver.Remote and the command_executor URL; everything else, options, get, find_element, is identical.
That's the design goal of Grid. Your scraping code doesn't change, only where the browser runs. To scale out, you swap the standalone image for the hub-and-node compose setup and add nodes, and the same script fans out across all of them.
Managing proxies for geo and scale
Proxies route your requests through other IP addresses, which matters for two reasons in scraping:
- Accessing geo-restricted content
- Spreading requests across many IPs so no single one gets rate-limited or blocked
The basic form is a one-line Chrome argument:
from selenium.webdriver.chrome.options import Options

options = Options()
options.add_argument("--proxy-server=http://123.45.67.89:8080")
That works for an open proxy, but it has a real limitation you'll hit fast: it can't carry a username and password. The moment you use a commercial proxy that requires authentication (which is nearly all of them), --proxy-server alone won't do it, because Chrome pops a native auth dialog that Selenium can't fill.
The reliable workaround is a small Chrome extension that packages your proxy username and password and loads them at launch, so Chrome authenticates without ever showing the dialog.
The selenium-wire library
You'll also see the selenium-wire library recommended for this in older tutorials, and it did the job cleanly for years. Still, its repository was archived in January 2024 (last release 5.1.0, October 2022), and it no longer installs on current blinker versions, so it isn't a safe pick for new code.
If you want the same request-capture workflow today, reach for SeleniumBase's CDP mode or the Chrome DevTools Protocol directly, both of which are actively maintained. For most scrapers, the credentials-extension route is the least fragile option.
Rotating proxies
For rotation, you keep a pool of proxies and pick a different one per session, launching a fresh driver with the next proxy when one gets blocked, the same rotate-on-block pattern that any serious scrape converges on.
Managing that pool well, dead-proxy eviction, geo-targeting, sticky sessions, is real work, which is a big part of why the next question, when to stop building this yourself, is worth asking honestly. Our guide on rotating and residential proxies covers the pooling side in more depth.
When to switch to a managed API
Everything above, Grid infrastructure, proxy pools, stealth tooling, CAPTCHA handling, is buildable, and for a while, it's even satisfying to build.
But it's also a standing maintenance cost:
- The Grid needs babysitting
- The proxy pool needs rotation logic
- The anti-bot evasions break every time Cloudflare updates
- Someone has to own all of it
There's a point where the engineering hours you're pouring into staying unblocked exceed what the data is worth, and beyond that, a managed scraping API is simply the cheaper option.
Scale your web scraping with ScrapingBee
Once your scraper is running at scale (a headless browser fleet that eats memory, a proxy pool that needs rotation logic, stealth patches that break every time an anti-bot vendor updates, a Grid to babysit, and a CAPTCHA budget), you have a lot of infrastructure standing between you and the data you wanted.
Here's how ScrapingBee's web scraping API takes all of it off your plate:
- Headless browser rendering: JavaScript rendering is on by default (render_js=true), so the API runs a real browser server-side, and JavaScript-heavy sites return the rendered HTML
- Proxy rotation built in: Residential and datacenter IPs rotate automatically, with geotargeting when you need it, so you never build or babysit a proxy pool.
- Blocks and CAPTCHAs handled: The anti-bot evasion that breaks every Cloudflare update on a DIY setup is the API's problem to keep working, not yours.
- The same data, less code: You get back the page HTML (or structured data) and parse it however you like; the parsing skills from this article carry straight over.
Start on ScrapingBee with 1,000 free API credits, no credit card, and see whether the handoff makes sense for your own targets.
Frequently asked questions about Selenium web scraping
Is Selenium still the best choice for web scraping?
Selenium is the best choice when you need broad browser and language support, existing Selenium code, or Selenium Grid for distributed runs. For brand-new projects that want speed and built-in auto-waiting, Playwright is often the better pick. And when the page is static HTML, skip both and use requests with BeautifulSoup. "Best" depends entirely on whether you need a browser.
How can I avoid detection when using Selenium for web scraping?
Send a realistic User-Agent, add randomized delays, reuse sessions, and filter out honeypots with is_displayed() before interacting. For CAPTCHAs, first try to avoid triggering them by removing bot signals such as datacenter IPs; if you must solve them, third-party services like 2Captcha offer APIs. Serious anti-bot systems still catch determined automation, so this is about the easy filters, not a guarantee.
How do I handle infinite scrolling websites with Selenium?
Scroll to the bottom with driver.execute_script("window.scrollTo(0, document.body.scrollHeight);"), wait for new content to load, then compare the page's scrollHeight before and after. When the height stops growing, you've reached the end. This lets you collect every item without hardcoding a page count you don't know in advance.
Is headless mode detectable by websites?
Yes. Even with --headless=new, which behaves much more like a real browser than the old headless mode, determined anti-bot systems can still fingerprint headless Chrome through subtle differences in rendering, timing, and browser properties. --headless=new gets you past basic checks; past the serious ones, you need stealth tooling or a managed API that handles the fingerprinting for you.
Can I run Selenium scrapers in the cloud?
Yes. Selenium runs anywhere Python and a browser do: in a VM, a container, a CI pipeline, or a serverless function with a headless Chrome layer. Always run --headless=new in the cloud since there's no display, and add --no-sandbox and --disable-dev-shm-usage for container environments. Selenium Grid on Docker is the standard way to scale cloud runs across multiple machines.
How can I handle cookie consent popups or modals automatically?
Locate the accept button by its text and click it. Because button wording varies, match case-insensitively with XPath's translate(): //button[contains(translate(text(), 'ABCDEFGHIJKLMNOPQRSTUVWXYZ', 'abcdefghijklmnopqrstuvwxyz'), 'accept')]. Avoid XPath's matches() function for this; it's XPath 2.0, which browsers don't support, so it raises an invalid-expression error. Wrap the click in a try/except since the popup isn't always present.
Do I still need to download ChromeDriver for Selenium?
No. Since Selenium 4.6, Selenium Manager ships inside Selenium and automatically downloads and caches the right driver for your installed browser. You only need Chrome, Firefox, or Edge installed. Manual chromedriver downloads, PATH edits, and the webdriver-manager package are only needed for unusual setups, like a custom Chromium build or a network that blocks the driver download.

Ismail is a Senior Managing Editor and Senior AI Workflow Engineer. For a decade, he has turned the trickiest corners of web scraping, Python, content marketing, and AI infrastructure into guides readers keep open in a second tab. He builds the tools before he documents them, breaks them, and reports back with the scars.