The web acts like a giant, powerful database, with tons of data being generated every single day. With the rise of trends such as big data and data science, data has become more useful than ever, being used to train machine learning algorithms, generate insights, forecast the future, and many other purposes. Extracting this data manually, page by page, can be a very slow and time consuming process. The process of web scraping can be a helpful solution, programmatically extracting data from the web. Thanks to browser automation, which emulates human actions such as clicking and scrolling through a web system, users can simply and efficiently gather useful data without being hindered by a manual process.
There are a number of tools and libraries in Python for web scraping. Some of the most popular options include requests, BeautifulSoup, Scrapy, MechanicalSoup, lxml, and selenium. In this article, you’ll learn about another powerful alternative, Pyppeteer, and explore how to get started with it as a Python developer.

What is Pyppeteer ?
Pyppeteer is a Python wrapper for the JavaScript (Node) library, Puppeteer. It works similarly to Selenium, supporting both headless and non-headless mode, though Pyppeteer’s native support is limited to JavaScript and Chromium browsers.
Headless mode simply refers to running the web browser in the background without the graphical user interface (GUI). This is typically preferable for tasks like web automation, automated testing, and web scraping, as it significantly reduces the load time of the browser and the computation power required since all the work is being done in the background.
Why Pyppeteer?
While tools like requests and BeautifulSoup excel at extracting data from static sites, they struggle when it comes to dynamic or reactive sites that involve a lot of JS on the UI made with frameworks such as ReactJS, AngularJS, or VueJS. They simply weren’t made to deal with dynamically created content.
Pyppeteer, on the other hand, gives you the ability to control the entire browser and its elements instead of using HTTP libraries like requests to get the content of the page. This gives you much more flexibility in terms of what you can accomplish. Some of Pyppeteer’s specific use cases include:
- Creating screenshots or PDFs of website pages
- Automating keyboard input, form submission, UI testing, and more
- Crawling a single-page application to produce pre-rendered content (i.e., server-side rendering)
- Generating an automated testing environment to run tests within fully updated versions of Chrome and JavaScript
You can learn more about all that you can with it by visiting the official Pyppeteer documentation.
Implementing Pyppeteer
Now that you know a little more about Pyppeteer, let’s get started with the tutorial on how to implement it in Python.
Setting Up Your Virtual Environment
First, it’s best practice for you to create a separate development environment so that you don’t mess up any existing libraries:
# Install virtualenv (If you don't have one)

## installing | Window
pip install --upgrade virtualenv

## installing | Linux | Mac
pip3 install --upgrade virtualenv

# create virtual environment | Window | Linux | Mac
virtualenv pyp-env

# activating pyp-env | Window
pyp-env\Scripts\activate

# activating pyp-env | Linux | Mac
source pyp-env/bin/activate
Installation
Pyppeteer is the main dependency to be installed. Note that it requires you to be running Python 3.6+, which you can install directly using pip or from the Pyppeteer GitHub repository:
# Installing using pip | Window
C:\> python -m pip install pyppeteer

# Installing using pip | Linux | Mac
$ python3 -m pip install pyppeteer

# Installing from a GitHub repository | Window
C:\> python -m pip install -U git+https://github.com/miyakogi/pyppeteer.git@dev

# Installing from a GitHub repository | Linux | Mac
$ python3 -m pip install -U git+https://github.com/miyakogi/pyppeteer.git@dev
Note:
- Pyppeteer may delay for a while when you run your script for the first time because it needs some time to download the latest version of the Chromium browser. Alternatively, you can complete installation manually before running your scripts using the following command:
$ pyppeteer-install
- M1 Macs may have problems with running Pyppeteer in arm64 mode, and may need to run via Rosetta instead.
It’s also worth mentioning that Pyppeteer has async support by default, which means that it allows your script/application to handle the browser automation and scraping process asynchronously. This can be a performance booster when it comes to tasks involving HTTP calls.
Capturing Screenshots with Pyppeteer
Next, you’ll learn how to use Pyppeteer to capture screenshots from a website and save them as an image.
First, import your required libraries:
import asyncio
from pyppeteer import launch
Then create an async function to open a website and capture a screenshot:
import asyncio
from pyppeteer import launch

async def main():
    # launch chromium browser in the background
    browser = await launch()
    # open a new tab in the browser
    page = await browser.newPage()
    # add URL to a new page and then open it
    await page.goto("https://www.python.org/")
    # create a screenshot of the page and save it
    await page.screenshot({"path": "python.png"})
    # close the browser
    await browser.close()

print("Starting...")
asyncio.get_event_loop().run_until_complete(main())
print("Screenshot has been taken")
Finally, run your script (app.py):
# Window
C:\> python app.py
......
Starting...
Screenshot has been taken

# Linux | Mac
$ python3 app.py
......
Starting...
Screenshot has been taken
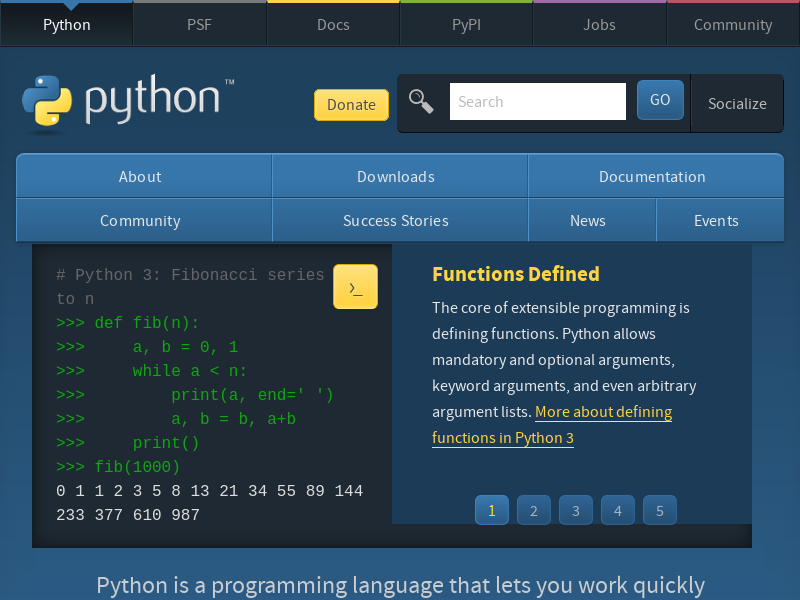
When you see “Screenshot has been taken,” you should be able to see a new image titled “python.png” in your current directory. It should look something like this:
This is a very basic example of taking a screenshot using Pyppeteer. However, as mentioned previously, Pyppeteer is also fit for use on more complex, dynamic websites. In the next section, you’ll explore a second example where you’ll learn how to build a simple web scraping script that extracts topics titles from an interactive site. This is where Pyppeteer shines, as this is almost impossible to accomplish with alternative tools like requests or BeautifulSoup.
Scraping Complex Page Content with Pyppeteer
Let’s say you’re given the task to scrape article ideas for a given list of topic names from Educative.io/edpresso. The content of the page renders interactively based on what you type the search box, as pictured here:
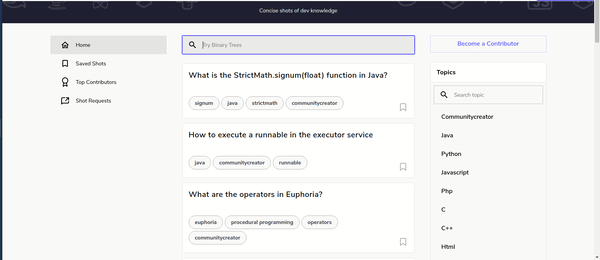
Examining this gif, you can quickly brainstorm the steps the scripts need to take to be able to effectively extract the interactive article ideas. Those steps might include:
- Locating the search box
- Writing a target topic on the search box
- Waiting for the topics to load
- Extracting all article titles about that topic
- Deleting the topic from the search box
- Repeating steps 2-5 until you iterate through all the necessary topics
Setting Up
Before you proceed to the implementation of the algorithm, remember that Pyppeteer, by default, launches a Chromium browser in headless mode. When it comes to building a script with a lot of unpredictability, it’s typically preferable to manually configure it to run in a non-headless mode as it tends to ease the burden of blind debugging.
Here’s how to configure Pyppeteer to run in non-headless mode:
# launch browser in non-headless mode
browser = await launch({"headless": False})

# It's also good choice to allow full screen
# To enable full screen on the launched browser
# Here how you do that
browser = await launch({"headless": False, "args": ["--start-maximized"]})
Now let’s get back to setting up the various aspects of the script.
1. Locating the Search Box
The first lines of code for opening a website will be similar to those used in the first example in this article. Here, though, you’ll need to add a new line that will locate the search box using a CSS selector. Your code will look like this:
import asyncio
from typing import List
from pyppeteer import launch

async def get_article_titles(keywords: List[str]):
    # launch browser in headless mode
    browser = await launch({"headless": False, "args": ["--start-maximized"]})
    # create a new page
    page = await browser.newPage()
    # set page viewport to the largest size
    await page.setViewport({"width": 1600, "height": 900})
    # navigate to the page
    await page.goto("https://www.educative.io/edpresso")
    # locate the search box
    entry_box = await page.querySelector(
       "#__next > div.ed-grid > div.ed-grid-main > div > div.flex.flex-row.items-center.justify-around.bg-gray-50.dark\:bg-dark.lg\:py-0.lg\:px-6 > div > div.w-full.p-0.m-0.flex.flex-col.lg\:w-1\/2.lg\:py-0.lg\:px-5 > div.pt-6.px-4.pb-0.lg\:sticky.lg\:p-0 > div > div > div.w-full.dark\:bg-dark.h-12.flex-auto.text-sm.font-normal.rounded-sm.cursor-text.inline-flex.items-center.hover\:bg-alphas-black06.dark\:hover\:bg-gray-A900.border.border-solid.overflow-hidden.focus-within\:ring-1.border-gray-400.dark\:border-gray-900.focus-within\:border-primary.dark\:focus-within\:border-primary-light.focus-within\:ring-primary.dark\:focus-within\:ring-primary-light > input"
   )
2. Writing a Target Topic
# Type keyword in search box
await entry_box.type(keyword)
3. Waiting for the Topics to Load
# wait for search results to load
await page.waitFor(4000)
4. Extracting the Article Ideas
# extract the article titles
topics = await page.querySelectorAll("h2")
for topic in topics:
    title = await topic.getProperty("textContent")
    # print the article titles
    print(await title.jsonValue())
5. Deleting the Topic from the Search Box
# clear the input box
for _ in range(len(keyword)):
    await page.keyboard.press("Backspace")
6. Repeating Steps 2-5 (Iterating over Topics)
for keyword in keywords:
    # type keyword in search box
    await entry_box.type(keyword)
    # wait for search results to load
    await page.waitFor(4000)
    # extract the article titles
    topics = await page.querySelectorAll("h2")

    # print the article titles
    for topic in topics:
        title = await topic.getProperty("textContent")
        print(await title.jsonValue())

    # clear the input box
    for _ in range(len(keyword)):
        await page.keyboard.press("Backspace")
Completing the Script
Now that you’ve built the various pieces of the algorithm, it’s time to put the whole script together. Your complete source code should look like this:
import asyncio
from typing import List
from pyppeteer import launch

async def get_article_titles(keywords: List[str]):
   # launch browser in headless mode
   browser = await launch({"headless": False, "args": ["--start-maximized"]})
   # create a new page
   page = await browser.newPage()
   # set page viewport to the largest size
   await page.setViewport({"width": 1600, "height": 900})
   # navigate to the page
   await page.goto("https://www.educative.io/edpresso")
   # locate the search box
   entry_box = await page.querySelector(
       "#__next > div.ed-grid > div.ed-grid-main > div > div.flex.flex-row.items-center.justify-around.bg-gray-50.dark\:bg-dark.lg\:py-0.lg\:px-6 > div > div.w-full.p-0.m-0.flex.flex-col.lg\:w-1\/2.lg\:py-0.lg\:px-5 > div.pt-6.px-4.pb-0.lg\:sticky.lg\:p-0 > div > div > div.w-full.dark\:bg-dark.h-12.flex-auto.text-sm.font-normal.rounded-sm.cursor-text.inline-flex.items-center.hover\:bg-alphas-black06.dark\:hover\:bg-gray-A900.border.border-solid.overflow-hidden.focus-within\:ring-1.border-gray-400.dark\:border-gray-900.focus-within\:border-primary.dark\:focus-within\:border-primary-light.focus-within\:ring-primary.dark\:focus-within\:ring-primary-light > input"
   )

   for keyword in keywords:
       print("====================== {} ======================".format(keyword))
       # type keyword in search box
       await entry_box.type(keyword)
       # wait for search results to load
       await page.waitFor(4000)
       # extract the article titles
       topics = await page.querySelectorAll("h2")
       for topic in topics:
           title = await topic.getProperty("textContent")
           # print the article titles
           print(await title.jsonValue())

       # clear the input box
       for _ in range(len(keyword)):
           await page.keyboard.press("Backspace")

print("Starting...")
asyncio.get_event_loop().run_until_complete(
   get_article_titles(["python", "opensource", "opencv"])
)
print("Finished extracting articles titles")
Running the Script
Once your script has been compiled, it’s time to see if it works. Launch the script as you would normally run a Python script, as shown here:
$ python3 app.py

Starting...
====================== python ======================
What is the contextlib module?
What is the difference between String find() and index() method?
Installing pip3 in Ubuntu
What is a private heap space?
......
====================== opensource ======================
Knative
How to use ASP.NET Core
What is apache Hadoop?
What is OpenJDK?
What is Azure Data Studio?
.....
====================== opencv ======================
What is OpenCV in Python?
Eye Blink detection using OpenCV, Python, and Dlib
How to capture a frame from real-time camera video using OpenCV
Finished extracting articles titles
When you run your script, it will automatically launch a Chromium browser and then open a new tab for the Educative.io page. Then it will go through all the steps highlighted above and print out the scraped article titles for each keyword. If you see results similar to the output above when you run your script, then congratulations—you made it!
Conclusion
In this article, you learned about web scraping and explored the abilities of Pyppeteer to build scripts to do anything from capturing simple website screenshots to web scraping dynamic, interactive web pages.These are just the basics, however. Now that you know the fundamentals, take some time to explore the rest at your own curiosity by visiting Pyppeteer’s official documentation.