In this article, you will learn how to create a simple web scraper using Go.
Robert Griesemer, Rob Pike, and Ken Thompson created the Golang programming language at Google, and it has been in the market since 2009. Go, also known as Golang, has many brilliant features. Getting started with Go is fast and straightforward. As a result, this comparatively newer language is gaining a lot of attraction in the developer world.
Implementing Web Scraping with Go
The support for concurrency has made Go a fast, powerful language, and because the language is easy to start, you can build your web scraper with only a few lines of code. Two libraries are very popular for creating web scrapers with Go:
In this article, you’ll implement a basic scraper using core Golang and Colly. At first, you’ll be learning the basics of building a scraper, and you’ll implement a URL scraper from a Wikipedia page. Once you know the basic building blocks of web scraping with Golang, you’ll level up the skill and implement a more advanced scraper with Colly.
Prerequisites
Before moving forward in this article, ensure the following tools and libraries are installed on your computer. You’ll need the following:
- Basic understanding of Go
- Go (preferably the latest version—1.23.2, as of writing this article)
- IDE or text editor of your choice (Visual Studio Code preferred)
- Go extension for the IDE (if available)
Setting up the Project
Before starting to write code, you have to initialize the project directory. Open the IDE of your choice and open a folder where you will save all your project files. Now, open a terminal window and locate your directory. After, type the following command in the terminal:
go mod init your-project-name
Once you type in the command and press enter, you’ll find that a new file is created with the name go.mod. This file holds information about the direct and indirect dependencies that the project needs.
Building a Basic Scraper
While libraries like Colly are great for demanding web scraping use cases, you can also implement a web scraper in pure Go using its core libraries. This approach works great for simple use cases, provides more control over the scraping process, and can be useful for avoiding external dependencies.
Let's create an application that scrapes all the links from a specific Wikipedia page and prints them on the terminal.
Create a new main.go file - all the logic will go into this file. Start by writing package main. This line tells the compiler that the package should compile as an executable program instead of a shared library.
package main
The next step is to write the main function:
func main() {
    print("Hello World!")
}
Fetching Website's Content
We need to get the page content before we can parse it. This can be easily achieved with http.Get() method:
package main

import (
    "io"
    "net/http"
)

func main() {
    if resp, err := http.Get("https://en.wikipedia.org/wiki/Web_scraping"); err == nil {
        defer resp.Body.Close()
        if body, err := io.ReadAll(resp.Body); err == nil {
            println(string(body))
        }
    }
}
Now, when you run it, it should display some HTML. Congratulations! You have just scraped the whole site and printed it out!
Let's try to extract some links now.
Parsing HTML
To extract links, you need to parse the HTML content. Luckily, Golang's standard library has a tool for this - html.Parse().
You need to pass the response body to html.Parse() method, and in return, you get an object representing a root node of the whole parsed tree:
package main

import (
    "fmt"
    "golang.org/x/net/html"
    "net/http"
)

func main() {
    if resp, err := http.Get("https://en.wikipedia.org/wiki/Web_scraping"); err == nil {
        if rootNode, err := html.Parse(resp.Body); err == nil {
            // ...
        }
    }
}
And now, all you need to do is to traverse the tree, and collect links:
func findLinks(n *html.Node) (links []string) {
    if n.Type == html.ElementNode && n.Data == "a" {
        for _, attr := range n.Attr {
            if attr.Key == "href" {
                links = append(links, attr.Val)
            }
        }
    }

    for c := n.FirstChild; c != nil; c = c.NextSibling {
        links = append(links, findLinks(c)...)
    }
    return links
}
Let's combine everything:
package main

import (
    "fmt"
    "golang.org/x/net/html"
    "net/http"
)

func main() {
    if resp, err := http.Get("https://en.wikipedia.org/wiki/Web_scraping"); err == nil {
        if rootNode, err := html.Parse(resp.Body); err == nil {
            for _, link := range findLinks(rootNode) {
                fmt.Printf("link: %s\n", link)
            }
        }
    }
}

func findLinks(n *html.Node) (links []string) {
    if n.Type == html.ElementNode && n.Data == "a" {
        for _, attr := range n.Attr {
            if attr.Key == "href" {
                links = append(links, attr.Val)
            }
        }
    }

    for c := n.FirstChild; c != nil; c = c.NextSibling {
        links = append(links, findLinks(c)...)
    }
    return links
}
And if you run it, you'll see all the extracted links. Congrats again!
However, Golang's inbuilt tooling is limited and lacks the convenient features of scraping libraries like Colly (e.g., handling sessions, rate limiting, retries, etc.).
Installing Colly
The next step is to install the Colly dependency. To install the dependency, type the following command in the terminal:
go get -u github.com/gocolly/colly/...
This will download the Colly library and generate a new file called go.sum. You can now find the dependency in the go.mod file. The go.sum file lists the checksum of the direct and indirect dependencies, along with the version. You can read more about the go.sum and go.mod files here.
Understanding Colly and the Collector Component
The Colly package is used to build web crawlers and scrapers. It is based on Go’s Net/HTTP and goquery package. The goquery package gives a jQuery-like syntax in Go to target HTML elements. This package alone is also used to build scrapers.
The main component of Colly is the Collector. According to the docs, the Collector component manages the network communications, and it is also responsible for the callbacks attached to it when a Collector job is running. This component is configurable, and you can modify the UserAgent string or add Authentication headers, restricting or allowing URLs with the help of this component.
Understanding Colly Callbacks
Callbacks can also be added to the Collector component. The Colly library has callbacks, such as OnHTML and OnRequest. You can refer to the docs to learn about all the callbacks. These callbacks run at different points in the life cycle of the Collector. For example, the OnRequest callback is run just before the Collector makes an HTTP request.
The OnHTML method is the most common callback for building web scrapers. It allows registering a callback for the Collector when it reaches a specific HTML tag on the web page.
Building a Basic Scraper
Now that you have set up the project directory with the necessary dependency, you can write some code. Once again, we'll scrape all the links from a specific Wikipedia page and print them on the terminal. This scraper is built to make you comfortable with the building blocks of the Colly library.
The next step is to start writing the main function (remember that you might need to rename an existing main() method as there can be only one). If you are using Visual Studio Code, it will do the importing of the necessary packages automatically. Otherwise, in the case of other IDEs, you may have to do it manually. The Collector of Colly is initialized with the following line of code:
func main() {
    c := colly.NewCollector(
        colly.AllowedDomains("en.wikipedia.org"),
    )
}
Here, the NewCollector is initialized, and as an option, en.wikipedia.org is passed as an allowed domain. The same Collector can also be initialized without passing any option to it. Now, if you save the file, Colly will be automatically imported to your main.go file; if not, add the following lines after the package main line:
import (
    "fmt"

    "github.com/gocolly/colly"
)
The above lines import two packages in the main.go file. The first package is the fmt package and the second one is the Colly library.
Now, open this URL in your browser. This is the Wikipedia page on web scraping. The web scraper is going to scrape all the links from this page. Understanding the browser developer tools well is an invaluable skill in web scraping. Open the browser inspect tools by right-clicking on the page and selecting Inspect. This will open the page inspector. You’ll be able to see all the HTML, CSS, network calls, and other important information here. For this example specifically, find the mw-parser-output div:
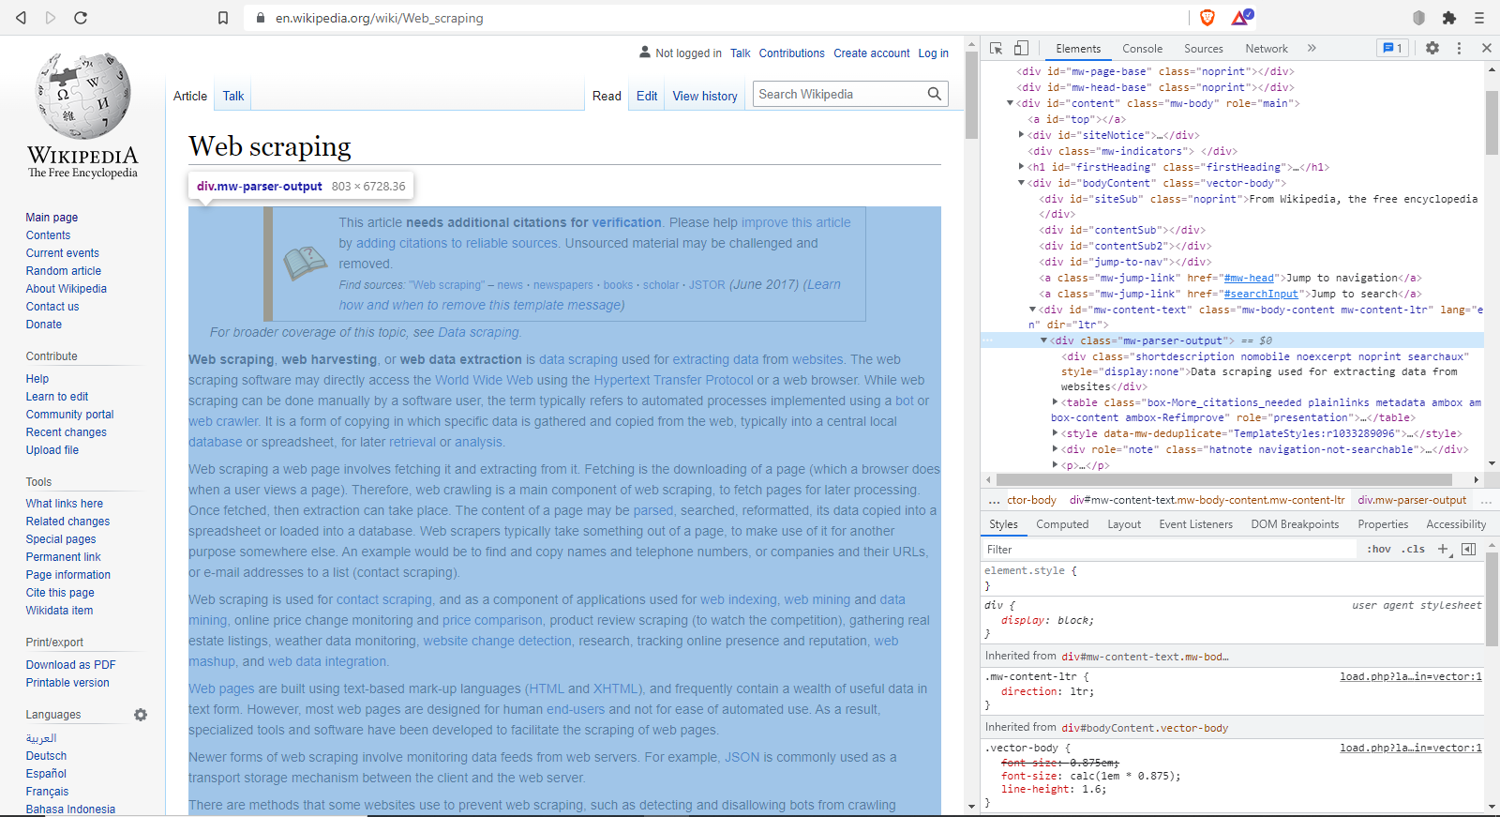
This div element contains the body of the page. Targeting the links inside this div will provide all the links used inside the article.
Next, you will use the OnHTML method. Here is the remaining code for the scraper:
// Find and print all links
    c.OnHTML(".mw-parser-output", func(e *colly.HTMLElement) {
        links := e.ChildAttrs("a", "href")
        fmt.Println(links)
    })
    c.Visit("https://en.wikipedia.org/wiki/Web_scraping")
The OnHTML method takes in two parameters. The first parameter is the HTML element. Reaching it is going to execute the callback function, which is passed as the second parameter. Inside the callback function, the links variable is assigned to a method that returns all the child attributes matching the element’s attributes. The e.ChildAttrs("a", "href") function returns a slice of strings of all the links inside the mw-parser-output div. The fmt.Println(links) function prints the links in the terminal.
Finally, visit the URL using the c.Visit("https://en.wikipedia.org/wiki/Web_scraping") command. The complete scraper code will look like this:
package main

import (
    "fmt"

    "github.com/gocolly/colly"
)

func main() {
    c := colly.NewCollector(
        colly.AllowedDomains("en.wikipedia.org"),
    )

    // Find and print all links
    c.OnHTML(".mw-parser-output", func(e *colly.HTMLElement) {
        links := e.ChildAttrs("a", "href")
        fmt.Println(links)
    })
    c.Visit("https://en.wikipedia.org/wiki/Web_scraping")
}
Running this code with the command go run main.go will get all the links on the page.
Scraping Table Data
To scrape the table data, you can either remove the codes you have written inside c.OnHTML or create a new project by following the same steps mentioned above. To make and write a CSV file, you’ll be using the encoding/csv library available in Go. Here is the starter code:
package main

import (
    "encoding/csv"
    "log"
    "os"
)

func main() {
    fName := "data.csv"
    file, err := os.Create(fName)
    if err != nil {
        log.Fatalf("Could not create file, err: %q", err)
        return
    }
    defer file.Close()

    writer := csv.NewWriter(file)
    defer writer.Flush()
}
Inside the main function, the first action is to define the file name. Here, it is defined as data.csv. Then using the os.Create(fName) method, the file is created with the name data.csv. If any error occurs during the creation of the file, it’ll also log the error and exit the program. The defer file.Close() command will close the file when the surrounding function returns.
The writer := csv.NewWriter(file) command initializes the CSV writer to write to the file, and the writer.Flush() will throw everything from the buffer to the writer.
Once the file creation process is done, the scraping process can be started. This is similar to the above example.
Next, add the lines of code below after the defer writer.Flush() line ends:
c := colly.NewCollector()
    c.OnHTML("table#customers", func(e *colly.HTMLElement) {
        e.ForEach("tr", func(_ int, el *colly.HTMLElement) {
            writer.Write([]string{
                el.ChildText("td:nth-child(1)"),
                el.ChildText("td:nth-child(2)"),
                el.ChildText("td:nth-child(3)"),
            })
        })
        fmt.Println("Scrapping Complete")
    })
    c.Visit("https://www.w3schools.com/html/html_tables.asp")
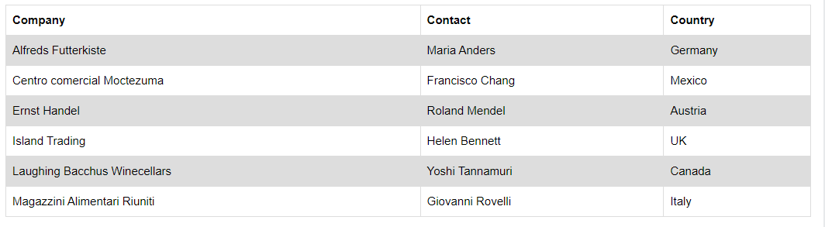
In this code, Colly is being initialized. Colly uses the ForEach method to iterate through the content. Because the table has three columns or td elements, using the nth-child pseudo selector, three columns are selected. el.ChildText returns the text inside the element. Putting it inside the writer.Write method will write the elements into the CSV file. Finally, the print statement prints a message when the scraping is complete. Because this code is not targeting the table headers, it will not print the heading. The complete code for this scraper will be like this:
package main

import (
    "encoding/csv"
    "fmt"
    "log"
    "os"

    "github.com/gocolly/colly"
)

func main() {
    fName := "data.csv"
    file, err := os.Create(fName)
    if err != nil {
        log.Fatalf("Could not create file, err: %q", err)
        return
    }
    defer file.Close()

    writer := csv.NewWriter(file)
    defer writer.Flush()

    c := colly.NewCollector()
    c.OnHTML("table#customers", func(e *colly.HTMLElement) {
        e.ForEach("tr", func(_ int, el *colly.HTMLElement) {
            writer.Write([]string{
                el.ChildText("td:nth-child(1)"),
                el.ChildText("td:nth-child(2)"),
                el.ChildText("td:nth-child(3)"),
            })
        })
        fmt.Println("Scrapping Complete")
    })
    c.Visit("https://www.w3schools.com/html/html_tables.asp")
}
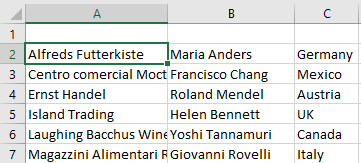
Once successful, the output will appear like this:
💡 Love scraping in GO? Check out our guide on how to use headless ChromeDP in GO to scrape dynamic websites.
Conclusion
In this article, you learned what web scrapers are as well as some use cases and how they can be implemented with Go, with and without the help of the Colly library.
However, the methods described in this tutorial are not the only possible ways to implement a scraper. Consider experimenting with this yourself and finding new ways to do it. Colly can also work with the goquery library to make a more powerful scraper.
Depending on your use case, you can modify Colly to satisfy your needs. Web scraping is very handy for keyword research, brand protection, promotion, website testing, etc. So, knowing how to build your web scraper can help you become a better developer.
If you love low-level languages, you might also like our Web scraping with C++.
Before you go, check out these related reads: