In our previous tutorial, we looked at how to use the Scrapy framework for basic web scraping tasks. Today, we'll dive into using Selenium with Python in a straightforward, detailed guide.
Selenium is a powerful suite of tools designed for automating web browsers. It provides programming interfaces, known as bindings, for all major programming languages, including Python, which we will focus on in this guide.
The Selenium API uses something called the WebDriver protocol to interact with web browsers such as Chrome, Firefox, or Safari. It can manage both browsers installed on your local machine and those running on remote servers.
Originally developed for testing websites across different browsers, Selenium is now widely used for automating web browsers for various tasks such as taking screenshots, managing cookies, and, crucially for us, web scraping.
Selenium is particularly adept at handling websites that use a lot of JavaScript, making it possible to automate tasks that involve:
- Clicking buttons
- Filling out forms
- Scrolling through web pages
- Taking screenshots
- Executing custom JavaScript commands
This makes Selenium an excellent choice for scraping data from dynamic, JavaScript-heavy websites, often called Single-Page Applications (SPAs). Traditional tools that use simple HTTP requests and HTML parsing might only fetch JavaScript code without accessing the underlying data, whereas Selenium can interact with these pages just like a human user would.
Installation
To get started with Selenium, you first need to set up your environment:
- Google Chrome: Download and install the latest version from the Chrome download page.
- ChromeDriver: Ensure you download a version of ChromeDriver that matches your version of Chrome from the ChromeDriver download page. This is essential as it enables Selenium to communicate with your browser.
- Selenium Python Bindings: These allow you to control your browser directly from Python. You can download them from the Selenium downloads page.
Setting up your environment
For package management and virtual environments, I recommend using Poetry. It's efficient and integrates well with your workflow. Here's how to add Selenium to your Python project:
- Add Selenium to your
pyproject.tomlfile:
selenium = "^4.20.0"
- Install the package using Poetry:
poetry install
- To run your Selenium script, use:
poetry run python3 my_script.py
Alternatively, if you prefer a more straightforward method, install Selenium directly with:
pip install selenium
This setup will ensure that you have all necessary tools to start scripting with Selenium. Once you have these components installed, you’re ready to move on to writing your first scraping script.
Quickstart
Once you've installed Chrome and ChromeDriver and have Selenium set up, you're all set to fire up the browser:
from selenium import webdriver

# Set the path to the Chromedriver
DRIVER_PATH = '/path/to/chromedriver'

# Initialize the Chrome driver
driver = webdriver.Chrome(executable_path=DRIVER_PATH)

# Navigate to the URL
driver.get('https://google.com')

# It's a good practice to close the browser when done
driver.quit()
Note that we didn't explicitly configure headless mode, therefore when you run your initial script, a regular Chrome window will be launched. You'll also see an alert banner that says, "Chrome is being controlled by automated testing software." This confirms that Selenium is in control.
Chrome headless mode
Using the visible mode where you can see the browser is great for development because it lets you see exactly what's happening as your script runs. However, for production environments, it's best to switch to headless mode. In headless mode, Chrome operates in the background with no visible interface, saving valuable system resources. This is ideal for servers or systems where graphical output is unnecessary and could be a waste of resources.
Headless mode can be enabled with just a few adjustments in your Selenium setup, allowing Chrome to run silently but fully functional, executing all tasks as it would in a non-headless mode:
from selenium import webdriver
from selenium.webdriver.chrome.options import Options

# Configure Chrome options
options = Options()
options.headless = True  # Enable headless mode
options.add_argument("--window-size=1920,1200")  # Set the window size

# Set the path to the Chromedriver
DRIVER_PATH = '/path/to/chromedriver'

# Initialize the Chrome driver with the specified options
driver = webdriver.Chrome(options=options, executable_path=DRIVER_PATH)

# Your code here to interact with the page
# ...

# It's a good practice to close the driver when you're finished
driver.quit()
We only need to instantiate an Options object, set its headless field to True, and pass it to our WebDriver constructor. Done.
WebDriver page properties
Building on our headless mode example, let's go full Mario and check out Nintendo's website:
from selenium import webdriver
from selenium.webdriver.chrome.options import Options

# Set up options for headless Chrome
options = Options()
options.headless = True  # Enable headless mode for invisible operation
options.add_argument("--window-size=1920,1200")  # Define the window size of the browser

# Set the path to the Chromedriver
DRIVER_PATH = '/path/to/chromedriver'

# Initialize Chrome with the specified options
driver = webdriver.Chrome(options=options, executable_path=DRIVER_PATH)

# Navigate to the Nintendo website
driver.get("https://www.nintendo.com/")

# Output the page source to the console
print(driver.page_source)

# Close the browser session cleanly to free up system resources
driver.quit()
When you execute this script, Selenium will launch Chrome in headless mode, navigate to Nintendo's website, and print the page source. This output allows you to see the complete HTML content of the webpage, which is incredibly useful for scraping or debugging.
Observing the page source is just the start. Selenium provides access to several useful properties that can enhance your scraping tasks:
driver.title: This property fetches the title of the current webpage, which can be helpful for validation checks or when you need to ensure you are on the correct page before proceeding.driver.current_url: Useful for situations involving redirects, this property allows you to capture the final URL after all redirects have been resolved, ensuring you're working with the correct page.
These properties are especially useful in dynamic web environments where content might change based on user interaction or JavaScript execution. For developers looking to get more out of Selenium, a full list of WebDriver properties and methods can be explored in the official WebDriver documentation.
Locating elements
One of the foundational tasks in web scraping is pinpointing exactly where the data you want is located on a web page. Selenium excels in this area by offering robust tools for locating elements—a critical feature not only for scraping data but also for automating test cases that check for the presence or absence of specific elements.
Selenium provides several strategies for finding elements on a page, such as:
- Searching by tag name: Useful for broad searches within the HTML structure.
- Using HTML classes or IDs: Ideal for pinpointing specific elements quickly if you know the class or ID.
- Employing CSS selectors or XPath expressions: These methods offer precision in navigating complex page structures.
If you're new to XPath, or need a refresher on how it can be used to navigate the DOM, be sure to check out our detailed guide on how XPath expressions can help you filter the DOM tree. It's an excellent resource for understanding how to effectively utilize XPath within your scraping projects.
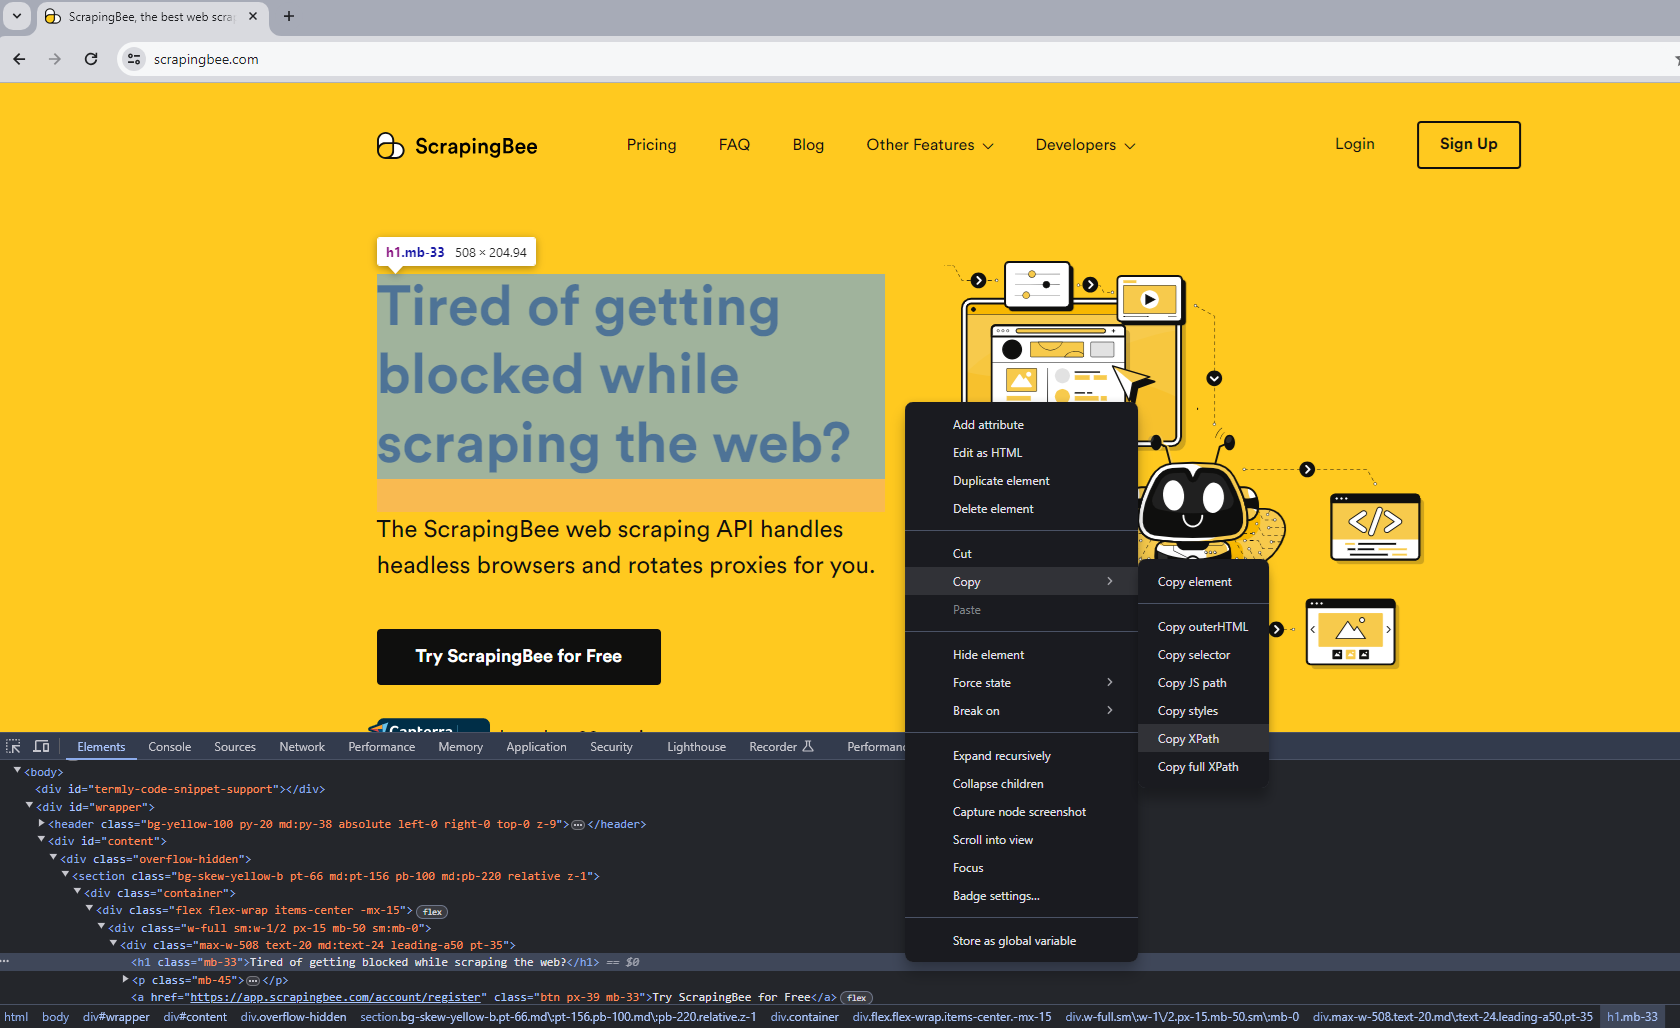
To locate an element in Chrome, a handy approach is to use the browser's developer tools. You can quickly access the tool you need by hovering over the desired element, then pressing Ctrl + Shift + C (or Cmd + Shift + C on macOS). This shortcut bypasses the usual right-click and select Inspect method, speeding up your workflow.
These element location strategies form the backbone of effective web scraping, allowing you to extract data accurately and efficiently. As you become more familiar with these tools, you'll find that Selenium offers a powerful way to interact with and manipulate web page content.
The find_element methods
In Selenium WebDriver, we have two primary methods to locate elements on a web page:
find_elementfind_elements
Both methods are crucial, but they serve slightly different purposes. The find_element method is used to find the first element that matches a specified selector and returns it. On the other hand, find_elements returns a list of all elements that match the selector, which is useful when you're dealing with multiple elements.
Supported locator strategies
Both find_element and find_elements can utilize various locator strategies through the By class, which provides flexibility in how you can pinpoint elements. Here's a quick overview of the different types of locators you can use:
| Type | Description | DOM Sample | Example |
|---|---|---|---|
By.ID |
Searches for elements based on their HTML ID. | <div id="myID"> |
find_element(By.ID, "myID") |
By.NAME |
Searches for elements based on their name attribute. | <input name="myNAME"> |
find_element(By.NAME, "myNAME") |
By.XPATH |
Searches for elements based on an XPath expression. | <span>My <a>Link</a></span> |
find_element(By.XPATH, "//span/a") |
By.LINK_TEXT |
Searches for anchor elements based on a match of their text content. | <a>My Link</a> |
find_element(By.LINK_TEXT, "My Link") |
By.PARTIAL_LINK_TEXT |
Searches for anchor elements based on a sub-string match of their text content. | <a>My Link</a> |
find_element(By.PARTIAL_LINK_TEXT, "Link") |
By.TAG_NAME |
Searches for elements based on their tag name. | <h1> |
find_element(By.TAG_NAME, "h1") |
By.CLASS_NAME |
Searches for elements based on their HTML classes. | <div class="myCLASS"> |
find_element(By.CLASSNAME, "myCLASS") |
By.CSS_SELECTOR |
Searches for elements based on a CSS selector. | <span>My <a>Link</a></span> |
find_element(By.CSS_SELECTOR, "span > a") |
A detailed guide on these methods can be found in the official Selenium docs.
Examples of find_element usage
Consider the following HTML document:
<html>
    <head>
        <!-- some meta tags -->
    </head>
    <body>
        <h1 class="someclass" id="greatID">Super title</h1>
    </body>
</html>
If we want to select the <h1> element, any of the following lines of code will effectively do the job:
h1 = driver.find_element(By.NAME, 'h1')
h1 = driver.find_element(By.CLASS_NAME, 'someclass')
h1 = driver.find_element(By.XPATH, '//h1')
h1 = driver.find_element(By.XPATH, '/html/body/h1')
h1 = driver.find_element(By.ID, 'greatID')
For selecting all anchor/link tags on the page, since more than one element might be involved, we use find_elements:
all_links = driver.find_elements(By.TAG_NAME, 'a')
XPath is particularly useful when elements are not easily accessible with an ID or class, or when these attributes are shared by multiple elements, despite IDs supposed to be unique. It allows for precise location of any element based on its absolute or relative position in the DOM.
Selenium WebElement
A WebElement in Selenium represents an HTML element on a web page. You can perform a variety of actions with these objects, which are critical for automating web interactions and scraping data.
Here are some common operations you can perform on a WebElement:
- Accessing the text: Use
element.textto retrieve the visible text of an element. - Clicking: Simulate mouse clicks with
element.click(). - Retrieving attributes: Fetch any attribute of an element using
element.get_attribute('attribute_name'), such aselement.get_attribute('class'). - Sending keys: Send text to input fields using
element.send_keys('your_text').
Another useful method is is_displayed(), which checks if an element is visible to the user—helpful to avoid interacting with deliberately hidden elements (honeypots).
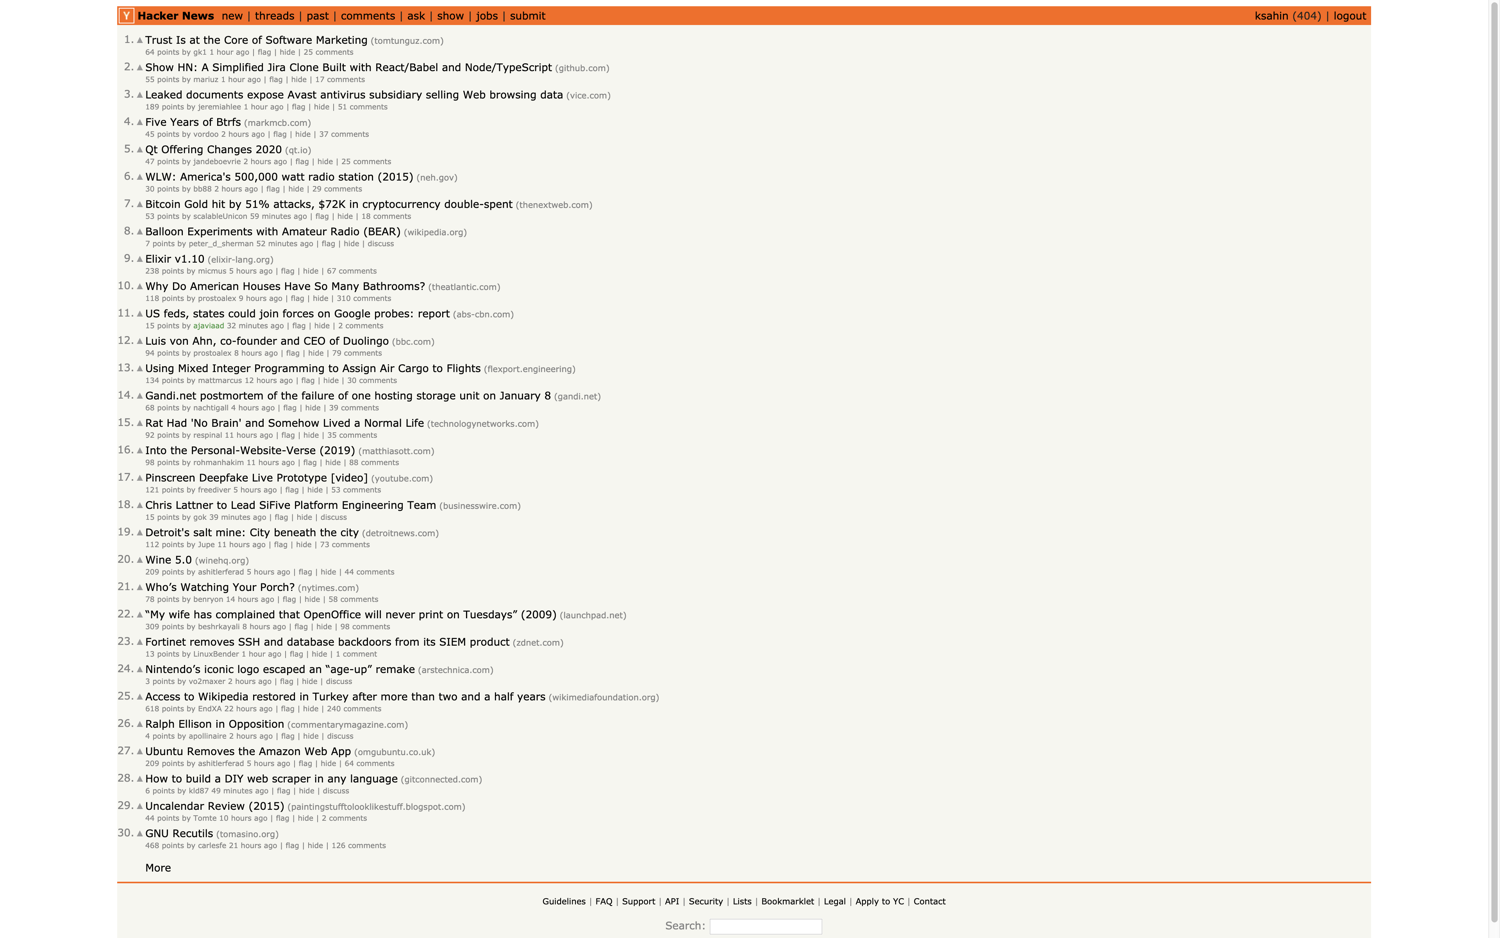
Example: Extracting text from Hacker News
To demonstrate how to extract the title of the first news item listed on Hacker News, here’s a concise example. The site structure includes a large table with each row representing a news article. The third td element of each row contains the news title and a link.
from selenium import webdriver

DRIVER_PATH = '/path/to/chromedriver'

# Set up Chrome WebDriver
driver = webdriver.Chrome(executable_path=DRIVER_PATH)

# Navigate to Hacker News
driver.get("https://news.ycombinator.com/")

# Locate the third 'td' of the first 'tr' which contains the article's title and link
title_element = driver.find_element_by_xpath('//tr[@class="athing"]/td[3]/a')

# Extract and print the text from the located WebElement
print(title_element.text)

# Click on the link to navigate to the article's page
title_element.click()

# Optionally, wait for the new page to load and perform actions there
# For demonstration, let's print the current URL after clicking
print(driver.current_url)

# Close the driver
driver.quit()
This script sets up a Selenium WebDriver for Chrome, navigates to Hacker News, locates the WebElement containing the title of the first news article, and prints its text. Then it clicks on the link to visit the corresponding page. This example efficiently demonstrates how to use Selenium to scrape text from specific elements on a webpage.
Selenium and BeautifulSoup
Combining Selenium with BeautifulSoup offers a powerful toolkit for web scraping. Selenium handles web browser automation, allowing you to interact with web pages just as a human would. On the other hand, BeautifulSoup is a Python library designed to make parsing HTML and XML documents easy and intuitive. By parsing HTML, BeautifulSoup allows you to extract specific pieces of information, navigate the document, and modify it. It's particularly useful for web scraping because it can quickly extract large amounts of data from complex web pages.
While Selenium can retrieve any page and interact with it dynamically, it can sometimes be overkill if you just need to parse static content or extract specific data after the initial page load. BeautifulSoup, being a parsing library, excels in quickly extracting data from the HTML content that Selenium retrieves. This combination is especially effective for scraping sites that utilize JavaScript to render their content, like Hacker News, where the actual data might only be accessible after executing JavaScript.
Here's how you can use both Selenium and BeautifulSoup to scrape all the news titles from the Hacker News website:
from selenium import webdriver
from bs4 import BeautifulSoup

DRIVER_PATH = '/path/to/chromedriver'

# Set up Chrome WebDriver
driver = webdriver.Chrome(executable_path=DRIVER_PATH)

# Navigate to Hacker News
driver.get("https://news.ycombinator.com/")

# Retrieve the page source
html = driver.page_source

# Close the driver
driver.quit()

# Parse the HTML with BeautifulSoup
soup = BeautifulSoup(html, 'html.parser')

# Find all 'tr' elements with class 'athing' which contain the news titles
titles = soup.find_all('tr', class_='athing')

# Loop through each title and print it
for title in titles:
    # Find the <a> tag within the 'titleline' span inside a 'td' with class 'title'
    title_link = title.find('td', class_='title').find('span', class_='titleline').find('a')
    title_text = title_link.get_text()  # Extract the text of the title
    print(title_text)
In this script we perform the following steps:
-
Set Up Selenium WebDriver: Initializes the Chrome WebDriver, which allows for browser interaction.
-
Navigate to Hacker News: Commands Chrome to load the Hacker News homepage.
-
Retrieve the Page Source: After the page loads, Selenium captures the entire HTML source of the page.
-
Close the WebDriver: Closing the WebDriver after its use is essential to free up system resources.
-
Parse HTML with BeautifulSoup: The retrieved HTML is then parsed using BeautifulSoup, creating a structured soup object for easy HTML navigation.
-
Find All Titles: The code searches for all
trelements with the class athing, each representing a news item. -
Extract and Print Titles: Inside each of these
trelements, the script locates thetdwith class"title", navigates to the nested span with class "titleline", and finds theatag within it. The text of thisatag contains the news article's title, which is then printed.
This script effectively uses both Selenium and BeautifulSoup to navigate and extract structured data from a dynamically loaded website like Hacker News, showcasing the power of combining these tools for robust web scraping tasks.
Identifying honeypots
Honeypots are traps set by website owners to detect and block bots. These typically include elements that are invisible to regular users but can be interacted with by automated scripts if not handled properly.
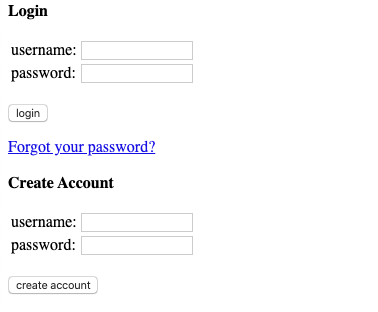
For example, a common type of honeypot is a hidden input field. These fields are not visible to users but are present in the HTML of the page:
<input type="hidden" id="custId" name="custId" value="">
In this example, the input is designed to remain empty. A bot programmed to automatically populate all fields on a page would fill this hidden field, revealing itself to the site's security mechanisms. However, a legitimate user would never see or interact with this field.
Using Selenium, you can avoid falling into these traps by checking whether an element is displayed to the user. As already mentioned above, the is_displayed() method returns True if an element is visible on the page, and False if it is not. For example, here's how you can use this method to safely interact with visible elements only:
from selenium import webdriver

DRIVER_PATH = '/path/to/chromedriver'

# Initialize the driver
driver = webdriver.Chrome(executable_path=DRIVER_PATH)

# Navigate to the page
driver.get("https://example.com")

# Find the input element
input_element = driver.find_element_by_id("custId")

# Check if the element is displayed
if input_element.is_displayed():
    # The element is visible, safe to interact
    input_element.send_keys("12345")
else:
    # The element is likely a honeypot, do not interact
    print("Honeypot detected, skipping interaction")

# Close the driver
driver.quit()
Key takeaways:
- Visibility Check: Always verify if an element is visible with
is_displayed()before interacting with it. This method is important for distinguishing between legitimate fields and honeypots. - Cautious Automation: When automating form submissions or data entry, apply checks to ensure that you are interacting only with elements intended for user interaction.
- Site Policies: Be aware of the ethical and legal considerations when scraping websites. Avoiding honeypots also means respecting the intentions of website administrators.
By incorporating these checks into your Selenium scripts, you can minimize the risk of your bot being flagged as malicious and ensure that your web scraping activities remain ethical and effective.
Logging into a website
Logging into a website programmatically with Selenium is a powerful way to automate tasks that require user authentication, like posting updates or accessing user-specific data. In this section we'll see how to log into Hacker News, illustrating a general approach that can be adapted for other websites.
Steps to authenticate:
- Navigate to the Login Page: Use the
driver.get()method to direct the browser to the login page. - Enter Username and Password:
- Locate the username input field and use
element.send_keys()to input the username. - Do the same for the password field.
- Locate the username input field and use
- Submit the Credentials:
- Identify the login button by its selector and use
element.click()to submit the login form.
- Identify the login button by its selector and use
Let's see the code:
from selenium import webdriver

# Set up the Chrome WebDriver
DRIVER_PATH = '/path/to/chromedriver'
driver = webdriver.Chrome(executable_path=DRIVER_PATH)

# Navigate to the login page
driver.get("https://news.ycombinator.com/login")

# Enter username
username_field = driver.find_element_by_xpath("//input[@type='text']")
username_field.send_keys("YOUR_USERNAME")  # Replace YOUR_USERNAME with your username

# Enter password
password_field = driver.find_element_by_xpath("//input[@type='password']")
password_field.send_keys("YOUR_PASSWORD")  # Replace YOUR_PASSWORD with your password

# Click the login button
login_button = driver.find_element_by_xpath("//input[@value='login']")
login_button.click()

# Ensure to add error handling and cleanup
# Continue with other tasks or close the driver
driver.quit()
Easy, right?
Post-login verification is crucial to confirm whether the authentication was successful. This involves checking for elements or messages that indicate the login state:
- Check for Error Messages: Search for UI elements that might display messages like "Wrong password" to indicate login failure.
- Confirm Presence of User-Specific Elements: For instance, check for a 'logout' button, which only appears when a user is logged in. This can be done as follows:
# Import the necessary exception class
from selenium.common.exceptions import NoSuchElementException

# Attempt to locate the logout button
try:
    logout_button = driver.find_element_by_id("logout")
    print('Successfully logged in')
except NoSuchElementException:
    print('Incorrect login/password')
It's important to implement exception handling to manage scenarios where expected elements are missing, which could indicate a failed login. Using NoSuchElementException, you can determine if the logout button—which should be present after a successful login—is not found:
Additional tips:
- Use Explicit Waits: Implement explicit waits to wait for certain conditions or elements to be loaded, which is useful when elements might take time to appear post-login.
- Secure Handling of Credentials: Always secure the handling of login credentials. Avoid hardcoding credentials directly in the script. Use environment variables or secure vaults to store sensitive information.
By following these steps and considerations, you can effectively automate login processes on websites with Selenium, ensuring your automation scripts are robust and reliable.
Taking screenshots
A major advantage of using a browser-based automation tool like Selenium is not only accessing data and the DOM tree but also fully rendering web pages as they would appear to users. This capability extends to taking screenshots, a feature natively supported by Selenium.
Taking a screenshot is straightforward with just a single function call. However, there are a few considerations to ensure the screenshots are captured correctly:
- Window Size: Ensure the browser window is sized appropriately for what needs to be captured. If the window is too small, some parts of the page might be cut off.
- Page Load Completion: Before capturing a screenshot, verify that all asynchronous HTTP requests have completed and the page has fully rendered. This ensures the screenshot accurately reflects the final state of the page.
For basic scenarios like capturing the Hacker News homepage, these issues are generally minimal. The page structure is simple and loads quickly.
Here's the code sample showing how to capture a screenshot:
from selenium import webdriver

# Set up the path to the ChromeDriver
DRIVER_PATH = '/path/to/chromedriver'

# Initialize the WebDriver
driver = webdriver.Chrome(executable_path=DRIVER_PATH)

# Navigate to the Hacker News website
driver.get("https://news.ycombinator.com/")

# Set the desired window size (optional)
driver.set_window_size(1920, 1080)  # This sets the browser window to 1920x1080

# Take a screenshot and save it to a file
driver.save_screenshot('hacker_news.png')

# Close the browser
driver.quit()
Main things to note:
- Initialize the WebDriver: This sets up Chrome with Selenium using the path to chromedriver.
- Navigate to the Website: The
driver.get()method is used to load the Hacker News homepage. - Set Window Size: Optionally, you can set the window size to ensure that the screenshot captures the entire page as needed. This step is particularly useful if the default window size doesn't capture the entire page content or if you require a specific screenshot resolution.
- Take a Screenshot: The
driver.save_screenshot()method captures the current view of the browser window and saves it as an image file. Here, it's saved as 'hacker_news.png'. - Close the Browser: Finally,
driver.quit()closes the browser window and ends the WebDriver session, freeing up system resources.
💡 Tip: For large-scale screenshot operations, consider using a service like ScrapingBee's dedicated screenshot API. This can simplify the process by handling the complexities of web rendering and scaling, allowing you to focus on other tasks—perhaps while enjoying a hot cup of cocoa ☕.
Waiting for an element to be present
Handling websites that heavily utilize JavaScript frameworks like Angular, React, or Vue.js can pose a challenge for web scraping. These frameworks do not simply serve static HTML; instead, they manipulate the DOM dynamically and make asynchronous requests in the background using AJAX. This complexity means that content might not be immediately available when the page loads.
To effectively scrape data from dynamic sites, it's essential to manage the timing of your scraping activities. Here are two common approaches:
-
Using
time.sleep(): This method involves pausing the script for a predetermined duration before attempting to interact with the page. While simple, this approach has significant drawbacks:- Timing Issues: You may end up waiting either too long, wasting precious time, or not long enough, missing the content.
- Environment Variability: The actual load time may vary, especially if your script runs in different environments (e.g., a slower residential ISP connection versus a faster data center connection).
Because of these issues, using
time.sleep()is generally less reliable and can lead to inconsistent scraping results. -
Employing
WebDriverWait: A more sophisticated approach involves usingWebDriverWaitto dynamically pause the script until a specific condition is met, such as the presence of an element. This method is more efficient as it adapts to the actual load time, waiting only as long as necessary, up to a specified timeout.
from selenium import webdriver
from selenium.webdriver.common.by import By
from selenium.webdriver.support.ui import WebDriverWait
from selenium.webdriver.support import expected_conditions as EC

# Set up the Chrome WebDriver
DRIVER_PATH = '/path/to/chromedriver'
driver = webdriver.Chrome(executable_path=DRIVER_PATH)

try:
    # Wait for up to 5 seconds until the element with ID "mySuperId" is present in the DOM
    element = WebDriverWait(driver, 5).until(
        EC.presence_of_element_located((By.ID, "mySuperId"))
    )
    # Perform actions on the element here (if needed)
    # For example: element.click()

finally:
    # Ensure the driver is quit properly to free up resources
    driver.quit()
This snippet demonstrates how to wait until a specific element, identified by its HTML ID, becomes present on the page. If the element doesn't appear within the timeout period (e.g., five seconds), the script will proceed, potentially throwing an error if the element's absence breaks subsequent steps.
Expected conditions in Selenium
WebDriverWait can be combined with various Expected Conditions to refine how your script waits for elements or events:
alert_is_present: Waits for an alert popup.element_to_be_clickable: Ensures an element is not only present but also clickable.text_to_be_present_in_element: Checks for specific text within an element.visibility_of: Waits for an element to not only be present in the DOM but also visible on the page.
A comprehensive list of these conditions is available in the Selenium documentation, providing a powerful toolkit for handling nearly any dynamic scenario encountered during web scraping.
| Method | Description | Example Usage |
|---|---|---|
alert_is_present() |
Checks if an alert is currently visible. | WebDriverWait(driver, 10).until(EC.alert_is_present()) |
element_to_be_clickable() |
Ensures that an element is present on the DOM and is clickable. | WebDriverWait(driver, 10).until(EC.element_to_be_clickable((By.ID, 'submit'))) |
text_to_be_present_in_element() |
Checks if the specified text is present in a certain element. | WebDriverWait(driver, 10).until(EC.text_to_be_present_in_element((By.ID, 'status'), 'Loaded')) |
visibility_of() |
Ensures that an element is not only present on the DOM but is also visible. | WebDriverWait(driver, 10).until(EC.visibility_of_element_located((By.ID, 'visibleElement'))) |
Having a full browser engine at our disposal not only allows us to handle JavaScript executed by the website but also enables us to run our own custom JavaScript. This can be particularly useful for interacting with elements in ways that Selenium’s built-in methods do not support directly.
Next, we'll explore how to leverage this capability to enhance our scraping techniques further.
Executing JavaScript
One of the standout features of using a browser automation tool like Selenium is the ability to leverage the browser’s own JavaScript engine. This means you can inject and execute custom JavaScript code right within the context of the webpage you’re interacting with.
Practical uses of execute_script
The execute_script method allows you to perform a variety of dynamic actions that are not directly supported by the Selenium API:
- Scrolling: Need to capture a screenshot of a page element that's not immediately visible? You can scroll to any part of the page using a simple JavaScript command:
javaScript = "window.scrollBy(0, 1000);"
driver.execute_script(javaScript)
- Styling Elements: Want to visually highlight all links on a page for debugging purposes? You can alter CSS properties of DOM elements directly:
javaScript = "document.querySelectorAll('a').forEach(e => e.style.border='red 2px solid')"
driver.execute_script(javaScript)
Capturing return values
A useful feature of execute_script is its ability to return values from the executed JavaScript to your Python script. For example, if you need to retrieve the title of the document dynamically, you can do so with a single line of code:
title = driver.execute_script('return document.title')
This capability makes execute_script synchronous, meaning it waits for the script to complete and returns the result immediately, which is perfect for situations where you need immediate feedback from your page interactions.
Asynchronous JavaScript execution
For scenarios where you don't need an immediate result, or if you are dealing with operations that take some time (like waiting for animations or API calls to complete), Selenium also offers execute_async_script. This variant of the script execution method allows you to handle asynchronous operations without blocking the rest of your script’s execution.
💡 Tip: Using
execute_scriptandexecute_async_scripteffectively can dramatically enhance the functionality of your web scraping or testing scripts by enabling direct interaction with the page's JavaScript environment, thus providing more control and flexibility in your automation tasks.
Handling infinite scroll
Infinite scroll is a popular technique used by many modern websites where more content loads dynamically as the user scrolls down the page. This can be tricky to deal with if you need to scrape or interact with content that only appears after some scrolling. Here's how you can automate scrolling through such a page with Selenium:
Automatically scrolling to the bottom of an infinite scroll page
To handle infinite scrolling, you can use a loop in combination with Selenium's execute_script method to keep scrolling down until no new content loads. Here's a practical example:
from selenium import webdriver
import time

DRIVER_PATH = '/path/to/chromedriver'
driver = webdriver.Chrome(executable_path=DRIVER_PATH)
driver.get("https://example.com/infinite-scroll-page")

# Function to scroll to the bottom
def scroll_to_bottom(driver):
    old_position = driver.execute_script("return window.pageYOffset;")
    while True:
        # Execute JavaScript to scroll down
        driver.execute_script("window.scrollTo(0, document.body.scrollHeight);")
        # Wait for the page to load
        time.sleep(3)  # This delay will depend on the connection speed and server response time
        new_position = driver.execute_script("return window.pageYOffset;")
        if new_position == old_position:
            break  # Exit the loop if the page hasn't scrolled, meaning end of page
        old_position = new_position

scroll_to_bottom(driver)

# Now you can perform any actions on the content loaded
# Example: extract data, take screenshots, etc.

driver.quit()
Key points:
- Initialize WebDriver: Set up Selenium to use Chrome and navigate to the target webpage.
- Define a Scroll Function: This function repeatedly scrolls to the bottom of the page until no more content loads.
- Detect Scroll Position: Before and after each scroll, the script checks the vertical position on the page.
- Break the Loop: If the scroll position before and after the scroll is the same, it indicates the bottom of the page or that no further content is loading.
- Perform Further Actions: Once the scrolling is complete, you can continue with other tasks like data extraction.
This method ensures that all dynamically loaded content is made visible and interactable on the page, which is crucial for comprehensive scraping or full interaction with the site.
By effectively combining Selenium's capabilities with JavaScript execution, you can overcome the challenges posed by modern web designs such as infinite scrolling.
Using a proxy with Selenium Wire
When scraping websites, developers often face challenges like anti-bot technologies that detect and block automated browsers. Proxies can help overcome these obstacles by routing your requests through different servers, thus masking your actual IP address and making your bot appear as regular user traffic. This is especially useful when you need to gather data from websites that are sensitive to access patterns and might restrict scraping activities.
Proxies are essential for:
- Bypassing geo-restrictions: Access content available only in certain regions.
- Avoiding rate limits and bans: Alternate requests between different IP addresses to prevent being blocked by websites that have strict limits on access frequency.
- Enhancing privacy: Keep your scraping activities discrete and protect your primary IP address from being blacklisted.
Unfortunately, Selenium's native proxy handling capabilities are quite basic and do not support proxy authentication out of the box.
Solution: Selenium Wire
To address these limitations, you can use Selenium Wire. This package extends the standard Selenium bindings to provide advanced capabilities, including access to all the underlying HTTP requests made by the browser. If your scraping tasks require proxy authentication, Selenium Wire is the tool you need.
Installation is straightforward:
pip install selenium-wire
Implementing proxy in Selenium Wire
This code snippet illustrates how to configure your headless browser to operate behind a proxy using Selenium Wire (don't forget to install this library before usage):
# Import the webdriver from selenium-wire which extends Selenium's capabilities
from seleniumwire import webdriver

# Define proxy credentials and server details
proxy_username = "USER_NAME"  # Replace with your proxy username
proxy_password = "PASSWORD"   # Replace with your proxy password
proxy_url = "http://proxy.scrapingbee.com"  # Proxy server URL
proxy_port = 8886  # Proxy server port number

# Configure proxy settings for Selenium Wire
options = {
    "proxy": {
        "http": f"http://{proxy_username}:{proxy_password}@{proxy_url}:{proxy_port}",
        "https": f"https://{proxy_username}:{proxy_password}@{proxy_url}:{proxy_port}",
        "verify_ssl": False,  # Turn off SSL verification (not recommended for production)
    },
}

# Specify the URL to fetch
URL = "https://httpbin.org/headers?json"

# Initialize the Chrome driver with the specified executable path and proxy options
driver = webdriver.Chrome(
    executable_path="YOUR-CHROME-EXECUTABLE-PATH",  # Replace with the path to your ChromeDriver
    seleniumwire_options=options
)

# Navigate to the specified URL
driver.get(URL)

# Add any additional interactions here

# Clean up by closing the browser
driver.quit()
Leveraging ScrapingBee's proxy options
After setting up your proxy with Selenium Wire, you might still encounter scalability issues when dealing with large-scale scraping operations. Our web scraping API at ScrapingBee includes a selection of different proxy options designed to bypass anti-bot technologies efficiently at scale. This allows you to handle more extensive and frequent scraping tasks without the hassle of managing individual proxies.
Using proxies effectively with tools like Selenium Wire and integrating services like ScrapingBee can significantly enhance your web scraping capabilities, ensuring you can access and retrieve data reliably and responsibly.
Blocking images and JavaScript
Utilizing a full-fledged browser for scraping provides immense advantages, such as rendering pages completely, executing JavaScript in the correct context, and enabling screenshot capture. However, there are scenarios where you might not need all these capabilities, especially when they could slow down your scraping process.
Optimizing performance
Often, downloading images or executing JavaScript is not necessary, particularly if you are not taking screenshots or need to interact with dynamic content. Selenium and WebDriver offer flexible configurations to help streamline your scraping tasks by disabling unnecessary features.
Configuring WebDriver options
Remember the Options class we discussed earlier? It allows you to fine-tune how the browser behaves by setting preferences. For instance, you can disable the loading of images and the execution of JavaScript, which can significantly speed up page loading times for scraping purposes:
from selenium import webdriver

chrome_options = webdriver.ChromeOptions()

### This blocks images and javascript requests
chrome_prefs = {
    "profile.default_content_setting_values": {
        "images": 2,
        "javascript": 2,
    }
}
chrome_options.experimental_options["prefs"] = chrome_prefs
###

driver = webdriver.Chrome(
    executable_path="YOUR-CHROME-EXECUTABLE-PATH",
    chrome_options=chrome_options,
)
driver.get(URL)
This configuration sets up Chrome with specific preferences to block images and JavaScript from being loaded. This not only makes your scraping operation faster but also reduces bandwidth usage, which can be crucial when scraping large volumes of data or when operating under network constraints.
Love Selenium? Expand your knowledge with our guide to rSelenium, which introduces web scraping in R, offering another powerful tool for your data gathering toolkit.
Scaling Selenium for web scraping
As your web scraping requirements expand, effectively scaling Selenium becomes crucial. Whether you’re dealing with more websites or increasingly complex data extraction tasks, a basic setup may no longer suffice. Here’s how you can scale your Selenium operations to meet growing demands efficiently.
Meet Selenium Grid
Selenium Grid is a robust tool that enhances the scalability of web scraping and automated testing by allowing you to run your Selenium scripts on multiple machines and browsers simultaneously. This capability enables you to execute tests or scrape data across diverse environments at once, significantly reducing the time needed for large-scale scraping projects.
Selenium Grid utilizes a hub-and-node architecture:
- Hub: Acts as the central point where your Selenium scripts are loaded. The hub manages the distribution of test commands to various nodes.
- Nodes: These machines execute the scripts as directed by the hub. You can configure each node with different browser versions and operating systems to suit specific testing or scraping needs.
This distributed approach allows for parallel execution of scripts, vastly improving the scalability and efficiency of your operations.
Steps to scale your web scraping operation with Selenium
To scale your web scraping effectively, consider these strategic steps:
- Assess Your Current Needs: Evaluate the amount of data you need to scrape, how often you need to scrape, and the number of target websites. This assessment will guide your scaling strategy.
- Infrastructure Planning: Choose between vertical scaling (enhancing your existing machine's capabilities) and horizontal scaling (adding more machines to distribute the workload). Horizontal scaling is generally preferred for its flexibility and scalability.
- Implement Selenium Grid: Configure a central hub and multiple nodes. You can set up nodes in various locations or with different configurations to handle a wide range of scraping scenarios.
- Optimize Test Scripts: Refine your Selenium scripts for peak performance and reliability. This may involve improving selectors, managing timeouts, and adhering to scripting best practices.
- Manage Sessions and Concurrency: Regulate the number of concurrent sessions to prevent any node from being overwhelmed, which could degrade performance and increase error rates.
- Incorporate Load Balancing: Use load balancing to evenly distribute requests across all nodes, ensuring no single node becomes a bottleneck.
- Continuous Monitoring and Maintenance: Regularly check the performance of your scraping grid, update browsers, drivers, and scripts, and adapt to changes in web technologies.
- Legal and Ethical Considerations: Ensure compliance with legal standards and website terms. Adhere to ethical scraping practices, such as respecting robots.txt rules and managing request rates.
Challenges of scaling with Selenium
While Selenium Grid lays the foundation for parallel execution, its setup and ongoing management can be intricate:
- Infrastructure Management: Involves setting up and maintaining a server environment capable of supporting multiple nodes.
- Resource Allocation: Requires the strategic distribution of tasks to avoid overloading resources.
- Cost: The operational expenses can escalate, particularly if managing extensive physical or virtual server infrastructures.
Simplifying scaling with ScrapingBee
For those seeking to scale their web scraping operations without the complexity of infrastructure management, our web scraping API provides a potent solution. We manage all backend infrastructure, allowing you to focus solely on data extraction. Our API automatically adjusts to handle any volume of requests, and our integrated proxy management ensures high reliability and access by circumventing anti-bot measures.
Explore our services at ScrapingBee and let us take on the technical challenges, leaving you to concentrate on analyzing and utilizing your data.
Conclusion
I hope you found this guide on using Selenium with Python helpful! You should now have a solid understanding of how to leverage the Selenium API to scrape and interact with JavaScript-heavy websites effectively.
If you're eager to explore more about web scraping with Python, don't miss our comprehensive guide to Python web scraping. It's packed with tips and techniques for beginners and seasoned developers alike.
For those interested in other powerful tools, check out our guide on Puppeteer with Python. Puppeteer, maintained by the Google Chrome team, offers advanced features that go beyond what Selenium can provide, making it a formidable choice for controlling Chrome headlessly.
While Selenium is invaluable for extracting data from dynamic web pages, scaling Selenium or Headless Chrome instances can be challenging. This is where ScrapingBee comes in! Our web scraping API helps you scale your scraping operations efficiently, handling complexities like proxy management and request throttling seamlessly.
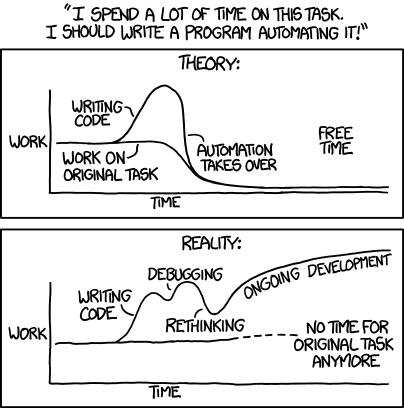
Selenium isn’t just for scraping; it’s also an excellent tool for automating virtually any web-based task. Whether you're automating form submissions or managing data behind login pages without an API, Selenium can simplify these processes. Just remember, as the following xkcd comic humorously points out, automation should make your life easier, not more complicated.
Thank you for reading, and happy scraping!

Ilya is an IT tutor and author, web developer, and ex-Microsoft/Cisco specialist. His primary programming languages are Ruby, JavaScript, Python, and Elixir. He enjoys coding, teaching people and learning new things. In his free time he writes educational posts, participates in OpenSource projects, tweets, goes in for sports and plays music.