A Puppeteer download file task sounds simple until it breaks in real life. Some sites trigger real browser downloads. Others hide files behind JavaScript, redirects, or dynamic buttons. In many cases, your script clicks "Download" and exits before anything is saved. As soon as you move beyond toy examples, downloading files with Puppeteer becomes surprisingly tricky.
This guide walks through four proven ways to handle a Puppeteer download file in Node.js. Each method solves a different problem, from simple button clicks to scalable, production-ready downloads. By the end, you'll know which pattern to use and why.
Quick answer (TL;DR)
If you just want a Puppeteer download file to work without digging into edge cases, do this:
- set a custom download folder
- allow downloads via Chrome DevTools Protocol
- click the download button
- wait until the file actually appears on disk
This single script solves the core problem end to end:
// You'll need to install with:
// npm install puppeteer
import puppeteer from "puppeteer";
import fs from "fs";
import path from "path";

// Page with a real browser download button
const url = "https://unsplash.com/photos/pile-of-printing-papers-tn57JI3CewI";

// Stable selector for the free download button
const downloadBtn = '[data-testid="non-sponsored-photo-download-button"]';

// Custom download folder (never rely on OS default Downloads)
const downloadPath = path.resolve("./downloads");

// Create download directory once (no-op if it already exists)
if (!fs.existsSync(downloadPath)) {
  fs.mkdirSync(downloadPath, { recursive: true });
}

/**
 * Wait until a real file appears in the download folder.
 * Chrome writes temporary `.crdownload` files first,
 * so we wait until a new file exists without that extension.
 * (may still be heuristic)
 */
async function waitForFile(dir, timeoutMs = 60000) {
  const start = Date.now();

  // Snapshot of files before the download starts
  const before = new Set(fs.readdirSync(dir));

  while (Date.now() - start < timeoutMs) {
    // Read directory contents repeatedly
    const files = fs.readdirSync(dir);

    // Find files that were added after we started watching
    const added = files.filter((f) => !before.has(f));

    // Ignore Chrome temporary download files
    const ready = added.find((f) => !f.endsWith(".crdownload"));

    if (ready) {
      // Return full path once a real file appears
      return path.join(dir, ready);
    }

    // Small delay to avoid hammering the filesystem
    await new Promise((r) => setTimeout(r, 300));
  }

  throw new Error("Download timed out");
}

// Launch Puppeteer
// Use default headless mode (headless: true)
// Avoid headless: 'shell' for browser-managed downloads
// unless you’ve tested it.
const browser = await puppeteer.launch({ headless: true });
const page = await browser.newPage();

// Force a desktop layout so the download button is visible
await page.setUserAgent(
  "Mozilla/5.0 (Windows NT 10.0; Win64; x64) AppleWebKit/537.36 (KHTML, like Gecko) Chrome/120.0.0.0 Safari/537.36"
);
await page.setViewport({ width: 1280, height: 800 });

try {
  // Load the page and wait until network activity settles
  await page.goto(url, { waitUntil: "networkidle2" });

  // Ensure the download button is present before clicking
  await page.waitForSelector(downloadBtn, { visible: true });

  // Open a Chrome DevTools Protocol session
  const client = await page.createCDPSession();

  // Explicitly allow downloads and set a custom folder
  await client.send("Browser.setDownloadBehavior", {
    behavior: "allow",
    downloadPath,
  });

  // Start watching the folder BEFORE clicking the button.
  // This is heuristic; for production use Method 3 (CDP events)
  // or the stable-size polling helper that will be introduced
  // later in the article.
  const downloadPromise = waitForFile(downloadPath);

  // Trigger the browser download
  await page.click(downloadBtn);

  // Block until a non-.crdownload file appears (heuristic)
  const filePath = await downloadPromise;

  console.log("Downloaded:", filePath);
} catch (err) {
  // Any navigation, selector, or download error ends up here
  console.error("Failed:", err);
} finally {
  // Always close the browser to free resources
  await browser.close();
}
If this works for your case, you're done. If it doesn't, the rest of the article shows safer and more scalable patterns for tougher sites.
Setting up Puppeteer for file downloads
Before we start saving files, let's get a clean Puppeteer setup. Nothing fancy, just a solid Node.js project that won't explode when you run the examples later. We'll use modern Node.js with ESM modules.
If you're new to Puppeteer in general, this guide assumes you already know what it is and why you'd use it. If not, this is a good warm-up read: Puppeteer web scraping tutorial in Nodejs
Installing Puppeteer and required modules
Start by creating a fresh project folder and initializing Node.js (we'll use Node 20+):
mkdir puppeteer-downloads
cd puppeteer-downloads
npm init -y
Next, open up package.json and add:
"type": "module"
If the file contains the "type": "commonjs", remove it.
Now install Puppeteer:
npm install puppeteer
That's enough for most cases. Puppeteer already bundles Chrome for Testing and downloads it automatically during install.
You'll also use built-in Node modules:
fsfor working with filespathfor resolving directories
Optionally, you can install axios. It's useful later if you want to download files directly instead of through the browser:
npm install axios
About Chromium downloads
By default, Puppeteer downloads a compatible Chrome for Testing build when you install it. This is usually what you want. If you're in a restricted environment or want to use your system Chrome instead, you can skip the download:
macOS / Linux
PUPPETEER_SKIP_DOWNLOAD=true npm install puppeteer
Windows (PowerShell)
$env:PUPPETEER_SKIP_DOWNLOAD="true"
npm install puppeteer
Quick background information can be found here: What is Puppeteer?.
Quick sanity check ("Hello world")
Before touching downloads, make sure Puppeteer actually runs.
Create a file called index.js in the project root:
import puppeteer from "puppeteer";

// Launch a headless Chrome instance controlled by Puppeteer.
// Headless mode is sufficient for simple navigation and checks.
const browser = await puppeteer.launch({ headless: true });

// Create a new browser tab (page context).
const page = await browser.newPage();

// Navigate to a simple test page.
// This verifies that Puppeteer and Chromium are installed correctly.
await page.goto("https://example.com");

// Read and print the page title as a basic sanity check.
console.log("Page title:", await page.title());

// Always close the browser to free system resources.
await browser.close();
Run it:
node index.js
If you see the page title printed, you're good. So, let's move on.
Note on headless mode: Puppeteer has multiple headless modes (
true,false, andheadless: "shell"). Download behavior can differ inheadless: "shell", especially with browser-managed downloads. All examples in this article assume the default headless mode. If downloads behave weirdly, use regular headless (headless: true, default).
Configuring downloadPath with setDownloadBehavior()
This is the core pattern that we'll often use throughout this article. By default, Chromium may block downloads in automation. You need to explicitly allow them and tell Puppeteer where files should go. You do that with Browser.setDownloadBehavior().
First, create a local download folder using an absolute path. Chrome requires absolute paths; relative ones won't work.
import puppeteer from "puppeteer";
import path from "path";
import fs from "fs";

const downloadPath = path.resolve("./downloads");

// Create download path if it doesn't exist yet
if (!fs.existsSync(downloadPath)) {
  fs.mkdirSync(downloadPath, { recursive: true });
}
Then allow downloads for the current page:
// ... previous code ...

// Launch a headless Chrome instance controlled by Puppeteer.
// Headless mode is sufficient here because we are not interacting with visible UI.
const browser = await puppeteer.launch({ headless: true });

// Create a new browser tab (page context).
const page = await browser.newPage();

try {
  // Open a Chrome DevTools Protocol (CDP) session for this page.
  // This gives low-level control over browser behavior, including downloads.
  const client = await page.createCDPSession();

  // Explicitly allow browser-managed downloads and
  // tell Chrome to save files into a custom, controlled directory.
  // Chrome requires an absolute path for downloadPath.
  await client.send("Browser.setDownloadBehavior", {
    behavior: "allow",
    downloadPath,
  });

  // Navigate to the target page.
  // domcontentloaded is usually enough here because we only need
  // the document to be parsed, not all subresources.
  await page.goto("https://example.com", { waitUntil: "domcontentloaded" });

  // Simple sanity check to confirm navigation worked.
  console.log("Page title:", await page.title());
} catch (e) {
  // Catch any unexpected error from navigation or CDP calls.
  console.error(e);
} finally {
  // Always close the browser to free system resources,
  // even if an error occurred above.
  await browser.close();
}
That's it. Behind the scenes, this talks directly to the Chrome DevTools Protocol. It's not a Puppeteer-only feature, which is why the path must be absolute and valid on your system.
You'll reuse this exact pattern in some examples later.
Setting User-Agent and viewport for compatibility
Some sites hide download buttons based on device type or screen size. Mobile layouts are especially guilty here. To avoid weird missing buttons, force a desktop browser profile:
// ... create browser and page ...

await page.setUserAgent(
  "Mozilla/5.0 (Windows NT 10.0; Win64; x64) AppleWebKit/537.36 (KHTML, like Gecko) Chrome/120.0.0.0 Safari/537.36"
);

await page.setViewport({
  width: 1280,
  height: 800
});

// ... use page.goto() ...
This makes Puppeteer behave like a normal desktop browser. Download links render correctly and buttons stop disappearing. You can keep these settings in all later examples without thinking about them again.
Method 1: Simulating clicks to trigger downloads
This is the most direct Puppeteer download file approach. You open the page, click the download button, and let the browser save the file. Then you watch your download folder until the file shows up.
This method is perfect when:
- the site has a normal download button
- the download is handled by the browser (not some API you need to call)
- you just need the file on disk and you don't care about intercepting responses
Move to other methods if:
- the "download" is actually fetched by XHR/fetch and never triggers a real browser download
- the site opens a new tab, shows a captcha, or needs a signed URL
- you need the final URL, headers, or want to save the response yourself
We'll use a simple page with a single download button: an Unsplash photo page, where the download button is a regular <a> element.
Using page.click() on download buttons
First, you need a reliable selector. On the Unsplash page, the download anchor has a stable attribute: data-testid="non-sponsored-photo-download-button".
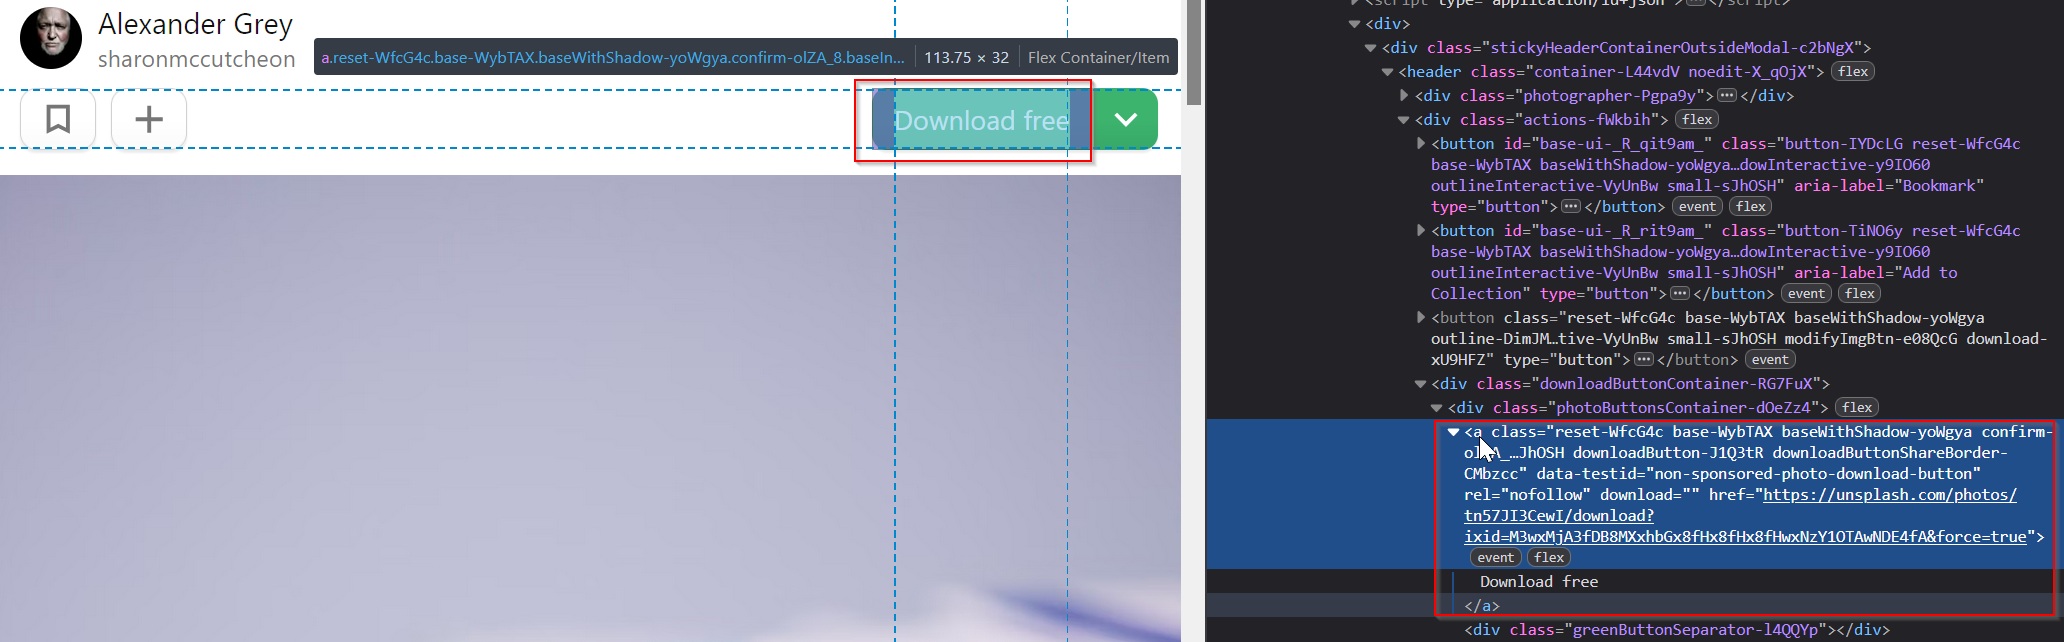
That's gold. Don't target those long CSS class names as they change all the time. You can select it with CSS:
const downloadBtn = '[data-testid="non-sponsored-photo-download-button"]';
Or with XPath (sometimes useful if you can't rely on attributes):
const downloadBtnXPath = '//a[@data-testid="non-sponsored-photo-download-button"]';
Now here's an example that:
- opens the page
- sets a controlled download folder
- waits for the page to settle (networkidle2)
- clicks the button
import puppeteer from "puppeteer";
import fs from "fs";
import path from "path";

const url = "https://unsplash.com/photos/pile-of-printing-papers-tn57JI3CewI";
const downloadPath = path.resolve("./downloads");

if (!fs.existsSync(downloadPath)) {
  fs.mkdirSync(downloadPath, { recursive: true });
}

const browser = await puppeteer.launch({ headless: true });
const page = await browser.newPage();

// Optional but helps with sites that change UI based on device/screen
await page.setUserAgent(
  "Mozilla/5.0 (Windows NT 10.0; Win64; x64) AppleWebKit/537.36 (KHTML, like Gecko) Chrome/120.0.0.0 Safari/537.36"
);
await page.setViewport({ width: 1280, height: 800 });

// Tell Chrome where downloads must go (absolute path required)
const client = await page.createCDPSession();
await client.send("Browser.setDownloadBehavior", {
  behavior: "allow",
  downloadPath,
});

// Load the page and wait until it's not busy
await page.goto(url, { waitUntil: "networkidle2" });

// Download selector
const downloadBtn = '[data-testid="non-sponsored-photo-download-button"]';

// Let's wait for the selector to appear
await page.waitForSelector(downloadBtn, { visible: true });

// Scroll to it (to be on a safe side)
await page.evaluate((selector) => {
  const el = document.querySelector(selector);
  if (el) el.scrollIntoView({ block: "center" });
}, downloadBtn);

// Click to trigger the browser download
await page.click(downloadBtn);

// We close the browser immediately for now;
// in the next section we will discuss how to wait
// for the download operation to complete
// (otherwise, the browser might close before the file is downloaded)
await browser.close();
const client = await page.createCDPSession();— opens a Chrome DevTools Protocol session for low-level browser control.await client.send("Browser.setDownloadBehavior", { behavior: "allow", downloadPath });— explicitly allows browser-managed downloads and redirects them to a custom folder.await page.goto(url, { waitUntil: "networkidle2" });— loads the page and waits until network activity settles to reduce race conditions.await page.waitForSelector(downloadBtn, { visible: true });— ensures the download button exists and is visible before interaction.await page.click(downloadBtn);— triggers a real browser download handled by Chrome’s download manager.await browser.close();— closes the browser. If done too early, an active download may be interrupted.
If you want more Puppeteer scraping Q&A for typical headaches, check out: Common questions about web scraping with Puppeteer.
Waiting for download completion (reliable file checks)
Clicking the button is the easy part. Knowing when the download is actually finished is where scripts might lie to you. A common issue is relying on fs.watch() events or assuming that "a filename appeared" means the file is ready. On Windows especially, this can produce false positives: temporary files, ghost events, or files that disappear immediately.
A more reliable pattern looks like this:
- take a snapshot of the download folder before clicking
- trigger the download
- poll the folder until a real file appears
- verify that the file exists and has a non-zero size
- fail with a timeout if nothing shows up
This avoids race conditions and works consistently across platforms.
Here's a helper that does exactly that:
// Waits until a real downloaded file appears in the download directory.
async function waitForRealFile(
  downloadDir,
  { timeoutMs = 90000, stableChecks = 3, intervalMs = 250 } = {}
) {
  // Track total elapsed time to enforce a hard timeout
  const start = Date.now();

  // Snapshot directory contents BEFORE download starts,
  // so we only react to newly created files
  const before = new Set(fs.readdirSync(downloadDir));

  // Track file stability:
  // filename -> { last known size, number of consecutive stable checks }
  const state = new Map();

  // Poll the filesystem until timeout
  while (Date.now() - start < timeoutMs) {
    // Read current directory contents
    const now = fs.readdirSync(downloadDir);

    // Detect files that appeared after we started watching
    const added = now.filter((f) => !before.has(f));

    // Ignore Chrome temporary download files (.crdownload)
    const candidates = added.filter((f) => !f.endsWith(".crdownload"));

    for (const name of candidates) {
      const full = path.join(downloadDir, name);

      // File may disappear briefly on some platforms
      if (!fs.existsSync(full)) continue;

      const stat = fs.statSync(full);

      // Ignore non-files and zero-byte placeholders
      if (!stat.isFile() || stat.size === 0) continue;

      const prev = state.get(name);

      // First time we see this file: initialize tracking
      if (!prev) {
        state.set(name, { size: stat.size, stable: 0 });
        continue;
      }

      // If file size hasn't changed, count as a stable check
      if (stat.size === prev.size) {
        prev.stable += 1;
      } else {
        // Size changed → download still in progress
        prev.size = stat.size;
        prev.stable = 0;
      }

      // File size stayed the same long enough → assume download finished
      if (prev.stable >= stableChecks) {
        return full;
      }
    }

    // Small delay to avoid hammering the filesystem
    await new Promise((r) => setTimeout(r, intervalMs));
  }

  // Timed out without seeing a stable file
  throw new Error("Timeout: file did not stabilize");
}
Use it like this:
// ... create browser and page ...
const downloadPromise = waitForRealFile(downloadPath);

await page.click(downloadBtn);

const filePath = await downloadPromise;
console.log("Downloaded:", filePath);

console.log("Exists:", fs.existsSync(filePath));
console.log("Folder now:", fs.readdirSync(downloadPath));

// finally, close browser
await browser.close();
This helper watches the download folder and waits until a new file appears and stops changing in size. You start it before clicking the download button, then await it afterward. This guarantees the script doesn’t continue (or close the browser) until a real, fully written file exists on disk, instead of trusting the click or filesystem events alone.
Note: File system checks are inherently heuristic. For additional reliability (parallel downloads, overwrites, progress tracking), use Chrome DevTools Protocol events (
Browser.downloadProgress) as shown in Method 3.
Final code version for method 1
import puppeteer from "puppeteer";
import fs from "fs";
import path from "path";

/**
 * Waits until a newly downloaded file appears
 * and stops changing in size (heuristic but robust).
 */
async function waitForRealFile(
  downloadDir,
  { timeoutMs = 90000, stableChecks = 3, intervalMs = 250 } = {}
) {
  const start = Date.now();

  // Snapshot directory BEFORE download starts
  const before = new Set(fs.readdirSync(downloadDir));

  // filename -> { lastSize, stableCount }
  const state = new Map();

  while (Date.now() - start < timeoutMs) {
    // Detect newly added files
    const added = fs
      .readdirSync(downloadDir)
      .filter((f) => !before.has(f))
      .filter((f) => !f.endsWith(".crdownload")); // ignore temp files

    for (const name of added) {
      const full = path.join(downloadDir, name);
      if (!fs.existsSync(full)) continue;

      const stat = fs.statSync(full);
      if (!stat.isFile() || stat.size === 0) continue;

      const prev = state.get(name);

      // First time seeing this file
      if (!prev) {
        state.set(name, { size: stat.size, stable: 0 });
        continue;
      }

      // Track size stability
      if (stat.size === prev.size) prev.stable += 1;
      else {
        prev.size = stat.size;
        prev.stable = 0;
      }

      // Size stopped changing → assume download finished
      if (prev.stable >= stableChecks) {
        return full;
      }
    }

    await new Promise((r) => setTimeout(r, intervalMs));
  }

  throw new Error("Timeout: file did not stabilize");
}

// Example page with a real browser download button
const url = "https://unsplash.com/photos/pile-of-printing-papers-tn57JI3CewI";

// Controlled download directory (absolute path required)
const downloadPath = path.resolve("./downloads");

// Ensure download directory exists
if (!fs.existsSync(downloadPath)) {
  fs.mkdirSync(downloadPath, { recursive: true });
}

// Launch headless Chrome
const browser = await puppeteer.launch({ headless: true });
const page = await browser.newPage();

// Force desktop layout so download UI is visible
await page.setUserAgent(
  "Mozilla/5.0 (Windows NT 10.0; Win64; x64) AppleWebKit/537.36 (KHTML, like Gecko) Chrome/120.0.0.0 Safari/537.36"
);
await page.setViewport({ width: 1280, height: 800 });

// Enable browser-managed downloads via CDP
const client = await page.createCDPSession();
await client.send("Browser.setDownloadBehavior", {
  behavior: "allow",
  downloadPath,
});

// Load page and wait until network settles
await page.goto(url, { waitUntil: "networkidle2" });

// Stable selector for the free download button
const downloadBtn = '[data-testid="non-sponsored-photo-download-button"]';

// Ensure button exists before clicking
await page.waitForSelector(downloadBtn, { visible: true });

// Scroll into view to avoid off-screen click issues
await page.evaluate((selector) => {
  document.querySelector(selector)?.scrollIntoView({ block: "center" });
}, downloadBtn);

// Start watching the folder BEFORE triggering download
const downloadPromise = waitForRealFile(downloadPath);

// Trigger browser download
await page.click(downloadBtn);

// Wait until the file is fully written to disk
const filePath = await downloadPromise;

console.log("Downloaded:", filePath);
console.log("Exists:", fs.existsSync(filePath));
console.log("Folder now:", fs.readdirSync(downloadPath));

// Clean shutdown
await browser.close();
What this version guarantees:
- The browser saves files into a known, controlled folder
- The script waits for the actual downloaded file, not just a click
- Temporary Chrome files are ignored
- The browser is not closed until the download is truly complete
After running it, you'll see something like:
Downloaded: c:\js\puppeteer-downloads\downloads\alexander-grey-tn57JI3CewI-unsplash.jpg
Exists: true
Folder now: [ 'alexander-grey-tn57JI3CewI-unsplash.jpg' ]
Handling default download folder issues
You can let downloads go to your OS default Downloads folder. But it's usually a bad idea as you might hit the following problems:
- Your Downloads folder already has files, so "what just downloaded?" becomes guesswork
- Permissions can differ between machines
- Paths differ across environments and are annoying to normalize
- CI/CD runners and containers may not even have a real "Downloads" folder
Concrete examples:
- CI/CD pipelines: the runner might not have a writable user Downloads directory at all
- Docker containers: the filesystem may be read-only or mapped, and you usually want something like
/app/downloads - shared dev machines: personal files and test downloads get mixed, debugging turns into pain
That's why it's better to always set a controlled downloadPath. You get:
- a clean folder
- predictable behavior
- simple "wait for new file" logic
Method 2: Downloading files via Fetch API
Clicking a download button is not always the best option for a Puppeteer download file. In this method, the browser does not handle downloads at all. Instead, we'll use fetch() inside the page, read the file data manually, send it back to Node.js, and save it ourselves. From Chrome's point of view, no "download" ever happens.
This approach works best when:
- the download button ultimately resolves to a direct file URL that the page itself is allowed to fetch
- browser downloads are flaky or hard to detect
- you want predictable file names and folders
- you need the same logic for images, PDFs, ZIPs, or other binary files
- the files are small to medium in size
We'll walk through a simple example: fetching an image from an Unsplash photo page using its download link and saving it manually in Node.js.
Using page.evaluate() with fetch()
The idea is simple: you run fetch() inside page.evaluate(), just like you would in a normal browser. The difference is that instead of letting the browser save the file, you read the response data yourself.
Inside the page context:
- call
fetch()with the file URL - read the response as an
ArrayBuffer - convert it to base64 so it can be returned to Node.js
Example:
import puppeteer from "puppeteer";
import fs from "fs/promises";
import path from "path";

const url = "https://unsplash.com/photos/pile-of-printing-papers-tn57JI3CewI";

// Stable selector for the free download button (avoids brittle class names)
const downloadBtn = '[data-testid="non-sponsored-photo-download-button"]';

const browser = await puppeteer.launch({ headless: true });
const page = await browser.newPage();

await page.setUserAgent(
  "Mozilla/5.0 (Windows NT 10.0; Win64; x64) AppleWebKit/537.36 (KHTML, like Gecko) Chrome/120.0.0.0 Safari/537.36"
);
await page.setViewport({ width: 1280, height: 800 });

try {
  await page.goto(url, { waitUntil: "networkidle2" });

  // Ensure the download link exists before trying to fetch it
  await page.waitForSelector(downloadBtn, { visible: true });

  // Run fetch() inside the browser context.
  // Instead of triggering a browser download, we manually read the file data.
  const fileBase64 = await page.evaluate(async (selector) => {
    // Locate the download link in the DOM
    const link = document.querySelector(selector);
    if (!link || !(link instanceof HTMLAnchorElement) || !link.href) {
      throw new Error("Download link not found");
    }

    // Fetch the file using the browser's fetch API
    const response = await fetch(link.href);
    if (!response.ok) throw new Error(`Request failed: ${response.status}`);

    // Read the response as a Blob (binary data)
    const blob = await response.blob();

    // Convert the Blob into a base64-encoded string so it can be
    // safely returned across the Puppeteer boundary
    const dataUrl = await new Promise((resolve, reject) => {
      const reader = new FileReader();
      reader.onerror = () => reject(new Error("Failed to read blob"));
      reader.onload = () => resolve(reader.result);
      reader.readAsDataURL(blob);
    });

    // Extract only the base64 payload from the data URL
    const base64 = String(dataUrl).split(",")[1];
    if (!base64) throw new Error("Failed to extract base64 payload");

    return base64;
  }, downloadBtn);

  // At this point, the file data is in Node.js as a base64 string
  console.log("Got base64 bytes:", fileBase64.length);
} catch (err) {
  // Any navigation, fetch, or evaluation error ends up here
  console.error("Failed:", err);
} finally {
  // Always close the browser to free resources
  await browser.close();
}
This is only the first part of Method 2. In the next sections, we'll extend this code to decode the data and save it to disk.
Key points in this snippet:
await page.goto(url, { waitUntil: "networkidle2" });— loads the page and waits until most network requests finish, reducing the chance of fetching the link too early.await page.waitForSelector(downloadBtn, { visible: true });— ensures the download link exists and is visible before attempting to use it.const fileBase64 = await page.evaluate(async (selector) => { ... }, downloadBtn);— runs code inside the browser context to fetch the file data and return it to Node.js.const response = await fetch(link.href);— downloads the file directly using the browser’sfetch()API instead of triggering a browser-managed download.const blob = await response.blob();— reads the response as binary data inside the browser.reader.readAsDataURL(blob);— converts binary data into a base64-encoded data URL so Puppeteer can transfer it back to Node.js.const base64 = String(dataUrl).split(",")[1];— extracts only the base64 payload from the data URL, removing metadata.
At this point, we have the file data in Node.js as a base64 string.
A quick warning about limits:
fetch()insidepage.evaluate()follows browser rules- CORS and same-origin policies still apply
- this works best for links that the page itself is allowed to download
- If the page can fetch the URL without CORS errors, this method usually works
Returning base64 data to Node.js
Puppeteer can only return serializable values from page.evaluate().
That means:
- no
ArrayBuffer - no
Uint8Array - no raw binary
Base64 works because it's just a string. Once the base64 string reaches Node.js, you decode it back into a Buffer:
// ... imports and preparations ...

try {
  const fileBase64 = await page.evaluate(async (selector) => {
    // ...
  });

  // Make a buffer:
  const buffer = Buffer.from(fileBase64, "base64");
} catch (err) {
  console.error("Failed:", err);
} finally {
  await browser.close();
}
This step is required. There's no shortcut around it. If you try to return raw binary data directly, Puppeteer will throw or silently fail.
Saving buffer to file system
Now you're back in full control.
You decide:
- the file name
- the extension
- the target folder
Saving the file is just standard Node.js:
// inside try block:

// Decode base64 -> Buffer in Node.js
const buffer = Buffer.from(fileBase64, "base64");

// Where we save the file (fully controlled by Node.js)
const downloadDir = path.resolve("./downloads");
const outputPath = path.join(downloadDir, "unsplash-image.jpg");

// Create output folder (no-op if it already exists)
await fs.mkdir(downloadDir, { recursive: true });

// Save to disk (this is NOT a browser download)
await fs.writeFile(outputPath, buffer);

console.log("Saved file to:", outputPath);

// ... catch and finally ...
This approach works for any binary file, not just images: ZIP files, PDFs, or other downloads follow the exact same pattern.
The big win here is control. You're no longer tied to browser download behavior or OS-specific folders. If you're comparing Puppeteer download file strategies, this method is often the most predictable once you have a direct file URL.
For more related questions and edge cases, see: Common questions about web scraping with Puppeteer.
Final code version for method 2
import puppeteer from "puppeteer";
import fs from "fs/promises";
import path from "path";

const url = "https://unsplash.com/photos/pile-of-printing-papers-tn57JI3CewI";

// Use a stable attribute-based selector instead of fragile class names
const downloadBtn = '[data-testid="non-sponsored-photo-download-button"]';

const browser = await puppeteer.launch({ headless: true });
const page = await browser.newPage();

await page.setUserAgent(
  "Mozilla/5.0 (Windows NT 10.0; Win64; x64) AppleWebKit/537.36 (KHTML, like Gecko) Chrome/120.0.0.0 Safari/537.36"
);
await page.setViewport({ width: 1280, height: 800 });

try {
  await page.goto(url, { waitUntil: "networkidle2" });

  // Ensure the download link is present before interacting with it
  await page.waitForSelector(downloadBtn, { visible: true });

  // Fetch the file inside the browser context and return it as base64.
  // Puppeteer cannot transfer raw binary data, only serializable values.
  const fileBase64 = await page.evaluate(async (selector) => {
    const link = document.querySelector(selector);
    if (!link || !(link instanceof HTMLAnchorElement) || !link.href) {
      throw new Error("Download link not found");
    }

    // Download the file using the browser's fetch API
    const response = await fetch(link.href);
    if (!response.ok) throw new Error(`Request failed: ${response.status}`);

    // Read binary data as a Blob
    const blob = await response.blob();

    // Convert Blob → base64 so Puppeteer can return it to Node.js
    const dataUrl = await new Promise((resolve, reject) => {
      const reader = new FileReader();
      reader.onerror = () => reject(new Error("Failed to read blob"));
      reader.onload = () => resolve(reader.result);
      reader.readAsDataURL(blob);
    });

    // Strip metadata and keep only the base64 payload
    const base64 = String(dataUrl).split(",")[1];
    if (!base64) throw new Error("Failed to extract base64 payload");

    return base64;
  }, downloadBtn);

  // Decode base64 back into binary data in Node.js
  const buffer = Buffer.from(fileBase64, "base64");

  // Choose a fully controlled output path (not a browser download)
  const downloadDir = path.resolve("./downloads");
  const outputPath = path.join(downloadDir, "unsplash-image.jpg");

  // Ensure output directory exists
  await fs.mkdir(downloadDir, { recursive: true });

  // Write the file to disk using Node.js
  await fs.writeFile(outputPath, buffer);

  console.log("Saved file to:", outputPath);
} catch (err) {
  // Any navigation, fetch, or decoding error ends up here
  console.error("Failed:", err);
} finally {
  // Always close the browser to free resources
  await browser.close();
}
After running it, you'll see:
Got base64 bytes: 3672808
Saved file to: d:\js\puppeteer-downloads\downloads\unsplash-image.jpg
Performance note: returning file data as base64 from
page.evaluate()is CPU- and memory-intensive. This approach works well for small to medium files, but it does not scale for very large downloads. For big files or batch downloads, prefer Method 4 (Puppeteer with Axios/HTTPS) and stream data directly in Node.js.
Handling medium-sized/larger files with base64 chunks
The base64 approach is simple, but it has a weakness. If the file is medium-sized, returning one huge base64 string can:
- eat a lot of RAM
- hit Puppeteer's "JSON-ish" payload limits
- crash the tab when you build a massive
binarystring
A safer pattern is to return base64 in chunks. You still fetch in the browser context, but instead of one base64 string, you return an array of base64 chunks. Then Node.js decodes each chunk and writes it to disk as a stream. This keeps memory usage much lower on the Node side. Plus, it avoids one giant payload crossing the Puppeteer boundary.
Return base64 chunks from page.evaluate()
This version converts the ArrayBuffer into multiple base64 strings.
import puppeteer from "puppeteer";
import fs from "fs";
import path from "path";

const url = "https://unsplash.com/photos/pile-of-printing-papers-tn57JI3CewI";

const downloadBtn = '[data-testid="non-sponsored-photo-download-button"]';

const browser = await puppeteer.launch({ headless: true });
const page = await browser.newPage();

await page.setUserAgent(
  "Mozilla/5.0 (Windows NT 10.0; Win64; x64) AppleWebKit/537.36 (KHTML, like Gecko) Chrome/120.0.0.0 Safari/537.36"
);
await page.setViewport({ width: 1280, height: 800 });

try {
  await page.goto(url, { waitUntil: "networkidle2" });

  // Ensure the download button exists before attempting to use it
  await page.waitForSelector(downloadBtn, { visible: true });

  // Fetch the file inside the browser context and return it in base64 chunks.
  // Chunking avoids sending one huge payload across the Puppeteer boundary.
  const base64Chunks = await page.evaluate(async (selector) => {
    // Locate the download link in the DOM
    const link = document.querySelector(selector);
    if (!link || !(link instanceof HTMLAnchorElement) || !link.href) {
      throw new Error("Download link not found");
    }

    // Download the file using the browser's fetch API
    const response = await fetch(link.href);
    if (!response.ok) throw new Error(`Request failed: ${response.status}`);

    // Read the entire response as binary data
    const arrayBuffer = await response.arrayBuffer();
    const bytes = new Uint8Array(arrayBuffer);

    // Split binary data into manageable chunks
    const chunkSize = 256 * 1024;
    const chunks = [];

    // Convert each binary chunk to base64 so it can be returned to Node.js
    const toBase64 = (u8) =>
      new Promise((resolve, reject) => {
        const blob = new Blob([u8]);
        const reader = new FileReader();
        reader.onerror = () => reject(new Error("Failed to read chunk"));
        reader.onload = () => {
          const dataUrl = String(reader.result);
          resolve(dataUrl.split(",")[1]);
        };
        reader.readAsDataURL(blob);
      });

    // Encode the file chunk-by-chunk
    for (let i = 0; i < bytes.length; i += chunkSize) {
      const slice = bytes.subarray(i, i + chunkSize);
      chunks.push(await toBase64(slice));
    }

    return chunks;
  }, downloadBtn);

  console.log("Chunk count:", base64Chunks.length);

  // Chunks will be decoded and written to disk in Node.js next
} catch (err) {
  console.error("Failed:", err);
} finally {
  await browser.close();
}
Note: this still loads the whole response in the browser as an ArrayBuffer, so it's not "true streaming" from the network. But it makes the Puppeteer boundary transfer much safer.
Decode chunk-by-chunk and stream to disk in Node.js
Now write the file without building one huge Buffer.
// inside try block:

// Run browser-side code to fetch the file and return it
// as an array of base64-encoded chunks
const base64Chunks = await page.evaluate(async (selector) => {
  // ...
}, downloadBtn);

const downloadDir = path.resolve("./downloads");
const outputPath = path.join(downloadDir, "unsplash-image.jpg");

await fs.promises.mkdir(downloadDir, { recursive: true });

// Write the file incrementally using a Node.js stream.
// Each base64 chunk is decoded and written immediately,
// avoiding one large in-memory buffer.
await new Promise((resolve, reject) => {
  const out = fs.createWriteStream(outputPath);

  // Propagate any filesystem errors
  out.on("error", reject);

  // Resolve once all data has been flushed to disk
  out.on("finish", resolve);

  // Decode and write each chunk sequentially
  for (const chunk of base64Chunks) {
    out.write(Buffer.from(chunk, "base64"));
  }

  // Signal that no more data will be written
  out.end();
});

console.log("Saved file to:", outputPath);
When to use chunking
Use this when your Puppeteer download file is "medium or big" and you see:
- the script finishes but the data is missing
- random crashes in page.evaluate()
- huge memory usage spikes
- timeouts while returning data to Node.js
If you need real streaming for very large files (hundreds of MB or more), this method still won't be ideal. At that point, it's usually better to download from Node.js directly (outside the page context) and stream the response to disk.
Method 3: Using Chrome DevTools Protocol (CDP)
You may notice that CDP already appeared earlier in this article. So what's different here?
- In Method 1, CDP was used passively. We flipped a switch to allow downloads and then ignored CDP completely. The browser did its thing, and we checked the file system afterward.
- In this method, CDP becomes active. Instead of guessing what happened by looking at folders, you listen directly to Chrome. You get download events, progress updates, and clear signals for success or failure.
Before we start, let's be clear about the baseline. At this point in the article, you already have working Puppeteer code from the previous methods. It opens the page, waits for the download button, and is ready to trigger a download.
Here is the starting point we'll build on for Method 3:
import puppeteer from "puppeteer";
import fs from "fs";
import path from "path";

const url = "https://unsplash.com/photos/pile-of-printing-papers-tn57JI3CewI";
const downloadBtn = '[data-testid="non-sponsored-photo-download-button"]';

const browser = await puppeteer.launch({ headless: true });
const page = await browser.newPage();

await page.setUserAgent(
  "Mozilla/5.0 (Windows NT 10.0; Win64; x64) AppleWebKit/537.36 (KHTML, like Gecko) Chrome/120.0.0.0 Safari/537.36"
);
await page.setViewport({ width: 1280, height: 800 });

const downloadPath = path.resolve("./downloads");
if (!fs.existsSync(downloadPath)) fs.mkdirSync(downloadPath, { recursive: true });

try {
  // Method 3 additions start here
} catch (err) {
  console.error("Failed:", err);
} finally {
  await browser.close();
}
Creating a CDP Session with page.createCDPSession()
The first step is opening a CDP session for the current page. Add this inside the try block, after the page is loaded and ready:
// ... preparations ...

try {
  // Open a Chrome DevTools Protocol (CDP) session for this page.
  // CDP gives low-level access to browser features like download control.
  const client = await page.createCDPSession();
} catch (err) {
  console.error("Failed:", err);
} finally {
  await browser.close();
}
This client object is your direct connection to Chrome DevTools Protocol for this tab.
Setting download behavior via CDP
Next, tell Chrome where downloads are allowed to go. Add this:
// ... preparations ...

try {
  const client = await page.createCDPSession();

  // Explicitly allow browser-managed downloads and
  // enable download events for progress and completion tracking.
  await client.send("Browser.setDownloadBehavior", {
    // If you run parallel downloads, consider
    // behavior: 'allowAndName' and use the GUID mapping.
    behavior: "allow",
    downloadPath,
    eventsEnabled: true,
  });

  // Navigate to the target page and wait until most network activity finishes
  await page.goto(url, { waitUntil: "networkidle2" });

  // Ensure the download button exists before triggering the download
  await page.waitForSelector(downloadBtn, { visible: true });
} catch (err) {
  // Catch any CDP, navigation, or selector errors
  console.error("Failed:", err);
} finally {
  // Always close the browser to free system resources
  await browser.close();
}
This step is required. Without it, Chrome may block downloads or send them to a default OS folder.
Monitoring Browser.downloadWillBegin and Browser.downloadProgress events
This is the reason to use CDP at all: instead of guessing when a file appears on disk, you listen to Chrome's own download events.
Add this before triggering the click:
// ... imports ...

function waitForBrowserDownload(client, { timeoutMs = 90000 } = {}) {
  // Wrap CDP download events into a Promise
  // so we can await download completion cleanly
  return new Promise((resolve, reject) => {
    // Unique identifier for the current download
    let guid = null;

    // Suggested file name reported by the browser
    let suggestedFilename = null;

    // Hard timeout to avoid waiting forever if no events arrive
    const timeout = setTimeout(() => {
      cleanup();
      reject(new Error("Timeout waiting for Browser.downloadProgress"));
    }, timeoutMs);

    // Fired when Chrome is about to start a download
    const onWillBegin = (evt) => {
      guid = evt.guid;
      suggestedFilename = evt.suggestedFilename;
      console.log("Download will begin:", guid, suggestedFilename, evt.url);
    };

    // Fired repeatedly as the download progresses
    const onProgress = (evt) => {
      // Once we know the GUID, ignore events from other downloads
      if (guid && evt.guid !== guid) return;

      console.log(
        "State:", evt.state,
        "Received:", evt.receivedBytes,
        "Total:", evt.totalBytes
      );

      // Download finished successfully
      if (evt.state === "completed") {
        cleanup();
        resolve({ guid: evt.guid, suggestedFilename });
      }
      // Download was canceled or failed
      else if (evt.state === "canceled") {
        cleanup();
        reject(new Error("Download was canceled"));
      }
    };

    // Remove listeners and clear timeout once we're done
    const cleanup = () => {
      clearTimeout(timeout);
      client.off("Browser.downloadWillBegin", onWillBegin);
      client.off("Browser.downloadProgress", onProgress);
    };

    // Start listening for download lifecycle events
    client.on("Browser.downloadWillBegin", onWillBegin);
    client.on("Browser.downloadProgress", onProgress);
  });
}
Now trigger the download as usual:
// ... preparations ...

// Now, inside try block right after setDownloadBehavior, page.goto and waitForSelector, add:
const downloadDone = waitForBrowserDownload(client, { timeoutMs: 90000 });

await page.click(downloadBtn);

const info = await downloadDone;
This approach is especially useful if you need:
- progress indicators
- reliable success/failure signals
- logging and metrics in production systems
If your Puppeteer download file logic is starting to feel fragile or opaque, CDP gives you visibility that filesystem polling never will.
For related browser-level optimizations, see: Block resources with Puppeteer.
Additional checks
Browser.downloadProgress with state: "completed" is a strong signal, but it’s not an absolute guarantee that the file is already visible and finalized on disk. Depending on OS/filesystem timing, Chrome may report completion slightly before:
- the file is fully flushed to disk,
- the final filename appears (rename from temp),
- the file metadata (mtime, size) stabilizes.
So it’s smart to verify the file exists in your download folder and (even better) wait until its size stops changing.
// Wait until a specific file exists and its size stops changing.
// This helps avoid "completed" events where the file is still being finalized.
async function waitForFileStable(
  dir,
  name,
  { timeoutMs = 30000, stableChecks = 3, intervalMs = 250 } = {}
) {
  const full = path.join(dir, name);
  const start = Date.now();

  // Track last observed size and how many consecutive checks were stable
  let lastSize = -1;
  let stable = 0;

  while (Date.now() - start < timeoutMs) {
    // Only proceed if the file exists
    if (fs.existsSync(full)) {
      const stat = fs.statSync(full);

      // Ignore non-files and zero-byte placeholders
      if (stat.isFile() && stat.size > 0) {
        // If size didn't change since last check, count stability
        if (stat.size === lastSize) stable++;
        else stable = 0;

        lastSize = stat.size;

        // Size stayed the same long enough → assume file is finalized
        if (stable >= stableChecks) return full;
      }
    }

    // Poll at a small interval to avoid hammering the filesystem
    await new Promise((r) => setTimeout(r, intervalMs));
  }

  throw new Error(
    `Download completed event fired, but file did not appear (or was not stable): ${full}`
  );
}

// Fallback when the browser-provided suggestedFilename is missing or wrong.
// Find "the newest file created since startedAt" and wait until it stabilizes.
// To be extra-safe, you might always want to download into an empty folder.
async function waitForAnyNewFileStable(
  dir,
  startedAt,
  { timeoutMs = 30000 } = {}
) {
  const start = Date.now();

  while (Date.now() - start < timeoutMs) {
    // List potential new files, excluding Chrome temp downloads
    const files = fs
      .readdirSync(dir)
      .filter((f) => !f.endsWith(".crdownload"))
      .map((f) => ({ name: f, full: path.join(dir, f) }))
      .filter((x) => fs.existsSync(x.full))
      .map((x) => ({ ...x, stat: fs.statSync(x.full) }))
      // Keep only real files modified after the click moment
      .filter(
        (x) => x.stat.isFile() && x.stat.mtimeMs >= startedAt && x.stat.size > 0
      )
      // Pick the most recently modified file
      .sort((a, b) => b.stat.mtimeMs - a.stat.mtimeMs);

    // If we found a candidate, wait for its size to stabilize
    if (files[0]) {
      return waitForFileStable(dir, files[0].name, { timeoutMs: 15000 });
    }

    // Keep polling until timeout
    await new Promise((r) => setTimeout(r, 250));
  }

  throw new Error("Download completed but no new file found in download folder.");
}

// run page.goto()...

// Record a timestamp right before triggering the download.
// Used by the fallback to identify "new" files.
const startedAt = Date.now();

// Wait for CDP download completion events...
const downloadDone = waitForBrowserDownload(client, { timeoutMs: 90000 });

// Trigger the download
await page.click(downloadBtn);

// CDP reports completion/cancel + suggested filename (if available)
const info = await downloadDone;

let filePath;
try {
  // Best case: trust Chrome's suggested filename, then verify stability
  filePath = await waitForFileStable(downloadPath, info.suggestedFilename, {
    timeoutMs: 15000,
  });
} catch {
  // Fallback: if filename is missing/wrong, locate the newest file and verify it
  filePath = await waitForAnyNewFileStable(downloadPath, startedAt, {
    timeoutMs: 30000,
  });
}

console.log("Verified download file:", filePath);
console.log("Download completed:", info);
Final code version for method 3
import puppeteer from "puppeteer";
import fs from "fs";
import path from "path";

async function waitForFileStable(
  dir,
  name,
  { timeoutMs = 30000, stableChecks = 3, intervalMs = 250 } = {}
) {
  const full = path.join(dir, name);
  const start = Date.now();

  let lastSize = -1;
  let stable = 0;

  while (Date.now() - start < timeoutMs) {
    if (fs.existsSync(full)) {
      const stat = fs.statSync(full);
      if (stat.isFile() && stat.size > 0) {
        if (stat.size === lastSize) stable++;
        else stable = 0;

        lastSize = stat.size;

        if (stable >= stableChecks) return full;
      }
    }

    await new Promise((r) => setTimeout(r, intervalMs));
  }

  throw new Error(
    `Download completed event fired, but file did not appear (or was not stable): ${full}`
  );
}

async function waitForAnyNewFileStable(
  dir,
  startedAt,
  { timeoutMs = 30000 } = {}
) {
  const start = Date.now();

  while (Date.now() - start < timeoutMs) {
    const files = fs
      .readdirSync(dir)
      .filter((f) => !f.endsWith(".crdownload"))
      .map((f) => ({ name: f, full: path.join(dir, f) }))
      .filter((x) => fs.existsSync(x.full))
      .map((x) => ({ ...x, stat: fs.statSync(x.full) }))
      .filter(
        (x) => x.stat.isFile() && x.stat.mtimeMs >= startedAt && x.stat.size > 0
      )
      .sort((a, b) => b.stat.mtimeMs - a.stat.mtimeMs);

    if (files[0]) {
      return waitForFileStable(dir, files[0].name, { timeoutMs: 15000 });
    }

    await new Promise((r) => setTimeout(r, 250));
  }

  throw new Error(
    "Download completed but no new file found in download folder."
  );
}

function waitForBrowserDownload(client, { timeoutMs = 90000 } = {}) {
  return new Promise((resolve, reject) => {
    let guid = null;
    let suggestedFilename = null;

    const timeout = setTimeout(() => {
      cleanup();
      reject(new Error("Timeout waiting for Browser.downloadProgress"));
    }, timeoutMs);

    const onWillBegin = (evt) => {
      guid = evt.guid;
      suggestedFilename = evt.suggestedFilename;
      console.log("Download will begin:", guid, suggestedFilename, evt.url);
    };

    const onProgress = (evt) => {
      if (guid && evt.guid !== guid) return;

      console.log(
        "State:",
        evt.state,
        "Received:",
        evt.receivedBytes,
        "Total:",
        evt.totalBytes
      );

      if (evt.state === "completed") {
        cleanup();
        resolve({ guid: evt.guid, suggestedFilename });
      } else if (evt.state === "canceled") {
        cleanup();
        reject(new Error("Download was canceled"));
      }
    };

    const cleanup = () => {
      clearTimeout(timeout);
      client.off("Browser.downloadWillBegin", onWillBegin);
      client.off("Browser.downloadProgress", onProgress);
    };

    client.on("Browser.downloadWillBegin", onWillBegin);
    client.on("Browser.downloadProgress", onProgress);
  });
}

const url = "https://unsplash.com/photos/pile-of-printing-papers-tn57JI3CewI";
const downloadBtn = '[data-testid="non-sponsored-photo-download-button"]';

const browser = await puppeteer.launch({ headless: true });
const page = await browser.newPage();

await page.setUserAgent(
  "Mozilla/5.0 (Windows NT 10.0; Win64; x64) AppleWebKit/537.36 (KHTML, like Gecko) Chrome/120.0.0.0 Safari/537.36"
);
await page.setViewport({ width: 1280, height: 800 });

const downloadPath = path.resolve("./downloads");
if (!fs.existsSync(downloadPath))
  fs.mkdirSync(downloadPath, { recursive: true });

try {
  const client = await page.createCDPSession();

  await client.send("Browser.setDownloadBehavior", {
    behavior: "allow",
    downloadPath,
    eventsEnabled: true,
  });

  await page.goto(url, { waitUntil: "networkidle2" });
  await page.waitForSelector(downloadBtn, { visible: true });

  const startedAt = Date.now();

  const downloadDone = waitForBrowserDownload(client, { timeoutMs: 90000 });
  await page.click(downloadBtn);
  const info = await downloadDone;

  let filePath;
  try {
    filePath = await waitForFileStable(downloadPath, info.suggestedFilename, {
      timeoutMs: 15000,
    });
  } catch {
    filePath = await waitForAnyNewFileStable(downloadPath, startedAt, {
      timeoutMs: 30000,
    });
  }

  console.log("Verified download file:", filePath);
  console.log("Download completed:", info);
} catch (err) {
  console.error("Failed:", err);
} finally {
  await browser.close();
}
After running this code you'll see something like:
Download will begin: d32acdee-a941-40d1-8bcc-c5f896e212ad alexander-grey-tn57JI3CewI-unsplash.jpg https://images.unsplash.com/photo-1562240020-ce31ccb0fa7d?ixlib=rb-4.1.0&q=85&fm=jpg&crop=entropy&cs=srgb&dl=alexander-grey-tn57JI3CewI-unsplash.jpg
State: inProgress Received: 0 Total: 2754606
State: inProgress Received: 2754606 Total: 2754606
State: completed Received: 2754606 Total: 2754606
Verified download file: d:\js\puppeteer-downloads\downloads\alexander-grey-tn57JI3CewI-unsplash.jpg
Download completed: {
  guid: 'd32acdee-a941-40d1-8bcc-c5f896e212ad',
  suggestedFilename: 'alexander-grey-tn57JI3CewI-unsplash.jpg'
}
Method 4: Combining Puppeteer with Axios or HTTPS
This is the classic Puppeteer download file from URL setup. You use Puppeteer only for what it's great at:
- rendering pages
- running site JavaScript
- extracting the real file URLs
Then you let Node.js do the actual downloading with axios or https.
Why this hybrid approach is awesome:
- Faster than browser downloads when you have many files
- More stable for large files (streams, no UI, no download manager)
- Easy to scale (add concurrency limits, retries, logging)
We'll use an Unsplash search gallery, extract a few photo page URLs, then download images using Node streams.
Extracting file URLs from DOM
First task: collect links from the gallery. On the Unsplash search page, the grid items contain <a> links to photo pages like: /photos/.... That's perfect for Puppeteer. We can grab the first 5 and build absolute URLs:
import puppeteer from "puppeteer";

const searchUrl = "https://unsplash.com/s/photos/papers";

const browser = await puppeteer.launch({ headless: true });
const page = await browser.newPage();

await page.setUserAgent(
  "Mozilla/5.0 (Windows NT 10.0; Win64; x64) AppleWebKit/537.36 (KHTML, like Gecko) Chrome/120.0.0.0 Safari/537.36"
);
await page.setViewport({ width: 1280, height: 800 });

try {
  await page.goto(searchUrl, { waitUntil: "networkidle2" });

  // Wait for the search/gallery route container
  await page.waitForSelector('[data-testid="search-photos-route"]', { timeout: 30_000 });

  // Photo page links live in <a href="/photos/...">
  const photoPageUrls = await page.$$eval(
    '[data-testid="search-photos-route"] a[href^="/photos/"]',
    (links) => {
      const unique = Array.from(new Set(links.map((a) => a.getAttribute("href"))))
        .filter(Boolean)
        .slice(0, 5);

      return unique.map((href) => `https://unsplash.com${href}`);
    }
  );

  console.log("Photo pages:", photoPageUrls);
} finally {
  await browser.close();
}
When does this work well?
- when the DOM already contains direct links (href, src, srcset)
- when the file URLs are stable and can be fetched with a normal GET request
When might it not work?
- the site hides URLs behind signed links that expire fast
- the "download" is generated via a POST request
- the link requires cookies/auth headers you don't have outside the browser
In those cases, you may need a different method (like fetching in the page context or using CDP).
Downloading files with axios.get() or https.get()
Now the Node.js part. The key idea: use streams. Streams mean:
- Download the file in chunks
- Pipe those chunks straight into a file
- Don't load the whole file into memory
Here is a minimal axios downloader:
import axios from "axios";
import fs from "fs";
import path from "path";

async function downloadToFile(url, outputPath) {
  // Download the file using Axios as a stream so the entire
  // response is never loaded into memory at once
  const response = await axios.get(url, {
    responseType: "stream",       // Enable streaming instead of buffering
    timeout: 30_000,              // Fail fast on slow or stalled connections
    maxRedirects: 5,              // Follow common redirect chains safely
    validateStatus: (status) => status >= 200 && status < 300, // Only accept successful responses
    headers: {
      "User-Agent": "Mozilla/5.0", // Some hosts reject requests without a UA
      "Accept": "*/*",
    },
  });

  // Inspect the response type to avoid accidentally saving an HTML error page
  const contentType = response.headers["content-type"] || "";

  if (contentType.includes("text/html")) {
    throw new Error(`Expected binary file, got HTML (${contentType})`);
  }

  // Pipe the incoming stream directly to a file on disk
  await new Promise((resolve, reject) => {
    const out = fs.createWriteStream(outputPath);

    // Stream data from the HTTP response into the file
    response.data.pipe(out);

    // Resolve when the file is fully written
    out.on("finish", resolve);

    // Propagate filesystem or network errors
    out.on("error", reject);
    response.data.on("error", reject);
  });
}
If you don't want axios, https.get() can do the same job. The idea is identical: pipe response → file stream.
One more thing: don't download everything in parallel. If you fire 50 downloads at once, you can:
- overload the server
- get rate-limited
- make your own machine slower
A simple safe default is sequential downloads (for...of + await). If you want concurrency later, add a small limit like 3–5 at a time.
Handling Puppeteer download file from URL use case
This is the "gallery scraper" use case:
- extract a list of file URLs
- download them efficiently
- save with predictable names
For Unsplash, the flow is:
- scrape photo page URLs from the search grid
- open each photo page with Puppeteer
- extract the real download URL from the download button
- download it with axios as a stream (we expect JPG files)
Here is a an end-to-end example that downloads 5 images and saves them as image-001.jpg, image-002.jpg, etc.
import puppeteer from "puppeteer";
import axios from "axios";
import fs from "fs";
import path from "path";

// Search results page that contains a photo gallery
const searchUrl = "https://unsplash.com/s/photos/papers";

// Local folder where downloaded files will be saved
const outDir = path.resolve("./downloads");

// Create the output directory if it does not exist
if (!fs.existsSync(outDir)) fs.mkdirSync(outDir, { recursive: true });

// Download a file using Node.js (outside the browser)
// The response is streamed directly to disk to avoid loading the full file into memory
async function downloadToFile(url, outputPath) {
  const response = await axios.get(url, {
    responseType: "stream",
    timeout: 30_000,
    maxRedirects: 5,
    validateStatus: (status) => status >= 200 && status < 300,
    headers: {
      "User-Agent": "Mozilla/5.0",
      Accept: "*/*",
    },
  });

  const contentType = response.headers["content-type"] || "";

  if (contentType.includes("text/html")) {
    throw new Error(`Expected binary file, got HTML (${contentType})`);
  }

  await new Promise((resolve, reject) => {
    const out = fs.createWriteStream(outputPath);

    response.data.pipe(out);

    out.on("finish", resolve);
    out.on("error", reject);
    response.data.on("error", reject);
  });
}

// Launch Puppeteer only to extract URLs, not to download files
const browser = await puppeteer.launch({ headless: true });
const page = await browser.newPage();

await page.setUserAgent(
  "Mozilla/5.0 (Windows NT 10.0; Win64; x64) AppleWebKit/537.36 (KHTML, like Gecko) Chrome/120.0.0.0 Safari/537.36"
);
await page.setViewport({ width: 1280, height: 800 });

try {
  await page.goto(searchUrl, { waitUntil: "networkidle2" });

  // Wait for the search/gallery route container
  await page.waitForSelector('[data-testid="search-photos-route"]', {
    timeout: 30_000,
  });

  // Extract links to individual photo pages from the grid
  // We limit this to the first 5 items to keep the example simple
  const photoPages = await page.$$eval(
    '[data-testid="search-photos-route"] a[href^="/photos/"]',
    (links) => {
      const unique = Array.from(
        new Set(links.map((a) => a.getAttribute("href")))
      )
        .filter(Boolean)
        .slice(0, 5);

      // Convert relative URLs into absolute ones
      return unique.map((href) => `https://unsplash.com${href}`);
    }
  );

  // 2) Visit each photo page, extract the real download URL, and download the file with Node.js
  for (let i = 0; i < photoPages.length; i++) {
    const photoUrl = photoPages[i];

    // Navigate to the individual photo page
    console.log(`Go to: ${photoUrl}`);
    await page.goto(photoUrl, { waitUntil: "domcontentloaded" });

    // Some photos are Unsplash+ and do not expose a free download button.
    // We check for the button and return null if it does not exist.
    const downloadUrl = await page.evaluate(async () => {
      const selector = '[data-testid="non-sponsored-photo-download-button"]';
      const timeoutMs = 10_000;
      const intervalMs = 250;
      const start = Date.now();

      while (Date.now() - start < timeoutMs) {
        const btn = document.querySelector(selector);
        if (btn instanceof HTMLAnchorElement && btn.href) {
          return btn.href;
        }
        await new Promise((r) => setTimeout(r, intervalMs));
      }

      return null;
    });

    if (!downloadUrl) {
      console.log("Skipped (no free download button):", photoUrl);
      continue;
    }

    // Generate a predictable file name: image-001.jpg, image-002.jpg, etc.
    const fileName = `image-${String(i + 1).padStart(3, "0")}.jpg`;
    const outputPath = path.join(outDir, fileName);

    // Download the file using axios and Node streams
    await downloadToFile(downloadUrl, outputPath);

    console.log("Saved:", outputPath);
  }
} catch (err) {
  // Catch and log any unexpected error in the scraping or download flow
  console.error("Failed:", err);
} finally {
  // Always close the browser to free resources
  await browser.close();
}
Key points to note:
async function downloadToFile(url, outputPath) { ... }— encapsulates file downloading logic in Node.js using streaming, keeping downloads out of the browser.responseType: "stream"— streams the HTTP response directly to disk instead of buffering the entire file in memory.if (contentType.includes("text/html")) { throw new Error(...) }— guards against accidentally saving HTML error pages instead of binary files.page.$$eval('[data-testid="search-photos-route"] a[href^="/photos/"]', ...)— extracts links to individual photo pages, scoped strictly to the gallery container.const downloadUrl = await page.evaluate(async () => { ... });— polls the DOM inside the browser to detect whether a free download button appears.if (!downloadUrl) { console.log("Skipped ..."); continue; }— gracefully skips premium or restricted photos without failing the entire script.const fileName = \image-${String(i + 1).padStart(3, "0")}.jpg`;` — generates predictable, ordered file names for easier tracking and post-processing.await downloadToFile(downloadUrl, outputPath);— downloads the file using Node.js streaming instead of browser-managed downloads.
After running it, you'll see:
Go to: https://unsplash.com/photos/a-stack-of-papers-sitting-on-top-of-a-table-UCCp5JyPf7A
Skipped (Unsplash+ or no free download): https://unsplash.com/photos/a-stack-of-papers-sitting-on-top-of-a-table-UCCp5JyPf7A
Go to: https://unsplash.com/photos/person-in-orange-long-sleeve-shirt-writing-on-white-paper-doplSDELX7E
Saved: d:\js\puppeteer-downloads\downloads\image-002.jpg
Go to: https://unsplash.com/photos/pile-of-printing-papers-tn57JI3CewI
Saved: d:\js\puppeteer-downloads\downloads\image-003.jpg
Go to: https://unsplash.com/photos/a-close-up-of-a-blue-piece-of-paper-TITnyN0FUrg
Skipped (Unsplash+ or no free download): https://unsplash.com/photos/a-close-up-of-a-blue-piece-of-paper-TITnyN0FUrg
Go to: https://unsplash.com/photos/silver-laptop-computer-near-notebook-ck0i9Dnjtj0
Saved: d:\js\puppeteer-downloads\downloads\image-005.jpg
Production note: when downloading files with Axios or https, add basic safety knobs: a request timeout, simple retries with backoff, and optional headers (some hosts reject generic clients). Also avoid hard-coding file extensions; derive them from the
Content-Typeheader when possible.
Start scraping smarter with ScrapingBee
Real-world scraping is rarely as clean as examples. At scale, you'll quickly run into:
- IP bans and rate limits
- CAPTCHAs
- blocked headless browsers
- fragile proxy setups
That's where ScrapingBee helps. ScrapingBee handles the hard parts for you:
- built-in proxy rotation
- automatic retry logic
- JavaScript rendering for dynamic pages
- consistent responses without browser maintenance
You focus on extracting data. ScrapingBee takes care of getting the page reliably.
👉 Get started for free and receive 1,000 free credits to test your scrapers with real-world targets.
Conclusion
There is no single “best” way to download files with Puppeteer. The correct approach depends on how the site exposes the file and how much control, reliability, and scale you need.
- Method 1: Click + browser-managed download. Use this when the site has a real download button and Chrome handles the file normally.
- It’s the simplest option and works well for one-off or low-volume downloads where you just need the file saved to disk.
- Not ideal if the download is triggered via XHR/fetch, opens extra tabs, or if you need strong guarantees around completion and error handling.
- Method 2: Fetch inside the page (
page.evaluate). Best when the page can fetch the file directly and browser downloads are unreliable or invisible.- Gives you full control over filenames and save locations, but data must cross the Puppeteer boundary. Good for small to medium files.
- Avoid for very large files due to base64 overhead and memory usage.
- Method 3: Chrome DevTools Protocol (CDP). Use this when you need accurate download lifecycle events: start, progress, completion, and cancellation. CDP removes guesswork and is the most reliable way to track browser downloads in production.
- Best for monitored or critical downloads, parallel jobs, or when filesystem polling feels fragile.
- More complex, but much more deterministic.
- Method 4: Puppeteer + Axios / HTTPS (hybrid). Use Puppeteer only to extract the real file URLs, then download files in Node.js using streams.
- This is the fastest and most scalable approach and handles large files cleanly. Best for batch downloads, galleries, and production pipelines.
- Requires that you can fetch the file URL directly (sometimes with cookies or headers).
In practice, these patterns are best wrapped into reusable helper functions or a small internal library. That way, downloading files becomes a solved problem instead of copy-pasted logic across scripts.
If you don't want to manage Chrome, proxies, rate limits, and blocks yourself, you can also offload that complexity entirely. ScrapingBee's API renders pages, handles proxy rotation, and lets you download files at scale without running browsers locally.
To go deeper, these resources may help:
- Why do we need Puppeteer?
- Which is better Playwright or Puppeteer?
- Puppeteer Web Scraping Tutorial in Nodejs
- Web Scraping with node-fetch
- How to submit forms with Puppeteer
- Intercepting requests with Puppeteer
Frequently asked questions (FAQs)
How do I choose the best method to download a file with Puppeteer?
Choose based on what the site exposes. If a visible button triggers a real browser download, clicking is enough. If you have a direct file URL, use fetch or Axios. For progress tracking or production monitoring, CDP helps. For many files, hybrid Puppeteer + Axios scales best.
Why is my Puppeteer file download stuck or never finishing?
Most often, the script exits before the download completes. Browser downloads are async and need explicit waiting. Another common cause is that the "download" is actually a navigation, not a real file download. Always wait for completion signals or verify files on disk.
Can I avoid running Chrome and still download files from dynamic pages?
Yes, partially. You can use Puppeteer only to extract real file URLs, then download files with Node.js using Axios or HTTPS. If the page relies heavily on JavaScript or protected endpoints, a rendering service like ScrapingBee can replace local Chrome entirely.
How does Puppeteer compare to Playwright for file downloads?
Both support file downloads well, but Puppeteer stays closer to Chrome DevTools Protocol and is often easier to reason about for low-level control. Playwright offers a higher-level API and better cross-browser support. For pure download logic, the choice usually comes down to ecosystem and team preference.

Kevin worked in the web scraping industry for 10 years before co-founding ScrapingBee. He is also the author of the Java Web Scraping Handbook.