Groovy has been around for quite a while and has established itself as reliable scripting language for tasks where you'd like to use the full power of Java and the JVM, but without all its verbosity.
While typical use-cases often are build pipelines or automated testing, it works equally well for anything related to data extraction and web scraping. And that's precisely, what we are going to check out in this article. Let's fasten our seatbelts and dive right into web scraping and handling HTTP requests with Groovy.

💡 Interested in web scraping with Java? Check out our guide to the best Java web scraping libraries
Prerequisites
Before we enter the realm of web scraping, we need to perform the usual housekeeping and make sure our Groovy environment is properly set up. For that, we need:
- a recent Java version
- the latest Groovy SDK
- the Jodd HTTP library for our HTTP requests
- the Jodd Lagarto library for parsing HTML documents
For the sake of brevity, we do assume you already have Java set up 😊, so it's just Groovy and Jodd. If you are using one of the mainstream IDEs (e.g. Eclipse or IntelliJ), you can typically quickly add Groovy support from their plugin configuration. Should you prefer to set it up manually, you can also always manually download and install it.
Once we have Groovy running, we just need our two Jodd libraries for HTTP and HTML parsing. Jodd is a fantastic set of Java libraries and Jodd HTTP and Jodd Lagarto, in particular, are two lean and elegant libraries.
Groovy Grapes
Usually, we'd be now talking about build management tools (e.g. Maven or Gradle) or JVM classpaths, however, did we already mention how much Groovy simplifies many things? Welcome to Groovy Grape.
All we need to do, is annotate our import statements with @Grab annotations and Groovy automatically takes care of all libraries on-the-fly.
All right, with the basics set up, we should be ready to go on our HTTP adventure. 🧙🏻♂️
Introduction to Groovy and Jodd HTTP
Sending a Plain GET Request
The most simple request always is a GET request. That's pretty much always the standard request type and barely requires additional configuration information.
@Grab('org.jodd:jodd-http:6.2.1')
import jodd.http.HttpRequest;

def request = HttpRequest.get('https://example.com');
def response = request.send();

println(response);
What we did here was create a new HttpRequest object, set up a GET call, send() it, store the response in our variable, and print it using println.
Pretty simple, right? If we really wanted to be succinct, we could even have skipped most of the declarative rituals and have had a true one-liner - println(jodd.http.HttpRequest.get('https://example.com').send()); - but do we want to be that succinct?
Let's save that to a Groovy script file BasicHTTPRequest.groovy and run it.
groovy BasicHTTPRequest.groovy
Perfect, if everything went all right, we should now have some output similar to the following.
HTTP/1.1 200 OK
Cache-Control: max-age=604800
Connection: close
Content-Length: 1256
Content-Type: text/html; charset=UTF-8

<!doctype html>
Lovely! As per convention, when we passed response to println(), it called the object's toString() method, which in turn provided us with the original response.
The response object has a number of methods, which provide access to most of the other response details. For example, we could have used
statusCode()to get the HTTP status code of the response, in our case200.
POSTing To The Server
Should we step it up a notch? Sure, let's do a POST coupled with Groovy's native JSON parser.

@Grab('org.jodd:jodd-http:6.2.1')
import jodd.http.HttpRequest;
import groovy.json.JsonSlurper;

def request = HttpRequest.post('https://httpbin.org/post');

request.form('param1', 'value1', 'param2', 'value2');

def response = request.send();

def json = new JsonSlurper().parseText(response.bodyText());

println(json);
Quite similar to our previous example. The main difference here is we used post() to create a POST request, we appended form data with form(), and we didn't print response directly, but passed this time only the response body (which is a JSON object in the example here) to Groovy's JsonSlurper, which did all the heavy JSON lifting for us and provided us with a beautifully pre-populated Java map object.
Save the code in POSTRequest.groovy and run it once again with
groovy POSTRequest.groovy
Voilà, we should have a similar output to this
[args:[:], data:, files:[:], form:[param1:value1, param2:value2], headers:[Content-Length:27, Content-Type:application/x-www-form-urlencoded, Host:httpbin.org, User-Agent:Jodd HTTP, json:null, url:https://httpbin.org/post]
Here, we also notice the beauty of httpbin.org. Everything we send to it, it sends back to us and we can find the two form parameters, which previously passed in our request, in the JSON's form field. Not bad, is it?
Quick summary
The combination of Groovy and Jodd HTTP allows us to write really concise and mostly boilerplate-free code, which still has the ability to leverage the full potential of the Java platform.
Compared to Java, Groovy makes many things quite a bit easier (e.g. default handling of JSON) and its syntax is overall a lot less verbose (e.g. no mandatory classes, equality).
Jodd HTTP, on the other hand, approaches HTTP with a rather straightforward and rational approach and tries to avoid boilerplate as well. Features like method-chaining are intrinsic to the library and allow one to compile a possibly complex HTTP request with just a handful of lines of code.
But enough of theory and simple examples, let's scrape the web.
Real World Web Scraping in Groovy
In this part of the article, we are going to take a deep dive right into scraping and crawling code.
We will show three sample projects. The first example will focus on anonymous data extraction and we will learn about how to send HTTP requests with Jodd on Groovy, and how to handle HTML content with Lagarto and Jerry and how to extract information with CSS selectors.
With the second example, we will find out more about POST requests and how to use them to log into a page. On top of that we learn how to keep track of session cookies and how to use them for subsequent requests.
The third example will eventually be a proper deep dive into headless browsing and we will learn more about how we can control an entire browser instance from Groovy.
Example #1: Extracting Hacker News Comments
If you already read a couple of our other articles, you'll have noticed we like to crawl Hacker News in our demos. It's a great and resourceful site and always has fresh content to satisfy a hungry crawler, so in short, perfect.
This time, however, we are not just going to scrape the homepage for new articles, but instead, we want to crawl all the comments of an article, along with their metadata - and Groovy and Jodd allow us to do that in less than 50 lines of code.
Analyzing the DOM tree
But before we jump right into coding, let's first check out the page structure, so that we know where the information is, we'd like to access, and how to extract it. So let's aim for that F12 key and open the developer tools, select Elements/Inspector, and scroll to the comments at <table class="comment-tree">. There we should find quite a few entries like the following.
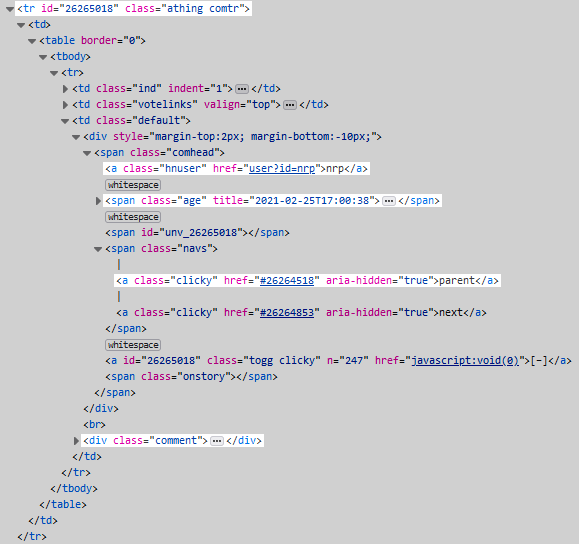
Here, we have highlighted all the DOM elements which are of our interest.
For starters, we want to select all individual comment containers, which is particularly easy here, as we can simply select the <tr class="comtr">s within our comment table: table.comment-tree tr.comtr
Jolly good! Now, that we have each <tr> as the baseline for each comment, we can select
- the comment ID, directly from our comment's element's ID attribute
- the username -> text of
a.hnuser - the time ->
titleattribute ofspan.age - the comment text -> text of
div.comment - the parent ->
hrefattribute ofa:contains(parent)
Structure-wise we should be all set now and can really jump right into coding.
Scraping with Groovy and Jodd Lagarto
First, we will create an HttpRequest instance, configure it for a GET request to our URL, and send that request off.
def response = HttpRequest.get(url).send();
This gets us the response object, which contains the whole HTTP response sent by the server, including the page of course.
We can now use Jodd Lagarto and Jerry to convert that HTML document into a proper DOM tree.
def doc = Jerry.of(response.bodyText());
Wonderful, we now have a DOM representation of our HTML page in doc. And doc comes with a few very convenient methods to access the document elements via CSS selectors.
So let's select all comment table rows in our main comment table.
def comments = doc.find('table.comment-tree tr.comtr');
There we go! We've got all comments at our fingertips and just need to iterate over them to access each comment's metadata. This, we can achieve with each(), where we use additional CSS selectors to access all the comment details we need and append everything to our own data array.
Pagination - last, but not least, Hacker News uses pagination for the comment screen, so in order to get all remaining comments, we should simply check if there's a "next" link and, if there is, repeat what we just did for the next page URL.
def next = doc.find('a[rel="next"]').attr('href');
if (next) url = 'https://news.ycombinator.com/' + next; else break;
That's pretty much it. Once we have completed the data extraction, we should have all comments in comment_list and can save that either to a file or a database.
And here, for the complete code, printing comment_list.
@Grab('org.jodd:jodd-http:6.2.1')
import jodd.http.HttpRequest;
@Grab('org.jodd:jodd-lagarto:6.0.6')
import jodd.jerry.Jerry;


def url = args[0];

def comment_list = [];

while (true)
{
	println("Scraping $url");

	// Send the HTTP request to our URL
	def response = HttpRequest.get(url).send();

	// Parse the HTML document into a Jerry DOM object
	def doc = Jerry.of(response.bodyText());

	// Find all comments <tr>s in the main comment table
	def comments = doc.find('table.comment-tree tr.comtr');

	// Iterate over each comment and extract its data
	comments.each
	{ def element ->

		def id = element.attr('id');
		def user = element.find('a.hnuser').text();
		def time = element.find('span.age').attr('title');
		def comment = element.find('div.comment').text();
		def parent = element.find('a:contains(parent)').attr('href');

		// Append the data to comment_list
		comment_list.push([id: id, user: user, time: time, comment: comment, parent: parent]);
	}

	// If there is a next link, set the URL and continue the while, otherwise exit
	def next = doc.find('a[rel="next"]').attr('href');
	if (next) url = 'https://news.ycombinator.com/' + next;
		else break;
}

println(comment_list)
Let's save it as HNCommentScraper.groovy and run it with the following command, where we pass the URL of our thread as argument.
groovy HNCommentScraper.groovy 'https://news.ycombinator.com/item?id=26263508'
This should scrape four pages ....
Scraping https://news.ycombinator.com/item?id=26263508
Scraping https://news.ycombinator.com/item?id=26263508&p=2
Scraping https://news.ycombinator.com/item?id=26263508&p=3
Scraping https://news.ycombinator.com/item?id=26263508&p=4
.... and eventually print all the extracted comments.
Example #2: Changing our Hacker News password, using session cookies and POST requests
With our second example, we will still stay with Hacker News.
This time round, we won't focus that much on data extraction (just briefly, to get a one-time token) but rather on changing our Hacker News account password. This will involve more complex requests than just GET requests, namely POST requests, and we need to manage the cookies sent by the server, to persist the session information across requests.
Please note, we could have also used the HttpBrowser class for our example, however we ran into some redirection issues with Hacker News, which is why we opted to go the manual route here. Still, check out HttpBrowser as well.
The basics of POST requests and session cookies
Up until now, we used GET requests to fetch information from the server. However, as we want to change our account password in this example, we must provide that information to the server. That is typically done with POST requests (there are also a couple of others, such as PUT and PATCH) and that's what we are going to use now.
Actually, compared to many other sites, changing the password is fairly easy on Hacker News. One just needs to have two key items
- a valid user session (represented by a session cookie)
- a one-time token
Let's get those, shall we.
Obtaining a session cookie
All one needs to do, to get a valid user session, is to log into Hacker News. That login is performed via a POST request to https://news.ycombinator.com/login. Along with our request, we have to send our username, the current password, and the path where we'd like to be redirected to upon the login.
Jodd provides a very convenient method for specifying these parameters here: HttpRequest.form()
def resp = HttpRequest.post('https://news.ycombinator.com/login').form('acct', 'OUR_USERNAME', 'pw', 'OUR_LOVELY_PASSWORD', 'goto', 'news').send();
All we now had to do was send() our request and we got an HttpResponse object with the answer from the server.
Brilliant, let's just check its statusCode (Hacker News sends a 302 upon a successful login) and once we are logged in, we can access the session cookie via the cookies() method. We store that in sessionCookie and, in that way, have that handy for all subsequent requests. Very good.
Next, the one-time token.
Getting the one-time token
Once you have the user session, you may think, changing the password is just one more request. That's almost true. As mentioned previously, changing the password on Hacker News is rather straightforward, but there's one hurdle, a one-time token.
Before we can actually set our new password, we first need to send a request to https://news.ycombinator.com/changepw. On that page, we will find that token in the element <input type="hidden" name="fnid" value="TOKEN-HERE" />. So, let's request that URL with a GET request (of course with the session cookie we got earlier)
resp = HttpRequest.get('https://news.ycombinator.com/changepw').cookies(sessionCookie).send();
Now, we can simply use Lagarto/Jerry to get the token from the page with the CSS selector input[name="fnid"].
def fnid = doc.find('input[name="fnid"]').attr('value');
Jolly good! We should now have everything we need to change our password.
- Our account credentials
- A valid session cookie
- The one-time token, which allows us to change the password
Sending the POST request with form data
All it takes now, is one more POST request to https://news.ycombinator.com/r, where we provide our session cookie, the one-time token, our current and the new password, and we should be good to go.
resp = HttpRequest.post('https://news.ycombinator.com/r').form('fnid', fnid, 'fnop', 'changepw-page', 'oldpw', hn_pass, 'pw', 'SHINY-NEW-PASSWORD').cookies(sessionCookie).send();
The complete example to change the account password with Groovy and Jodd
Of course, here the full code as well.
@Grab('org.jodd:jodd-http:6.2.1')
import jodd.http.HttpRequest;
@Grab('org.jodd:jodd-lagarto:6.0.6')
import jodd.jerry.Jerry;


def hn_user = 'USERNAME';
def hn_pass = 'PASSWORD';

// Log into Hacker News
def resp = HttpRequest.post('https://news.ycombinator.com/login')
	.form(
		'acct', hn_user,
		'pw', hn_pass,
		'goto', 'news'
	)
	.send();

// Check status code, a successful login will send a redirect
if (resp.statusCode != 302)
{
	println('Incorrect credentials');
	return;
}

// Save session cookie
def sessionCookie = resp.cookies();

// Request the change password page, to get the one-time token
resp = HttpRequest.get('https://news.ycombinator.com/changepw')
	.cookies(sessionCookie)
	.send();

// Parse page into DOM
def doc = Jerry.of(resp.bodyText());

// Get one-time token
def fnid = doc.find('input[name="fnid"]').attr('value');

// Send password change request with the one-time token and the old and the new password
resp = HttpRequest.post('https://news.ycombinator.com/r')
	.form(
		'fnid', fnid,
		'fnop', 'changepw-page',
		'oldpw', hn_pass,
		'pw', 'SHINY-NEW-PASSWORD'
	)
	.cookies(sessionCookie)
	.send();


// A successful password change logs us out and redirects to /news
def success = resp.header('Location').contains('news');
println('Password changed successfully: ' + success);
Just save this to HNChangePassword.groovy and run it, as usual, with the following command.
groovy HNChangePassword.groovy
Summary
Our examples work beautifully for static sites. Single HTTP requests and manual DOM parsing will work absolutely great if you receive server-side rendered/composed content, where all tags are already neatly in place.
These days, however, a lot of sites do not go that route any more but rather opt for client-side rendering/composing, using JavaScript. In such cases, a single HTTP request won't suffice, as you'd only receive an HTML skeleton, with a lot of resource reference links to external JavaScript URLs.
And these JavaScript URLs contain the real sauce of the site. Hence, we need a full-fledged browser, which renders the whole page for us and runs all its JavaScript code. That's what we are going to check out next 😎
Example #3: Headless scraping of Twitter with Groovy
With this example, we are slightly leaving the world of Jodd and static scraping and entering the realm of headless browsers. If you already read our Introduction to Chrome Headless with Java, you will probably recognize a lot in our following example.
As mentioned in that article, we first need to extend our setup. In addition to what we set up earlier, we will now also need these components.
- Selenium Java Bindings -
@Grabagain, of course - The recent version of Google's Chrome browser
- A ChromeDriver binary, matching your Chrome version
Once we have everything in place, we can dive right into our example.
Scraping Twitter
What do we want to do?
We would like to write a scraper which gets us a list of tweet links for a specific search query.
If you are after tweets, the immediate intuition might tell you, to simply open Twitter, run your search, and extract the content for all tweets. This admittedly sounds logical, however experience has shown, that the good old divide and conquer often is the better approach in web scraping. So let's web crawl and get first the links to our tweets. In a second step, we can then scrape each individual tweet, of course.
Twitter's DOM
Twitter's search is pretty straightforward, its DOM unfortunately not so much.
So let's get started with how to search first. For that, we open https://twitter.com/explore, type our search term apache groovy, and hit Enter. Voilà, that should get us to https://twitter.com/search?q=apache%20groovy&src=typed_query and display an initial set of tweets. Lovely!
Please note the URL structure of our search URL. Its base URL is https://twitter.com/search and it has the two query string parameters q and src. While the latter only tells Twitter that the search was typed in (and we should still include it in our queries), the former is where the real action is. q tells Twitter what we want to search for, which in our case was "apache groovy", or URL encoded apache%20groovy. Even lovelier!
All right, time to check out the DOM. Let's hit F12 again and take a look at the DOM tree in the developer tools, shall we?
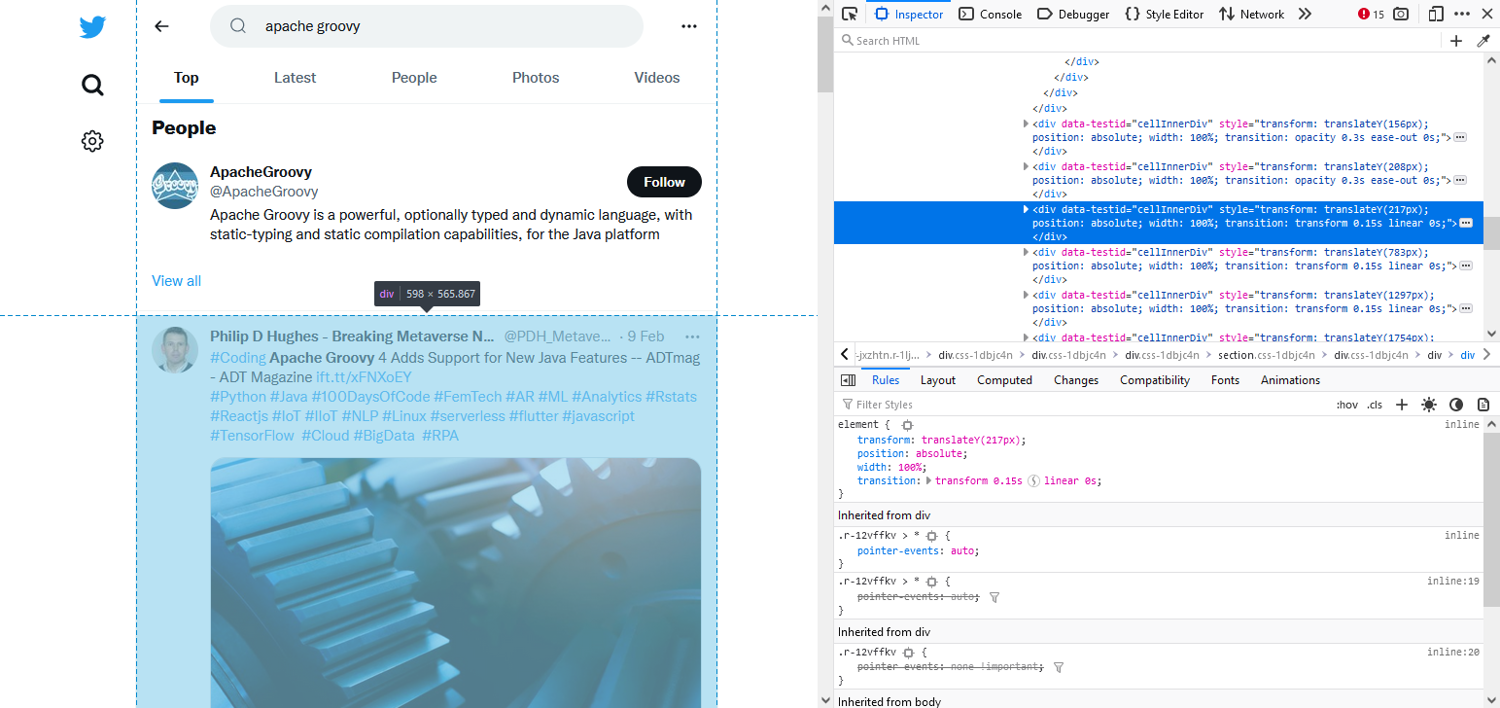
What we'll realize here at first glance, is that Twitter is using lots of random identifiers. This kind of makes a scraper's life a nightmare (on Twitter Street) and may be very well deliberate. Still, on a closer inspection, we will notice one element which appears to be slightly less-randomly named.
<div data-testid="cellInnerDiv">
That <div> seems to be the main container of each tweet. Great, we have something to start with.
Please keep in mind, this applies to Twitter's HTML structure at the time when this article was written. Twitter does occasionally shift things around, in which case elements may change.
Now, if we wanted to scrape several items from a tweet, it usually would be a good idea to select each <div> and then use them as baseline for any further relative selectors. In our case, however, we only want to select one particular child element of our <div>, so we can incorporate that into our selector, which will allow us to use one single selector. Neat, ain't it?
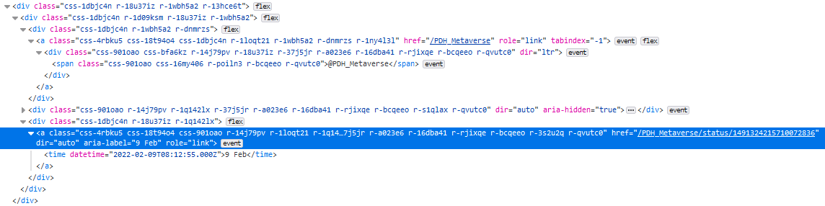
//div[@data-testid="cellInnerDiv"]//time/..
An XPath expression, not a CSS selector? Well, XPaths work equally well, but you are right, our examples often use CSS selectors. Here, we have to use an XPath expression, however, as we specifically want to select a parent element. That is not possible with CSS selectors yet and would have required additional logic in the code, hence an XPath expression is simply more elegant.
💡 It wouldn't be scrapingbee.com, if we hadn't already prepared something on XPath expressions and their syntax. Check out our article on how to write your own concise and efficient XPath expressions if you want to learn more about them.
But what did we actually do here? We looked for all <div> tags which have a <time> tag descendant (immediate and non-immediate children) and then selected the <time>'s immediate parent element. As always, a picture is worth a thousand words, so let's just illustrate that with a screenshot.
Jolly good, we know how to load our search page and we know about the structure of the DOM tree. We should be pretty much ready for scraping.
Scraping with Groovy and Selenium
We will start with setting up a couple of system options.
System.setProperty('webdriver.chrome.driver', '/path/to/chromedriver');

ChromeOptions options = new ChromeOptions();
options.addArguments("--headless", "--window-size=1920,1200","--ignore-certificate-errors", "--silent");
For example, if the ChromeDriver binary is not located in our current working directory, we'd need to specify its path in the system property webdriver.chrome.driver. Additionally, we are creating an options instance for our browser object, where we specify a couple of browser specific settings.
Next, we create the browser instance itself.
def driver = new ChromeDriver(options);
Quite straightforward. We define a driver variable which is going to hold our browser driver instance (here, an instance of ChromeDriver as we are using Chrome).
So far, so good, let's load the page now.
driver.get('https://twitter.com/search?q=apache%20groovy&src=typed_query');

new WebDriverWait(driver, Duration.ofSeconds(10)).until(ExpectedConditions.presenceOfElementLocated(By.cssSelector('main section')));

def page = driver.findElement(By.cssSelector('body'));
Fetching the page itself is a piece of cake, we simply call get() with the URL.
Next, we will take some well-deserved pause and use WebDriverWait to wait until the element for the CSS selector main section appears. Once it does, we know the site has finished with its asynchronous JavaScript work and the first tweets are visible. While at it, let's also grab a reference to the page's <body> element (we are going to need this in just a moment).
"First tweets are visible" is something every scraper loves to hear. It means we can start the actual work.
def l = driver.findElements(By.xpath('//div[@data-testid="cellInnerDiv"]//time/..'));
for (def e : l) links.add(e.getAttribute('href'));
We use our driver's findElements() method to find all elements matching our earlier XPath expression.
Now, all we need to do is iterate over the elements we got from findElements() (which should all be <a>s) and store the links from their href attributes in our links set. Please note, we specifically instantiated links as set, as we will encounter duplicates and the very nature of a set will take care of that.
Are we done? Not quite, Twitter only displays a handful of tweets by default and we need to scroll the page to load more content. Let's do that.
page.sendKeys(Keys.PAGE_DOWN);
sleep(1500);
That's exactly where our earlier page reference comes in. We use sendKeys() to send a Page Down to the page. We then wait 1.5 seconds and continue with our loop to scrape the new tweets until our links set reached MAX_TWEETS entries. At that point we close our driver instance with driver.quit(); and print our set. Of course, you could also save the links to a database and use them as a feed for another scraper which extracts the actual tweet information.
Here, the whole code.
@Grab('org.seleniumhq.selenium:selenium-chrome-driver:4.3.0')
import org.openqa.selenium.chrome.ChromeOptions;
import org.openqa.selenium.WebDriver;
import org.openqa.selenium.chrome.ChromeDriver;
import org.openqa.selenium.By;
@Grab('org.seleniumhq.selenium:selenium-support:4.3.0')
import org.openqa.selenium.support.ui.WebDriverWait;
import org.openqa.selenium.support.ui.ExpectedConditions;
import org.openqa.selenium.Keys;
import java.time.Duration;
import java.net.URLEncoder;


def MAX_TWEETS = 20;

// Specify the path to your ChromeDriver binary, unless it is in the current working directory
//System.setProperty('webdriver.chrome.driver', '/path/to/chromedriver');

def options = new ChromeOptions();
options.addArguments("--headless", "--window-size=1920,1200","--ignore-certificate-errors", "--silent");

def driver = new ChromeDriver(options);

def query = URLEncoder.encode(args[0], 'UTF-8').replace('+', '%20');

// Load main page
driver.get("https://twitter.com/search?q=${query}&src=typed_query");

// Wait until the page has loaded
new WebDriverWait(driver, Duration.ofSeconds(10)).until(ExpectedConditions.presenceOfElementLocated(By.cssSelector('main section')));

// Get reference to <body>, used later to scroll down
def page = driver.findElement(By.cssSelector('body'));

def links = [] as Set;
while (links.size() < MAX_TWEETS)
{
	// Select each tweet's time link
	def l = driver.findElements(By.xpath('//div[@data-testid="cellInnerDiv"]//time/..'));
	for (def e : l) links.add(e.getAttribute('href'));

	page.sendKeys(Keys.PAGE_DOWN);

	sleep(1500);
}

driver.quit();

println(links);
As with all of our other examples, let's save that as TwitterCrawler.groovy and run it with this command to crawl for our search query "apache groovy".
groovy TwitterCrawler.groovy "apache groovy"
Summary
Groovy is an amazing platform for web crawling and scraping. All our examples were well below 100 lines of code (mind you, including import statements) and yet managed to handle HTTP requests, session management, DOM parsing, and even full-blown browser instances.
If you want to handle HTTP and the DOM yourself, you should definitely check out Jodd HTTP and Jodd Lagarto. Both libraries are part of the Jodd stack and offer an extremely lightweight approach to their domains and have a very flat learning curve.
If, on the other hand, you have a use case where you need a full browser environment, Selenium will not disappoint. It provides you with direct access to a number of browser engines and allows you full control over the browser instance.
Be it Jodd or Selenium, coupled with Apache Groovy, you have the full power of the Java platform and the JVM, however, with a highly optimized and much less verbose language than what you may be used to from traditional Java code.
ℹ️ One important aspect of data scraping is making sure your crawlers are not blocked. Please check out our other article on that subject, Web Scraping without getting blocked.
While it can be fun to tweak your crawler configuration, it can take a lot of time. If you'd rather spend your time on analyzing the data you scraped, than on having to deal with user agent details, proxy networks, rotating addresses, and request throttle management, then please have a look at ScrapingBee's no-code data extraction solution. We've got you covered.
As always, if you have any questions, please do not hesitate to get in touch with us.
Happy Scraping!
Before you go, check out these related reads:

Alexander is a software engineer and technical writer with a passion for everything network related.