Web scraping with CloudProxy means running a free, open-source proxy pool on cloud accounts and asking its API for a working proxy whenever the scraper needs one. It is a good fit for cheap, light scraping, but every IP still comes from a data center, so protected sites may block it, and CloudProxy cannot render JavaScript.
CloudProxy handles the annoying infrastructure bits. It creates virtual machines, installs proxy software, checks which proxies are alive, and keeps the pool at the configured size. The scraper itself stays separate, so it can be written in Python, Node.js, or anything else that supports HTTP proxies.
That makes CloudProxy useful when the main job is rotating IPs without paying for a managed proxy network. The trade-off is that cloud credentials, firewall rules, VM bills, regions, authentication, cleanup, and dead instances all become part of the scraping setup.
This guide walks through a tested CloudProxy Docker setup, connects it to a Python scraper, and tries it against real pages. It also shows where CloudProxy web scraping starts to fall apart—especially on JavaScript-heavy and anti-bot-protected sites—and when handing the hard parts to a managed scraping API makes more sense.
Key takeaways
- CloudProxy for scraping is a free, open-source tool that creates proxy VMs in DigitalOcean, AWS, GCP, Hetzner, or Vultr, then lets a scraper request a healthy proxy from the pool.
- Every proxy still uses a datacenter IP, so Cloudflare, DataDome, and similar systems may block it. CloudProxy works best on open or lightly protected sites.
- CloudProxy only rotates proxies. It does not run a browser or execute JavaScript, so dynamic pages need a separate rendering layer.
- The software is free, but the infrastructure is not. Cloud instances, bandwidth, credentials, firewall rules, scaling, and dead IPs all stay on your side.
- For protected or JavaScript-heavy targets, a managed API may be the easier route. ScrapingBee can handle proxy selection, browser rendering, retries, and data extraction in one request.
What is CloudProxy?
CloudProxy is a free, open-source tool that builds a proxy pool using cloud accounts you already have. Give it API credentials for DigitalOcean, AWS, Google Cloud, Hetzner, or Vultr, tell it how many proxies to keep running, and it spins up the virtual machines for you.
Each VM runs a proxy server with its own public IP address. CloudProxy checks whether the proxy is alive, replaces missing instances, and exposes the pool through a local API and web interface.
A scraper can ask CloudProxy for a random healthy proxy:
GET http://localhost:8000/random
CloudProxy returns the IP address, port, provider, and authentication details:
{
  "proxy": {
    "ip": "35.209.101.228",
    "port": 8899,
    "auth_enabled": true,
    "provider": "gcp"
  }
}
The scraper then sends its request through that proxy. One small but important detail: /random is not a rotating proxy gateway. It picks a proxy from the pool and returns its connection details. The actual request goes directly through the selected VM.
All CloudProxy instances use datacenter proxies. A datacenter proxy is an IP address assigned to a server in a hosting or cloud provider, rather than to a normal home internet connection. These IPs are usually fast and inexpensive, but they are also easy to recognize. A website can often tell that traffic is coming from AWS or Google Cloud before the scraper even gets to the interesting part.
CloudProxy is also self-hosted. The software is free under the MIT license, but the servers are not. Cloud provider bills, API tokens, firewall rules, quotas, regions, failed instances, and cleanup all stay on your side of the fence.
The CloudProxy project on GitHub last published a release in September 2025. It still works: I used it successfully while preparing this guide—but the repository has not received updates since then. So “usable but quiet” is a fairer description than “actively maintained.”
How to set up web scraping with CloudProxy and Docker
The easiest way to run CloudProxy is with Docker. The basic setup is simple: connect at least one cloud provider, start the container, and let CloudProxy create proxy VMs in that account.
The steps below use Google Cloud because that is the setup I tested while preparing this guide. DigitalOcean is often the easier place to start, but the overall flow is similar across providers.
Prerequisites
Before starting, make sure the following are ready:
- Docker Desktop or Docker Engine. Docker Compose is included with current Docker Desktop releases.
- A cloud provider account. CloudProxy supports DigitalOcean, AWS, Google Cloud, Hetzner, and Vultr.
- Cloud API credentials. For Google Cloud, this means a service account and a JSON key file. CloudProxy uses that key to create and remove Compute Engine instances. In my test project, Google Cloud blocked service account key creation through an organization policy, so I had to override that policy before downloading the JSON key. Treat this as a security change, not just another setup checkbox: only relax the policy for the project that runs CloudProxy, and keep the key out of Git.
- Billing enabled for the cloud project. CloudProxy itself is free, but the virtual machines it creates are not. Even small instances can generate charges while they are running.
- Permission to create virtual machines. On Google Cloud, the Compute Engine API must be enabled, and the service account needs enough access to manage instances.
- A safe place for the credentials. API tokens and service account keys can control paid infrastructure, so do not commit them to Git or paste them into public examples.
DigitalOcean only needs an API token, which makes the first setup a bit shorter. Google Cloud takes a few more clicks because it uses service accounts and downloadable key files, but it works fine once those pieces are in place.
Create a new working directory before continuing:
mkdir cloudproxy
cd cloudproxy
The remaining files—the Docker Compose configuration, environment variables, and cloud credentials—will live in this directory.
Run CloudProxy
CloudProxy does not require Docker Compose. I tested it on Windows with Docker Desktop and started the container directly from PowerShell.
Place the downloaded service account key in the working directory and name it gcp-key.json. Then replace your-gcp-project-id in the command below with the ID of the Google Cloud project.
On Linux and macOS:
docker run -d \
  --name cloudproxy \
  -p 8000:8000 \
  -e PROXY_USERNAME=cloudproxyuser \
  -e PROXY_PASSWORD=cloudproxypass123 \
  -e GCP_ENABLED=True \
  -e GCP_SA_JSON=/app/gcp-key.json \
  -e GCP_PROJECT=your-gcp-project-id \
  -e GCP_ZONE=us-central1-a \
  -e GCP_IMAGE_PROJECT=ubuntu-os-cloud \
  -e GCP_IMAGE_FAMILY=ubuntu-2204-lts \
  -e GCP_MIN_SCALING=1 \
  -v "${PWD}/gcp-key.json:/app/gcp-key.json:ro" \
  laffin/cloudproxy:latest
On Windows (PowerShell):
docker run -d `
  --name cloudproxy `
  -p 8000:8000 `
  -e PROXY_USERNAME=cloudproxyuser `
  -e PROXY_PASSWORD=cloudproxypass123 `
  -e GCP_ENABLED=True `
  -e GCP_SA_JSON=/app/gcp-key.json `
  -e GCP_PROJECT=your-gcp-project-id `
  -e GCP_ZONE=us-central1-a `
  -e GCP_IMAGE_PROJECT=ubuntu-os-cloud `
  -e GCP_IMAGE_FAMILY=ubuntu-2204-lts `
  -e GCP_MIN_SCALING=1 `
  -v "${PWD}\gcp-key.json:/app/gcp-key.json:ro" `
  laffin/cloudproxy:latest
Use your own proxy username and password. CloudProxy passes these values into the proxy servers it creates, so a scraper will need them later. Keep both values alphanumeric; special characters can cause trouble when the startup script builds the proxy configuration.
I used the latest image while testing this guide. For a reproducible deployment, pin the current release instead, for example laffin/cloudproxy:0.6.44.
Here is what the less obvious options do:
GCP_SA_JSONpoints CloudProxy to the service account key inside the container.GCP_PROJECTselects the Google Cloud project where the VM will be created.GCP_ZONEcontrols where the proxy VM runs.GCP_MIN_SCALING=1tells CloudProxy to keep one proxy alive.GCP_IMAGE_PROJECTandGCP_IMAGE_FAMILYselect the operating system image used for the VM.
The final two image settings matter. My first attempt used CloudProxy's old ubuntu-minimal-2004-lts default and failed because Google Cloud could no longer find that image family. Setting the image explicitly to ubuntu-2204-lts fixed the deployment.
Check that the container is running:
docker ps
Then follow its logs:
docker logs -f cloudproxy
CloudProxy will authenticate with Google Cloud, create the requested VM, install Tinyproxy on it, and wait until the proxy answers its health check. Provisioning took a few minutes in my test, so repeated Waiting messages are normal at first.
Optional: use Docker Compose
A long docker run command is fine for testing. Docker Compose is easier once the setup needs to be restarted, edited, or shared with another developer.
Create a compose.yaml file:
services:
  cloudproxy:
    image: laffin/cloudproxy:latest
    container_name: cloudproxy
    ports:
      - "8000:8000"
    environment:
      PROXY_USERNAME: ${PROXY_USERNAME}
      PROXY_PASSWORD: ${PROXY_PASSWORD}
      GCP_ENABLED: "True"
      GCP_SA_JSON: /app/gcp-key.json
      GCP_PROJECT: ${GCP_PROJECT}
      GCP_ZONE: us-central1-a
      GCP_IMAGE_PROJECT: ubuntu-os-cloud
      GCP_IMAGE_FAMILY: ubuntu-2204-lts
      GCP_MIN_SCALING: "1"
    volumes:
      - ./gcp-key.json:/app/gcp-key.json:ro
    restart: unless-stopped
Keep the values that should not live in the Compose file in a local .env file:
PROXY_USERNAME=cloudproxyuser
PROXY_PASSWORD=cloudproxypass123
GCP_PROJECT=your-gcp-project-id
Add both .env and gcp-key.json to .gitignore:
.env
gcp-key.json
Then start the container:
docker compose up -d
CloudProxy can also run several providers at once. Enabling GCP and DigitalOcean, for example, puts IPs from different cloud networks into the same pool. They are still datacenter IPs, but the pool is no longer tied to one provider.
Verify the proxy pool in the dashboard
Once the container is running, open the CloudProxy web interface:
http://localhost:8000/ui
CloudProxy uses port 8000 for its local dashboard and API. The UI shows the proxies currently managed by the application. In my test, the GCP instance appeared with:
- a
Healthystatus; - its public IP address;
- the proxy type (
HTTP/HTTPS Proxy); - the Google Cloud zone;
- a button for removing the instance.
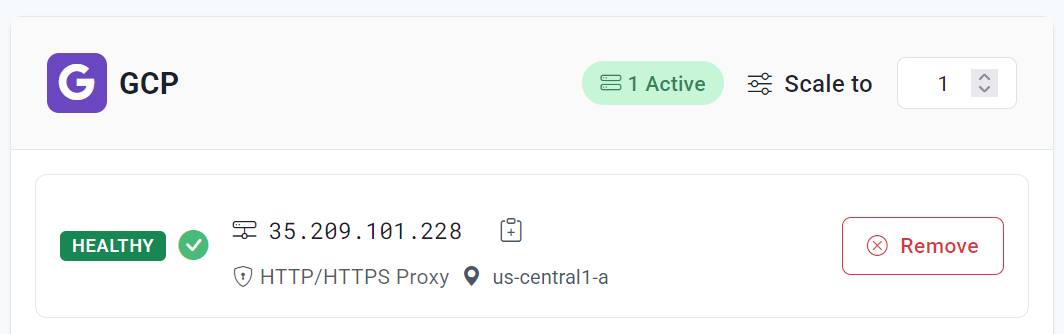
A healthy proxy means CloudProxy can reach the VM and connect to the proxy service running on it. It does not yet prove that a request from the local machine can pass through it, so we will test that separately in the next step.
CloudProxy also includes interactive REST API documentation:
http://localhost:8000/docs
The most useful endpoint for scraping is:
GET /random
It selects a healthy proxy from the pool and returns its connection details. Open the endpoint directly in a browser:
http://localhost:8000/random
Or call it from PowerShell:
curl.exe http://localhost:8000/random
A successful response looks like this:
{
  "message": "Random proxy retrieved successfully",
  "proxy": {
    "ip": "35.209.101.228",
    "port": 8899,
    "auth_enabled": true,
    "provider": "gcp",
    "instance": "default",
    "display_name": "GCP"
  }
}
CloudProxy is not forwarding the scraping request through /random. The endpoint only chooses a proxy and returns its IP address and port. The scraper then connects to that VM directly using the username and password from the Docker configuration.
Open the proxy port
Firewall behavior depends on the cloud provider and the network configuration already in place. Some providers may make the proxy reachable without any extra work, while others require an inbound rule or security group change.
In my Google Cloud test, the VM started normally and Tinyproxy was running, but CloudProxy kept logging Waiting because GCP was blocking inbound connections to port 8899. I had to create an ingress firewall rule before the health check could reach the proxy.
To do the same in Google Cloud:
- Open VPC network → Firewall.
- Create a new firewall rule.
- Set the direction to Ingress and the action to Allow.
- Target instances with the
cloudproxynetwork tag. - Allow TCP port
8899.
For a quick test, the source IPv4 range can be:
0.0.0.0/0
That exposes the proxy port to the whole internet, so it should not be the final configuration. Once everything works, replace it with the public IP address of the machine running the scraper, usually in /32 form:
203.0.113.25/32
The complete test rule looks like this:
Name: allow-cloudproxy-8899
Direction: Ingress
Action: Allow
Target tag: cloudproxy
Source IPv4 range: 0.0.0.0/0
Protocol: TCP
Port: 8899
CloudProxy should detect the instance during its next health-check cycle and change its status from Waiting to Healthy.
Send a request through the proxy
The dashboard status tells us that CloudProxy can reach the proxy service. The final check is to send a real request through the VM and confirm that the destination sees the VM's IP rather than the local connection.
Use the IP and port returned by /random.
Linux and Mac:
curl \
  -x http://cloudproxyuser:cloudproxypass123@35.209.101.228:8899 \
  https://httpbingo.org/ip
Windows:
curl.exe `
  -x http://cloudproxyuser:cloudproxypass123@35.209.101.228:8899 `
  https://httpbingo.org/ip
Replace the username, password, and IP address with the values from the current setup. A working proxy returns something like:
{
  "origin": "35.209.101.228"
}
That IP should match the proxy returned by CloudProxy. At this point, the full path is working: CloudProxy created the VM, Tinyproxy accepted the connection, and the request left through the Google Cloud IP.
Scale and rotate the proxy pool
CloudProxy keeps a fixed number of proxies running for each provider. For Google Cloud, that number comes from GCP_MIN_SCALING:
-e GCP_MIN_SCALING=3
With this setting, CloudProxy tries to maintain three healthy GCP instances. If one disappears, it creates a replacement.
Other providers follow the same naming pattern:
DIGITALOCEAN_MIN_SCALING
AWS_MIN_SCALING
HETZNER_MIN_SCALING
VULTR_MIN_SCALING
More instances mean more IP addresses to rotate between, but every instance also appears on the cloud bill. Three proxies are three running VMs, not one VM wearing three hats.
CloudProxy also has MAX_SCALING variables, such as GCP_MAX_SCALING, but they are currently reserved for future autoscaling and do not control the pool size. For now, MIN_SCALING is effectively the target number of proxies to keep alive.
To replace proxies periodically, set the global AGE_LIMIT value in seconds:
-e AGE_LIMIT=3600
This recycles a proxy after one hour. The default is 0, which disables age-based replacement. Recycling can help move the scraper onto new cloud IPs, although a new datacenter IP is not necessarily an IP with a good reputation.
There is one catch. With normal recycling, several proxies that reach the age limit together may be removed together. CloudProxy can replace them in smaller batches instead:
ROLLING_DEPLOYMENT=True
ROLLING_MIN_AVAILABLE=2
ROLLING_BATCH_SIZE=1
Add these variables to the Docker command with -e, or place them under environment in the Compose file.
ROLLING_MIN_AVAILABLE tells CloudProxy how many healthy proxies must remain available, while ROLLING_BATCH_SIZE limits how many it can recycle at once. This avoids dropping the whole pool while new VMs are still booting. Rolling replacement is disabled by default, so it must be enabled explicitly.
Allow some time for every new instance to become usable. CloudProxy has to request the VM, wait for it to boot, run the startup script, install and configure Tinyproxy, and complete a health check. During that cold start, the dashboard may show fewer healthy proxies than the configured target.
Point the scraper at CloudProxy
Now for the part that actually matters: sending scraping requests through the proxy pool.
The script below asks CloudProxy for a healthy proxy before every page request, builds a requests proxy configuration with basic authentication, and scrapes story titles from Hacker News. Hacker News works well as a first test because its story list is available in ordinary server-rendered HTML and does not need JavaScript.
Install the dependencies first:
python -m pip install requests beautifulsoup4
Create a file named scrape_hn.py:
import os
from urllib.parse import quote, urljoin

import requests
from bs4 import BeautifulSoup

CLOUDPROXY_API = os.getenv(
    "CLOUDPROXY_API",
    "http://localhost:8000",
)

PROXY_USERNAME = os.getenv(
    "PROXY_USERNAME",
    "cloudproxyuser",
)

PROXY_PASSWORD = os.getenv(
    "PROXY_PASSWORD",
    "cloudproxypass123",
)

PAGES = {
    "Top stories": "https://news.ycombinator.com/",
    "Newest": "https://news.ycombinator.com/newest",
    "Show HN": "https://news.ycombinator.com/show",
}


def get_live_proxy() -> tuple[dict[str, str], str]:
    """Get one healthy proxy from CloudProxy."""

    response = requests.get(
        f"{CLOUDPROXY_API}/random",
        timeout=10,
    )
    response.raise_for_status()

    data = response.json()
    proxy = data.get("proxy")

    if not proxy or not proxy.get("ip") or not proxy.get("port"):
        raise RuntimeError(
            "CloudProxy did not return a usable proxy."
        )

    username = quote(PROXY_USERNAME, safe="")
    password = quote(PROXY_PASSWORD, safe="")

    proxy_url = (
        f"http://{username}:{password}@"
        f"{proxy['ip']}:{proxy['port']}"
    )

    proxies = {
        "http": proxy_url,
        "https": proxy_url,
    }

    return proxies, proxy["ip"]


def scrape_hacker_news(
    url: str,
) -> tuple[list[tuple[str, str]], str]:
    """Download one Hacker News page through CloudProxy."""

    proxies, proxy_ip = get_live_proxy()

    response = requests.get(
        url,
        proxies=proxies,
        headers={
            "User-Agent": "cloudproxy-hn-example/1.0",
        },
        timeout=20,
    )
    response.raise_for_status()

    soup = BeautifulSoup(response.text, "html.parser")

    stories = [
        (
            link.get_text(" ", strip=True),
            urljoin(url, link["href"]),
        )
        for link in soup.select("span.titleline > a")
    ]

    if not stories:
        raise RuntimeError(
            "The page loaded, but no Hacker News stories were found."
        )

    return stories, proxy_ip


def main() -> None:
    for section, url in PAGES.items():
        stories, proxy_ip = scrape_hacker_news(url)

        print(f"\n{section} via proxy {proxy_ip}")

        for index, (title, link) in enumerate(
            stories[:5],
            start=1,
        ):
            print(f"{index}. {title}")
            print(f"   {link}")


if __name__ == "__main__":
    try:
        main()
    except requests.RequestException as error:
        raise SystemExit(
            f"HTTP request failed: {error}"
        ) from error
    except (RuntimeError, ValueError, KeyError) as error:
        raise SystemExit(
            f"Scraping failed: {error}"
        ) from error
The username and password must match the values passed to the CloudProxy container. They can also be set as environment variables instead of being left as defaults in the script.
Linux and macOS:
export PROXY_USERNAME="cloudproxyuser"
export PROXY_PASSWORD="cloudproxypass123"

python3 ./scrape_hn.py
Windows:
$env:PROXY_USERNAME = "cloudproxyuser"
$env:PROXY_PASSWORD = "cloudproxypass123"

python .\scrape_hn.py
The output should look roughly like this:
Top stories via proxy 35.209.101.228
1. Code mode yields a 99.2% cost reduction in our systems
   https://www.agent-swarm.dev/blog/code-mode-token-savings
2. Escape IntelliJ: Scala and Kotlin LSPs on Emacs Eglot
   https://jointhefreeworld.org/blog/articles/emacs/emacs-eglot-scala-kotlin/index.html
3. Terence Tao's ChatGPT conversation about the Jacobian Conjecture counterexample
   https://chatgpt.com/share/6a5fdc7a-d6f8-83e8-bbea-8deb42cfed56
Each call to scrape_hacker_news() requests a proxy from /random before downloading the page. With several healthy instances in the pool, different page requests may go through different IPs. The selection is random, though, so CloudProxy can return the same proxy twice.
With only one VM configured, every request will naturally use the same IP. Increase the provider's MIN_SCALING value to give CloudProxy more addresses to choose from.
The proxies dictionary contains both http and https because the proxy handles regular HTTP requests as well as HTTPS connections made through the HTTP CONNECT method. Basic proxy authentication is included directly in the proxy URL.
For a broader introduction to parsing pages, handling pagination, and storing results, see this guide to web scraping with Python.
Troubleshooting
CloudProxy has several moving parts: the local container, the cloud provider API, the VM, Tinyproxy, and the network between them. When something breaks, the logs usually tell which layer is responsible.
Start with:
docker logs -f cloudproxy
The proxy returns 407 Proxy Authentication Required
A 407 response usually means the proxy username or password is wrong.
Check that the scraper uses the same values passed to the CloudProxy container:
PROXY_USERNAME
PROXY_PASSWORD
Also make sure the credentials are included in the proxy URL:
proxy_url = "http://username:password@proxy-ip:8899"
CloudProxy expects alphanumeric proxy credentials. Special characters may need URL encoding and can also cause trouble in the VM startup script, so simple values are safer here.
If the container was restarted with different credentials, existing proxy VMs may still have the old ones. Remove those instances from the dashboard and let CloudProxy create replacements.
CloudProxy keeps logging Waiting
Waiting means the VM exists, but CloudProxy cannot complete its proxy health check yet.
A short wait is normal while the instance boots and installs Tinyproxy. If it continues for several minutes, check:
- whether the VM is still running;
- whether its startup script finished successfully;
- whether Tinyproxy is listening on port
8899; - whether the cloud firewall or security group allows inbound traffic to that port.
In my GCP setup, the VM and Tinyproxy were both fine, but Google Cloud blocked port 8899 until I added an ingress firewall rule.
The cloud provider cannot create an instance
A region or zone may temporarily lack capacity for the selected VM type. The provider API may return an availability, capacity, or resource exhaustion error.
Try another region or zone in the CloudProxy configuration. For GCP, for example:
GCP_ZONE=us-east1-b
Changing the zone also changes where the proxy IP is located, which may matter if the scraper expects traffic from a particular country or region.
The selected machine type can be unavailable as well. In that case, switch to another supported instance size rather than repeatedly retrying the same request.
The cloud account has reached its instance limit
Cloud providers limit how many virtual machines, CPUs, or public IP addresses an account can create. New accounts often start with fairly low quotas.
If CloudProxy stops scaling before reaching MIN_SCALING, check the provider console for:
- running instance counts;
- regional CPU quotas;
- public IP quotas;
- account spending limits;
- billing or verification warnings.
Either remove unused resources, lower MIN_SCALING, move part of the pool to another region, or request a quota increase from the provider.
Enabling another CloudProxy provider can also spread the pool across separate accounts and quota systems.
A proxy is dead or painfully slow
A proxy may disappear between the /random call and the actual request. It can also remain technically alive while responding too slowly to be useful.
Do not keep retrying the same IP forever. Request another proxy from CloudProxy and try again:
target_url = "https://example.com"

for attempt in range(3):
    try:
        proxies, proxy_ip = get_live_proxy()

        response = requests.get(
            target_url,
            proxies=proxies,
            timeout=20,
        )
        response.raise_for_status()
        break
    except requests.RequestException as error:
        print(f"Attempt {attempt + 1} failed: {error}")
else:
    raise RuntimeError(
        "No working proxy found after three attempts."
    )
Set a timeout on both the CloudProxy API request and the target request. Without one, a dead proxy can leave the scraper hanging for a long time.
With a small pool, /random may return the same proxy again. More instances improve the odds of getting another IP, but they also increase the cloud bill.
GCP reports that the VM image does not exist
CloudProxy's old Google Cloud default may still point to:
ubuntu-minimal-2004-lts
That image family was unavailable when I tested the setup. CloudProxy created the VM successfully after I set these values explicitly:
GCP_IMAGE_PROJECT=ubuntu-os-cloud
GCP_IMAGE_FAMILY=ubuntu-2204-lts
This kind of failure is worth checking whenever a self-hosted tool provisions cloud images by name. Providers retire old image families, while project defaults do not always get updated at the same time.
The API returns no healthy proxy
If /random returns an error or an empty proxy value, open:
http://localhost:8000/ui
If every instance is still provisioning, wait for one to become healthy. If the dashboard is empty, inspect the container logs for provider authentication, quota, image, or region errors.
Deleting a broken instance from the dashboard is safe: CloudProxy should create a replacement as long as the configured pool size has not been reached.
Where DIY CloudProxy breaks down
Web scraping with CloudProxy is fine until the target starts doing real bot detection. At that point, swapping one cloud IP for another often stops helping.
Every proxy in the pool is still a datacenter IP from AWS, GCP, DigitalOcean, or another hosting provider. Anti-bot systems such as Cloudflare, DataDome, and HUMAN Security can treat that traffic as lower trust. The result may be a 403, a challenge page, or a response that looks successful but contains nothing useful.
I hit exactly that in testing. Hacker News worked through the GCP proxy without any trouble, but the Cloudflare challenge page at ScrapingCourse returned:
Status: 403
That does not prove the GCP IP was the only reason for the block. A plain requests client also lacks browser execution, normal browser fingerprints, cookies, and other signals anti-bot systems expect. The important part is simpler: adding a cloud proxy did not make the request look like a real browser.
CloudProxy can still work well for static pages, public feeds, documentation, small forums, and other lightly protected sites. The problem starts when the target checks more than the source IP.
JavaScript-heavy pages have a separate limitation. CloudProxy only forwards requests; it does not run a browser. If the useful content appears after JavaScript executes, requests gets only the initial HTML shell. More IP rotation will not fix that. See how to scrape JavaScript-rendered pages for the browser side of the problem.
Geo-targeting is also limited to regions offered by the selected cloud providers, and the IP still looks like a cloud-server IP from that region.
On top of that, VM uptime, quotas, scaling, replacement, bills, and IP reputation all stay on your plate. Once those problems become the main work, it may be easier to move proxy rotation, retries, and rendering behind a managed scraping API.
What running your own cloud proxies actually costs
CloudProxy is free. The proxy pool is not.
The obvious cost is the virtual machines. One proxy means one running cloud instance, and a useful pool usually means several of them. More IPs give better rotation, but they also multiply the monthly bill. Replacing old proxies with AGE_LIMIT can add more churn as instances are deleted and recreated.
Then there is bandwidth. Every scraped page, image, API response, and download leaves the cloud provider through those VMs, so outbound traffic may be billed separately.
The less obvious cost is maintenance. Someone still has to:
- keep Docker and CloudProxy running;
- manage cloud tokens and service account keys;
- watch for failed or slow proxies;
- deal with quotas, unavailable regions, and firewall rules;
- remove abandoned instances;
- react when a provider's IP range starts getting blocked.
That work is manageable for a small internal scraper. It gets less fun when the pool becomes production infrastructure.
DIY spending is also uneven. A quiet month may cost almost nothing beyond a few small VMs. A busier month can mean more instances, more bandwidth, and several hours spent debugging a problem that is not in the scraper itself.
A managed service moves those costs into a subscription. It may cost more than a tiny DIY pool, but pricing and maintenance are easier to plan. ScrapingBee publishes its current plans on the pricing page.
DIY vs managed: which should you use?
Use web scraping with CloudProxy when the target is lightly defended and the main goal is cheap IP rotation. Use a managed API when scraping needs residential IPs, JavaScript rendering, country-level targeting, or a higher success rate without running proxy infrastructure yourself.
Neither option wins everywhere. The useful question is not “Which one is better?” but “Which one matches the target?”
| Target type | DIY CloudProxy | Managed API |
|---|---|---|
| Unprotected sites, internal APIs, and low-defense targets | Good fit. Cheap and usually enough. | Often more than needed. |
| Needs IP rotation but no anti-bot bypass | Works well with a small proxy pool. | Optional. |
| Protected by Cloudflare, DataDome, or HUMAN Security | Often blocked because the IPs come from known datacenter ranges. | Usually the better fit, especially with residential IPs and retry handling. |
| JavaScript-heavy pages or single-page apps | Cannot render JavaScript. A browser must be added separately. | Usually includes browser rendering as part of the request. |
| Geo-targeted content | Limited to regions available from the selected cloud providers. | Better for country-level targeting through dedicated proxy regions. |
| Production volume with no appetite for infrastructure | VM health, scaling, quotas, credentials, and IP reputation stay on your side. | The provider runs the proxy and rendering layer. |
CloudProxy for scraping is a good tool when a datacenter proxy is all the scraper needs. A managed API starts making more sense when the hard part is no longer sending the request, but getting a usable response back.
For a broader look at the available approaches, see these cloud-based web scraping options.
Scraping protected, JavaScript-heavy sites with a managed API
When CloudProxy starts returning 403 responses, adding another cloud VM may not help. The target may need browser rendering, a different proxy tier, or both.
With ScrapingBee, the scraper sends the target URL to the regular API instead of managing a proxy endpoint. Auto Mode tries the available scraping configurations from cheapest to most expensive and stops when one succeeds.
The same request can also extract the useful part of the page with AI, so the response contains the answer rather than a full HTML document.
Here is the same Cloudflare challenge page that returned 403 through CloudProxy:
import os

import requests

API_KEY = os.environ["SCRAPINGBEE_API_KEY"]
API_URL = "https://app.scrapingbee.com/api/v1"
TARGET_URL = "https://www.scrapingcourse.com/cloudflare-challenge"

response = requests.get(
    API_URL,
    headers={
        "Authorization": f"Bearer {API_KEY}",
    },
    params={
        "url": TARGET_URL,
        "mode": "auto",
        "ai_query": (
            "Return the main heading and briefly explain "
            "what this page demonstrates."
        ),
    },
    timeout=180,
)

print("Status:", response.status_code)
print("Auto Mode cost:", response.headers.get("Spb-auto-cost"))
print("Result:")
print(response.text)

response.raise_for_status()
Set the API key before running it.
Linux and macOS:
export SCRAPINGBEE_API_KEY="your-api-key"

python3 ./scrape_with_scrapingbee.py
Windows:
$env:SCRAPINGBEE_API_KEY = "your-api-key"

python .\scrape_with_scrapingbee.py
Unlike CloudProxy, there is no VM address, proxy password, firewall rule, or health check in the scraper. mode=auto lets ScrapingBee decide whether the request needs JavaScript rendering, premium proxies, or the stealth tier.
The ai_query parameter then extracts the requested information from the fetched page. It is optional: remove it when the full HTML is needed for local parsing.
Auto Mode is useful when targets vary. An open HTML page can use a cheap configuration, while a protected page can move up to a stronger one without hard-coding a different set of flags for every site. The successful configuration cost is returned in the Spb-auto-cost header.
For predictable bulk scraping of unprotected pages, CloudProxy may still be cheaper. ScrapingBee makes more sense when getting through the target and returning usable data is worth more than running the proxy infrastructure yourself.
Skip the proxy infrastructure with ScrapingBee
CloudProxy is a cheap way to rotate datacenter IPs on open sites. When a target starts returning 403 responses, needs JavaScript, or changes its defenses from page to page, ScrapingBee can take over the harder parts.
Auto Mode picks the cheapest proxy and rendering configuration that successfully loads the page, while AI extraction can return the data you asked for instead of a full page of HTML. Residential proxies, browser rendering, retries, and geo-targeting are all available without running VMs or maintaining a proxy pool.
Get 1,000 free API credits. No credit card required.
CloudProxy web scraping FAQs
Is CloudProxy free?
Yes, the CloudProxy software is free and open-source under the MIT license. Running it still costs money because every proxy is a VM in your own cloud account, plus bandwidth and maintenance time.
Does CloudProxy work on Cloudflare or DataDome sites?
Usually not very well. CloudProxy uses datacenter IPs, and protected sites may return a 403, a challenge page, or an empty response. In my test, a Cloudflare challenge page returned 403 through the GCP proxy.
CloudProxy vs residential proxies: what's the difference?
CloudProxy creates datacenter proxies on AWS, GCP, DigitalOcean, and similar providers. They are cheap and easy to create, but their network ranges are easy to identify and get blocked more often. Residential proxies cost more but usually work better on defended targets.
Can CloudProxy render JavaScript?
No. CloudProxy rotates proxies, but it does not run a browser or execute JavaScript. For single-page apps and other dynamic sites, add a headless browser or use a scraping API with JavaScript rendering.
How much does running CloudProxy cost?
The software is free, but every proxy is a billed cloud instance. Multiply that by the pool size, then add outbound bandwidth and the time spent handling credentials, dead instances, quotas, and blocked IP ranges.
What's a good CloudProxy alternative?
For open sites, a small DIY pool or a free proxy list may be enough. For protected or JavaScript-heavy pages, a managed scraping API is the more practical option. ScrapingBee can choose the proxy and rendering setup with Auto Mode, then return either the full page or extracted data through its AI scraping features.

Ilya is an IT tutor and author, web developer, and ex-Microsoft/Cisco specialist. His primary programming languages are Ruby, JavaScript, Python, and Elixir. He enjoys coding, teaching people and learning new things. In his free time he writes educational posts, participates in OpenSource projects, tweets, goes in for sports and plays music.