JavaScript has become one of the most popular and widely used languages due to the massive improvements it has seen and the introduction of the runtime known as Node.js. Whether it's a web or mobile application, JavaScript now has the right tools. This article will explain how the vibrant ecosystem of Node.js allows you to efficiently scrape the web to meet most of your requirements.

Prerequisites
This post is primarily aimed at developers who have some level of experience with JavaScript. However, if you have a firm understanding of web scraping but have no experience with JavaScript, it may still serve as light introduction to JavaScript. Still, having experience in the following fields will certainly help:
- ✅ Experience with JavaScript
- ✅ Experience using the browser's DevTools to extract selectors of elements
- ✅ Some experience with ES6 JavaScript (Optional)
⭐ Make sure to check out the resources at the end of this article for more details on the subject!
Outcomes
After reading this post you will be able to:
- Have a functional understanding of Node.js
- Use multiple HTTP clients to assist in the web scraping process
- Use multiple modern and battle-tested libraries to scrape the web
Understanding Node.js: A brief introduction
JavaScript was originally meant to add rudimentary scripting abilities to browsers, in order to allow websites to support more custom ways of interactivity with the user, like showing a dialog box or creating additional HTML content on-the-fly.
For this purpose, browsers are providing a runtime environment (with global objects such as document and window) to enable your code to interact with the browser instance and the page itself. And for more than a decade, JavaScript was really mostly confined to that use case and to the browser. However that changed when Ryan Dahl introduced Node.js in 2009.
Node.js took Chrome's JavaScript engine and brought it to the server (or better the command line). Contrary to the browser environment, it did not have any more access to a browser window or cookie storage, but what it got instead, was full access to the system resources. Now, it could easily open network connections, store records in databases, or even just read and write files on your hard drive.
Essentially, Node.js introduced JavaScript as a server-side language and provides a regular JavaScript engine, freed from the usual browser sandbox shackles and, instead, pumped up with a standard system library for networking and file access.
The JavaScript Event Loop
What it kept, was the Event Loop. As opposed to how many languages handle concurrency, with multi-threading, JavaScript has always only used a single thread and performed blocking operations in an asynchronous fashion, relying primarily on callback functions (or function pointers, as C developers may call them).
Let's check that quickly out with a simple web server example:
// Import the "http" package
const http = require('http');

// Use TCP port 3000 for our server
const PORT = 3000;

// Create a server instance and provide a request handler callback function
const server = http.createServer((req, res) => {
  res.statusCode = 200;
  res.setHeader('Content-Type', 'text/plain');
  res.end('Hello World');
});

// Start listening on port 3000
server.listen(PORT, () => {
  console.log(`Server running at PORT:${PORT}/`);
});
Here, we import the HTTP standard library with require, then create a server object with createServer and pass it an anonymous handler function, which the library will invoke for each incoming HTTP request. Finally, we listen on the specified port - and that's actually it.
There are two interesting bits here and both already hint at our event loop and JavaScript's asynchronicity:
- The handler function we pass to
createServer - The fact that
listenis not a blocking call, but returns immediately
In most other languages, we'd usually have an accept function/method, which would block our thread and return the connection socket of the connecting client. At this point, the latest, we'd have to switch to multi-threading, as otherwise we could handle exactly one connection at a time. In this case, however, we don't have to deal with thread management and we always stay with one thread, thanks to callbacks and the event loop.
As mentioned, listen will return immediately, but - although there's no code following our listen call - the application won't exit immediately. That is because we still have a callback registered via createServer (the function we passed).
Whenever a client sends a request, Node.js will parse it in the background and call our anonymous function and pass the request object. The only thing we have to pay attention to here is to return swiftly and not block the function itself, but it's hard to do that, as almost all standard calls are asynchronous (either via callbacks or Promises) - just make sure you don't run while (true); 😀
But enough of theory, let's check it out, shall we?
If you have Node.js installed, all you need to do is save the code to the file MyServer.js and run it in your shell with node MyServer.js. Now, just open your browser and load http://localhost:3000 - voilà, you should get a lovely "Hello World" greeting. That was easy, wasn't it?
One could assume the single-threaded approach may come with performance issues, because it only has one thread, but it's actually quite the opposite and that's the beauty of asynchronous programming. Single-threaded, asynchronous programming can have, especially for I/O intensive work, quite a few performance advantages, because one does not need to pre-allocate resources (e.g. threads).
All right, that was a very nice example of how we easily create a web server in Node.js, but we are in the business of scraping, aren't we? So let's take a look at the JavaScript HTTP client libraries.
HTTP clients: querying the web
HTTP clients are tools capable of sending a request to a server and then receiving a response from it. Almost every tool that will be discussed in this article uses an HTTP client under the hood to query the server of the website that you will attempt to scrape.
1. Built-In HTTP Client
As mentioned in the server example, Node.js does ship by default with an HTTP library. That library also has a built-in HTTP client.
// Import the "http" package
const http = require('http');

// Send a GET request to example.com and print the response
const req = http.request('http://example.com', res => {
	const data = [];

	res.on('data', _ => data.push(_))
	res.on('end', () => console.log(data.join()))
});

// Close the connection
req.end();
It's rather easy to get started, as there are zero third-party dependencies to install or manage, however - as you can notice from our example - the library does require a bit of boilerplate, as it provides the response only in chunks and you eventually need to stitch them together manually. You'll also need to use a separate library for HTTPS URLs.
In short, it's convenient because it comes out-of-the-box, but it may require you to write more code than you may want. Hence, let's take a look at the other HTTP libraries. Shall we?
2. Fetch API
Another built-in method would be the Fetch API.
While browsers have supported it for a while already, it took Node.js a bit longer, but as of version 18, Node.js does support fetch().
While at it, also check out our dedicated article on node-fetch.
The Fetch API heavily uses Promises and coupled with await, that can really provide you with lean and legible code.
async function fetch_demo()
{
	// Request the Reddit URL and save the response in "resp"
	const resp = await fetch('https://www.reddit.com/r/programming.json', {
		headers: {"User-Agent": "MyCustomAgentString"},
	});

	// Use the .json() method to parse the response as JSON object
	console.log(JSON.stringify(await resp.json(), null, 2));
}

fetch_demo();
The only workaround we had to employ, was to wrap our code into a function, as await is not supported on the top-level yet. Apart from that we really just called fetch() with our URL, awaited the response (Promise-magic happening in the background, of course), and used the json() function of our Response object (awaiting again) to get the response. Mind you, an already JSON-parsed response 😲. We've shown including HTTP headers for the sake of demonstration, but you can skip that to use the default headers.
Not bad, two lines of code, no manual handling of data, no distinction between HTTP and HTTPS, and a native JSON object.
fetch optionally accepts an additional options argument, where you can fine-tune your request with a specific request method (e.g. POST), additional HTTP headers, or pass authentication credentials.
3. Axios
Axios is pretty similar to Fetch. It's also a Promise-based HTTP client and it runs in both, browsers and Node.js. Users of TypeScript will also love its built-in type support.
One drawback, however, contrary to the libraries we mentioned so far, we do have to install it first.
npm install axios
Perfect, let's check out a first plain-Promise example:
// Import Axios
const axios = require('axios')

axios
	// Request Reddit URL
	.get('https://www.reddit.com/r/programming.json')
	// Configure callback for the HTTP response
	.then((response) => {
		console.log(response)
	})
	// Configure error callback
	.catch((error) => {
		console.error(error)
	});
Pretty straightforward. Relying on Promises, we can certainly also use await again and make the whole thing a bit less verbose. So let's wrap it into a function one more time:
async function getForum() {
	try {
		// Request Reddit URL and "await" the response
		const response = await axios.get(
			'https://www.reddit.com/r/programming.json'
		)

		// Print the response, once available and get() returned
		console.log(response)
	} catch (error) {
		console.error(error)
	}
}
All you have to do is call getForum! You can find the Axios library at Github.
4. Node Crawler
The HTTP clients we've discussed here so far simply send HTTP requests and receive responses, and are pretty much use case agnostic. It is up to us to process the response and most often we use other libraries to parse the HTML, maintain a crawl queue, and so on.
What if there was an HTTP framework that was purpose-built for scraping? Crawler is a full-fledged scraping framework that can start with any page on a website and iteratively crawl pages based on a defined callback function, with handy inbuilt features such as crawl queue, rate limiting, and parsing HTML. If you've heard of Scrapy for Python, you can consider this the Node.js equivalent of that.
We can install Crawler using npm as follows:
npm install crawler
Let's look at a quick start example to get all the blogs from the ScrapingBee blog page, and get some information from individual blog pages by crawling those:
const Crawler = require('crawler').default;

// define the Crawler
const c = new Crawler({
	maxConnections: 1,
	callback: (error, res, done) => {
		if (error) {
			console.log(error);
		} else {
			if(res.url == 'https://www.scrapingbee.com/blog/') {
				// for the main blog page,
				// extract all blog URLs and add it to the queue
				const $a = res.$("#content a.shadow-card");
				for(let i=0; i < $a.length; i++) {
				  c.add("https://www.scrapingbee.com" + $a[i].attribs['href']);
				}
			} else {
				// for individual blog pages,
				// extract and print some details from the page
				const title = res.$('title').text();
				const readTime = res.$('#content span.text-blue-200').text();
				console.log({title, readTime});
			}
		}
		done();
	},
});

// Add first URL to queue
c.add("https://scrapingbee.com/blog");
In the above snippet, we started our crawl using a single page, by defining a callback function to be executed for each page visit. In the callback, if the URL is the blog index page, we extract the blog links and add them to the queue. If the URL is a blog page, we extract and print some details from that page. The crawler runs until all the URLs in the queue are exhausted, and we get some output like this:
...
{
  title: 'How to bypass PerimeterX anti-bot system in 2025 | ScrapingBee',
  readTime: '20 min read'
}
{
  title: 'Playwright MCP - Scraping Smithery MCP database Tutorial with Cursor | ScrapingBee',
  readTime: '11 min read'
}
...
5. SuperAgent
Much like Axios, SuperAgent is another robust HTTP client that has support for promises and the async/await syntax sugar. It has a fairly straightforward API like Axios, but SuperAgent has more dependencies and is less popular.
Regardless, making an HTTP request with SuperAgent using promises, async/await, and callbacks looks like this:
const superagent = require("superagent")
const forumURL = "https://www.reddit.com/r/programming.json"

// callbacks
superagent
	.get(forumURL)
	.end((error, response) => {
		console.log(response)
	})

// promises
superagent
	.get(forumURL)
	.then((response) => {
		console.log(response)
	})
	.catch((error) => {
		console.error(error)
	})

// promises with async/await
async function getForum() {
	try {
		const response = await superagent.get(forumURL)
		console.log(response)
	} catch (error) {
		console.error(error)
	}
}
You can find the SuperAgent library at GitHub and installing SuperAgent is as simple as npm install superagent.
SuperAgent plugins
One feature, that sets SuperAgent apart from the other libraries here, is its extensibility. It features quite a list of plugins which allow for the tweaking of a request or response. For example, the superagent-throttle plugin would allow you to define throttling rules for your requests.
6. Request (Deprecated)
Though it is not actively maintained any more, Request used to be a popular and widely used HTTP client in the JavaScript ecosystem.
It is fairly simple to make an HTTP request with Request:
const request = require('request')
request('https://www.reddit.com/r/programming.json', function (
  error,
  response,
  body
) {
  console.error('error:', error)
  console.log('body:', body)
})
What you will definitely have noticed here, is that we were neither using plain Promises nor await. That is because Request still employs the traditional callback approach, however there are a couple of wrapper libraries to support await as well.
You can find the Request library at GitHub, and installing it is as simple as running npm install request.
Should you use Request? We included Request in this list because it used to be a popular choice. Nonetheless, development has officially stopped and it is not being actively maintained any more. Of course, that does not mean it is unusable, and there are still lots of libraries using it, but the fact itself, may still make us think twice before we use it for a brand-new project, especially with quite a list of viable alternatives and native fetch support.
Comparison of the different libraries
| Library | ✔️ Pros | ❌ Cons |
|---|---|---|
| HTTP package | Supported out-of-the-box | Relies only on callbacks Separate libraries for HTTP and HTTPS |
| Fetch | Supported out-of-the-box Promise-based with support for await | Limited configurability |
| Axios | Support for TypeScript types | Requires additional dependency |
| Crawler | Full-fledged framework for crawling | Reduced flexibility |
| SuperAgent | Extensible with plugins | Requires additional dependency |
| Request | Used to be a popular choice | Relies only on callbacks Requires additional dependency Not maintained any more |
Data Extraction in JavaScript
Fetching the content of a site is, undoubtedly, an important step in any scraping project, but it's only the first step and we actually need to locate and extract the data as well. This is what we are going to check out next, how we can handle an HTML document in JavaScript and how to locate and select information for data extraction.
First off, regular expressions 🙂
Regular expressions: the hard way
The simplest way to get started with web scraping without any dependencies, is to use a bunch of regular expressions on the HTML content you received from your HTTP client. But there is a big tradeoff.
While absolutely great in their domain, regular expressions are not ideal for parsing document structures like HTML. Plus, newcomers often struggle with getting them right ("do I need a look-ahead or a look-behind?"). For complex web scraping, regular expressions can also get out of hand. With that said, let's give it a go nonetheless.
Say there's a label with some username in it and we want the username. This is similar to what you'd have to do if you relied on regular expressions:
const htmlString = '<label>Username: John Doe</label>'
const result = htmlString.match(/<label>Username: (.+)<\/label>/)

console.log(result[1])
// John Doe
We are using String.match() here, which will provide us with an array containing the data of the evaluation of our regular expression. As we used a capturing group ((.+)), the second array element (result[1]) will contain whatever that group managed to capture.
While this certainly worked in our example, anything more complex will either not work or will require a way more complex expression. Just imagine you have a couple of <label> elements in your HTML document.
Don't get us wrong, regular expressions are an unimaginably great tool, just not for HTML 😊 - so let us introduce you to the world of CSS selectors and the DOM.
Cheerio: Core jQuery for traversing the DOM
Cheerio is an efficient and lightweight library that allows you to use the rich and powerful API of jQuery on the server-side. If you have used jQuery before, you will feel right at home with Cheerio. It provides you with an incredibly easy way to parse an HTML string into a DOM tree, which you can then access via the elegant interface you may be familiar with from jQuery (including function-chaining).
// Import Cheerio
const cheerio = require('cheerio')

// Parse the provided HTML into a Cheerio object
const $ = cheerio.load('<h2 class="title">Hello world</h2>')

// Set the text of the "h2" tag and add an HTML class
$('h2.title').text('Hello there!')
$('h2').addClass('welcome')

// Print the modified HTML document
$.html()
// <h2 class="title welcome">Hello there!</h2>
As you can see, using Cheerio really is almost identical to how you'd use jQuery.
Keep in mind, Cheerio really focuses on DOM-manipulation and you won't be able to directly "port" jQuery functionality, such as XHR/AJAX requests or mouse handling (e.g. onClick), one-to-one in Cheerio.
Cheerio is a great tool for most use cases when you need to handle the DOM yourself. Of course, if you want to crawl a JavaScript-heavy site (e.g. typical Single-page applications) you may need something closer to a full browser engine. We'll be talking about that in just a second, under Headless Browsers in JavaScript.
Time for a quick Cheerio example, wouldn't you agree? To demonstrate the power of Cheerio, we will attempt to crawl the ScrapingBee blog and get a list of post names.
First, install Cheerio and Axios by running the following command: npm install cheerio axios.
Then create a new file called crawler.js and copy/paste the following code:
// Import Axios and Cheerio
const axios = require('axios');
const cheerio = require('cheerio');

const getPostTitles = async () => {
	try {
		// Load ScrapingBee Blog
		const { data } = await axios.get(
			'https://www.scrapingbee.com/blog/'
		);

		// Parse HTML with Cheerio
		const $ = cheerio.load(data);

		// Initialise empty data array
		const postTitles = [];

		// Iterate over all anchor links for the given selector and ....
		$('#content a.shadow-card').each((_idx, el) => {
			// .... extract for each the tag text and add it to the data array
			const postTitle = $(el).text()
			postTitles.push(postTitle)
		});

		// Return the array with all titles
		return postTitles;
	} catch (error) {
		throw error;
	}
};

// Wait for the promise to fulfill and print the title array it returned
getPostTitles()
	.then((postTitles) => console.log(postTitles));
getPostTitles() is an asynchronous function that will crawl the ScrapingBee blog. First, the HTML of the website is obtained using a simple HTTP GET request with the Axios HTTP client library. Then, the HTML data is fed into Cheerio using the cheerio.load() function.
Wonderful, we now have, in good old-fashioned jQuery-manner, the fully parsed HTML document as DOM tree in $. What's next? Well, it might not be a bad idea to know where to get our posting titles from. So, let's right click one of the titles and pick Inspect. That should get us right to the right element in the browser's developer tools.
Excellent, equipped with our knowledge on XPath or CSS selectors, we can now easily compose the expression we need for that element. For our example, we chose CSS selectors and following one just works beautifully.
#content a.shadow-card
If you used jQuery, you probably know what we are up to, right? 😏
$('#content a.shadow-card')
You were absolutely right. The Cheerio call is identical to jQuery (there was a reason why we used $ for our DOM variable before) and using Cheerio with our CSS selector will give us the very list of elements matching our selector.
Now, we just need to iterate with each() over all elements and call their text() function to get their text content. 💯 jQuery, isn't it?
So much about the explanation. Time to run our code.
Open up your shell and run node crawler.js. You should now have a list of post titles similar to this:
[
  11 min readThe Best JavaScript Web Scraping LibrariesDiscover the best JavaScript web scraping libraries for 2025. We compare Playwright, Puppeteer, Cheerio, and more with code examples, pros, and cons to help you choose the right tool.Ilya Krukowski\n' +
	'09 June 2025',
  '7 min readurllib3 vs. Requests: Which HTTP Client is Best for Python?We compare urllib3 vs. Requests to show you which is best suited for different scenarios.Karthik Devan\n' +
	'03 June 2025',
  '40 min readPython Web Scraping: Full Tutorial With Examples (2025)Learn about web scraping in Python with this step-by-step tutorial. We will cover almost all of the tools Python offers to scrape the web. From Requests to BeautifulSoup, Scrapy, Selenium and more.Kevin Sahin\n' +
	'27 May 2025',
  '19 min readPython HTML ParsersWeb scraping comes in handy when collecting large amounts of data from the internet. This roundup shares a list of popular Python HTML parsers you can use to simplify web scraping.Karthik Devan\n' +
	'26 May 2025',
  '11 min readWhat is Screen Scraping and How To Do It With ExamplesUnlock data from any source! Learn Python screen scraping for web, GUIs, and terminals. Practical examples, tools, and tips to get you started.Grzegorz Piwowarek\n' +
	'19 May 2025',
  '56 min readWeb Scraping with R Tutorial: Scraping BrickEconomy.comIn-depth R web scraping tutorial. Master data extraction with rvest, httr2, & chromote. Handle JavaScript, pagination, avoid blocks & analyze results. Code included.Ismail Ajagbe\n' +
	'12 May 2025',
  '32 min readChatGPT Scraping - How to Vibe Scrape with ChatGPTCan ChatGPT scrape the web for product data? We tested it on Apple’s refurbished store and documented the journey from vibe coding to real scraping.Karthik Devan\n' +
	'09 May 2025',
  '20 min readHow to bypass PerimeterX anti-bot system in 2025Learn how to bypass PerimeterX/HUMAN anti-bot system with working examples that you can use straight away to scrape the data you need.Ilya Krukowski\n' +
	'06 May 2025',
  "11 min readPlaywright MCP - Scraping Smithery MCP database Tutorial with CursorDiscover how AI, using Model Context Protocol (MCP), can scrape web data without code, showcasing the Playwright MCP's potential and limitations in web scraping.Karthik Devan\n" +
	'28 April 2025',
  '28 min readThe Best Web Scraping Tools & Software in 2025Web scraping tools & software are used to extract data from the internet. Here is our list of the best web scraping tools for 2025.Kevin Sahin\n' +
	'22 April 2025',
  '8 min readWeb Scraping with PerlIn this tutorial, you will learn the basics of using Perl for web scraping and data extraction and parsing with the help of the TreeBuilder library.Alexander M\n' +
	'14 April 2025',
  '24 min readWeb Scraping with RubyLearn web scraping with Ruby with this step-by-step tutorial. We will see the different ways to scrape the web in Ruby through lots of example gems like Nokogiri, Kimurai and HTTParty.Ilya Krukowski\n' +
	'07 April 2025',
  '13 min readWeb Scraping with Scala - Easily Scrape and Parse HTMLThis tutorial covers the main tools and techniques for web scraping in Scala. You will learn how to use the Jsoup library to parse HTML with Scala and render Javascript with Selenium.Grzegorz Piwowarek\n' +
	'24 March 2025',
  '17 min readBrowserUse: How to use AI Browser Automation to ScrapeExplore AI-powered browser automation with BrowserUse. Learn to scrape data, log in and create reports using Python scripts and clear step-by-step prompts.Ilya Krukowski\n' +
	'17 March 2025',
  '21 min readHow to find all URLs on a domain’s website (multiple methods)Crawl any website! Step-by-step guide to finding all URLs on a domain to make scraping all their content easy. Multiple methods that are easy to follow.Ilya Krukowski\n' +
	'11 March 2025'
]
While this is a simple use case, it demonstrates the simple nature of the API provided by Cheerio.
Do not forget to check out our Node.js Axios proxy tutorial if you want to learn more about using proxies for web scraping!
If your use case requires the execution of JavaScript and loading of external sources, the following few options will be helpful.
jsdom: the DOM for Node
Similarly to how Cheerio replicates jQuery on the server-side, jsdom does the same for the browser's native DOM functionality.
Unlike Cheerio, however, jsdom does not only parse HTML into a DOM tree, it can also handle embedded JavaScript code and it allows you to "interact" with page elements.
Instantiating a jsdom object is rather easy:
// Import jsdom
const { JSDOM } = require('jsdom')

// Parse the given HTML document with jsdom
const { document } = new JSDOM(
	'<h2 class="title">Hello world</h2>'
).window

// Use querySelector() to get the h2 element with the specified HTML class
const heading = document.querySelector('.title')

// Set its text and add a class
heading.textContent = 'Hello there!'
heading.classList.add('welcome')

heading.outerHTML
// <h2 class="title welcome">Hello there!</h2>
Here, we imported the library with require and created a new jsdom instance using the constructor and passed our HTML snippet. Then, we simply used querySelector() (as we know it from front-end development) to select our element and tweaked its attributes a bit. Fairly standard and we could have done that with Cheerio as well, of course.
What sets jsdom, however, apart is aforementioned support for embedded JavaScript code and, that, we are going to check out now.
The following example uses a simple local HTML page, with one button adding a <div> with an ID.
const { JSDOM } = require("jsdom")

const HTML = `
	<html>
		<body>
			<button onclick="const e = document.createElement('div'); e.id = 'myid'; this.parentNode.appendChild(e);">Click me</button>
		</body>
	</html>`;

const dom = new JSDOM(HTML, {
	runScripts: "dangerously",
	resources: "usable"
});

const document = dom.window.document;

const button = document.querySelector('button');

console.log("Element before click: " + document.querySelector('div#myid'));
button.click();
console.log("Element after click: " + document.querySelector('div#myid'));
Nothing too complicated here:
- we
require()jsdom - set up our
HTMLdocument - pass
HTMLto our jsdom constructor (important, we need to enablerunScripts) - select the button with a
querySelector()call - and
click()it
Voilà, that should give us this output
Element before click: null
Element after click: [object HTMLDivElement]
Fairly straightforward and the example showcased how we can use jsdom to actually execute the page's JavaScript code. When we loaded the document, there was initially no <div>. Only once we clicked the button, it was added by the site's code, not our crawler's code.
In this context, the important details are runScripts and resources. These flags instruct jsdom to run the page's code, as well as fetch any relevant JavaScript files. As jsdom's documentation points out, that could potentially allow any site to escape the sandbox and get access to your local system, just by crawling it. Proceed with caution please.
jsdom is a great library to handle most of typical browser tasks within your local Node.js instance, but it still has some limitations and that's where headless browsers really come to shine.
💡 We released a new feature that makes this whole process way simpler. You can now extract data from HTML with one simple API call. Feel free to check the documentation here or read below for an example.
ScrapingBee API
We at ScrapingBee provide a robust web scraping API that can be used to scrape almost any website without worrying about bypassing anti-bot protections and maintaining your own infrastructure. We take care of routing your requests through a headless browser and premium proxies and offer inbuilt HTML parsing so you can skip all of these and get straight to the data you need. The best part is we also have AI scraping features, where you can pass in AI prompts to extract or summarize data from a URL, without bothering about CSS/XPath selectors.
You can get started with a free ScrapingBee API key loaded with 1000 credits.. Then, you just need to install our Node client library:
npm install scrapingbee
Let's see a basic example to get structured data from a URL using CSS selectors:
const scrapingbee = require('scrapingbee');

async function getBlog(url) {
	const client = new scrapingbee.ScrapingBeeClient(YOUR_API_KEY);
	const response = await client.get({
		url: url,
		params: {
			extract_rules: {
				// pass the CSS selectors here
				"title": "h1",
				"author": "#content div.avatar + strong"
			},
		}
	});

	const decoder = new TextDecoder();
	console.log(decoder.decode(response.data));

}

getBlog('https://www.scrapingbee.com/blog/best-javascript-web-scraping-libraries/');
// Output:
// {"title": "The Best JavaScript Web Scraping Libraries", "author": "Ilya Krukowski"}
Let's see an example with the AI features:
const scrapingbee = require('scrapingbee');

async function getBlog(url) {
	const client = new scrapingbee.ScrapingBeeClient(SBKEY);
	response = await client.get({
		url: url,
		params: {
			ai_query: "summary of the blog",
			ai_selector: "#content",
		}
	});
	const decoder = new TextDecoder();
	console.log(decoder.decode(response.data));

}

getBlog('https://www.scrapingbee.com/blog/best-javascript-web-scraping-libraries/');
// OUTPUT:
// The blog post discusses various JavaScript libraries for web scraping, including
// Playwright, Puppeteer, Cheerio, JSDOM, Puppeteer-extra, Rebrowswer-patches,
// Selenium WebDriver, Node-crawler, Htmlparser2, Apify SDK, and Nightmare.
// Each library is summarized with a quick start, pros, and cons, and the post
// also highlights a SaaS platform, ScrapingBee, for web scraping.
// The conclusion emphasizes choosing the appropriate tool based on the
// complexity of the website being scraped.
You can read more about ScrapingBee's AI Web Scraping Feature here.
Headless Browsers in JavaScript
Sites become more and more complex and often regular HTTP crawling won't suffice any more, but one actually needs a full-fledged browser engine, to get the necessary information from a site.
This is particularly true for SPAs which heavily rely on JavaScript and dynamic and asynchronous resources.
Browser automation and headless browsers come to the rescue here. Let's check out how they can help us to easily crawl Single-page Applications and other sites making use of JavaScript.
1. Puppeteer: the headless browser
Puppeteer, as the name implies, allows you to manipulate the browser programmatically, just like how a puppet would be manipulated by its puppeteer. It achieves this by providing a developer with a high-level API to control a headless version of Chrome by default and can be configured to run non-headless.
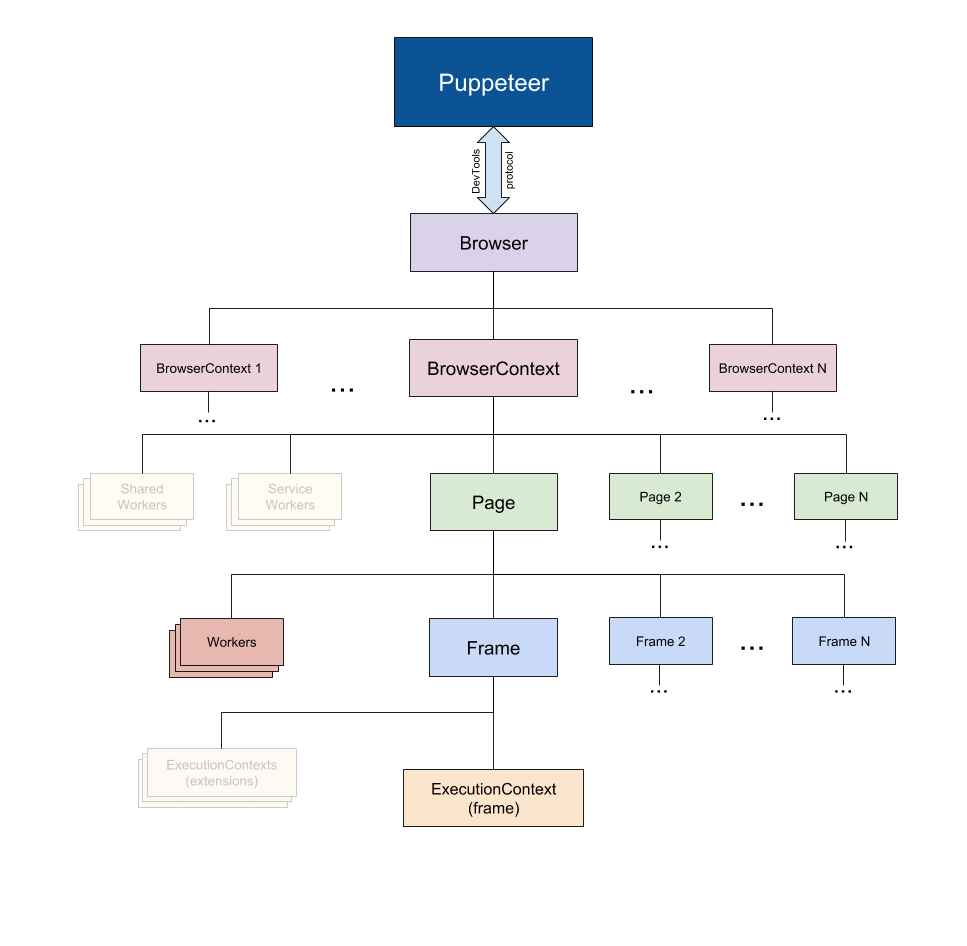 Taken from the Puppeteer Docs (Source)
Puppeteer is particularly more useful than the aforementioned tools because it allows you to crawl the web as if a real person were interacting with a browser. This opens up a few possibilities that weren't there before:
- You can get screenshots or generate PDFs of pages.
- You can crawl a Single Page Application and generate pre-rendered content.
- You can automate many different user interactions, like keyboard inputs, form submissions, navigation, etc.
It could also play a big role in many other tasks outside the scope of web crawling like UI testing, assist performance optimization, etc.
Quite often, you will probably want to take screenshots of websites or, get to know about a competitor's product catalog. Puppeteer can be used to do this. To start, install Puppeteer by running the following command: npm install puppeteer
This will download a bundled version of Chromium which takes up about 180 to 300 MB, depending on your operating system. You can avoid that step, and use an already installed setup, by specifying a couple of Puppeteer environment variables, such as PUPPETEER_SKIP_CHROMIUM_DOWNLOAD. Generally, though, Puppeteer does recommended to use the bundled version and does not support custom setups.
Let's attempt to get a screenshot and PDF of the ScrapingBee blog, create a new file called crawler.js, and copy/paste the following code:
const puppeteer = require('puppeteer')

async function getVisual() {
	try {
		const URL = 'https://www.scrapingbee.com/blog'
		const browser = await puppeteer.launch()

		const page = await browser.newPage()
		await page.goto(URL)

		await page.screenshot({ path: 'screenshot.png' })
		await page.pdf({ path: 'page.pdf' })

		await browser.close()
	} catch (error) {
		console.error(error)
	}
}

getVisual()
getVisual() is an asynchronous function that will take a screenshot of our page, as well as export it as PDF document.
To start, an instance of the browser is created by running puppeteer.launch(). Next, we create a new browser tab/page with newPage(). Now, we just need to call goto() on our page instance and pass it our URL.
All these functions are of asynchronous nature and will return immediately, but as they are returning a JavaScript Promise, and we are using await, the flow still appears to be synchronous and, hence, once goto "returned", our website should have loaded.
Excellent, we are ready to get pretty pictures. Let's just call screenshot() on our page instance and pass it a path to our image file. We do the same with pdf() and voilà, we should have at the specified locations two new files. Because we are responsible netizens, we also call close() on our browser object, to clean up behind ourselves. That's it.
One thing to keep in mind, when goto() returns, the page has loaded but it might not be done with all its asynchronous loading. So depending on your site, you may want to add additional logic in a production crawler, to wait for certain JavaScript events or DOM elements.
But let's run the code. Pop up a shell window, type node crawler.js, and after a few moments, you should have exactly the two mentioned files in your directory.
It's a great tool and if you are really keen on it now, please also check out our other guides on Puppeteer.
- How to download a file with Puppeteer
- Handling and submitting HTML forms with Puppeteer
- Using Puppeteer with Python and Pyppeteer
2. Playwright, the new web scraping framework
Playwright is a cross-language and cross-platform framework by Microsoft.
Its main advantage over Puppeteer is that it is cross platform and very easy to use.
Here is how to simply scrape a page with it:
// Import Playwright
const playwright = require('playwright');

async function main() {
	// Launch Chrome in full-UI mode
	const browser = await playwright.chromium.launch({
		headless: false // setting this to true will not run the UI
	});

	// Open new page
	const page = await browser.newPage();

	// Navigate to Yahoo
	await page.goto('https://finance.yahoo.com/world-indices');
	await page.waitForTimeout(5000); // wait for 5 seconds
	await browser.close();
}

main();
Feel free to check out our Playwright tutorial if you want to learn more.
Comparison of headless browser libraries
| Library | ✔️ Pros | ❌ Cons |
|---|---|---|
| Puppeteer | Very popular | Chrome-only |
| Playwright | Easier integration than Puppeteer Cross-browser support | Still relatively new |
🤖 Check out how the best headless browsers perform against each other when trying to go undetected by browser fingerprinting technology in our How to Bypass CreepJS and Spoof Browser Fingerprinting face-off.
Summary
Phew, that was a long read! But we hope, our examples managed to give you a first glimpse into the world of web scraping with JavaScript and which libraries you can use to crawl the web and scrape the information you need.
Let's give it a quick recap, what we learned today was:
- ✅ Node.js is a JavaScript runtime that allows JavaScript to be run server-side. It has a non-blocking nature thanks to the Event Loop.
- ✅ HTTP clients, such as the native libraries and fetch, as well as Axios, SuperAgent, node-fetch, and Request, are used to send HTTP requests to a server and receive a response.
- ✅ Cheerio abstracts the best out of jQuery for the sole purpose of running it server-side for web crawling but does not execute JavaScript code.
- ✅ JSDOM creates a DOM per the standard JavaScript specification out of an HTML string and allows you to perform DOM manipulations on it.
- ✅ Puppeteer and Playwright are high-level browser automation libraries, that allow you to programmatically manipulate web applications as if a real person were interacting with them.
This article focused on JavaScript's scraping ecosystem and its tools. However, there are certainly also other aspects to scraping, which we could not cover in this context.
For example, sites often employ techniques to recognize and block crawlers. You'll want to avoid these and blend in as normal visitor. On this subject, and more, we have an excellent, dedicated guide on how not to get blocked as a crawler. Check it out.
💡 Should you love scraping, but the usual time-constraints for your project don't allow you to tweak your crawlers to perfection, then please have a look at our scraping API platform. ScrapingBee was built with all these things in mind and has got your back in all crawling tasks.
Happy Scraping!
Resources
Would you like to read more? Check these links out:
- Node.js Website - The main site of Node.js with its official documentation.
- Puppeteer's Docs - Google's documentation of Puppeteer, with getting started guides and the API reference.
- Playwright - An alternative to Puppeteer, backed by Microsoft.
- Generating Random IPs to Use for Scraping - Guide to generating random IPs to help avoid bot detection.
- ScrapingBee's Blog - Contains a lot of information about Web Scraping goodies on multiple platforms.
- Handling infinite scroll with Puppeteer
- Node-unblocker - a Node.js package to facilitate web scraping through proxies.
- A Javascript developer's guide to cURL - If you like this article, you will love this guide about how to use cURL with Javascript.

Kevin worked in the web scraping industry for 10 years before co-founding ScrapingBee. He is also the author of the Java Web Scraping Handbook.