For years, it’s been possible to automate simple tasks on a computer when those tasks have been executed using the command line. This is known as scripting. A bigger challenge, however, is to control the browser since a GUI introduces a lot more variability in how elements act.
Browser automation describes the process of programmatically performing certain actions in the browser (or handing these actions over to robots) that might otherwise be quite tedious or repetitive to be performed manually by a human.
One of the tools built for this task and used by Ruby developers is Watir. In this tutorial, you’ll learn more about browser automation and how to do it using Watir.
What Is Browser Automation?
Browser automation is helpful for all kinds of use cases, such as those involving inputting data, extracting data, or uploading files to remote servers. It allows you to perform actions like inputting text and clicking buttons on webpages with greater speed, accuracy, and at scale than a manual workflow allows.
Imagine a government website that contains social/demographic data but does not expose an API. Many sites like this exist. You can use browser automation to scrape data from such a site (legally of course) and clean it up for your own use.
Browser automation can also be used to automatically fill out forms and documents, which can come in quite handy if you need to upload information for large numbers of clients.
Automation can be applied to testing local applications or performing full-coverage tests across multiple platforms and browsers. For instance, you may want to test how well a website you have built works on different browsers (e.g., Chrome, IE, Firefox, Safari) or different operating systems (e.g., Linux, Mac, Windows). A manual approach would be slow and error prone, but browser automation would ease the process of detecting and repairing broken links, discovering bugs, exposing browser incompatibilities, measuring response times, and so on.
Implementing Watir
Watir (pronounced “water”) stands for Web Application Testing In Ruby. It is a collection of open source Ruby libraries used for automating web browsers. Watir is a wrapper around another popular framework called Selenium. Watir incorporates certain improvements and opens the door for developers to use the Ruby language for their automation tasks.
This tutorial will utilize the Watir framework to explore the popular open source site Wikipedia. You will create a browser instance, visit the Wikipedia landing page, and navigate to the English-language version of the site. On the landing page, you will locate and fill a search bar, send a query, and navigate to the result page. Along the way, you will capture some data and send the output to the terminal. Finally, you will save a screenshot of the search result and close the browser.
The source code for this tutorial can be found in this GitHub repo.
Installing Gems
This tutorial assumes that you already have Ruby set up on your computer and are familiar with the command line and IRB.
The first order of business is to open a console and check if the watir and webdrivers gems are installed on your system. To view all the gems available on your computer, run the following command:
gem list
Examine the output on the console. If either watir or webdrivers (or both) are not available, install them:
gem install watir
gem install webdrivers
Next, fire up IRB on Linux or Mac, or start an Interactive Ruby session on Windows. You may type in the code below line by line or run it as a script. Following along and typing in an IRB session allows changes to be viewed in real time.
Setting Up Watir
To get started, pull in the watir and webdrivers gems:
#watir_testfile.rb

require 'watir'
require 'webdrivers'
Watir provides the necessary automation libraries, and webdrivers allows watir to seamlessly integrate with any supported browser. Without the webdrivers gem, it would be necessary to download different specific packages for each browser you want to utilize.
Launching a Browser
To launch a browser, invoke the following commands:
browser = Watir::Browser.new
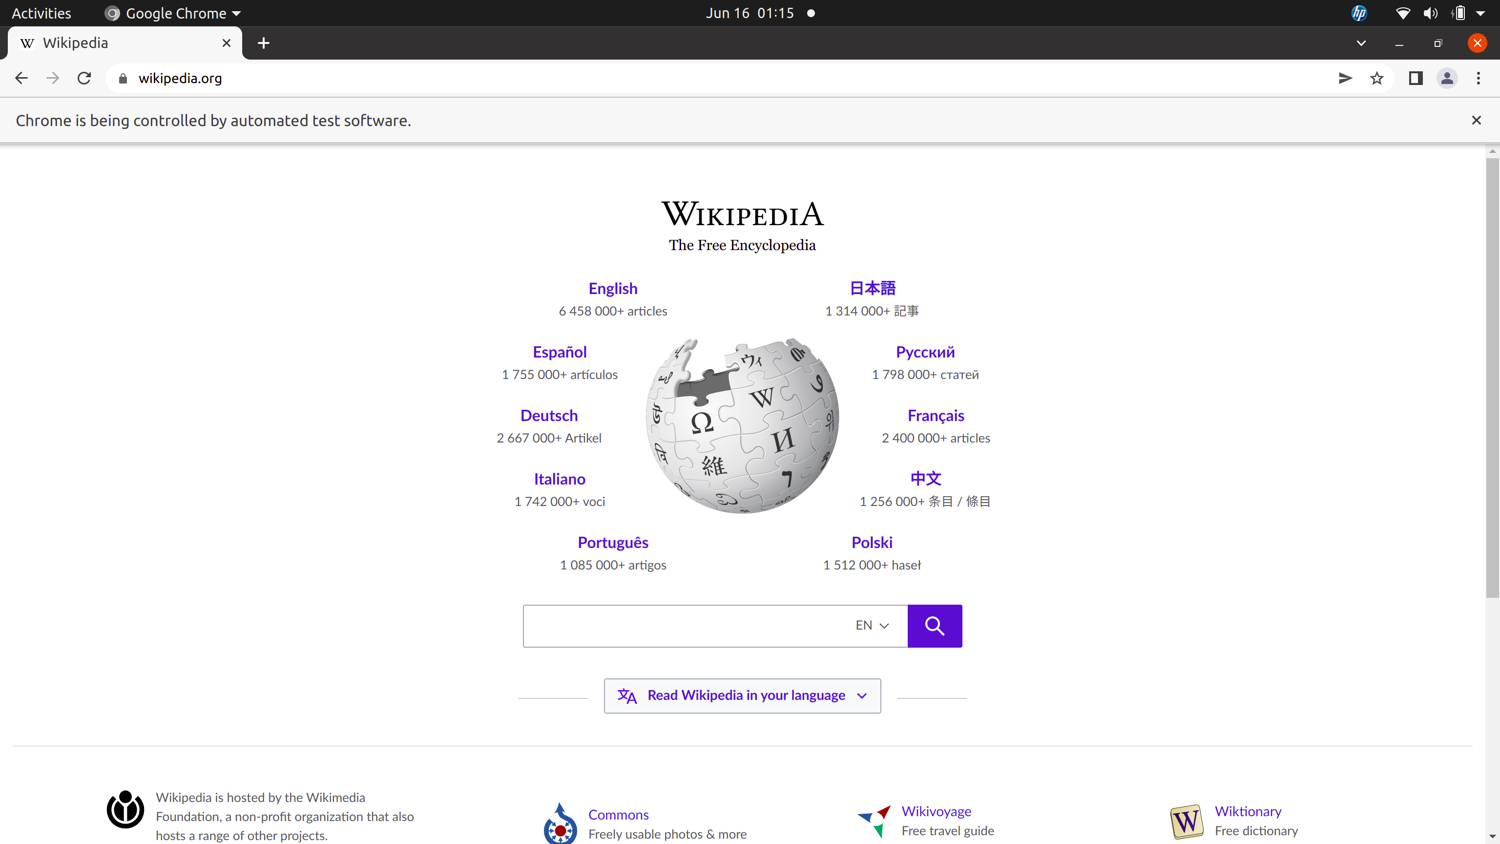
browser.goto ("wikipedia.org")
Here, Watir::Browser.new initializes a browser instance and fires up a so-called “ghost browser,” while goto points the new browser instance to a URL, which you provide.
The new command opens Chrome by default, but other browsers can be used provided they are passed in as options. Compatible browsers are Firefox, Internet Explorer, Edge, and Safari. This command, for instance, opens Firefox: Watir::Browser.new :firefox.
In a Chrome instance, the helpful message “Chrome is being controlled by automated test software” is displayed.
Finding and Interacting with Elements
The links method can be used to get all the links present on the page (in contrast, link gets only the first link). A data-harvesting operation is performed by chaining links to the Ruby method count and outputting the result:
puts browser.links.count
english_link = browser.div(class: "lang1")
english_link.present?
english_link.click
puts browser.url
The Wikipedia landing page contains links to various language versions of the site. You’ll want to target the link for the English language version using its class and attributes. (You may use your browser developer tools to find the classes and attributes.) Calling click on the targeted link navigates to the main Wikipedia page. Here and on subsequent occasions, you can maintain your orientation with browser calls to the url method of watir, which returns the URL of the current page.
Extracting Data from the Web Page
You can find elements on the page using the element method to target CSS selectors. In this instance, you are interested in an id named “articlecount.”
puts browser.element(id:'articlecount').text.strip
Once the element you are interested in is located, you can perform a data-capture operation on it using the text method to grab the text associated with the tagged element. Finally, by calling strip on the result, all trailing newlines are removed.
Locating a Text Field
Locating form fields is done using the text-field method, and it works in a similar way to element as discussed above. Text_field allows you to target form fields using selectors. In this case, you are interested in the class named “vector-search-box-input.”
search_box = browser.text_field(class: "vector-search-box-input")
This information is captured and held in a variable called search-box, which you can use in subsequent operations.
Setting Text and Waiting
Now that you have a way to accept data, it is time to pass some in. Watir provides not only an API to pass in the data you desire but also one that ensures the conditions are right before it is acted upon.
search_box.wait_until(&:present?).set("sailing yachts")
Here, the set method provides a way to populate the form field with data. In this example, the search term supplied is “sailing yachts.” You can change it to anything you wish.
Wait_until serves a special purpose. You may have noticed that page load takes a while to complete after the appropriate commands are issued. Calling set or performing any other operation on an element that has not loaded or is not enabled will raise an error. To avoid this, you need a way to ensure that the set method is invoked only when the element (in this case, the text field) is ready. This is the role of wait_until.
Wait_until is one of two methods defined in the module Waitable and is included in the Element, Alert, Window, Browser, ElementCollection, and WindowCollection classes.
Wait_until takes a block (or proc) that establishes the conditions to be met and will execute that block until a true value is obtained. In this case, you pass in the method present? as a proc, and it checks for the availability of the element. Wait_until will evaluate the condition until it returns a true value.
The other method made available by Waitable is wait_while. Wait_while is similar to wait_until, but it evaluates the given condition until it turns false. Neither wait_until nor wait_while run indefinitely; both have a thirty-second default time-out that can be adjusted as needed.
Clicking Buttons
You can click a button on a webpage to execute a search or perform some other activity. Here, you’ll locate the button element using the button class and the value attribute. Then you’ll call click on this element to have the browser navigate to a new page. These lines of code locate the button element associated with the search box and execute the search:
button = browser.button(value: "Go")
button.click
puts browser.url
Executing JavaScript
Watir can do more than locating page elements and submitting data. It also provides a way to execute javascript in the browser and does so using the execute_script method. For instance, the following code creates an alert modal with a customized message that pops up on the current page:
browser.execute_script("alert('On the page for sailing yachts !')")
browser.alert.wait_until { |a| a.text == "On the page for sailing yachts !" }
sleep 3
browser.alert.ok
The first line creates the modal with the embedded message. On the next line, a now-familiar method makes another appearance. For reasons similar to those discussed previously, it is necessary to synchronize page loads with requests—thus the use of wait_until. Here, wait_until runs a check against the supplied text (“On the page for sailing yachts!”), and the alert modal is fired off when the text appears on the page. Then, alert.ok closes the modal.
The sleep method suspends execution of the current thread for a given duration. The call to sleep is not strictly necessary, and in many instances within the context of browser automation, using it is regarded as sloppy coding since methods provided by the Waitable module typically operate more efficiently. Here, it is added for the convenience of the user. Automation software is indifferent, but humans appreciate visual cues, and sleep causes persistence of the modal on the screen. Without it, the alert modal would almost instantaneously close after firing.
Taking a Screenshot
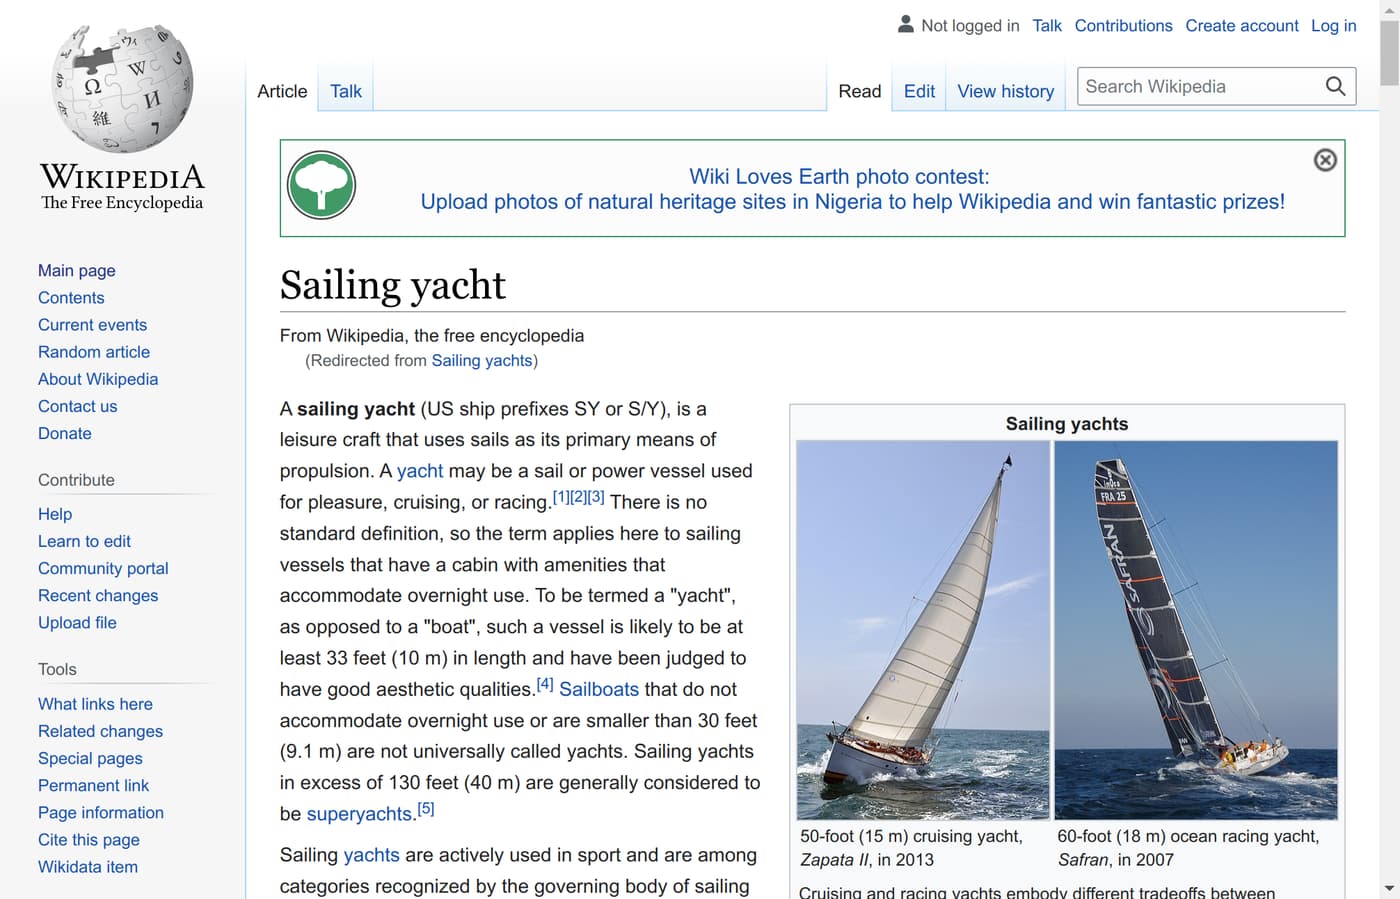
Finally, you can take a screenshot using the screenshot method, save it to a local file, and close the browser. Use the following code to do so:
browser.screenshot.save("./sailboats_screenshot.png")
browser.close
And that’s all! You’ve successfully automated all the actions associated with browsing a site. Here’s the screenshot captured of the sailboats page:
Conclusion
Watir is a family of libraries for web browser testing and automation. It is highly regarded in the Ruby community and easy to learn and use. In this tutorial, you learned how to set it up and harness its most common functionalities. These include selecting elements, sending and capturing data, executing JavaScript, and taking screenshots. However, Watir can do much more. It can be used for advanced web scraping or even paired with popular testing frameworks like minitest and rspec and used for automated, headless testing. To learn more about Watir’s capabilities, check out this Ruby post or visit Watir’s official guides.
Before you go, check out these related reads:

Doctor, software developer, and entrepreneur from Nigeria. Ruby, Rails, Python, Javascript.