XPath is a technology that uses path expressions to select nodes or node-sets in an XML document (or in our case an HTML document). Even if XPath is not a programming language in itself, it allows you to write an expression which can directly point to a specific HTML element, or even tag attribute, without the need to manually iterate over any element lists.
It looks like the perfect tool for web scraping right? At ScrapingBee we love XPath! ❤️
In our previous article about web scraping with Python we already briefly addressed XPath expressions. And now it's time to dig a bit deeper into this subject.

Why learn XPath
- Knowing how to use basic XPath expressions is a must-have skill when extracting data from a web page
- It's more powerful than CSS selectors (e.g. you can reference parent elements)
- It allows you to navigate the DOM in any direction
- Can match text inside HTML elements
Entire books have been written on the subject of XPath and I most certainly would not want to make the claim now that this article will provide a comprehensive guide on every single aspect of the subject, it rather is an introduction to XPath and we will see through real examples how you can use it for your web scraping projects.
But first, let's talk a little about the DOM
Document Object Model
I am going to assume you already know HTML, so this is just a small refresher.
As you already know, a web page is a document structured with a hierarchy of HTML tags, which describe the overall page layout (i.e. paragraphs, lists) and contain the relevant content (i.e. text, links, images) and so on. Let's check out a basic HTML page, to understand what the Document Object Model is.
<!doctype html>
<html>
    <head>
        <title>What is the DOM ?</title>
        <meta charset="utf-8" />
    </head>

    <body>
        <h1>DOM 101</h1>
        <p>Webscraping is awsome !</p>
        <p>Here is my <a href="https://www.scrapingbee.com/blog/">blog</a></p>
    </body>
</html>
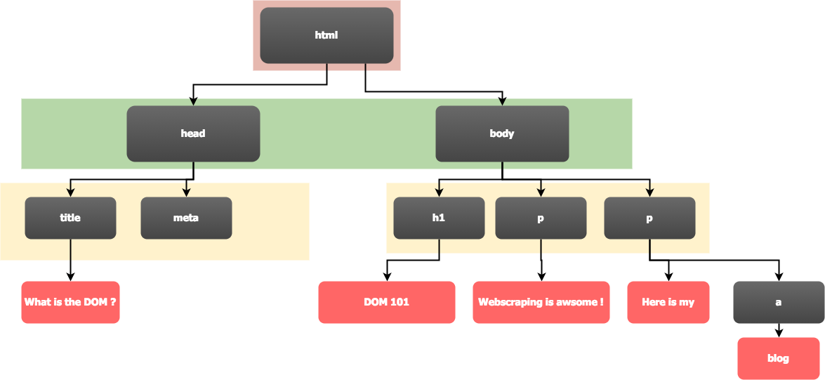
As you notice from the image (and the line indentation provides another hint), the HTML document can be viewed as a tree. And that's exactly what most HTML parsers (i.e. your web browser) will do, they will parse that HTML content into an internal tree representation - and that is called the DOM, the Document Object Model.
The following image is a screenshot of Chrome's developer tools and shows the DOM in its textual representation, which - in our example - is quite similar to our HTML code.
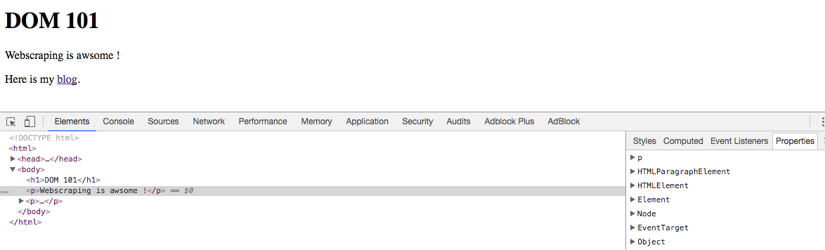
One thing to keep in mind, although, in our example the DOM tree is quite similar to our HTML code, there's no guarantee that this will always be the case and the DOM tree may vary greatly from the HTML code the server originally sent. Why that is, you ask? Our good old friend JavaScript.
As long as there is no JavaScript involved, the DOM tree will mostly match what the server sent, however with JavaScript all bets are off and the DOM tree may have been heavily manipulated by it. Especially SPAs often only send a basic HTML skeleton, which then gets "enriched" by JavaScript. Take Twitter for example, whenever you scroll to the bottom of the page, some JavaScript code will fetch new tweets and will append them to the page, and by that, to the DOM tree.
Now, that we have learned (or rather refreshed) the basics on HTML and the DOM, we can dive into XPath.
XPath Syntax
First let's have a look at some XPath vocabulary:
- Nodes - there are different types of nodes, the root node, element nodes, attribute nodes, and so called atomic values which is a synonym for text nodes in an HTML document.
- Parents - the immediate element containing the current element. Each element node has one parent. In our example above,
htmlis the parent ofheadandbody, whereasbodyis the parent of the site's actual content. - Children - the immediate elements contained by the current element. Element nodes can have any number of children. In our example,
h1and the twopelements are all children ofbody. - Siblings - nodes on the same level as the current element. In our example,
headandbodyare siblings (in their function as children ofhtml), as areh1and the twopelements (in their function as children ofbody). - Ancestors - a list of all parent elements of the current element.
- Descendants - a list of all child elements (with their own children) of the current element.
Following is a list of the fundamental syntax elements, which you will use to assemble your XPath expressions.
| XPath elements | Description |
|---|---|
nodename | This is the simplest one, it selects all nodes with this nodename |
/ | Selects from the root node (useful for writing absolute path) |
// | Selects nodes from the current node that matches |
. | Selects the current node |
.. | Selects the current node's parent |
@ | Selects attributes |
* | Matches any element |
preceding:: | Selects |
following:: | |
function() | Calls an XPath function in the given context (e.g. text(), contains()) |
XPath Predicates
XPath also supports predicates, which allow you to filter on the list of elements you got with your original expression. Predicates are appended to your XPath expression in square brackets, [mypredicate]. A couple of predicate examples would be
| Predicate | Description |
|---|---|
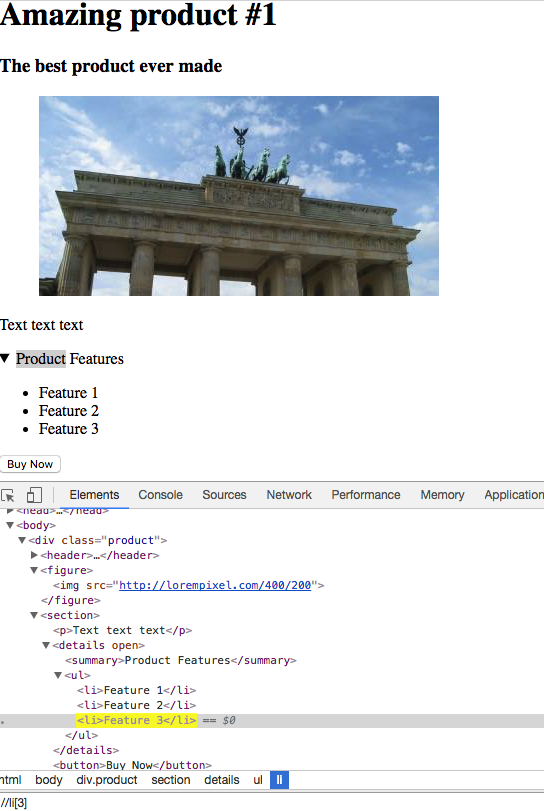
//li[last()] | Selects the last li element of each level. |
//div[@class="product"] | Selects all div elements that have a class attribute with the value product. |
//li[3] | Selects the third (XPath is one-based) li element of each level. |
//div[@class='product'] | Selects all div elements that have the class attribute with the product value. |
XPath Examples
All right, now that we have covered the basic syntax, let's check out a few examples based on the HTML code from our previous example.
| XPath expression | Description |
|---|---|
/html | Selects the document's root element. |
/html/head/title/text() | Selects the text content of <title>. |
//meta/@charset | Selects the charset attribute of all <meta> tags within the document. |
//p[last()] | Selects the last <p> tag on each level. |
//* | Selects every single element within the entire document. |
//*[1] | Selects the first element on each level (i.e. html, head, title, and h1). |
//h1/.. | Selects the parent elements of each <h1> tag. |
XPath In The Browser
Fortunately browsers support XPath natively, so just open your favourite website, press F12 to the developer tools, and switch over to the Elements/Inspector tab to show the current page's DOM tree.
Now, just press Ctrl/Cmd + F and you should get a DOM search field where you can enter any XPath expression and, upon Enter, your browser should highlight the next match.
💡 The developer tools also provide a convenient way to get the XPath expression for any DOM element. Just right-click a DOM element and copy the XPath.
XPath with Python
There are lots of Python packages with support for XPath,
For the following examples, we are going to use Selenium with Chrome in headless mode. Please check out Scraping Single Page Application with Python for more details on how to set up the environment.
1. E-commerce product data extraction
In this example, we will be loading the following Amazon page
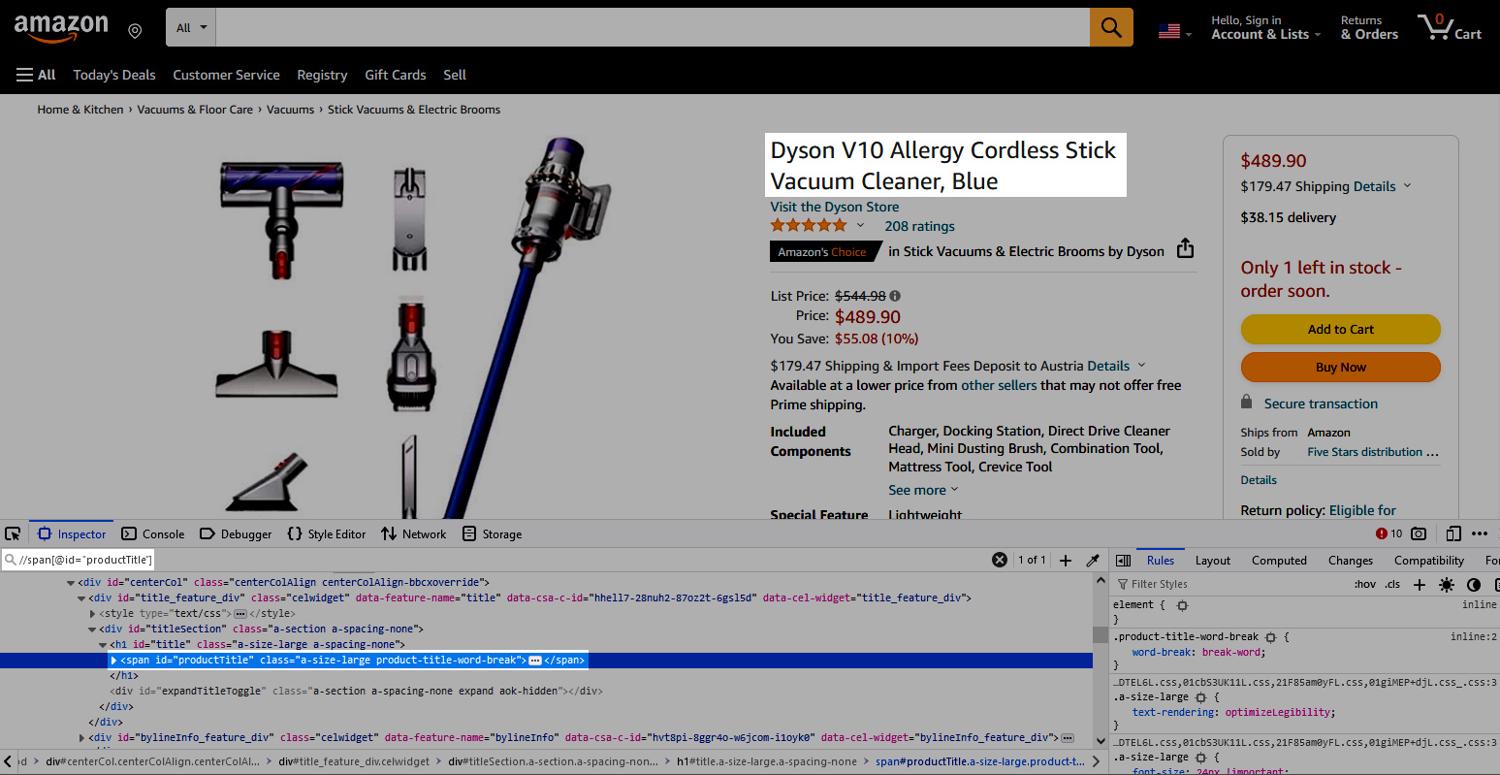
and the use a couple of XPath expressions to select the product name, its price, and its Amazon image.
from selenium import webdriver
from selenium.webdriver.chrome.service import Service
from selenium.webdriver.chrome.options import Options
from webdriver_manager.chrome import ChromeDriverManager
from selenium.webdriver.common.by import By

options = Options()
options.headless = True
options.add_argument("--window-size=1920,1200")
driver = webdriver.Chrome(options=options, service=Service(ChromeDriverManager().install()))
driver.get("https://www.amazon.com/Dyson-V10-Allergy-Cordless-Cleaner/dp/B095LD5SWQ/")

title = driver.find_element(by=By.XPATH, value='//span[@id="productTitle"]')
current_price = driver.find_element(by=By.XPATH, value='//div[@id="corePrice_feature_div"]//span[@data-a-color="price"]/span[1]')
image = driver.find_element(by=By.XPATH, value='//div[@id="imgTagWrapperId"]/img')

product_data = {
'title': title.text,
'current_price': current_price.get_attribute('innerHTML'),
'image_url': image.get_attribute('src')
}

print(product_data)
driver.quit()
While all the browser setup calls can be fascinating (after all, we really run a full-fledged browser instance with that code), we really want to focus on the following expressions in this tutorial.
//span[@id="productTitle"]//div[@id="corePrice_feature_div"]//span[@data-a-color="price"]/span[1]//div[@id="imgTagWrapperId"]/img
All three expressions are relative ones (note the //), which means we are selecting elements from the entire DOM tree without specifying a fully absolute path. Each expression is also using a predicate, to filter based on the elements' IDs.
- The first expression simply selects a
<span>tag with the ID "productTite". This should give us the product name. - The second expression selects a
<div>tag with the ID "corePrice_feature_div" and then searches its children for a<span data-a-color="price">tag and use the first immediate<span>child for the product price. - Last but not least, the image URL. Here, we search for a
<div id="imgTagWrapperId">tag and select its immediate<img>child.
Our example was still relatively easy because we had the luxury of HTML IDs which should be unique. If, for example, you were to filter for HTML classes, you may have to pay more attention and might have to resort to absolute paths.
2. A generic approach to submit login forms with XPath
When you scrape sites, you often have to authenticate against the site. While login forms have different styles and layouts, they usually follow a similar format, with one text field for the username, another one for the password, and finally one submit button.
Even if the format is the same, the DOM structure will differ from site to site - and that's exactly where we can employ XPath and its DOM navigation capabilities to create a "generic" authentication function. Our function will take a Selenium driver object, a URL, a username, and a password and will use all of that to log you into the site.
def autologin(driver, url, username, password):
# Load the page
driver.get(url)

# Find a password input field and enter the specified password string
password_input = driver.find_element(by=By.XPATH, value="//input[@type='password']")
password_input.send_keys(password)

# Find a visible input field preceding out password field and enter the specified username
username_input = password_input.find_element(by=By.XPATH, value=".//preceding::input[not(@type='hidden')]")
username_input.send_keys(username)

# Find the form element enclosing our password field
form_element = password_input.find_element(by=By.XPATH, value=".//ancestor::form")

# Find the form's submit element and click it
submit_button = form_element.find_element(by=By.XPATH, value=".//*[@type='submit']")
submit_button.click()

return driver
All right, what have we exactly done here?
- We simply loaded the specified URL into our driver object with the
get()method. Pretty straightforward so far, right? - Now we used the expression
//input[@type="password"]to find an<input type="password" />tag and - as we boldly assume it's our one and only password field 😎 - enter the provided password (send_keys()). Still easy, isn't it? Don't fret, it's getting more complicated, we are now searching backwards. - Next up, finding the username field. Starting from the password field, we went backwards in the DOM (
preceding::input) and tried to find the immediate previous<input />field which is not hidden. Again, boldly we assume it's our username field and enter the provided username (send_keys()). The hidden part is rather important here, as forms tend to contain such additional fields, for example with one-time to prevent Cross-Site Request Forgery attempts. If we did not exclude such hidden fields, we'd select the wrong input element. - We compiled the form and only need to submit it, but for that we should first find the form. We used
ancestor::formto find the<form>tag which encloses our password field. - We made it. We found the form element, compiled the relevant authentication elements, and now only need to submit the form. For that, we used
*[@type="submit"]to get, from within the form context, any tag of the "submit" type and click it. Done and dusted! 🥳
Please do keep in mind, while this example will work with many sites and will save you the time of analysing each login page manually, it's primarily still a basic showcase for XPath and there will be plenty of sites where it won't work (i.e. combine sign-up/sign-in pages), so please don't use it as drop-in solution for all your scrapers.
3. Handling and filtering HTML content
If you are regular reader of our blog and its tutorials, you will certainly have noticed that we very much like to provide samples on scraping Hacker News, and of course, we'd like to continue this tradition in this article as well.
So, let's scrape - again - the first three pages of https://news.ycombinator.com/newest, but this time with an XPath twist. 🥂
from selenium import webdriver
from selenium.webdriver.chrome.service import Service
from selenium.webdriver.chrome.options import Options
from webdriver_manager.chrome import ChromeDriverManager
from selenium.webdriver.common.by import By

options = Options()
options.headless = True
options.add_argument("--window-size=1920,1200")
driver = webdriver.Chrome(options=options, service=Service(ChromeDriverManager().install()))
driver.get("https://news.ycombinator.com/newest")

articles = []

for i in range(0, 3):
elems = driver.find_elements(by=By.XPATH, value="//a[@class='titlelink'][starts-with(text(), 'Ask HN')]/../..")

for elem in elems:
link = elem.find_element(by=By.XPATH, value=".//a[@class='titlelink']")
articles.append({
"id": elem.get_attribute("id"),
"link": link.get_attribute("href"),
"title": link.text
})

next = driver.find_element(by=By.XPATH, value="//a[@rel='next']")
next.click()

print(articles)

driver.quit()
Once more, let us take a step-by-step deep-dive into what exactly we did here.
- We started with lots of initialisation 😅
- Then, we loaded our start page https://news.ycombinator.com/newest
- Based on the HTML content we received, we used an XPath expression with two predicates and parent pointers to get the grandparent of the selected elements
- Now, we looped over all found elements and stored their IDs in an array, together with the link details of a child
<a>tag - We said we wanted the first three pages, right? So, let's find the next button, click it, and
GOTO 2 - We have collected now quite a bit of information, so it would be a waste not to print it at least, wouldn't it?
As before, in a real world setting we could optimise that code to some extent (e.g. we would not need to search for the anchor tags, only to then go straight to their table row parents) but the point of this exercise was of course to show more XPath use cases - and there occasionally definitely are sites with an HTML structure requiring such acrobatics.
Conclusion
XPath is a very versatile, compact, and expressive tool when it comes to XML (and for that matter HTML) and is often more powerful than CSS selectors, which are very similar in nature of course.
While XPath expressions may seem complicated at the beginning, the really challenging bit often is not the expression itself, but getting the right path, to be precise enough to select the desired element and, at the same time, flexible enough to not immediately break when there are minor changes in the DOM tree.
At ScrapingBee, as we mentioned at the beginning of the article, we really love XPath and CSS selectors and our scraping API makes heavy of both technologies.
💡 While it can be fun to play and tweak XPath expressions, it can still take some significant time out of your business day. If you want an easier solution, please check out our no-code scraping platform. The first 1,000 requests are on us, of course.
I hope you enjoyed this article, if you're interested in more information on CSS selectors, please check out this BeautifulSoup tutorial.
We also wrote an article about XPath vs CSS selectors, don't hesitate to check this out.
Happy Scraping!

Kevin worked in the web scraping industry for 10 years before co-founding ScrapingBee. He is also the author of the Java Web Scraping Handbook.