Playwright is a browser automation library for Node.js (similar to Selenium or Puppeteer) that allows reliable, fast, and efficient browser automation with a few lines of code. Its simplicity and powerful automation capabilities make it an ideal tool for web scraping and data mining. It also comes with headless browser support (more on headless browsers later on in the article). The biggest difference compared to Puppeteer is its cross-browser support. In this article, we will discuss:
- Various features of Playwright
- Common web scraping use cases of Playwright
- How playwright compares to others (Cypress vs Playwright vs Puppeteer vs Selenium) ?
- Playwright Pros and Cons
Playwright is also available for Python if that's your flavour.

What are headless browsers and why they are used for web scraping?
Before we even get into Playwright let’s take a step back and explore what is a headless browser. Well, a headless is a browser without a user interface. The obvious benefits of not having a user interface is less resource requirement and the ability to easily run it on a server. Since headless browsers require fewer resources we can spawn many instances of it simultaneously. This comes in handy when scraping data from several web pages at once.
The main reason why headless browsers are used for web scraping is that more and more websites are built using Single Page Application frameworks (SPA) like React.js, Vue.js, Angular... If you scrape one of those websites with a regular HTTP client like Axios, you would get an empty HTML page since it's built by the front-end Javascript code. Headless browsers solve this problem by executing the Javascript code, just like your regular desktop browser.
🤖 Check out how Playwright performs in headless mode vs other headless browsers when trying to go undetected by browser fingerprinting technology in our How to Bypass CreepJS and Spoof Browser Fingerprinting face-off.
Getting Started with Playwright
The best way to learn something is by building something useful. We will write a web scraper that scrapes financial data using Playwright.
The first step is to create a new Node.js project and installing the Playwright library.
    nmp init --yes
    npm i playwright
Let’s create a index.js file and write our first playwright code.
    const playwright = require('playwright');
    async function main() {
        const browser = await playwright.chromium.launch({
            headless: false // setting this to true will not run the UI
        });

        const page = await browser.newPage();
        await page.goto('https://finance.yahoo.com/world-indices');
        await page.waitForTimeout(5000); // wait for 5 seconds
        await browser.close();
    }

    main();
In the example above we are creating a new chromium instance of the headless browser. Notice I set headless to false for now (line 4), this will pop up a UI when we run the code. Setting this to true will run Playwright in headless mode. We create a new page in the browser and then we visit the yahoo finance website. We're waiting for 5 seconds and then close the browser.
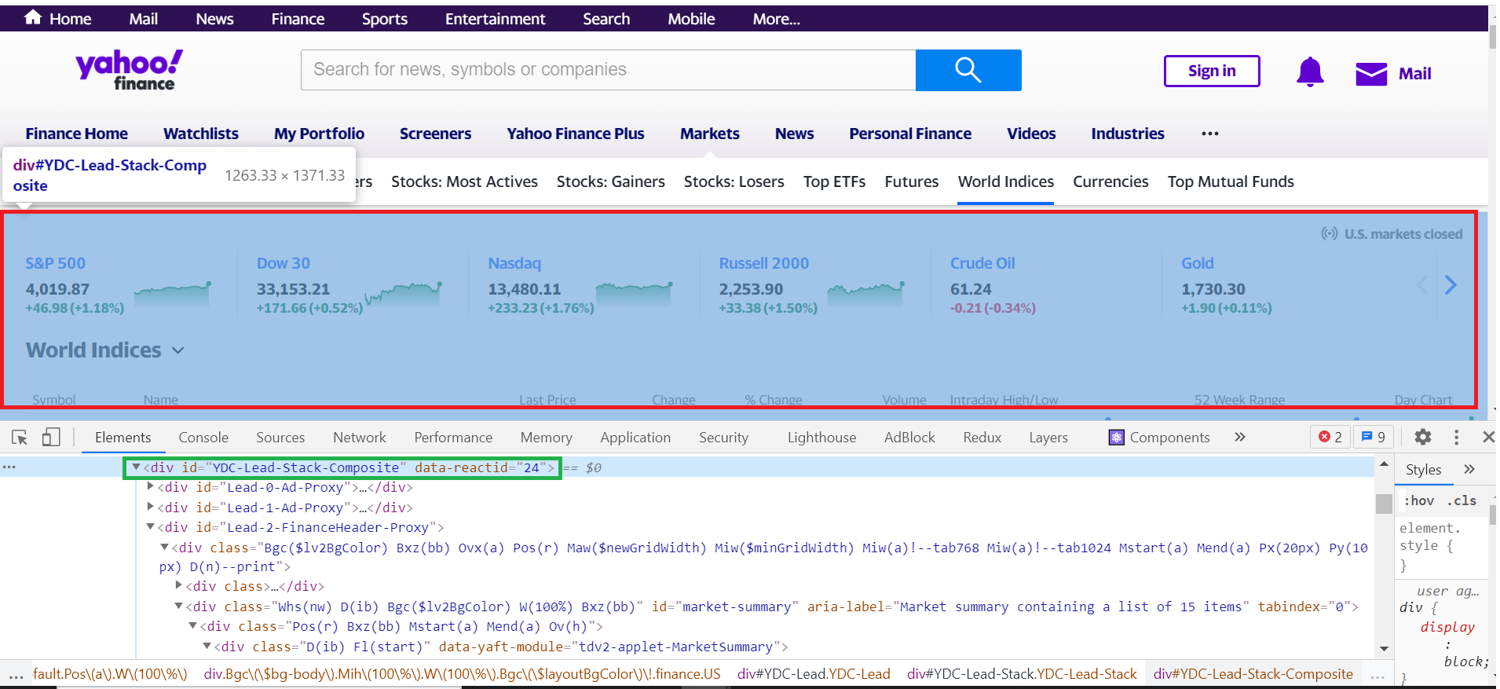
Let’s hop into the yahoo finance website in our browser. Inspect the home page for yahoo finance. Let’s say we are building a financial application and we would like to scrape all the stock market data for our application. On the yahoo home page, you will see that the top composite market data shows in the header. We can inspect the header element and its DOM node in the browser inspector shown below.
Unknown Shortcode
img
Observe that this header has an id=YDC-Lead-Stack-Composite. We can target this id and extract the information within. We can add the following lines to our code.
    const playwright = require('playwright');
    async function main() {
        const browser = await playwright.chromium.launch({
            headless: true // set this to true
        });

        const page = await browser.newPage();
        await page.goto('https://finance.yahoo.com/world-indices');
        const market = await page.$eval('#YDC-Lead-Stack-Composite', headerElm => {
            const data = [];
            const listElms = headerElm.getElementsByTagName('li');
            Array.from(listElms).forEach(elm => {
                data.push(elm.innerText.split('\n'));
            });
            return data;
        });

        console.log('Market Composites--->>>>', market);
        await page.waitForTimeout(5000); // wait
        await browser.close();
    }

    main();
page.$eval function requires two parameters. The first one is a selector identifier. In this scenario, we passed in the id of the node we wanted to grab. The second parameter is an anonymous function. Any kind of client-side code that you can think of running inside a browser can be run in this function.
🔎 Let’s take a close look at the *$eval* code block again.
    const market = await page.$eval('#YDC-Lead-Stack-Composite', headerElm => {
        const data = [];
        const listElms = headerElm.getElementsByTagName('li');
        listElms.forEach(elm => {
            data.push(elm.innerText.split('\n'));
        });
        return data;
    });
The highlighted portion is simple client-side JS code that is grabbing all the li elements within the header node. Then we are doing some data manipulation and returning it.
You can learn more about this $eval function in the official doc here.
Executing this code prints the following in the terminal.

Unknown Shortcode
img
We have successfully scraped our first piece of information.
Scraping list of elements with Playwright
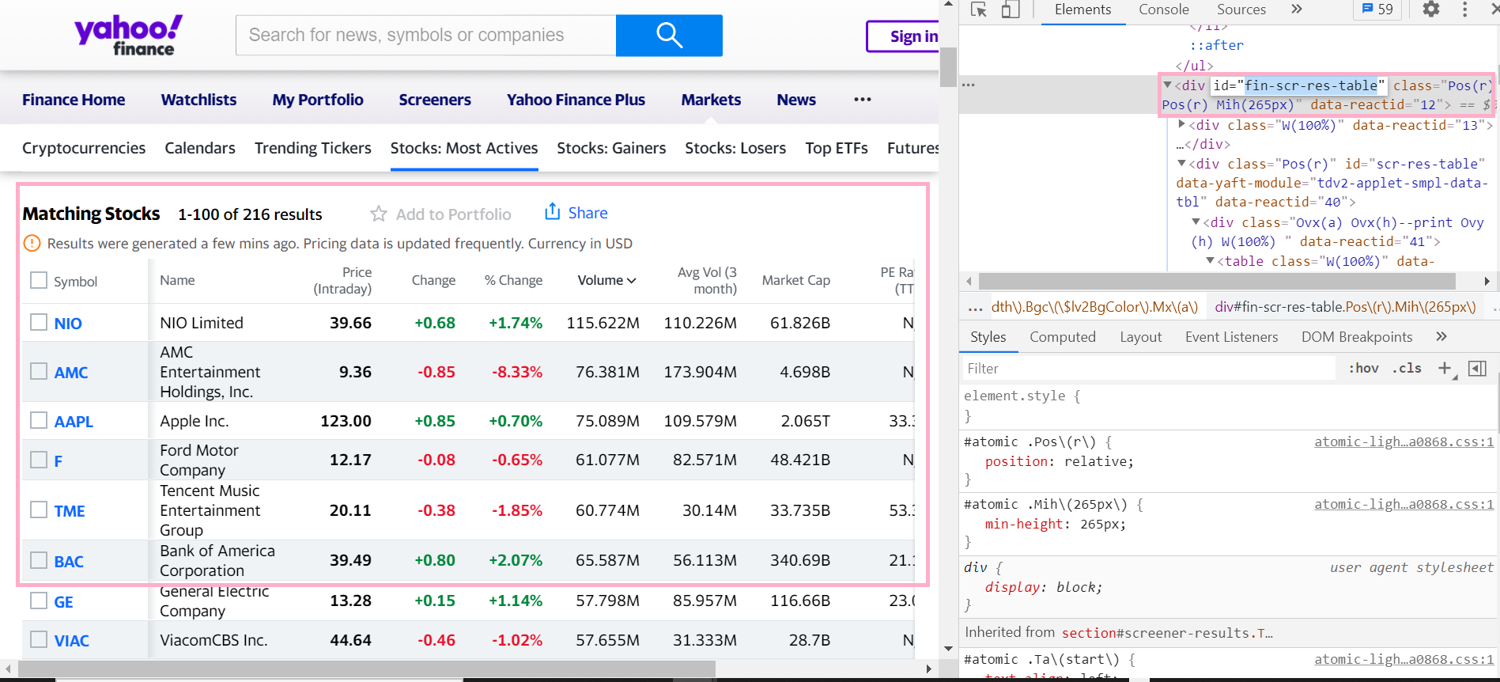
Next, let’s scrape a list of elements from a table. We are going to scrape the most actively traded stocks from https://finance.yahoo.com/most-active. Below I have provided a screenshot of the page and the information we are interested in scraping.
Unknown Shortcode
img
As you can see that the id we are interested in is fin-scr-res-table. We can drill down our search to targeting the table element in that DOM node.
Here’s the script that will do the trick,
    const playwright = require('playwright');
    async function mostActive() {
        const browser = await playwright.chromium.launch({
            headless: true // set this to true
        });

        const page = await browser.newPage();
        await page.goto('https://finance.yahoo.com/most-active?count=100');
        const mostActive = await page.$eval('#fin-scr-res-table tbody', tableBody => {
            let all = []
            for (let i = 0, row; row = tableBody.rows[i]; i++) {
                let stock = [];
                for (let j = 0, col; col = row.cells[j]; j++) {
                    stock.push(row.cells[j].innerText)
                }
                all.push(stock)
            }
            return all;
        });

        console.log('Most Active', mostActive);
        await page.waitForTimeout(30000); // wait
        await browser.close();
    }

    mostActive();
page.$eval sort of acts like querySelector property of client side JavaScript (Learn more about querySelector).
What if I want to scrape all the tags of a certain type (i.e.a, li) in a webpage?
In such cases, we can simple use the page.$$(selector) function for this. This will return all the elements matching the specific selector in the given page.
    async function allLists() {
        const browser = await playwright.chromium.launch({
            headless: true // set this to true
        });

        const page = await browser.newPage();
        await page.goto('https://finance.yahoo.com/');
        const allList = await page.$$('li', selected => {
            let data = []
            selected.forEach((item) => {
                data.push(item.innerText)
            });
            return data;
        });

        console.log('Most Active', allList);
    }
    allLists();
Scraping Images
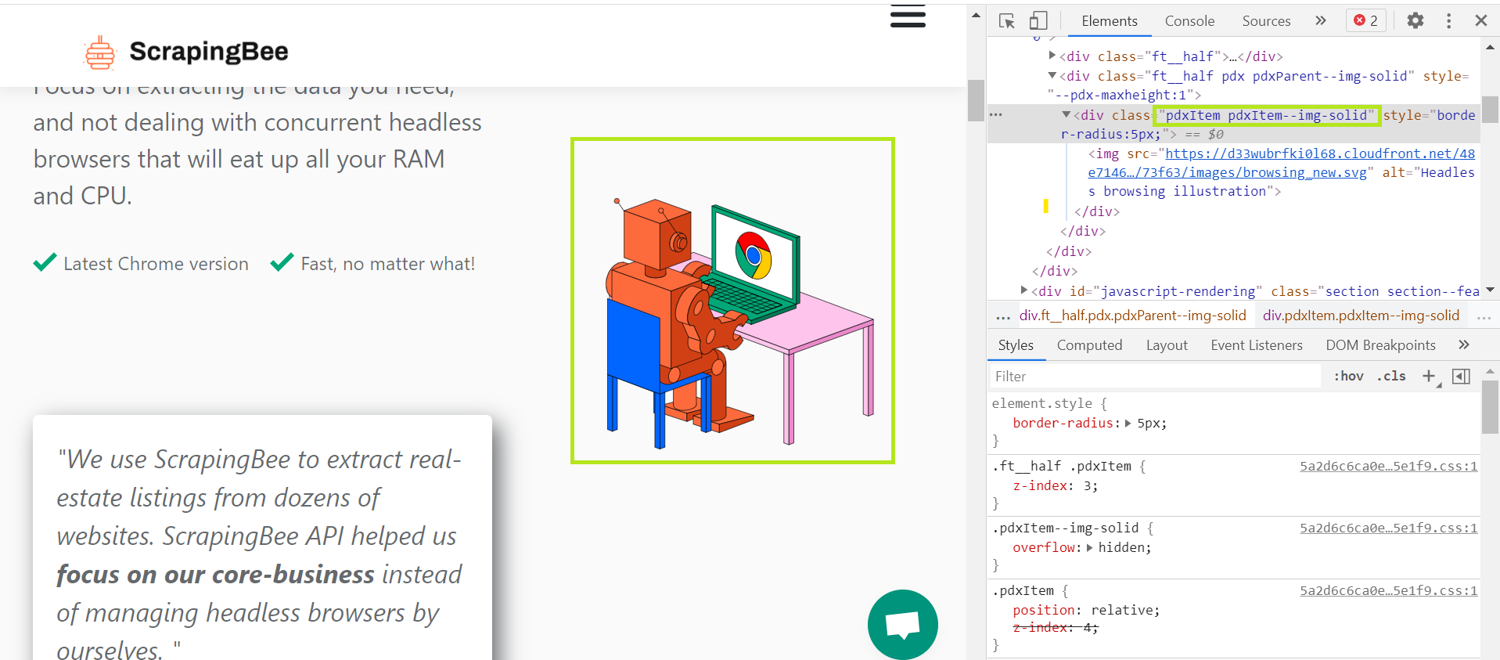
Next, let’s scrape some images from a webpage. For this example we will be using our home page scrapingbee.com. Let’s head over there. Take a look at the image below. We will be scraping the image of our friendly robot ScrapingBeeBot here.
Unknown Shortcode
img
The fundamental idea is the same. First we target the DOM node and them grab the image we are interested in. In order to download the image however, we need the image src. Once we have the source we have to make a HTTP GET request to the source and download the image. Let’s dive into the example below.
    const playwright = require('playwright');
    const axios = require("axios");
    const fs = require("fs");

    async function saveImages() {
        const browser = await playwright.chromium.launch({
            headless: true
        });
        const page = await browser.newPage();
        await page.goto('https://www.scrapingbee.com/');
        const url = await page.$eval(".pdxItem.pdxItem--img-solid img", img => img.src);
        const response = await axios.get(url);
        fs.writeFileSync("scrappy.svg", response.data);
        await browser.close();
    }

    saveImages();
As you can see above, first we target the DOM node we are interested in. Then on line 11 we are acquiring the src attribute from the image tag. Finally we make a GET request with axios and save the image in our file system.
How about taking screenshots?
We can take a screenshot of the page with Playwright as well. Playwright includes a page.screenshot method. Using this method we can take one or multiple screenshots of the webpage.
    async function takeScreenShots() {
        const browser = await playwright.chromium.launch({
            headless: true // set this to true
        });
        const page = await browser.newPage()
        await page.setViewportSize({ width: 1280, height: 800 }); // set screen shot dimention
        await page.goto('https://finance.yahoo.com/')
        await page.screenshot({ path: 'my_screenshot.png' })
        await browser.close()
    }
    takeScreenShots()
We can also limit our screenshot to a specific portion of the screen. We have to specify the coordinates of our viewport. Here’s an example of how to do this.
    const options = {
        path: 'clipped_screenshot.png',
        fullPage: false,
        clip: {
          x: 5,
          y: 60,
          width: 240,
          height: 40
        }
    }

    async function takeScreenShots() {
        const browser = await playwright.chromium.launch({
            headless: true // set this to true
        });
        const page = await browser.newPage()
        await page.setViewportSize({ width: 1280, height: 800 }); // set screen shot dimention
        await page.goto('https://finance.yahoo.com/')
        await page.screenshot(options)
        await browser.close()
    }
    takeScreenShots()
The x and y coordinates starts from the top left corner of the screen.
Querying with XPath expression selectors
Another simple yet powerful feature of Playwright is its ability to target and query DOM elements with XPath expressions. What is an XPath Expression? XPath Expression is a defined pattern that is used to select a set of nodes in the DOM.
☝️ You can learn more about this in our XPath for web scraping article.
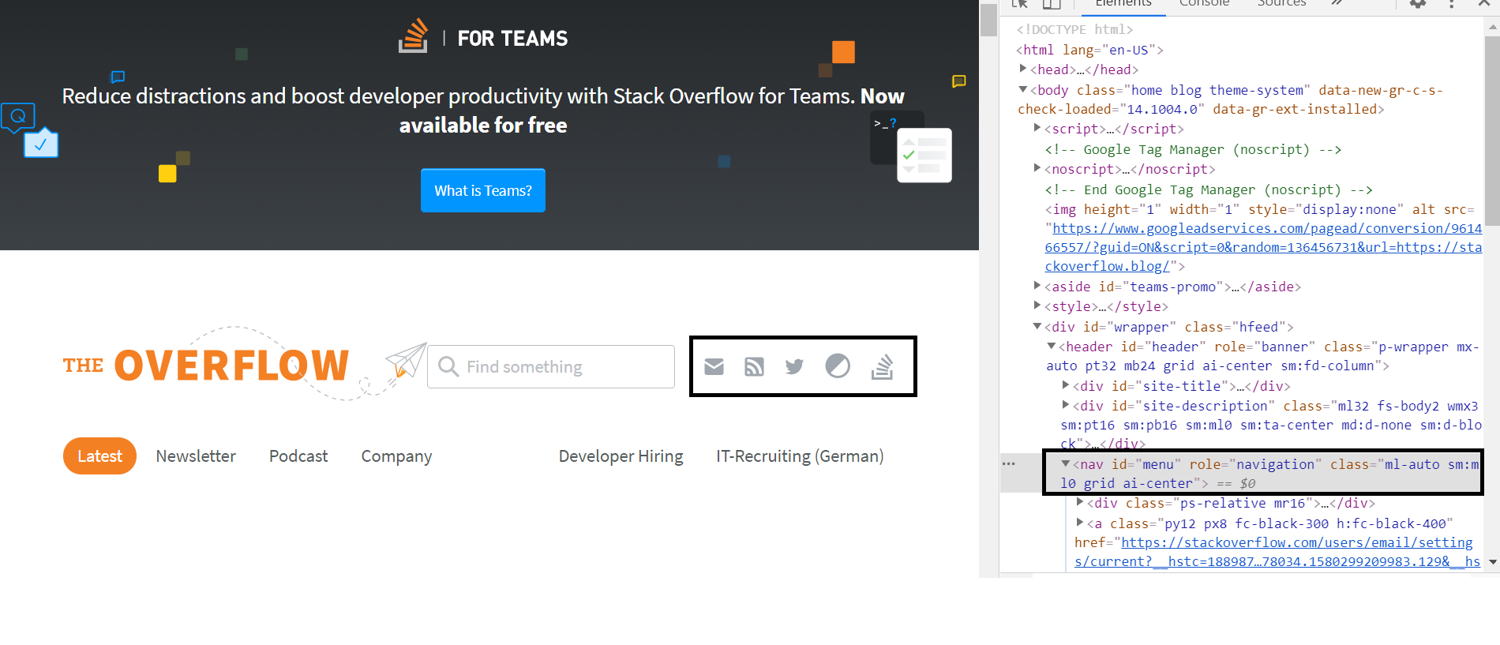
The best way to explain this is to demonstrate this with a comprehensive example. Let’s say we are trying to grab all the navigation links from StackOverflow blog. Observe that we want to scrape the nav element in the DOM. We can see that the nav element we are interested in is suspended in the tree in the following hierarchy html > body > div > header > nav
Unknown Shortcode
img
Using this information we can create our xpath expression. Our expression in this case will be xpath=//html/body/div/header/nav.
Here’s the script that will use the xpath expression to target the nav element in the DOM.
    const playwright = require('playwright');
    async function main() {
        const browser = await playwright.chromium.launch({
            headless: false
        });

        const page = await browser.newPage();
        await page.goto('https://stackoverflow.blog/');
        const xpathData = await page.$eval('xpath=//html/body/div/header/nav',
            navElm => {
                let refs = []
                let atags = navElm.getElementsByTagName("a");
                for (let item of atags) {
                    refs.push(item.href);
                }
                return refs;
            });

        console.log('StackOverflow Links', xpathData);
        await page.waitForTimeout(5000); // wait
        await browser.close();
    }

    main();
The XPath engine inside Playwright is equivalent to native Document.evaluate() expression. You can learn more about it here.
ℹ️ For additional information on XPath read the official Playwright documentation here.
Submitting forms and scraping authenticated routes
There will be times when we would want to scrape a webpage that is authentication protected. Now, one of the benefit of Playwright is that it makes it really simple to submit forms. Let’s dive into an example of this scenario.
    // Example taken from playwright official docs

    const playwright = require('playwright');
    async function formExample() {
        const browser = await playwright.chromium.launch({
            headless: false
        });

        const page = await browser.newPage();
        await page.goto('https://github.com/login');
        // Interact with login form
        await page.fill('input[name="login"]', "MyUsername");
        await page.fill('input[name="password"]', "Secrectpass");
        await page.click('input[type="submit"]');
    }

    formExample();
    // Verify app is logged in
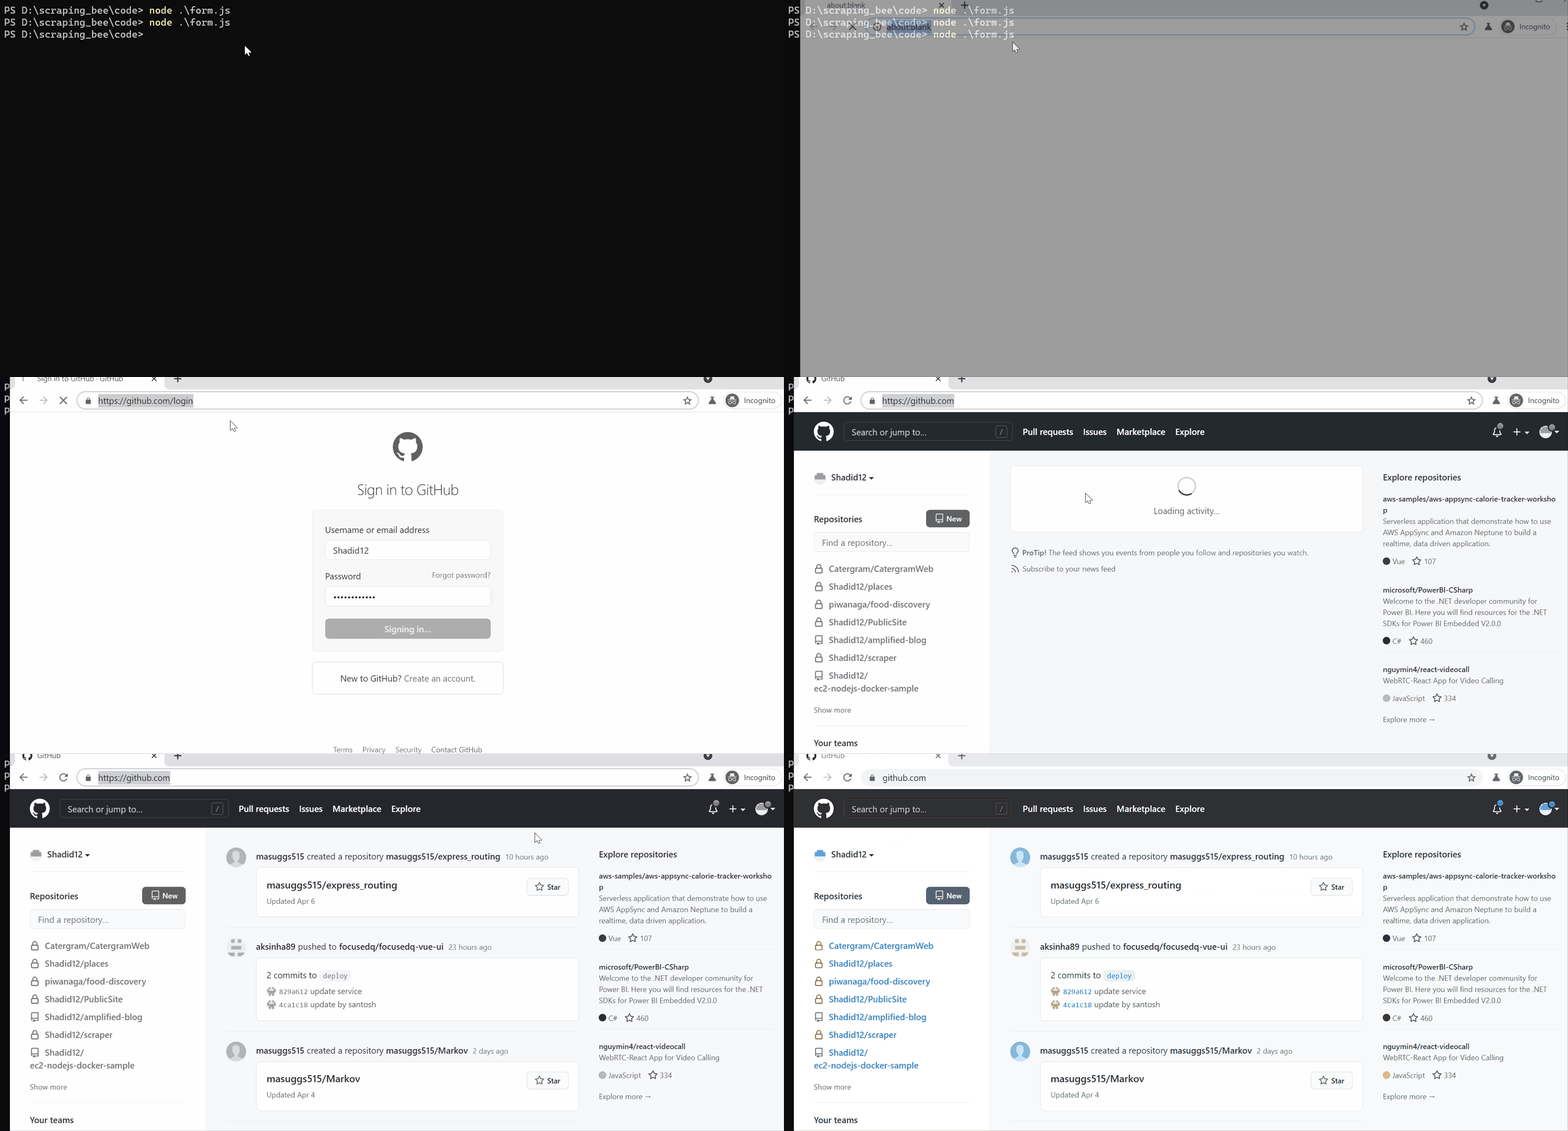
As you can see in the example above we can easily simulate clicks and form fill events. Running the above script will result in something like below.
Unknown Shortcode
img
ℹ️ Checkout the official docs to learn more about authentication with playwright
Playwright vs Others (Puppeteer, Selenium)
How does Playwright compare to some of the other known solutions such as Puppeteer and Selenium? The main selling point of Playwright is the ease of usage. It is very developer-friendly compared to Selenium. Puppeteer on the other hand is also developer-friendly and easy to set up; therefore, Playwright doesn’t have a significant upper hand against Puppeteer.
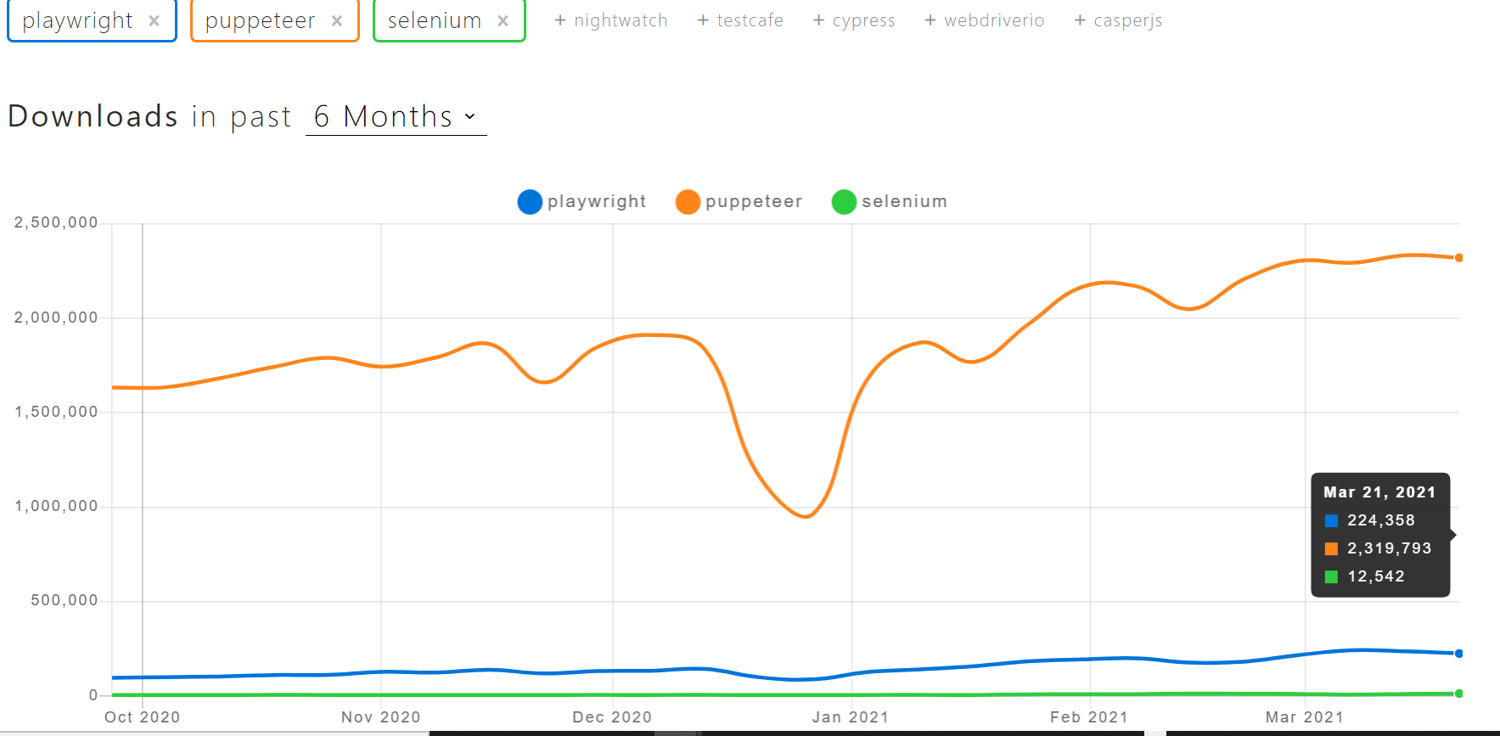
Let’s take a look at the npm trends and popularity for all three of these libraries.
Unknown Shortcode
img
You can see that Puppeteer is clearly the most popular choice among three. However, looking at the GitHub activity of these libraries, we can conclude both Playwright and Puppeteer has a strong community of open source developers behind it. ℹ️ source https://www.npmtrends.com/playwright-vs-puppeteer-vs-selenium
How about documentation?
Both Puppeteer and Playwright has excellent documentation. Selenium on the other hand has a fairly good documentation, but it could have been better.
Performance comparison
Doing a fined grained comparison of these three frameworks is beyond the scope of this article. Luckily for us, other people have already done this before. You can take a look at this detailed article for a performance comparison of these tools. When we ran the same scraping script in all these three environments we experience a longer executing time in Selenium compared to Playwright and Puppeteer. Puppeteer and Playwright performance was almost identical to most of the scraping jobs we ran. However, looking at various performance benchmarks (more fined tuned ones like the link above) it seems like Playwright does perform better in few scenarios than Puppeteer.
Finally, here’s a summary of our comparison of these libraries.
| Category | Playwright | Puppeteer | Selenium Web Driver |
|---|---|---|---|
| Execution time | Fast and Reliable | Fast and Reliable | Slow startup time |
| Documentation | Excellent | Excellent | Overall fairly well documented with some exception. |
| Developer Experience | Very Good | Very Good | Fair |
| Community | Small but active community. | Has a large community with lots of active projects. | Has a large and active community |
Conclusion
To summarize, Playwright is a powerful headless browser, with excellent documentation and a growing community behind it. Playwright is ideal for your web scraping solution if you already have Node.js experience, want to get up and running quickly, care about developer happiness and performance. I hope this article gave you a good first gleam of Playwright. That’s all for today and see you next time.

Kevin worked in the web scraping industry for 10 years before co-founding ScrapingBee. He is also the author of the Java Web Scraping Handbook.