For most of the last decade, collecting data from the web meant two things: open 10+ tabs, copy values into a spreadsheet, and call it research — or write Python. I did the latter — custom scripts, proxy management, CSS selectors that broke every time a site sneezed.
Web scraping has a reputation for being technical. That reputation is about 3 years out of date.
What changed everything was pairing n8n's visual workflow builder with an AI Web Scraping API. Instead of targeting specific HTML elements, you describe what you want in plain English. When the site redesigns, the workflow doesn't notice.
75% of active n8n workflows now include AI integrations, up from virtually zero in 2022. The people who figured this out aren't all engineers. Most of them aren't.
In this tutorial, we'll build a 4-node n8n web scraping workflow that crawls a website, follows internal links, and extracts structured data using AI. Let's build it.
In brief (TL;DR):
- n8n is a visual, no-code workflow automation platform where you connect nodes on a canvas instead of writing backend code
- ScrapingBee's AI Web Scraping API plugs into n8n via an HTTP Request node, letting you extract structured data using plain-English instructions instead of fragile CSS selectors
- A complete n8n web scraping workflow needs just 4 nodes: Manual Trigger → HTTP Request (scrape main page) → Code (extract links) → HTTP Request (spider each page)
- The output is clean, structured JSON (ready to pipe into Google Sheets, a database, or any downstream tool in your stack)
- When a target site redesigns, your workflow keeps running (the AI adapts to the new structure automatically, unlike CSS selectors that break on every layout change)
What is n8n?
n8n is an open-source, node-based workflow automation platform. Think of it as a visual canvas where you connect building blocks (nodes) rather than writing backend code. Each node does exactly one job: trigger something, fetch data, transform it, or send it somewhere.
That architecture makes it unusually good for web scraping. A typical scraping pipeline has 4 natural stages (trigger, fetch, parse, output), and n8n maps directly onto each one. You're not fighting the tool to fit a scraping pattern; the tool was already shaped like one.
What Do You Need to Extract Data from Any Website Using n8n and AI?
Before we start our n8n scraping tutorial, you'll need an n8n account for the workflow canvas and a ScrapingBee API key to handle the actual scraping.
Everything you need to use n8n to scrape website data at scale is covered here, and both tools are free to start.
An n8n Account
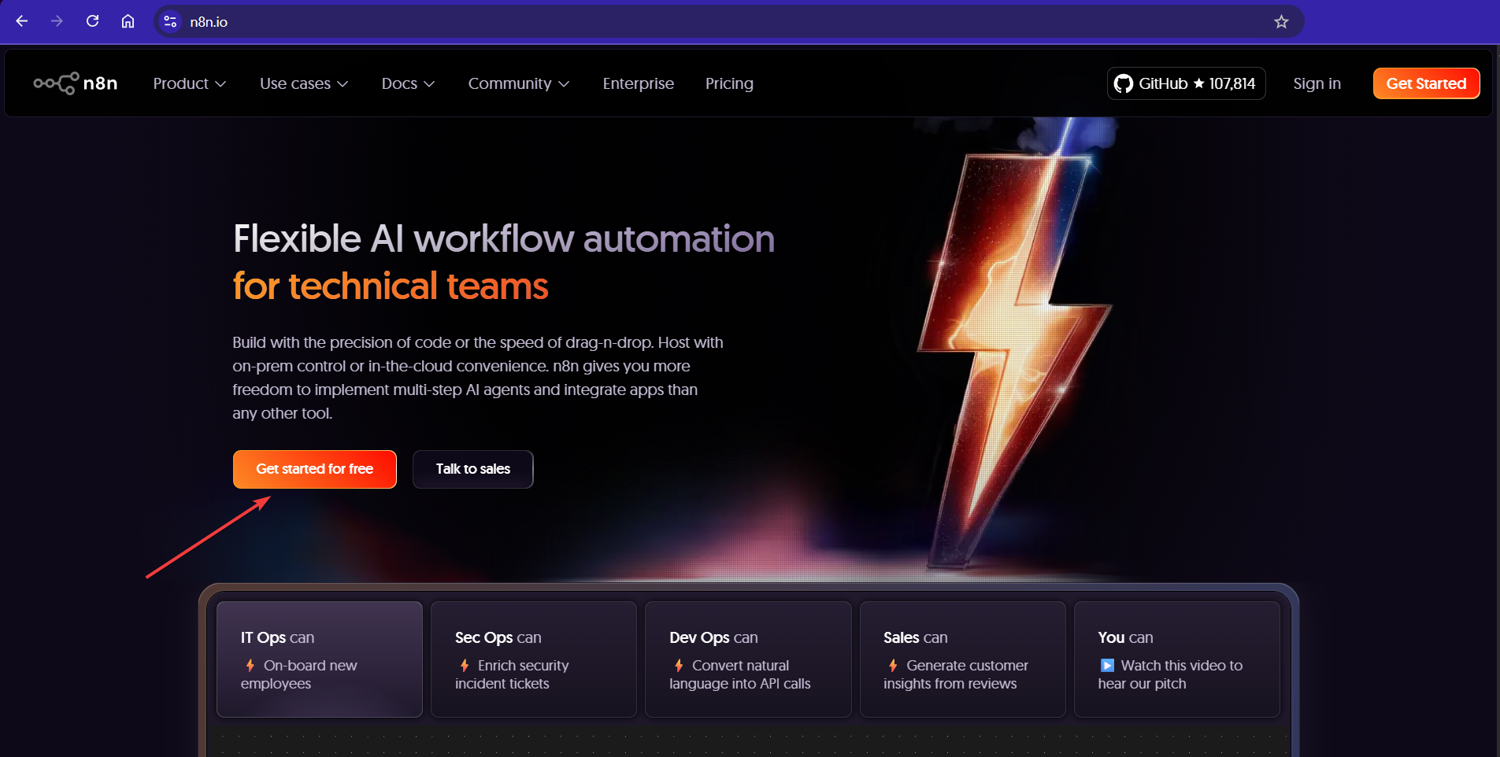
Head over to n8n.io and click the "Get started for free" button:
Once you're in, n8n will display its workflow canvas. Think of it as your visual programming interface; you drag, drop, and connect nodes instead of writing code. Each node does one job. Together, they do something powerful.
Pro Tip: If you're already comfortable with self-hosting, n8n's Docker deployment gives you full data control and zero usage caps. For this tutorial though, the cloud version is the fastest way to get moving. I always recommend starting there before committing to infrastructure.
ScrapingBee API Key
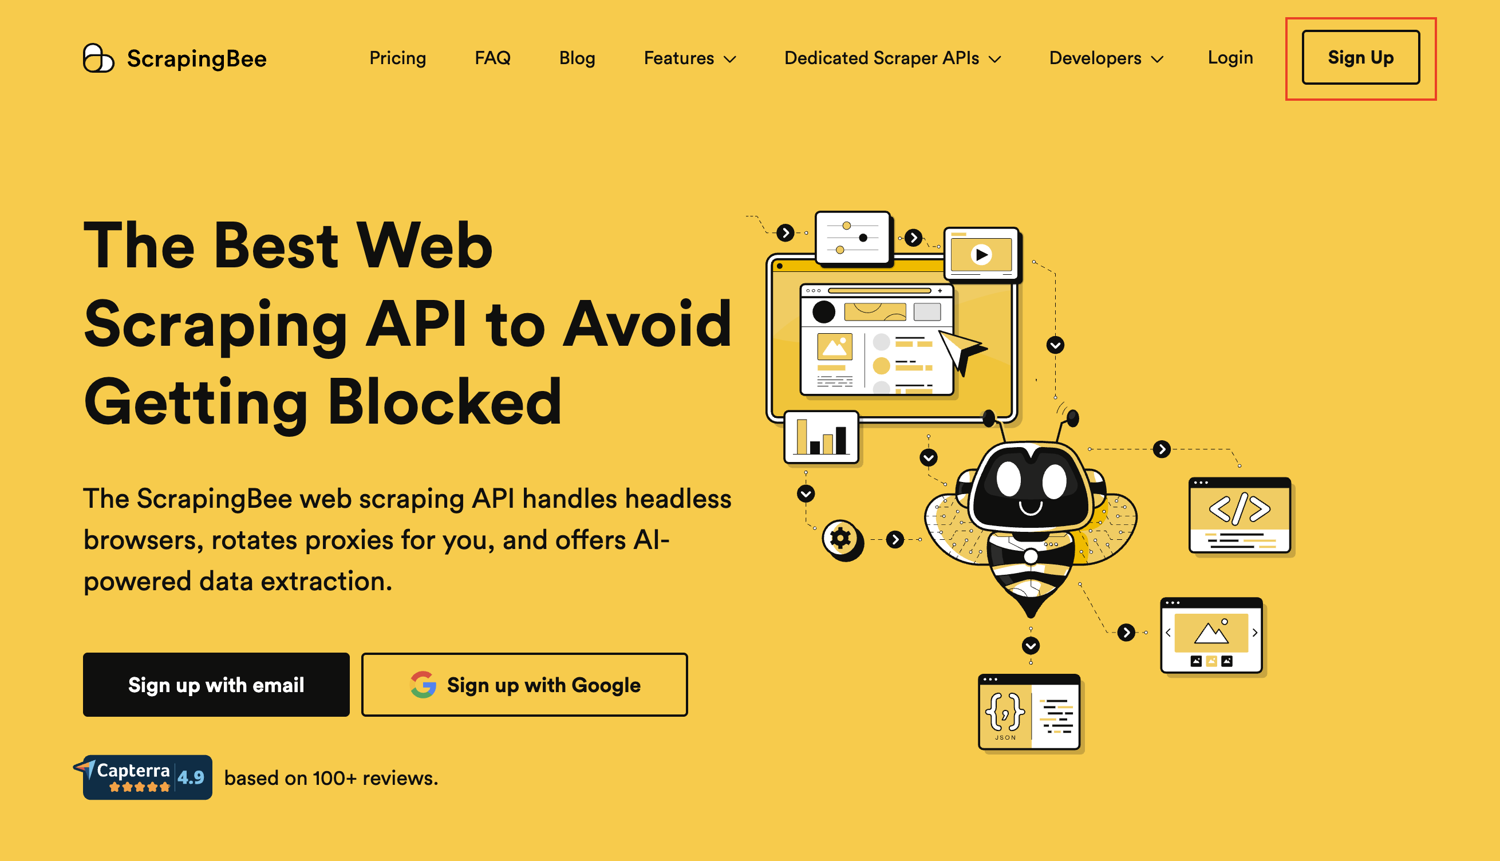
See that "Sign up" button at the top right of this page? Click it. We offer 1,000 free API calls; more than enough to test your n8n scraping workflow and extract data from hundreds of pages.
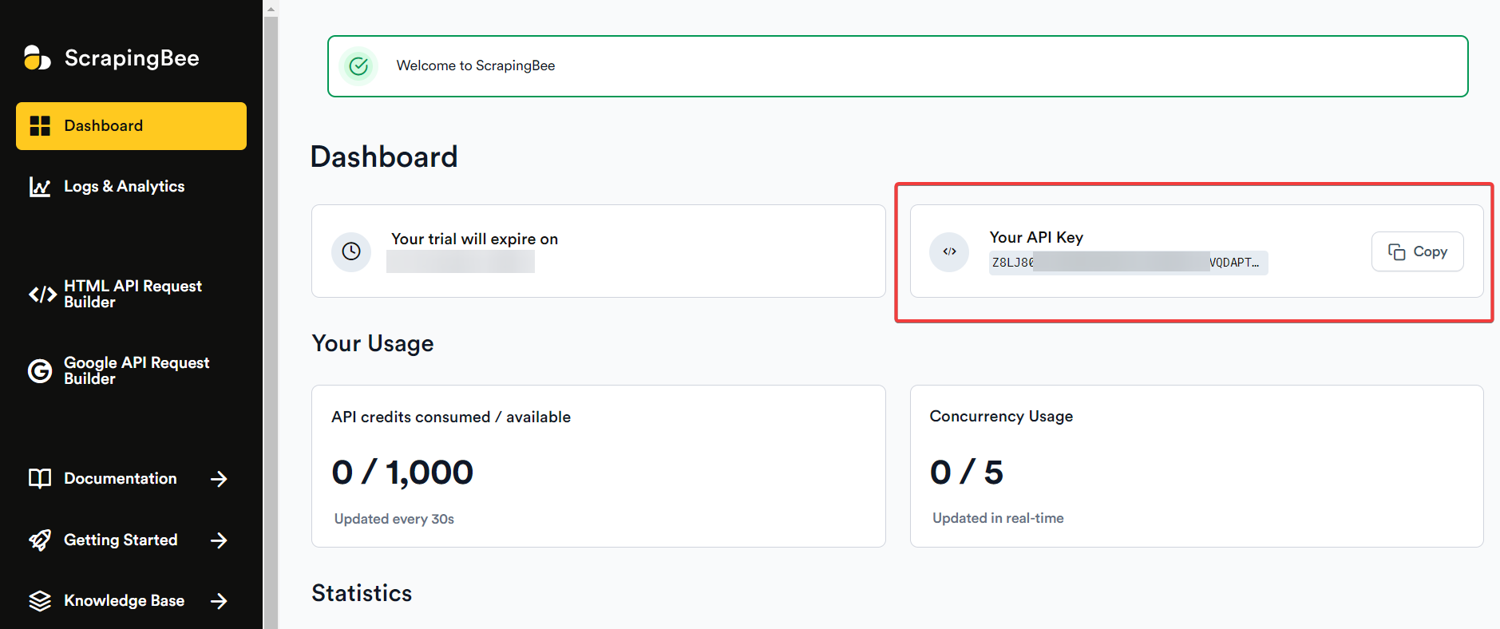
After signing up, navigate to your dashboard and copy your API key:
Pro Tip: Never share your API key publicly or commit it to version control platforms like GitHub. Store it in n8n's built-in credential manager instead. That way, it's encrypted, reusable across workflows, and never exposed in plain text.
With both accounts ready, let's build!
How to Build Your AI-Powered n8n Web Scraping Workflow
We're building a 4-node n8n web scraping workflow that crawls a website, spiders its internal links, and extracts structured data from each page using AI — all without touching a server or writing a backend script.
Each step below is a single, deliberate action. Follow them in order, and you'll have a working n8n scraping workflow by the end.
A quick note on our example URL: We're scraping the ScrapingBee blog throughout this tutorial. We use our own site because we know every page has clean H1 headings to extract; nothing's more frustrating than following a tutorial only to get empty results. Once you understand the pattern, swap in any URL you want.
Step #1: Create a New Workflow
From your n8n dashboard, click "Start from scratch" to open a fresh workflow canvas:
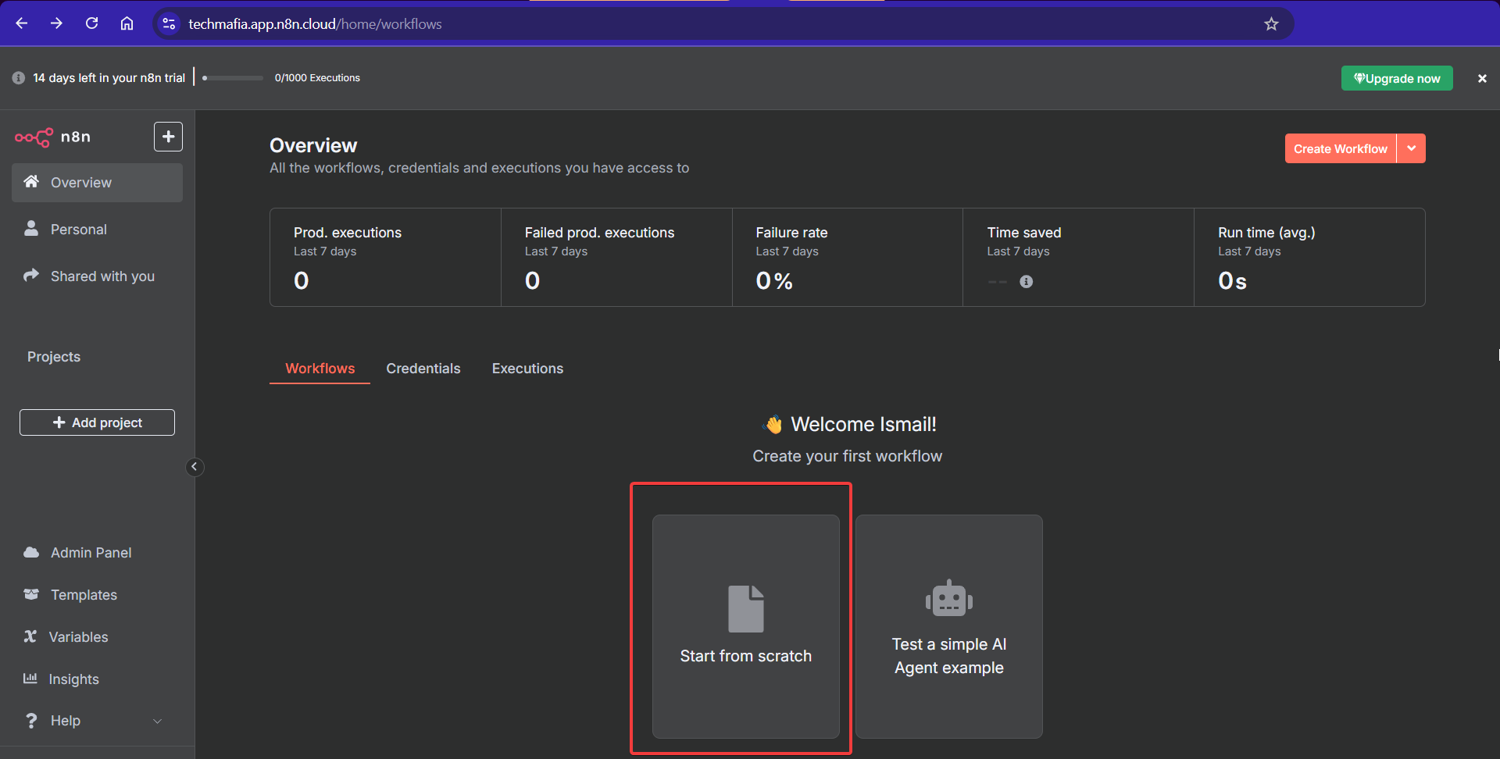
This blank canvas is where we'll assemble all four nodes. Think of it as a whiteboard; except this one executes.
Step #2: Set Up the Manual Trigger Node
Click the "+" button on the canvas and search for "Manual Trigger":
Select it and place it on the canvas. This node fires your n8n scraping workflow on demand. One click, and everything runs. No schedules, webhooks, or complications.
Pro Tip: Once your workflow is tested and stable, swap the Manual Trigger for a Schedule Trigger to run your n8n web scraping automation at set intervals (daily, hourly, or as needed for your use case). I've had competitor monitoring workflows running on 6-hour cycles for months without a single manual touch.
Step #3: Add Your First HTTP Request Node
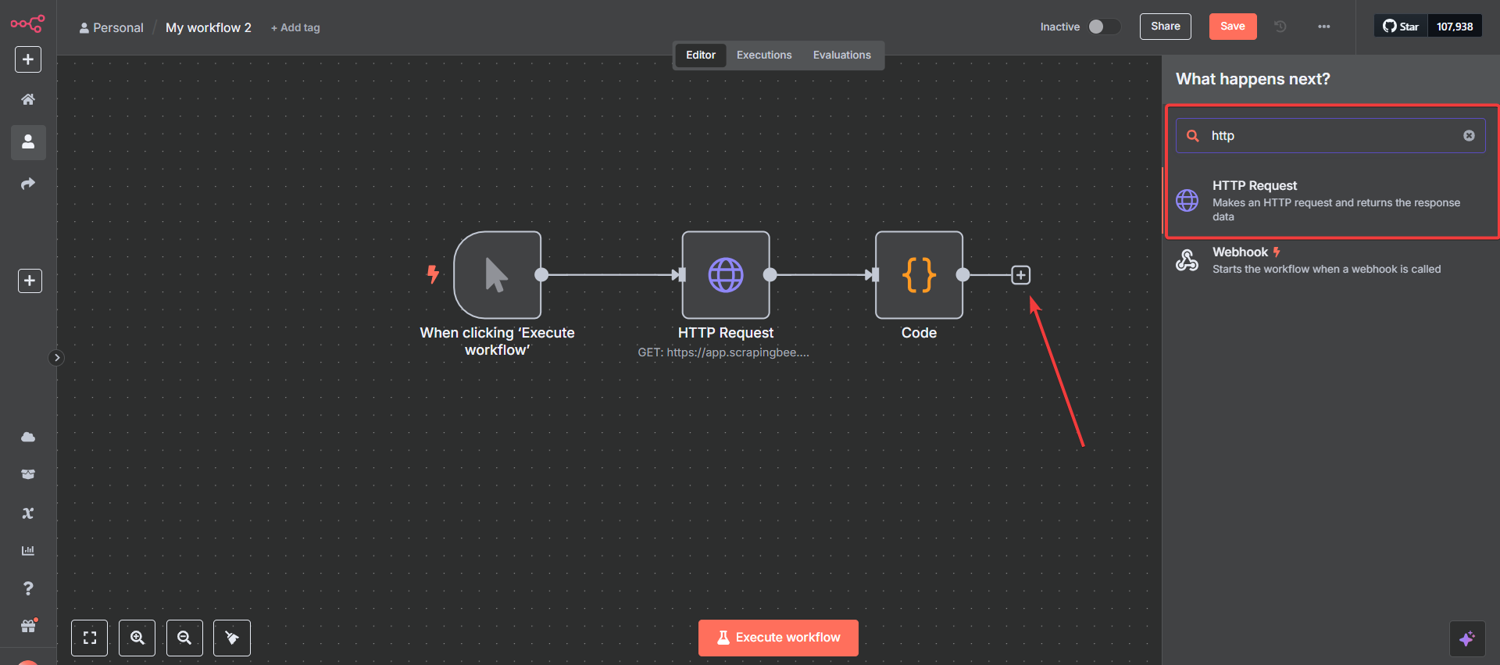
Click "+" again and search for "HTTP Request".
Add it to the canvas and connect it to your Manual Trigger:
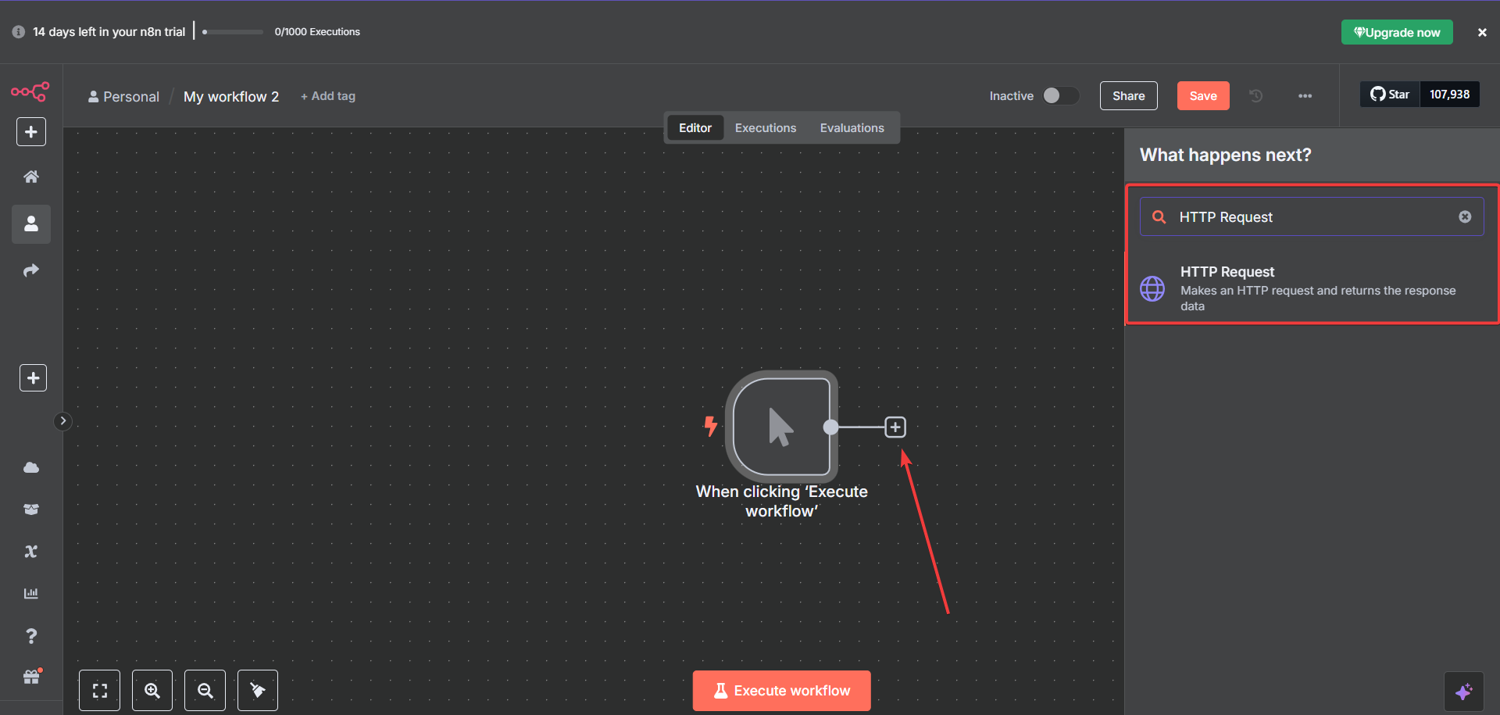
This node is the engine of your n8n data scraping setup. It calls our AI Web Scraping API and is how you extract data from website pages at scale. It handles JavaScript rendering, proxy rotation, and anti-bot bypass so you don't have to.
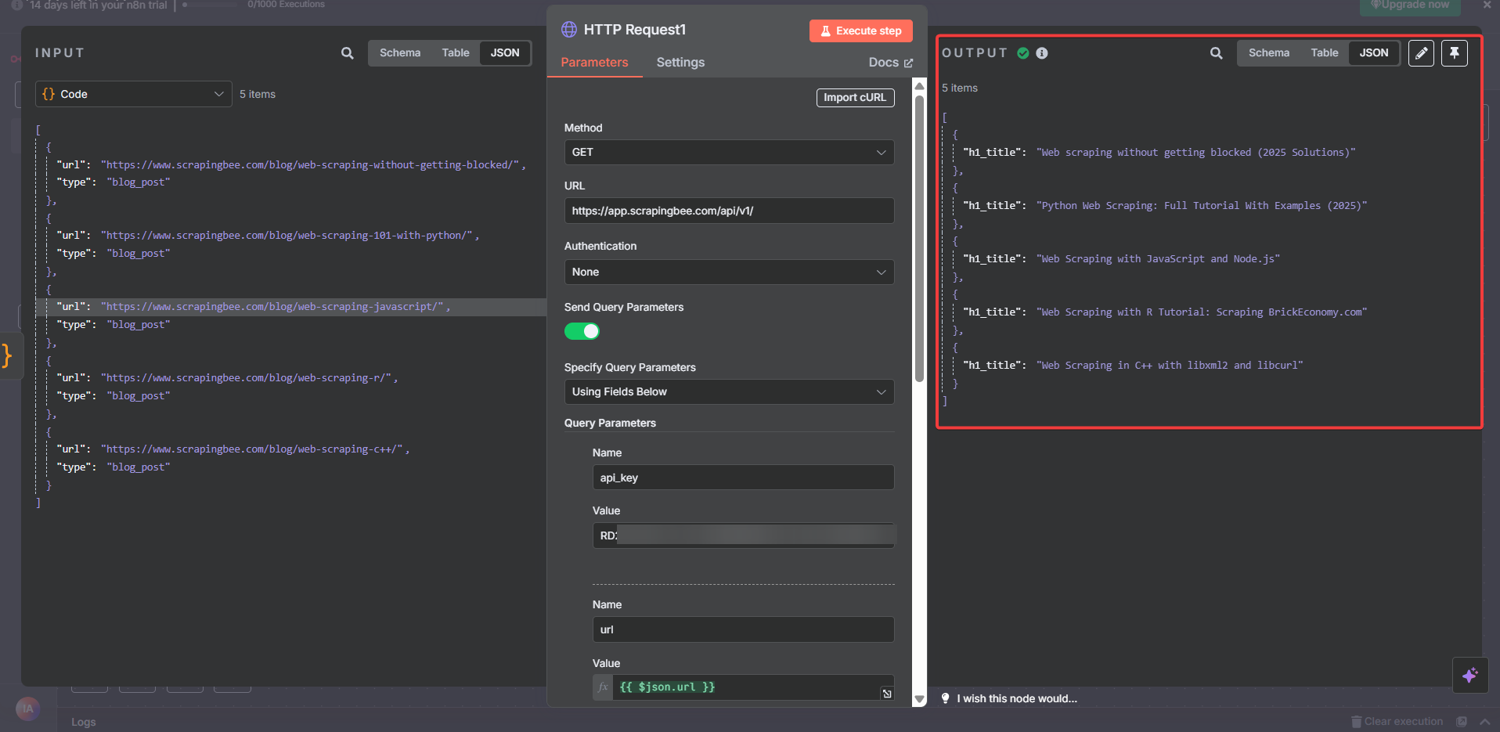
Configure the HTTP Request Node for n8n ScrapingBee Integration
Click the node to open its configuration panel, and apply these settings:
Basic Settings:
- Method: GET
- URL:
https://app.scrapingbee.com/api/v1/ - Authentication: None
- Send Query Parameters: ON
- Specify Query Parameters: Using Fields Below
Then add these four parameters by clicking "Add Parameter" for each:
- Parameter 1:
- Name: api_key
- Value: [YOUR_SCRAPINGBEE_API_KEY]
- Parameter 2:
- Name: url
- Value: https://www.scrapingbee.com/blog/
- Parameter 3:
- Name: ai_query
- Value: Extract the main H1 heading and find links to individual blog posts
- Parameter 4:
- Name: ai_extract_rules
- Value: {"h1_heading":{"type":"string","description":"The main H1 heading from the blog page"},"blog_post_links":{"type":"list","description":"URLs that link to individual blog posts on this site"}}
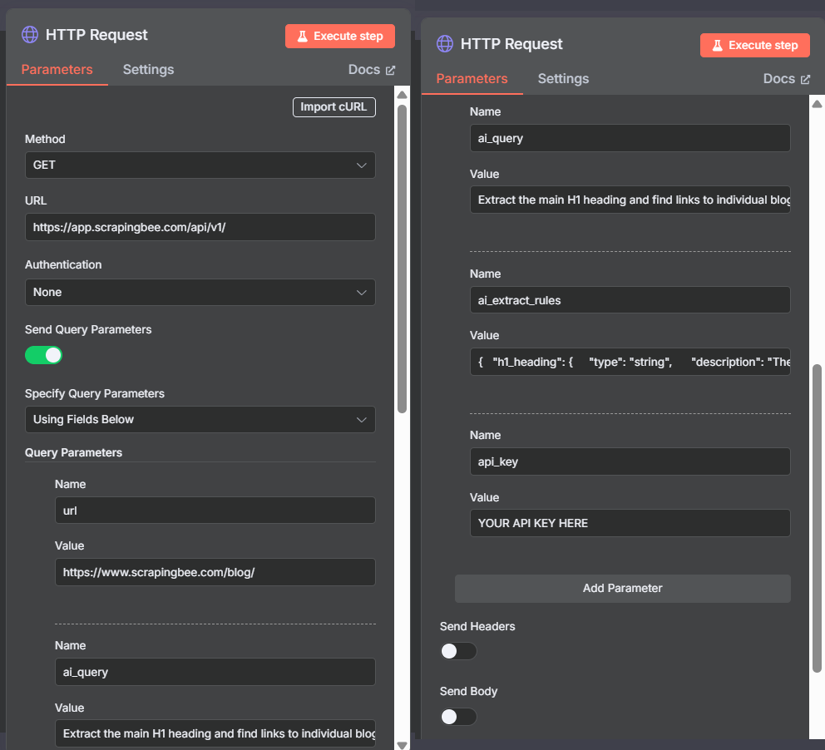
Important: Turn OFF Headers and Body. Our API doesn't need them for this request.
Pro Tip: Here's what's actually happening under the hood. The
ai_queryparameter tells our API what to look for in plain English. Theai_extract_rulesparameter defines the shape of the data you get back: field names, types, and descriptions. No CSS selectors or XPath. No fragile DOM parsing that breaks the moment a site redesigns.
The ai_query and ai_extract_rules parameters each add 5 API credits to your request cost, so a standard request with AI extraction runs 10 credits total (5 base + 5 for AI). Your 1,000 free credits cover roughly 100 AI-powered scrapes.
Heads up for JS-heavy sites: The configuration above works perfectly for standard HTML pages. If your target site renders content via JavaScript (single-page apps, lazy-loaded feeds, React/Vue frontends), add one more parameter to your HTTP Request node:
- Name: render_js
- Value: true
This routes your request through our headless browser, which fully executes JavaScript before the AI extracts data. For most blog pages and static marketing sites, you won't need it, but it's a one-field fix when you do.
For targeted extraction, use the optional ai_selector parameter to scope the AI to a specific section of the page. This speeds up the request and stretches your credits further. In my experience, combining ai_selector with a clean ai_extract_rules schema consistently produces the most reliable structured output.
Step #4: Add the Code Node for Link Extraction
Click "+" and add a "Code" node after your first HTTP Request node:
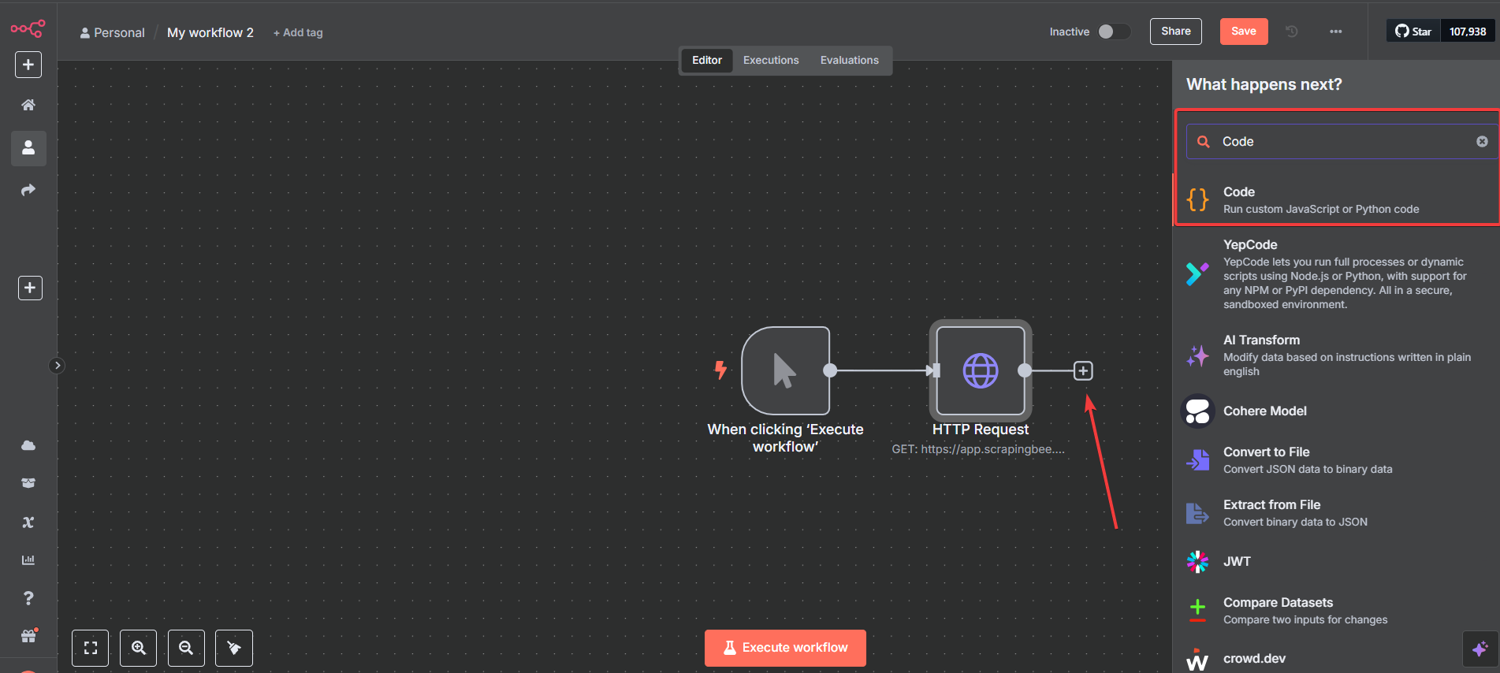
This node processes ScrapingBee's response and prepares the URLs for the next step.
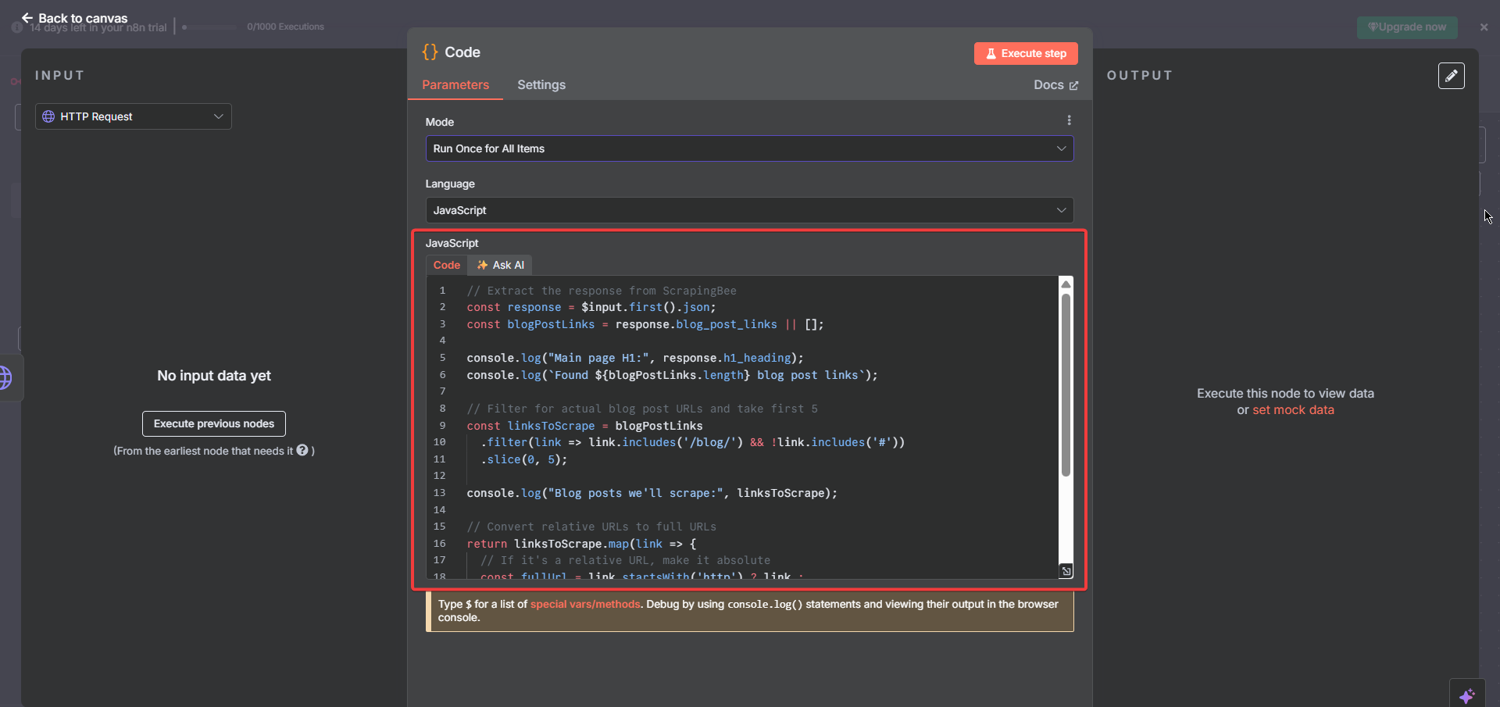
Then, click the node and paste this JavaScript exactly:
// Extract the response from ScrapingBee
const response = $input.first().json;
const blogPostLinks = response.blog_post_links || [];

console.log("Main page H1:", response.h1_heading);
console.log(`Found${blogPostLinks.length} blog post links`);

// Filter for actual blog post URLs and take the first 5
// Replace 5 with your preferred limit
const linksToScrape = blogPostLinks
  .filter(link => link.includes('/blog/') && !link.includes('#'))
  .slice(0, 5);

console.log("Blog posts to scrape:", linksToScrape);

// Convert relative URLs to absolute
return linksToScrape.map(link => {
  const fullUrl = link.startsWith('http') ? link : `https://www.scrapingbee.com${link}`;
  return {
    url: fullUrl,
    type: 'blog_post'
  };
});
Three things this code does, and why each one matters:
| What it does | Why it matters |
|---|---|
| Extracts blog_post_links from the API response | Isolates only the data we need from ScrapingBee's JSON output |
| Filters out anchors and non-blog URLs | Keeps the link list clean: no #section fragments, no external domains |
| Converts relative URLs to absolute | The next HTTP Request node needs full URLs to make valid API calls |
Pro Tip: The
.slice(0, 5)limit is intentional for testing. When I'm setting up a new n8n scrape website workflow, I always start with a maximum of 5 URLs. It keeps API credit usage low, speeds up debugging, and gives you a clean sample output to validate before scaling. Once it works, bump that number up.
Step #5: Add the Second HTTP Request Node (The Spider)
Click "+" and add another "HTTP Request" node after the Code node:
This is the node that does the actual spidering. While the first HTTP Request node scraped the main page, this one visits each URL the Code node extracted automatically, one by one, without you touching a thing.
Configure the Spider Node
Click the node to open its settings. This configuration is nearly identical to the first HTTP Request node, with one critical difference: the URL is dynamic.
Basic Settings:
- Method: GET
- URL:
https://app.scrapingbee.com/api/v1/ - Authentication: None
- Send Query Parameters: ON
- Specify Query Parameters: Using Fields Below
Then add these four parameters:
- Parameter 1:
- Name: api_key
- Value: [YOUR_SCRAPINGBEE_API_KEY]
- Parameter 2:
- Name: url
- Value: {{ $json.url }}
- Parameter 3:
- Name: ai_query
- Value: Extract the main H1 heading from this blog post
- Parameter 4:
- Name: ai_extract_rules
- Value: {"h1_title":{"type":"string","description":"The main H1 heading of this blog post"}}
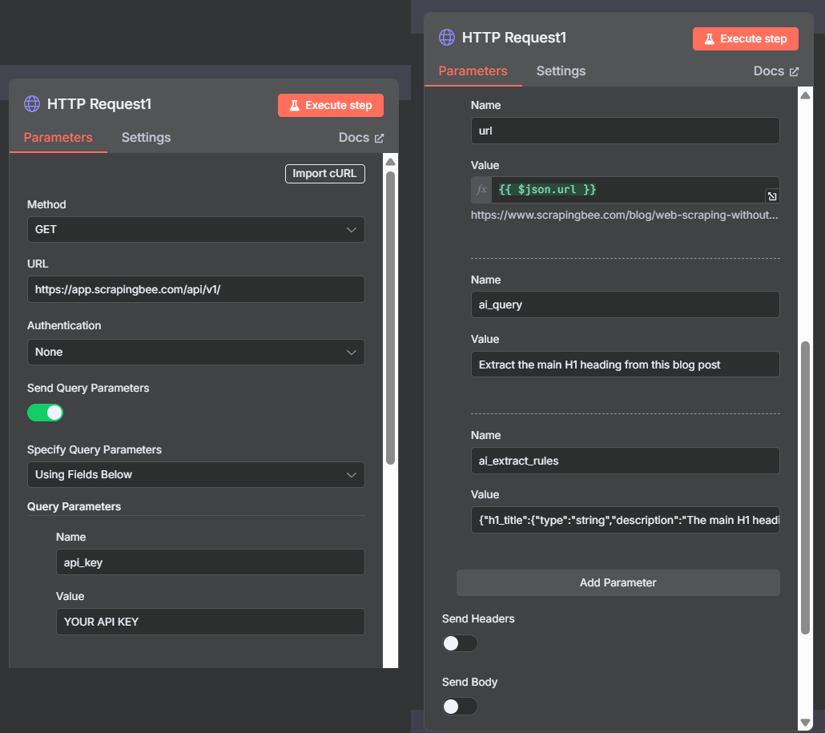
Important: Turn OFF Headers and Body here too.
The {{ $json.url }} expression is what makes this node a spider. Instead of scraping one fixed URL, n8n passes each item from the Code node's output through this node individually. So if the Code node returns 5 URLs, this node automatically runs 5 separate API calls. No loops to configure. No extra logic. n8n handles the iteration natively.
Pro Tip: In n8n, any node that receives multiple input items processes each one in sequence by default. This is called implicit iteration, and it's one of the most powerful things about building n8n web scraping workflows visually. If you ever need parallel processing instead, enable the "Execute Once per Item" batch settings in the node options. For most scraping use cases, though, sequential is exactly what you want.
Step #6: Test Your n8n Scraping Workflow
Your complete n8n web scraping workflow should now look like this:
Manual Trigger → HTTP Request → Code in JavaScript → HTTP Request
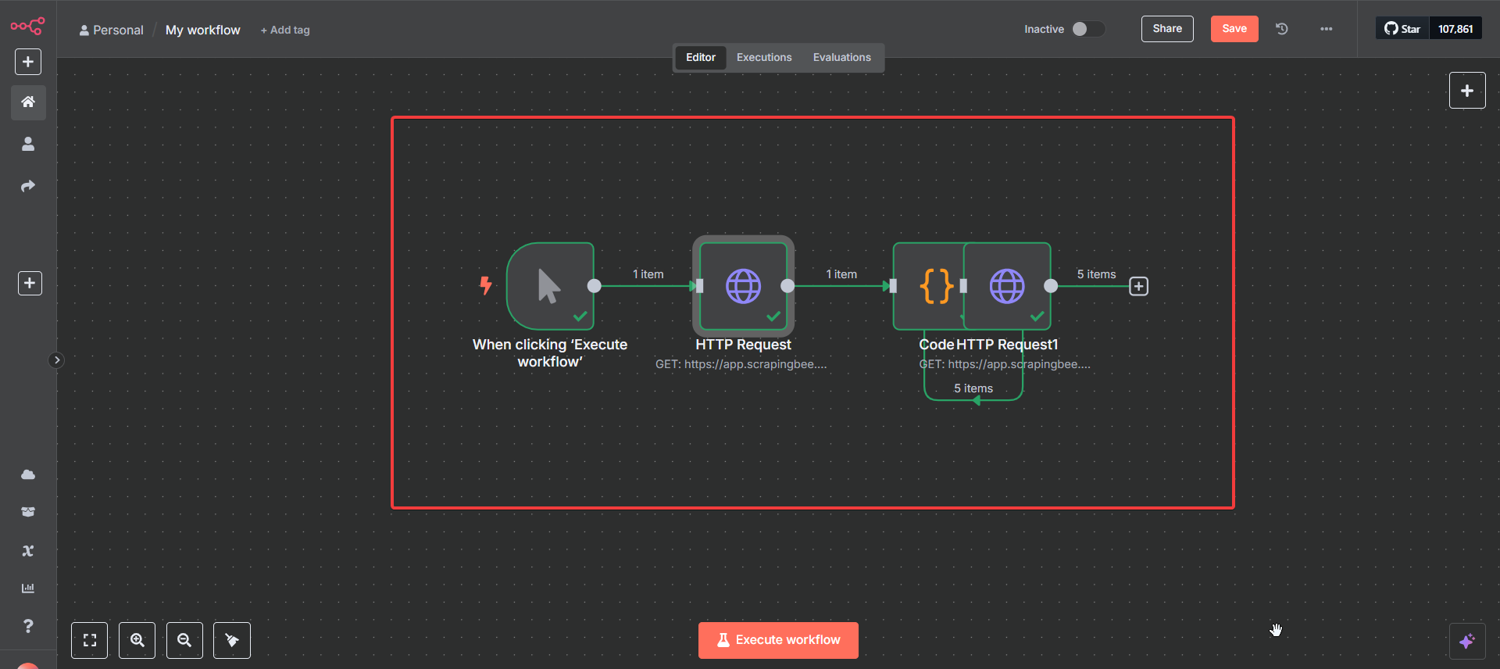
Run Your First Test
Your n8n workflow for web scraping is now complete.
Here's how to run your first test on this workflow:
- Click the "Execute Workflow" button
- Watch the nodes light up green as each one completes
- Click any node after execution to inspect its output
Pro Tip: Always test your n8n web scraping workflow with the smallest possible dataset first. I've seen people jump straight to scraping 500 URLs, then spend an hour debugging. Five URLs tell you everything you need to know before you scale. Fix it small, scale it fast.
Step #7: Analyze Your Results
After execution, click each node to inspect the data flowing through your workflow.
First HTTP Request Results
Here's a real n8n web scraping example of what the output looks like after execution:
{
  "h1_heading": "The ScrapingBee Blog",
  "blog_post_links": [
    "/blog/web-scraping-without-getting-blocked/",
    "/blog/web-scraping-101-with-python/",
    "/blog/web-scraping-javascript/",
    ...
  ]
}
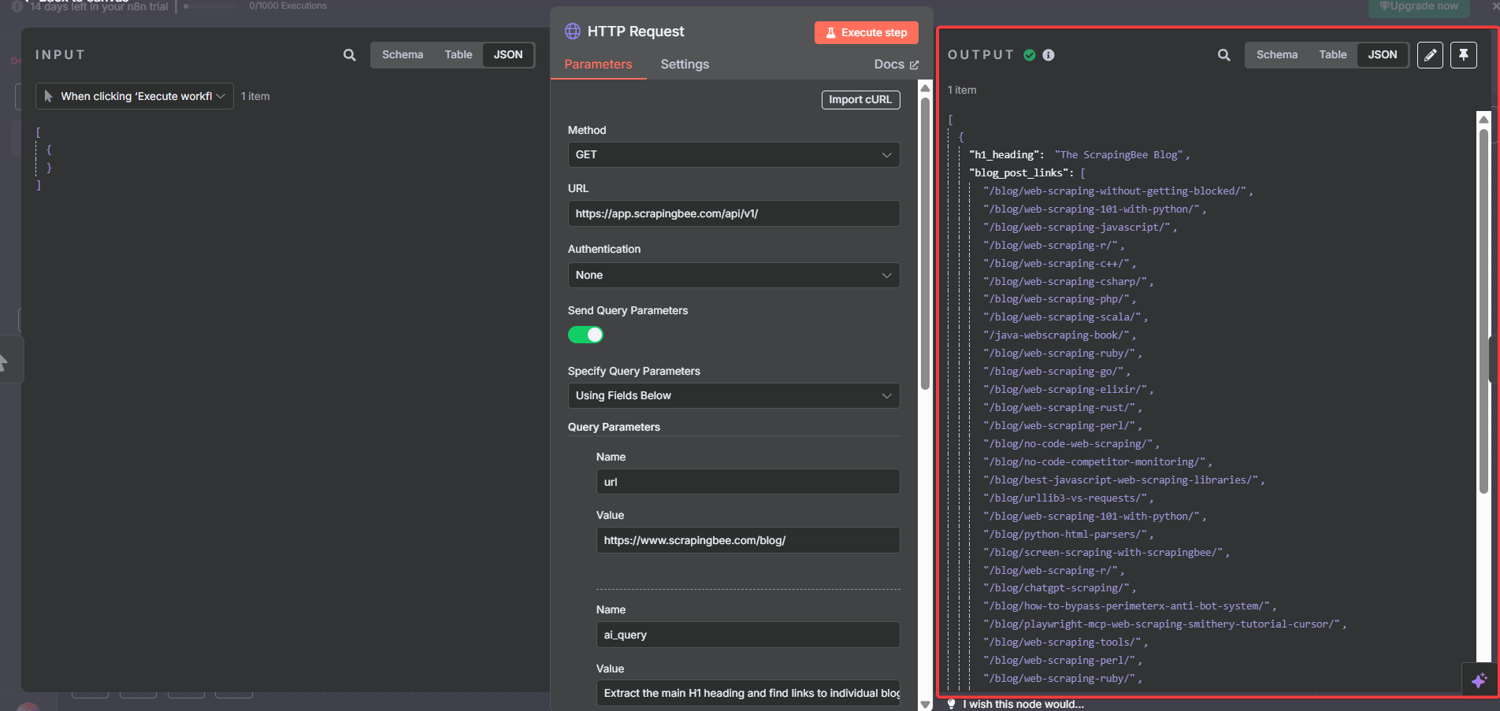
Two things are extracted in a single API call. The page's H1 and every internal blog post link. No HTML parsing, regex, or DOM traversal.
Second HTTP Request Results
Click the second HTTP Request node. You should see 5 separate items, with one per blog post:
{
  "h1_title": "Web Scraping Without Getting Blocked (2026 Solutions)"
}
{
  "h1_title": "Python Web Scraping: Full Tutorial With Examples (2026)"
}
{
  "h1_title": "Web Scraping with JavaScript and Node.js"
}
...
Congratulations! You've just built a working n8n web scraper that:
- Scraped a main page and extracted its H1
- Identified and filtered internal blog post links
- Automatically visited 5 individual pages
- Extracted each post's unique H1 title as structured JSON
What would have otherwise required:
| DIY approach | With n8n + ScrapingBee |
|---|---|
| Web scraping libraries + custom code | 4 visual nodes |
| Proxy management infrastructure | Built-in: we handle it |
| JavaScript rendering setup | Built-in: we handle it |
| CSS selector maintenance | Gone: plain English instructions |
| Link extraction + URL normalization logic | 15 lines of JavaScript |
| Error handling for blocks and timeouts | Built-in: we handle it |
This is the power of combining n8n's visual workflow approach with our AI Web Scraping API. We handle the infrastructure. You focus on what you actually need the data for.
Step #8: Export Your Scraped Data to Google Sheets (Optional)
Your workflow now produces clean, structured JSON. The fastest way to make that data usable is to pipe it directly into Google Sheets.
Here's how to add it in under 2 minutes:
- Click "+" after your second HTTP Request node and search for "Google Sheets."
- Select the "Append or Update Row" operation
- Authenticate with your Google account (one-time setup)
- Select your target spreadsheet and sheet tab
- Map your fields: set h1_title → Column A, url → Column B
Every workflow execution appends new rows automatically. Run it daily via a Schedule Trigger, and you have a self-updating dataset with zero manual work.
4 Real-World n8n AI Web Scraping Workflows Worth Stealing
Whether you're a marketer, a developer, or a one-person operation, the same n8n web scraping workflow pattern you just built maps directly to problems you're likely solving manually right now.
The same 4-node pattern (trigger, scrape, process, spider) scales into genuinely powerful data pipelines with minimal modifications.
Below are four proven ways to scrape a website with n8n beyond the basic tutorial. Each solves a problem that costs teams hours of manual work.
Workflow #1: Automated Competitor Price Monitoring
The problem: Manually checking competitor pricing pages is tedious, inconsistent, and always slightly out of date by the time someone acts on it.
How it works:
- A Schedule Trigger fires the workflow daily at 6 AM
- An HTTP Request node scrapes each competitor's pricing page via ScrapingBee's AI Web Scraping API
- A Code node compares today's prices against yesterday's stored values
- An IF node checks for changes (if prices shifted, a Slack or email node fires an alert)
The ai_extract_rules schema for this:
{
  "plan_name": {
    "type": "string",
    "description": "Name of the pricing plan or tier"
  },
  "price": {
    "type": "string",
    "description": "Monthly or annual price of the plan"
  },
  "key_features": {
    "type": "list",
    "description": "Main features listed under this pricing tier"
  }
}
Pro Tip: Store your baseline prices in a Google Sheets node rather than hardcoding them in the workflow. That way, your team can update the reference data without touching n8n at all. And you get a full audit trail of every price change, automatically timestamped. I set this up for a content client to track seven SaaS competitors, and it replaced a weekly manual task that was eating up 3 hours every Monday.
Workflow #2: Lead Generation from Industry Directories
The problem: Industry directories and listing sites are goldmines for B2B lead data (company names, descriptions, contact pages, locations). Scraping them manually is soul-crushing work.
How it works:
- A Manual Trigger (or webhook from a CRM) starts the workflow
- A first HTTP Request node scrapes the directory listing page and extracts company profile URLs
- A Code node filters and normalizes the URLs
- A second HTTP Request node visits each company profile and extracts structured lead data
- A Google Sheets node appends each row of data to a live spreadsheet
The ai_extract_rules schema for this:
{
  "company_name": {
    "type": "string",
    "description": "Name of the company"
  },
  "description": {
    "type": "string",
    "description": "Short company description or tagline"
  },
  "website": {
    "type": "string",
    "description": "Company website URL"
  },
  "location": {
    "type": "string",
    "description": "City and country of the company"
  }
}
This exact workflow (slightly adapted) powered a pipeline for a billion-dollar B2B company that was spending contractor hours each week on manual lead research. The n8n scraping workflow replaced that.
Pro Tip: I'd add a "Deduplicate" Code node before the Google Sheets append step. Directory pages often list the same company in multiple categories. Checking for duplicate domains before writing to the sheet keeps your data clean from the start.
Workflow #3: Content Gap Analysis via SERP Monitoring
The problem: Knowing which topics your competitors are covering (and ranking for) is the backbone of any serious content strategy. Doing it manually across dozens of competitor URLs is not a strategy. It's a punishment.
How it works:
- A Schedule Trigger fires weekly
- A first HTTP Request node scrapes each competitor's blog index page
- A Code node extracts article titles, URLs, and publication dates
- A second HTTP Request node visits each article and extracts H1, meta description, and word count estimates
- A Code node cross-references the list against your own tracked topics
- New topics get appended to a Notion or Google Sheets content calendar automatically
The ai_extract_rules schema for individual article scraping:
{
  "h1_title": {
    "type": "string",
    "description": "The main H1 heading of the article"
  },
  "meta_description": {
    "type": "string",
    "description": "The meta description of the page"
  },
  "primary_topic": {
    "type": "string",
    "description": "The main subject or keyword this article appears to target"
  }
}
To scrape website content from competitor blogs at scale, this is the workflow pattern I reach for every time. I've run this exact pattern for three enterprise content teams, and it consistently surfaces 20–30 content gaps that manual audits miss, in under 10 minutes.
Pro Tip: Pipe the output into an AI node (n8n's built-in OpenAI integration works well here) and prompt it to cluster the extracted topics by theme. What you get back is essentially an automated competitor content audit generated every week. I've used this pattern for content operations at scale, and it consistently surfaces gaps that manual audits miss.
Workflow #4: Job Board Aggregator with Instant Alerts
The problem: Recruiters, job seekers, and market researchers all need fresh job posting data regularly. Job boards update constantly. Manual checks miss listings within hours of them going live.
How it works:
- A Schedule Trigger fires every 2 hours
- An HTTP Request node scrapes the target job board's results page for a specific role or keyword
- A Code node extracts and deduplicates job listings against a stored list of already-seen IDs
- New listings only get passed to the next node via an IF condition
- A Slack or email node fires an alert with the job title, company, location, and link
The ai_extract_rules schema for this:
{
  "job_title": {
    "type": "string",
    "description": "The title of the job posting"
  },
  "company": {
    "type": "string",
    "description": "The name of the hiring company"
  },
  "location": {
    "type": "string",
    "description": "Job location or remote status"
  },
  "salary_range": {
    "type": "string",
    "description": "Salary range if listed"
  },
  "posting_url": {
    "type": "string",
    "description": "Direct URL to the job posting"
  }
}
For anyone scraping job boards regularly, manual checks are a liability. If you want to go deeper, see how to scrape job postings with an AI job board scraper for large-scale collection, data cleaning, and handling constantly rotating job board structures.
Pro Tip: Use n8n's built-in "Compare Datasets" node instead of writing custom deduplication logic in the Code node. It handles the diffing natively and produces cleaner output. Pair it with a simple Google Sheets or Airtable node as your "seen listings" database, and you have a fully stateful job alert system.
5 Common AI-Powered n8n Web Scraping Issues and How to Fix Them
Even the cleanest web scraping with n8n workflow can hit snags. The difference between a scraper that breaks and one that doesn't is knowing what to look for before it becomes a problem.
These are the five n8n scraping issues I see most consistently across clients, and how to fix each one.
Issue #1: 401 Unauthorized (API Key Not Being Passed Correctly)
What it looks like: Your first HTTP Request node returns a 401 Unauthorized error immediately on execution.
Why it happens: The most common cause is a formatting issue in how the API key gets passed. A trailing space when pasting the key, a missing parameter name, or accidentally enabling Header/Body options that override the query string can all trigger this.
How to fix it:
- Open your HTTP Request node and verify the
api_keyparameter name is spelled exactly as shown (lower case, underscore, no spaces) - Re-paste your API key directly from your ScrapingBee dashboard; don't type it manually
- Confirm that Headers and Body are both turned OFF
- Check that "Send Query Parameters" is ON and set to "Using Fields Below"
Pro Tip: Store your ScrapingBee API key in n8n's Credential Manager rather than pasting it directly into the node parameter field. Go to Settings → Credentials → Add Credential → Generic → Query Auth, set the parameter name as
api_key, and reference it in your node. This way, one credential update propagates across every workflow that uses it. No need to hunt through nodes when your key rotates.
Issue #2: AI Extraction Returns Null or Empty Fields
What it looks like: The HTTP Request node returns a 200 status, but your extracted fields (h1_heading, blog_post_links, or any custom field) come back as null or an empty array.
Why it happens: Three common culprits:
- The
ai_querydescription doesn't match what's actually on the page - The target site renders content via JavaScript after initial page load, and the AI is reading an incomplete DOM
- The
ai_extract_rulesschema uses a type that doesn't match the data (e.g.,"type":"string"for a field that returns a list)
How to fix it:
| Root cause | Fix |
|---|---|
| Vague ai_query description | Be more specific; instead of "get links", use "find URLs that link to individual blog posts on this domain" |
| JavaScript-rendered content | Add render_js=true as a fifth query parameter in your HTTP Request node |
| Wrong field type in ai_extract_rules | Use "type":"list" for arrays, "type":"string" for single values |
| Wrong section of the page being read | Add the optional ai_selector parameter with a CSS selector to focus extraction on a specific container |
Pro Tip: When debugging empty extractions, test your
ai_queryandai_extract_rulesdirectly in ScrapingBee's API playground before troubleshooting inside n8n. Isolating the API call from the workflow removes half the variables instantly. In my experience, most of the empty extraction issues are in the query wording, not the workflow.
Issue #3: The Code Node Throws "Cannot Read Properties of Undefined"
What it looks like: The first HTTP Request node succeeds, but the Code node immediately errors with something like TypeError: Cannot read properties of undefined (reading 'blog_post_links').
Why it happens: The Code node is trying to access a field that doesn't exist yet in the response, either because the extraction returned null, the field name in your JavaScript doesn't match the key in your ai_extract_rules, or the response structure is nested differently than expected.
How to fix it:
First, click the first HTTP Request node after a test run and inspect the exact JSON structure it returned.
Then update the Code node to match:
// Always use a fallback to avoid crashing on null responses
const response = $input.first().json;
const blogPostLinks = response.blog_post_links || [];

// Add a guard before processing
if (blogPostLinks.length === 0) {
  console.log("No links found. Check your ai_query and ai_extract_rules");
  return [];
}
The || [] fallback on line 2 is non-negotiable. It prevents a null response from crashing the entire workflow and lets you debug gracefully instead of firefighting.
Pro Tip: I always advise enabling "Continue on Fail" in your Code node's settings during development. This lets the rest of the workflow execute even if one item errors, so you can see which specific input caused the issue rather than stopping at the first failure. Turn it off again in production once everything is stable.
Issue #4: The Second HTTP Request Node Only Scrapes One URL Instead of All Five
What it looks like: The Code node outputs 5 items correctly, but the second HTTP Request node only shows 1 result instead of 5.
Why it happens: This is almost always caused by the URL parameter being set to a hardcoded value instead of the {{ $json.url }} expression. Without the expression, the node ignores the Code node's output and scrapes the same fixed URL every time.
How to fix it:
- Open the second HTTP Request node
- Find the
urlparameter value field - Verify it contains
{{ $json.url }}— not a hardcoded URL, not$json.urlwithout the double curly braces - Make sure the field is in Expression mode (the toggle next to the field should show a purple expression indicator, not plain text)
If the expression mode toggle isn't active, n8n treats the value as a literal string. This means that it tries to literally scrape a URL called {{ $json.url }} rather than evaluating it.
Pro Tip: To confirm your expression is resolving correctly before running the full workflow, click the second HTTP Request node, hover over the
urlparameter value field, and look for the small "Preview" option. It will show you exactly what URL the expression resolves to for the first item in the queue — a 2-second check that saves a lot of head-scratching.
Issue #5: Workflow Execution Times Out on Large Link Lists
What it looks like: Everything works perfectly with 5 URLs, but when you increase the slice limit to 50 or 100, the workflow stalls, times out, or returns partial results.
Why it happens: n8n's cloud-free tier enforces execution time limits. Beyond that, sending 50+ sequential API calls in rapid succession can also trigger rate limiting on the target website, even with our proxy rotation handling the blocks.
How to fix it:
- Add a Wait node between the Code node and the second HTTP Request node. Set it to 1–2 seconds. This paces your requests and keeps you well within polite scraping territory
- Batch your URLs instead of passing all 50 at once (split them into groups of 10 using a Code node and process each batch in sequence)
- Upgrade your n8n plan if execution time limits are the bottleneck (the Starter plan removes the timeout restrictions for long-running workflows)
- Use n8n's built-in error handling by adding an Error Trigger node to catch failed executions and log them to a Google Sheet for manual review
Pro Tip: For any n8n web scraping automation running more than 20 URLs, I always add a Wait node set to 1,500ms as a matter of habit — because it costs nothing and prevents a whole category of rate-limit issues before they start. The scrape that finishes reliably in 3 minutes is always better than the one that finishes in 90 seconds half the time.
You've just completed this n8n web scraper tutorial and built a smart n8n web scraping template that would have taken weeks to code from scratch.
Ship Faster Web Scraping Workflows with ScrapingBee
Websites change. Selectors break. Proxies get banned. If you've ever woken up to a failed scrape, an empty dataset, or a wall of 403 errors, you already know the real cost of maintaining scrapers the hard way; it's not the build time, it's the endless maintenance tax on every project that comes after.
That's exactly the problem ScrapingBee API was built to eliminate. Instead of fragile HTML targeting, you describe what you want in plain English. When the site changes, your workflow doesn't.
Here's what you unlock the moment you connect ScrapingBee to your n8n web scraping capabilities:
- AI Data Extraction: Describe any data point in natural language (no CSS selectors, XPath, or re-engineering when layouts change)
- Headless Browser Rendering: Every request runs through the latest headless browsers (JavaScript-heavy SPAs, dynamic content, lazy-loaded elements), all handled automatically
- Built-in Proxy Rotation: A continuously refreshed proxy pool keeps your scraper running across high-volume jobs without manual IP management
- Anti-Bot Bypass: Stealth and premium proxy modes cut through Cloudflare, Datadome, and other advanced protection layers at scale
- 1,000 Free API Credits: Enough to test your entire workflow, scrape hundreds of pages, and validate your data pipeline before spending a cent
Start scraping on ScrapingBee today and stop losing hours to scrapers that break every time.
Whether you want to use n8n to scrape website content into Google Sheets, monitor Amazon prices, or build automated competitor pipelines, we handle the infrastructure; you own the data.
Frequently asked questions on n8n web scraping
Is n8n web scraping good enough to replace a custom Python scraper?
For most use cases, yes. Web scraping with n8n handles pagination, link spidering, and structured extraction without custom code. N8n for web scraping wins on maintainability; Python wins only on highly complex, stateful logic.
How does ScrapingBee handle websites that block scrapers?
ScrapingBee rotates proxies automatically and renders JavaScript via headless browsers. For heavily protected sites, adding stealth_proxy=true to your HTTP Request node bypasses advanced anti-bot systems like Cloudflare and Datadome without any extra configuration on your end.
Can my n8n web scraping workflow handle pagination?
Yes. Add a second Code node that detects the "next page" URL from each response, then loop it back into another HTTP Request node. Alternatively, use n8n's Loop Over Items node to cycle through pre-built paginated URLs automatically.
How do I save my n8n scraping results to Google Sheets?
Add a Google Sheets node after your final HTTP Request node. Map each extracted field (h1_title, url, etc.) to a column. Every workflow execution appends new rows automatically. No manual exports or copy-pasting.
Will my n8n scraping workflow break if a website redesigns?
With CSS selectors, yes, eventually. With ScrapingBee's AI Web Scraping API, no. Because you're describing what to extract in plain English rather than targeting specific HTML elements, layout changes don't affect your workflow.
How do I scrape data behind a login with n8n and ScrapingBee?
ScrapingBee does not support post-login scraping. This is intentional and aligns with our acceptable use policy. For authenticated data collection, use n8n's HTTP Request node directly with session cookies or OAuth tokens where terms permit.
Further Reading (Go Beyond Scraping with n8n)
You've just built a smart n8n web scraping template that would have taken weeks to code from scratch. But this is only the beginning.
The same n8n + ScrapingBee approach scales into every data collection problem you'll encounter, from monitoring Amazon prices to extracting job listings to building fully automated competitor intelligence pipelines:
| Article | Description |
|---|---|
| How to scrape websites with Google Sheets | Skip the complex workflows. Scrape data directly into spreadsheets with simple formulas. |
| Scrape Amazon products' price with no code | Automate Amazon product monitoring and never miss a competitor price change again. |
| Extract Job Listings from Indeed with Make.com | Turn job hunting into job hunting automation. Extract listings and salaries without manual browsing. |
| No-code web scraping | The comprehensive guide to building powerful scrapers without touching code. |
| Send stock prices to Slack with Make | Get market updates delivered to your team chat automatically. |
| No-code competitor monitoring | Know when competitors change prices, launch features, or update their messaging, while you sleep. |