Tracking webpage changes is useful when you want to know when a price changes, a job listing opens, or a product comes back in stock.
You can use a no-code website monitoring tool for this, and that is often enough for simple alerts. But if you want more control over how the page is fetched, which part of the page is monitored, where alerts are sent, and how often checks run, you can build your own monitor with Python and ScrapingBee.
In this guide, you'll learn how to set up an alert when a webpage changes. We'll build a Python script that fetches a webpage with ScrapingBee, extracts parts of the page, and sends an alert through Slack or email when something changes.

Key Takeaways (TL;DR)
- No-code tools are the fastest way to monitor a webpage, but free plans often cap frequency and lock Slack/email alerts behind paid tiers.
- A DIY monitor follows a simple loop: fetch the page, compare it to a baseline and send an alert on meaningful changes.
- The most difficult part is fetching reliably when pages rely on dynamic rendering or employ anti-bot systems. However, ScrapingBee handles all that.
- One ScrapingBee API call with render_js and premium_proxy parameters replaces a self‑hosted Playwright container and proxy setup.
- Monitor one element or property instead of the full page to reduce false positives.
- Use cron or the ScrapingBee CLI to schedule runs so the script runs without you.
Why monitor a webpage for changes?
Webpage change monitoring saves you from manually refreshing a page just to catch an update. Instead of checking the same page over and over, a monitor watches it for you and sends a notification the moment something important changes.
You can use it to:
- Track product availability
- Monitor price changes
- Watch job boards for new listings
- Follow documentation updates
- Get notified when a competitor changes a landing page
This way, we are not only checking whether the HTML changed, but we can also make each alert much more useful.
A generic alert might read something like:
1 product was added
Whereas our monitor can go into more detail and highlight specific changes, such as a price drop, a new job title, or an item that is back in stock.
The fastest way to get an alert when a webpage changes
The fastest way to get an alert when a webpage changes is to use a no-code tool. Most of these work by letting you choose the part of the page you want to watch, add your email, and then the tool checks the page for you.
Some common no-code options include:
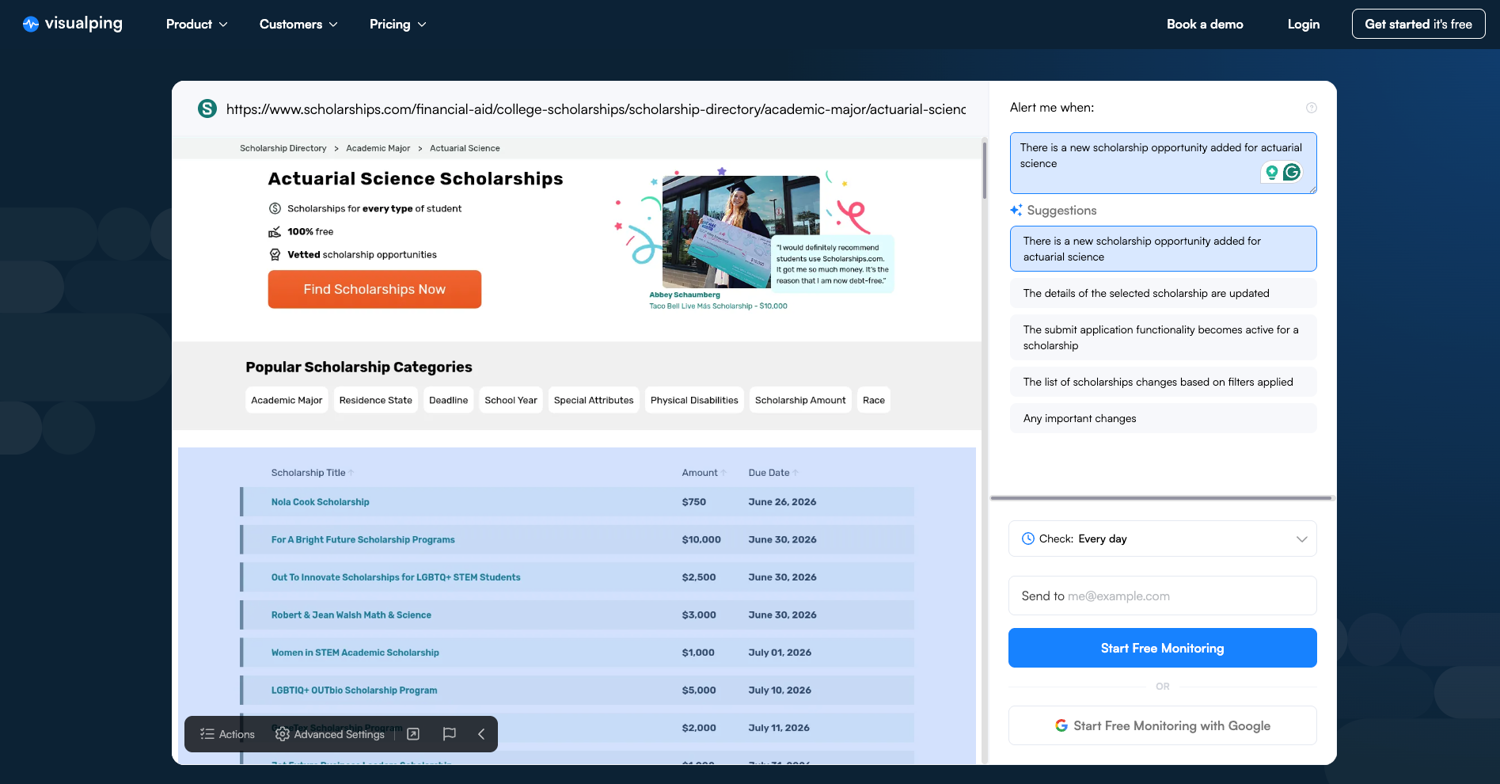
- Visualping: useful when you want visual page diffs and screenshots of what changed.
- UptimeRobot: useful if you want a free website change monitoring tool for simpler checks.
- ChangeTower: useful for tracking page changes, keywords, and archived versions.
- Google Alerts: useful for new indexed content around keywords, but not for arbitrary changes on a specific page.
- Chrome extensions: useful for casual checks, but not ideal for always-on monitoring because they depend on your browser and machine.
That said, no-code tools usually have limits. Free tiers usually cap how often they check pages (often hourly or every six hours) and features like Slack alerts, API access, and team workflows are usually locked behind paid plans. So while you can monitor website changes free, the free setup may not cover more advanced workflows.
There is also the self-hosted route with tools like changedetection.io, but that comes with its own setup cost and the service doesn't even offer a free trial.
At that point, it makes sense to build your own monitor. This route is better when you need tighter control over check frequency, JavaScript rendering, Slack or email alerts, semantic conditions, or monitoring at scale. It is also a good next step if a no-code tool like Browse AI keeps breaking on dynamic pages.
What makes webpage change monitoring hard?
At first glance, webpage monitoring looks very simple. However, most websites are rarely that clean. The content you want may load after JavaScript runs, or the page may include banners, timestamps, ads, or recommended products that change per request.
Even when your script detects a change correctly, you still need a reliable way to send the alert and run the check on a schedule.
Dynamic content
Many websites load important content with JavaScript, so if you use a plain requests.get() call, you may not receive the same content that appears in your browser.
This matters for pages like:
- Product pages
- Job boards
- News aggregators
If your monitor only sees the first HTML response, it may miss the actual data you wanted to track. ScrapingBee helps here because you can enable JavaScript rendering when the page needs it or off and make a lighter request if you're scraping a static site.
Irrelevant page changes
A page can look different on every visit because of ads, timestamps, cookie banners, recommended posts, or session-specific content. If you compare the full HTML each time, you will get alerts even when the part you care about did not change.
This is why it is better to monitor a specific CSS selector, such as a price, "in stock" label, job-listing container, etc.
Alert delivery
Detecting a change is only one part of the job. You also need to decide where the alert should go. Email is useful for personal or formal alerts, while Slack is better for team workflows because alerts appear in the channel where your team already works.
In this guide, we'll use Slack for the alert, but the same function can be extended to send email, write to a database, create a ticket, or trigger another workflow.
Scheduling
A script only checks a page when it runs. If you run it once from your terminal, it checks the page once and exits. Now, to monitor a page continuously, you need a scheduler that runs the script at regular intervals.
That scheduler can be:
- cron on a VPS
- GitHub Actions
- Render Cron Jobs
- another cloud scheduler
For this guide, we will start locally, then show how to run the monitor on a schedule.
How to set up an alert when a webpage changes
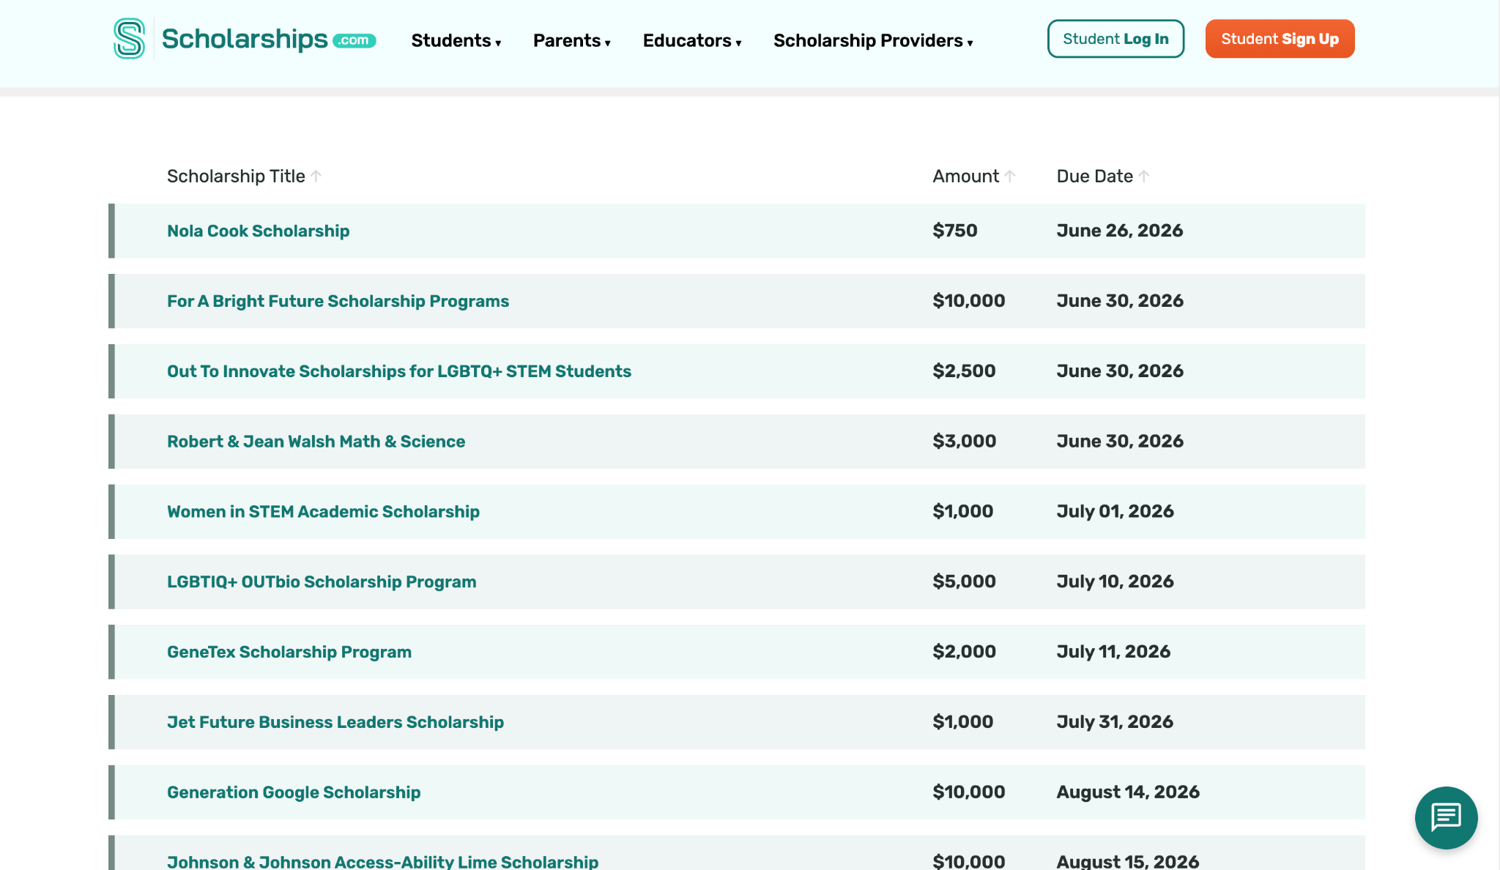
Without further ado, let's build a webpage change monitor with Python and ScrapingBee. We'll monitor Scholarships.com for available college scholarships for actuarial science since it gets a lot of funding.
Prerequisites
To follow along with this guide, you'll need a few things:
Create a fresh project folder and virtual environment first:
mkdir webpage_change_monitor
cd webpage_change_monitor
python3 -m venv .venv
source .venv/bin/activate   # On Windows: .venv\Scripts\activate
Now install the packages we need:
pip install scrapingbee beautifulsoup4 requests
Here is what each package does:
- scrapingbee sends the webpage request through ScrapingBee.
- beautifulsoup4 parses the returned HTML.
- requests sends the Slack webhook request.
Create a .env file and add the following:
SCRAPINGBEE_API_KEY=YOUR_API_KEY
SLACK_WEBHOOK_URL=YOUR_SLACK_WEBHOOK_URL
Replace YOUR_API_KEY with the key from your ScrapingBee dashboard. Treat API keys and webhook URLs like passwords. Never hardcode them in the script.
If you are new to the parsing side, ScrapingBee has a separate guide to web scraping with Python that covers Requests, Beautiful Soup, selectors, and when to move to browser rendering.
Why a naive request is not enough
If you haven't scraped a website in a while, your first attempt might be something like this:
import requests

html = requests.get(
    "https://www.scholarships.com/financial-aid/college-scholarships/"
    "scholarship-directory/academic-major/actuarial-science"
).text
That call can work on simple, static pages. But for a monitor that needs to run reliably over time, a plain HTTP request is simply too fragile and will likely become the first breakpoint.
You may run into issues like:
- JavaScript rendering: if the data you need loads after the initial HTML response, requests.get() will not see it.
- Anti-bot blocking: repeated requests from one IP can get flagged, and the page may return a challenge instead of the content.
- Request infrastructure: you are left to manage timeouts, proxy routing, browser rendering, and failed requests yourself.
For our scheduled monitor, it is better to replace the bare request with a managed fetch layer that handles these concerns more reliably.
Step 1: Importing dependencies and constants
Create a file called watch.py and start by declaring the imports and constants:
import hashlib
import json
import os
from datetime import datetime, timezone
from pathlib import Path

import requests
from bs4 import BeautifulSoup
from scrapingbee import ScrapingBeeClient


URL = (
    "https://www.scholarships.com/financial-aid/college-scholarships/"
    "scholarship-directory/academic-major/actuarial-science"
)
STATE = Path("page_state.json")
The STATE file stores the last successful snapshot of the extracted scholarship data. On the first run, the script creates it. On later runs, it compares the current listings against this saved version.
Add a lightweight helper that reads the .env file without adding another dependency:
def load_env_file(path=Path(".env")):
    if not path.exists():
        return

    for line in path.read_text().splitlines():
        line = line.strip()

        if line and not line.startswith("#") and "=" in line:
            key, _, value = line.partition("=")
            os.environ.setdefault(key.strip(), value.strip())
This loads values from the .env file into environment variables so the script can access them.
Step 2: Fetch the scholarship page with ScrapingBee
Now lets replace the bare request with ScrapingBee. Add a fetch() function that uses the ScrapingBee client:
def fetch(url):
    client = ScrapingBeeClient(api_key=os.environ["SCRAPINGBEE_API_KEY"])

    response = client.get(
        url,
        params={
            "render_js": "false",
        },
        timeout=120,
    )

    response.raise_for_status()
    return response.text
For this particular target, "render_js": "false" is enough because the scholarship rows are already present in the returned HTML. You should always start with the lightest request that returns the data you need.
When monitoring a page that loads content with JavaScript rendering, change the parameters to:
response = client.get(
    url,
    params={
        "render_js": "true",
    },
    timeout=180,
)
If the page is harder to fetch or blocks requests aggressively, you can also add:
"premium_proxy": "true"
That is the value ScrapingBee adds here. It handles the headless browser, proxy rotation, and retries so our script only needs to call the API and ask for the right options.
Step 3: Extract the listing data
Now that you can fetch the page, let's extract the scholarship rows. This gives us a clean, structured dataset to compare over time.
Unless you have no other option, you should avoid comparing raw HTML directly, as it often contains irrelevant or dynamic elements that may change on every load even when the scholarship data itself has not changed.
We will extract the scholarship listings with Beautiful Soup:
def extract(html):
    soup = BeautifulSoup(html, "html.parser")
    table = soup.find("table", id="award-grid")

    if table is None:
        raise ValueError("Could not find the listing table.")

    scholarships = []

    for row in table.find_all("tr"):
        link = row.find("a", class_="blacklink")
        if link is None:
            continue

        cells = row.find_all("td")
        amount = cells[2].get_text(" ", strip=True).removeprefix("Amount:").strip()
        deadline = cells[3].get_text(" ", strip=True).removeprefix("Due Date:").strip()

        scholarships.append(
            {
                "title": link.get_text(strip=True),
                "link": "https://www.scholarships.com" + link["href"],
                "amount": amount,
                "deadline": deadline,
            }
        )
    return scholarships
The useful data is inside a table with the ID award-grid. Each scholarship link uses the class blacklink. If the table cannot be found, the function raises an error instead of continuing with incomplete data.
Next, it loops through each table row and looks for the scholarship link. Rows without a scholarship link are skipped because they do not represent actual listings.
For every valid scholarship row, the parser extracts:
- scholarship title
- scholarship URL
- award amount
- application deadline
Each scholarship is stored as a dictionary and added to the scholarships list.
By returning a structured list of scholarship records instead of the raw HTML, the monitor can compare meaningful data between runs. This also avoids triggering alerts for unrelated page changes that do not affect the scholarship listings themselves.
Step 4: Save a baseline
A monitor needs a reference point. To detect changes, it has to compare the current data against a previously saved version.
On the first successful run, there is nothing to compare yet, so the script should not send an alert. Instead, it saves the current extracted data as the baseline that future runs will use for comparison.
Add this code to implement this:
def build_state(scholarships):
    serialized = json.dumps(scholarships, sort_keys=True)

    return {
        "fetched_at": datetime.now(timezone.utc).isoformat(timespec="seconds"),
        "url": URL,
        "hash": hashlib.sha256(serialized.encode()).hexdigest(),
        "scholarships": scholarships,
    }
The state object stores four pieces of information:
- the time the page was fetched
- the monitored URL
- a hash of the extracted scholarship data
- the full scholarship list
The hash provides a fast way to detect whether anything has changed since the last run. The full scholarship list lets you see exactly which scholarships were added, removed, or modified.
The hash will tell you that the data is different, but it cannot explain how, so keeping the full scholarship list makes it possible to report which scholarships were added, removed, or updated.
Step 5: Compare old and new data
When you have a previous baseline and fresh data, compare them with a function that groups changes by scholarship URL:
def diff_states(previous, current):
    prev_by_link = {item["link"]: item for item in previous["scholarships"]}
    curr_by_link = {item["link"]: item for item in current["scholarships"]}

    added = [item for link, item in curr_by_link.items() if link not in prev_by_link]
    removed = [item for link, item in prev_by_link.items() if link not in curr_by_link]
    changed = []

    for link, curr_item in curr_by_link.items():
        prev_item = prev_by_link.get(link)

        if prev_item and prev_item != curr_item:
            fields = [key for key in curr_item if curr_item[key] != prev_item[key]]
            changed.append(
                {
                    "before": prev_item,
                    "after": curr_item,
                    "fields": fields,
                }
            )

    return {
        "added": added,
        "removed": removed,
        "changed": changed,
    }
If a row moves to a different position in the table, the monitor still recognizes it as the same scholarship. It only flags actual field changes, such as a changed amount, changed deadline, edited title, added listing, or removed listing.
That is much cleaner because it highlights meaningful changes to the scholarship data instead of flagging every small difference in the page markup.
Step 6: Set up a Slack webhook for alerts
At this point, the script can fetch the page, extract the scholarship listings, save a baseline, and compare old and new data, but It does not send webpage-change alerts to us yet.
If we are not actively watching the terminal, we do not have a way to know that something has changed.
We will use Slack webhooks for receiving our alerts because it is simple and requires only one HTTP request. To get a webhook URL, you need to create an incoming Slack webhook.
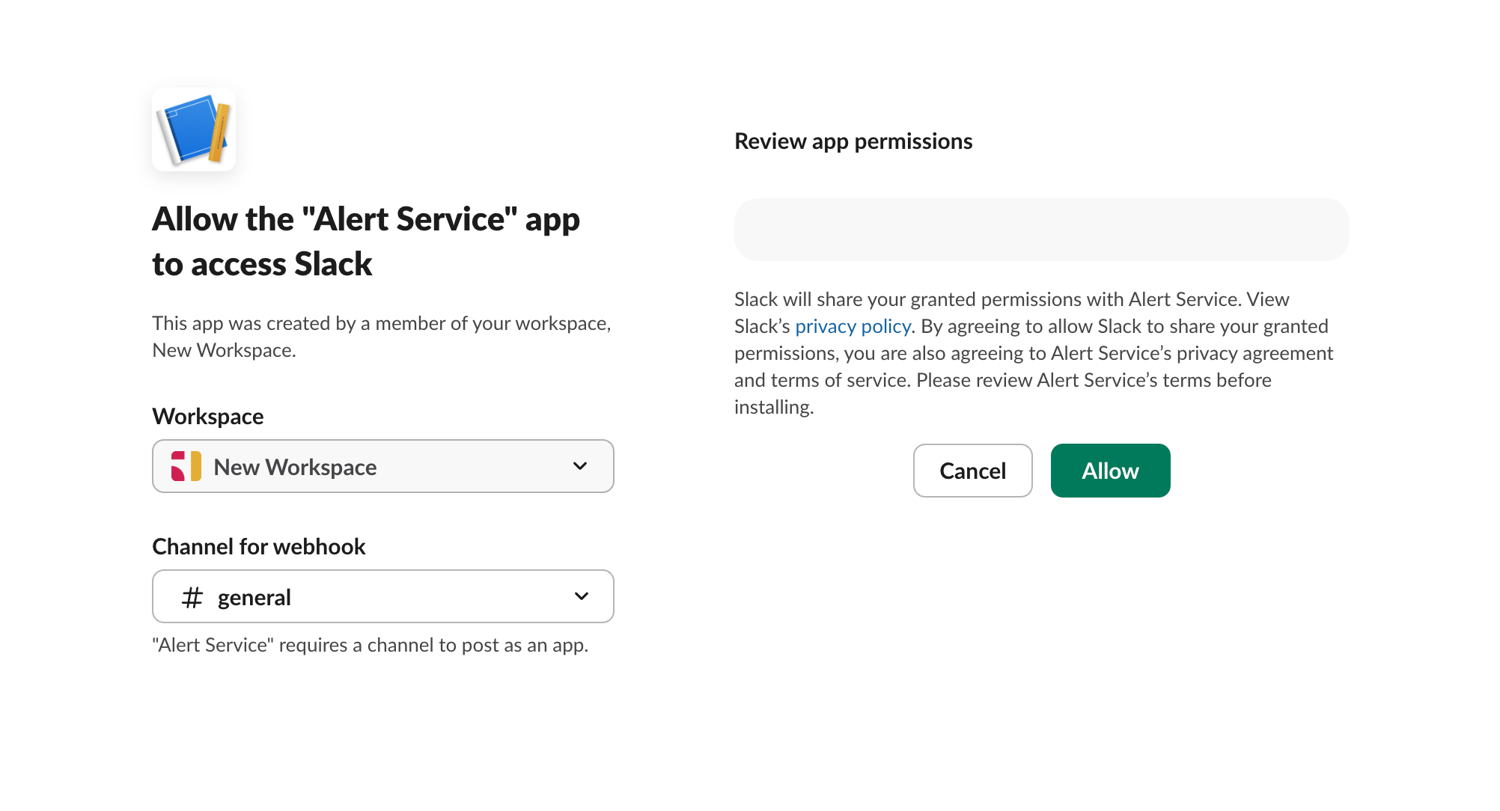
Go to the Slack API dashboard and click Create an app, then select From scratch.
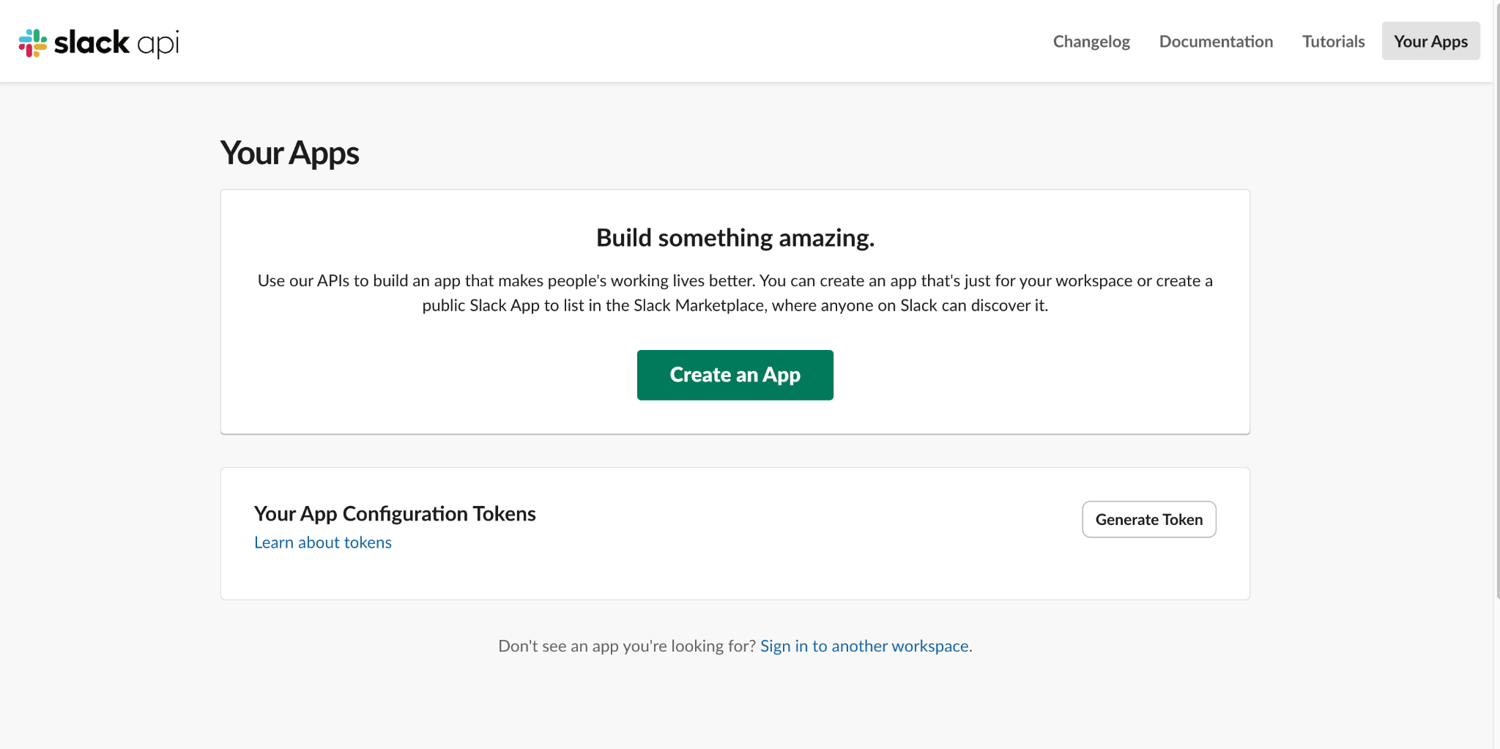
Name the app (for example, "Alert Service") and pick the workspace where alerts should appear.
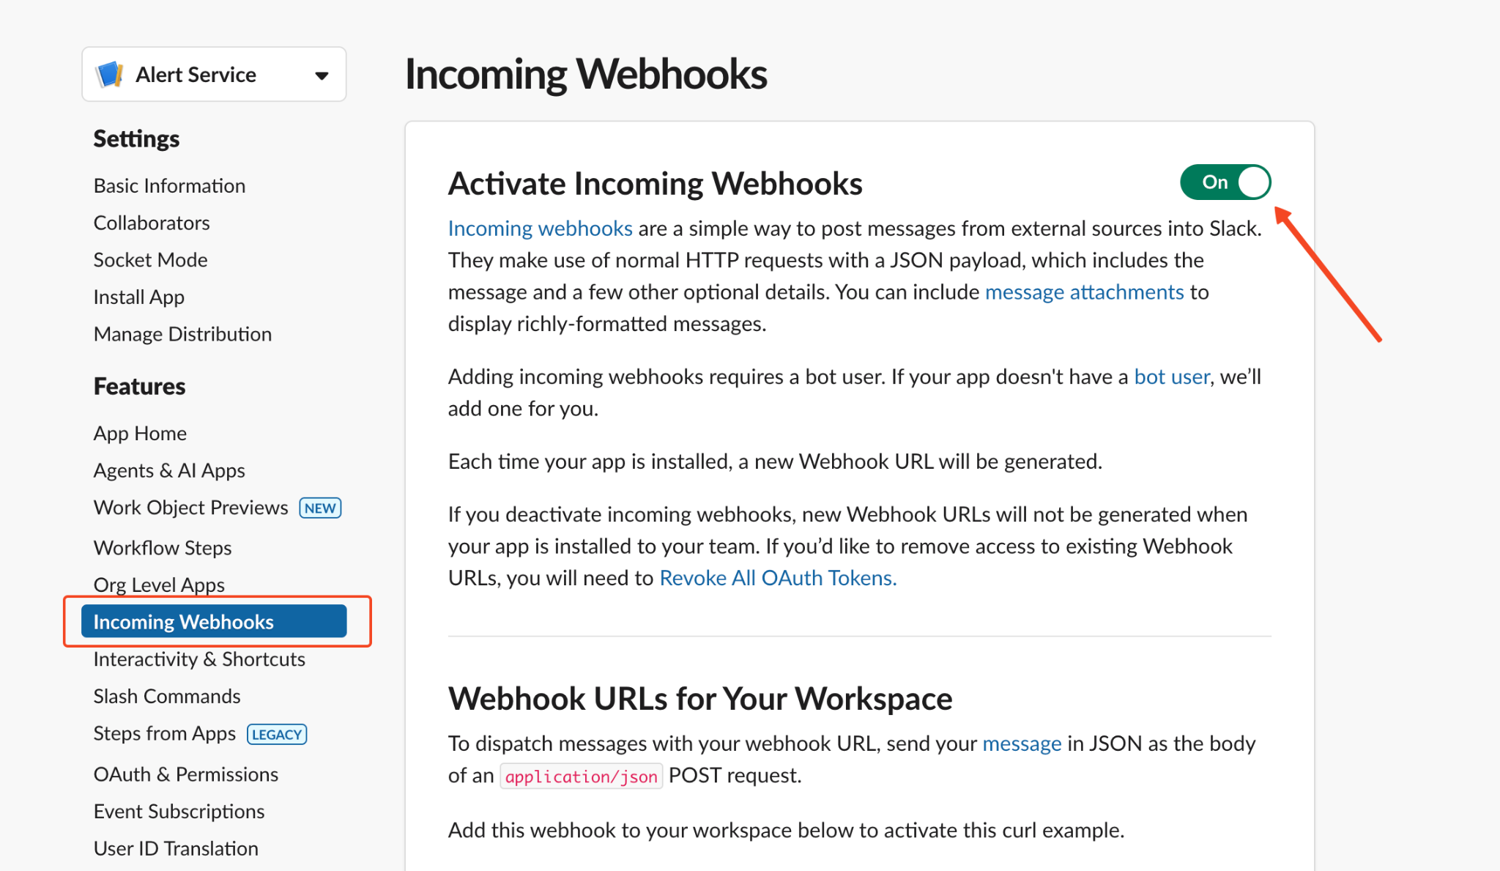
Then click "Add New Webhook to Workspace".
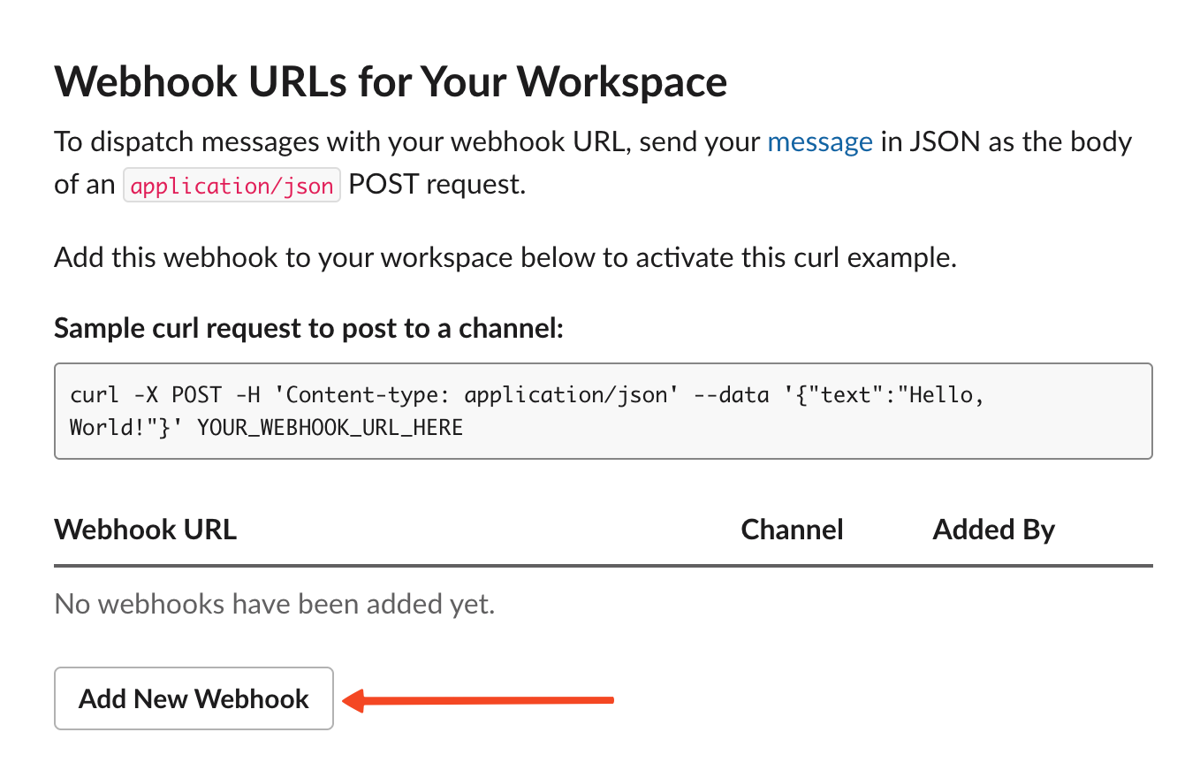
Choose the channel that will receive the alerts and click "Allow".
Copy the webhook URL from the list.
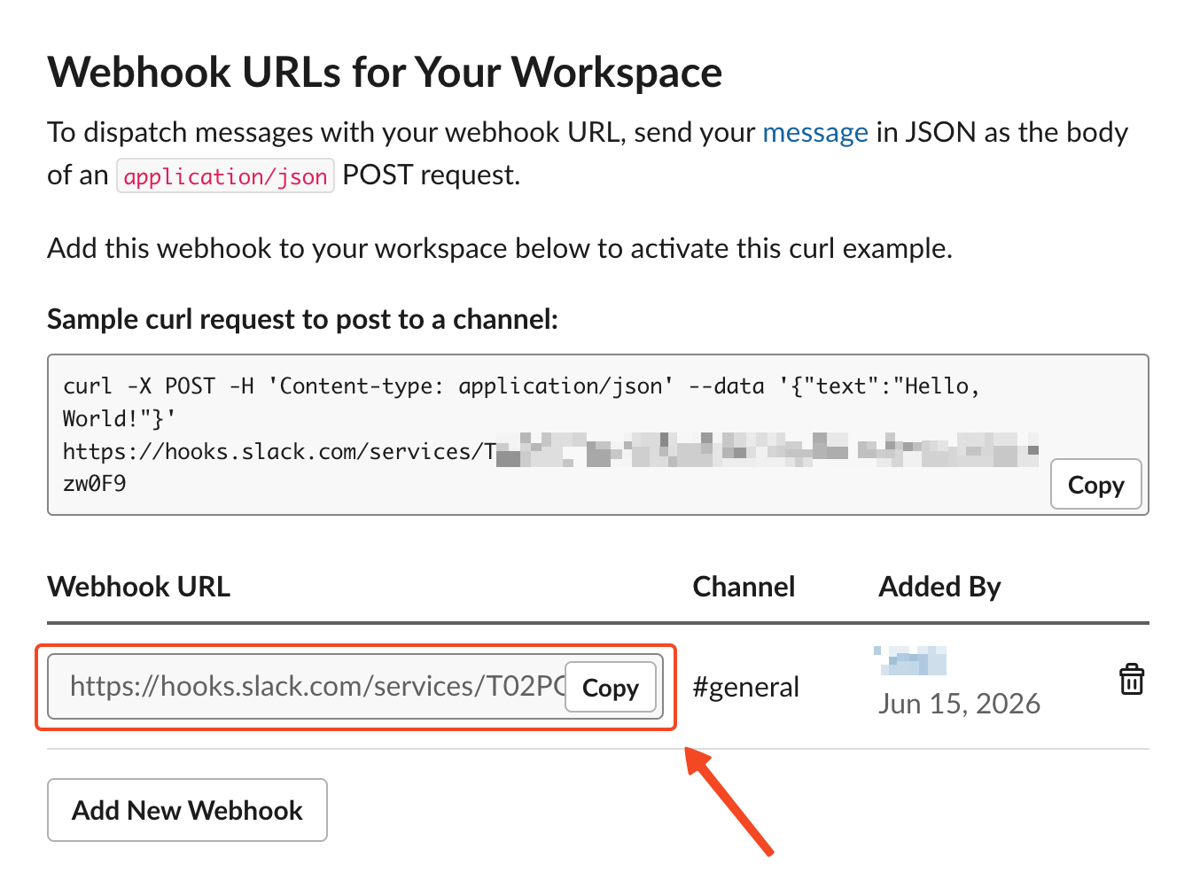
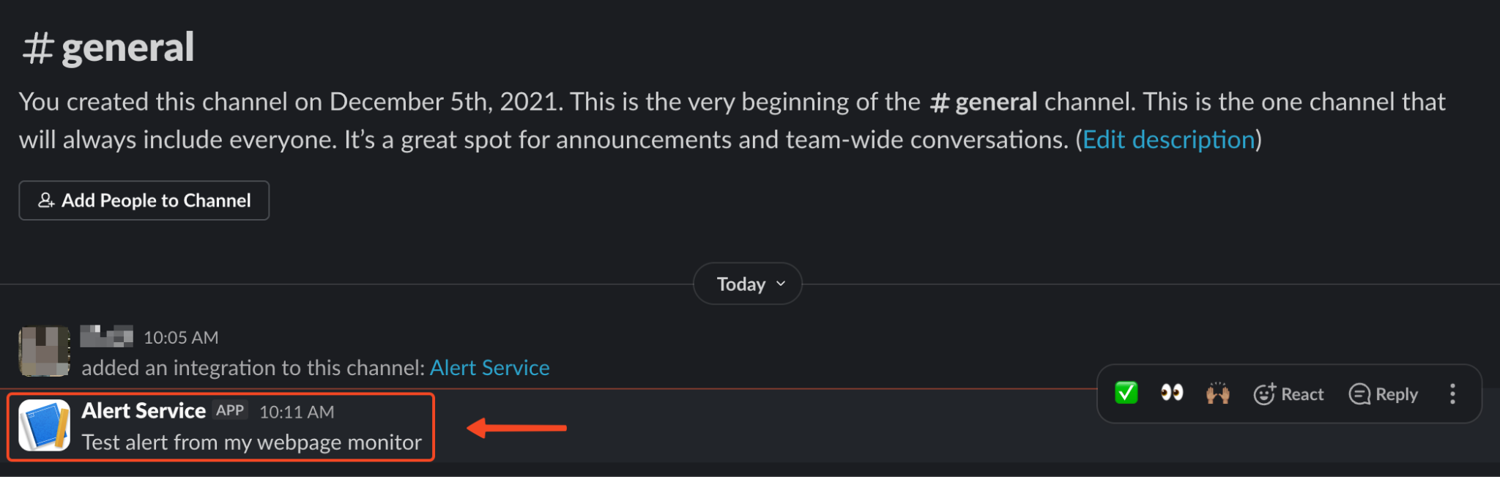
From here, all that's left is to test the webhook so we can connect it to the monitor. Run this small script and remember to use your actual webhook URL:
import requests
SLACK_WEBHOOK_URL = "https://hooks.slack.com/services/YOUR_SLACK_WEBHOOK"

requests.post(
    SLACK_WEBHOOK_URL,
    json={"text": "Test alert from my webpage monitor"},
    timeout=30,
).raise_for_status()
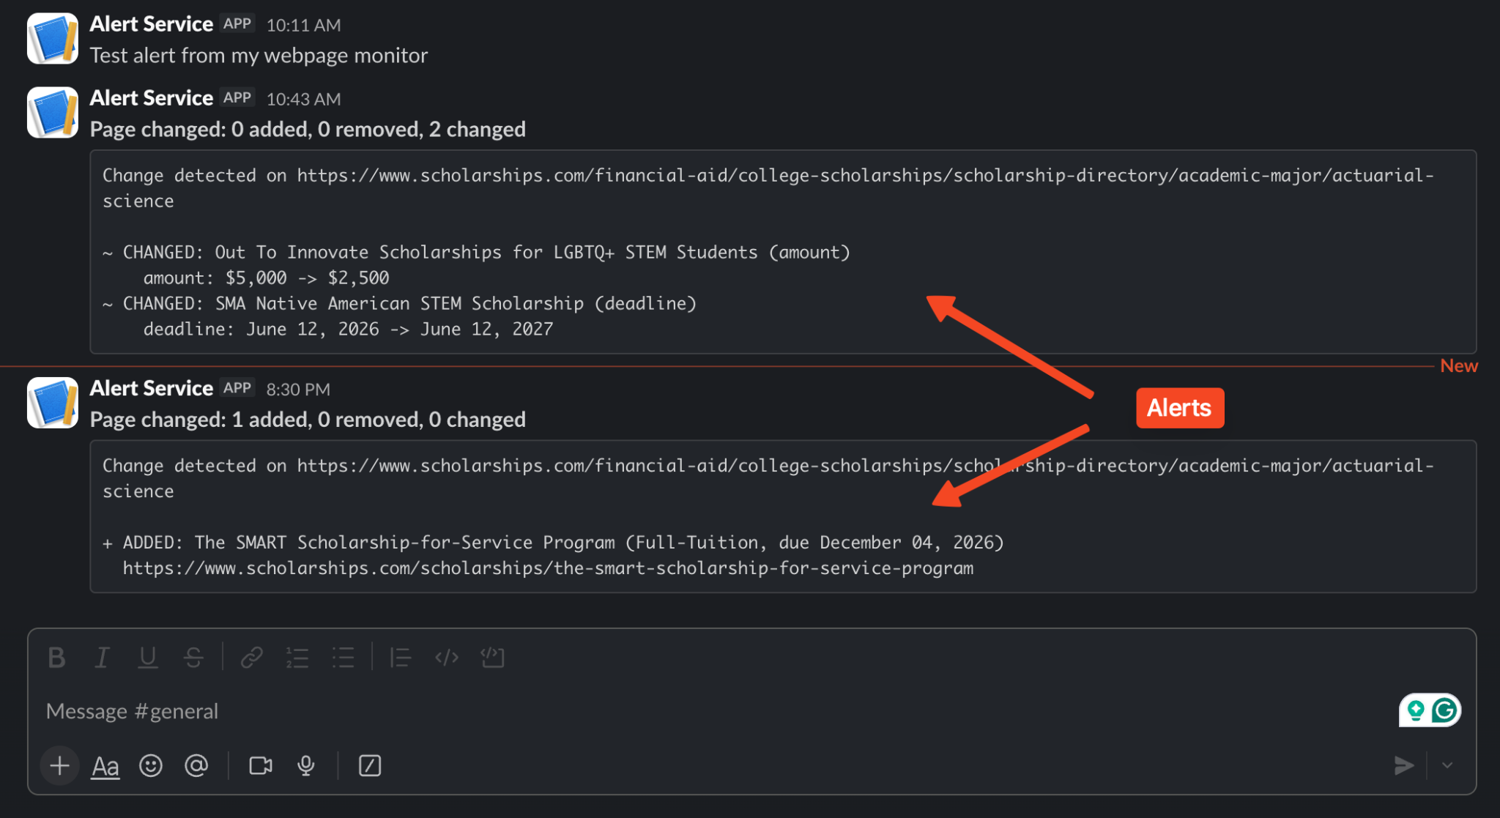
If a message appears in the channel, the webhook is correctly set up.
Step 7: Format the alert message
Now that Slack is ready, we need to turn the detected changes into a message someone can actually understand.
A vague alert like "Page changed" is not very useful as you can imagine, so a better alert should summarize what changed and show the affected scholarships.
def format_alert(diff):
    lines = [f"Change detected on {URL}", ""]

    for item in diff["added"]:
        lines.append(
            f"+ ADDED: {item['title']} ({item['amount']}, due {item['deadline']})"
        )
        lines.append(f"  {item['link']}")

    for item in diff["removed"]:
        lines.append(
            f"- REMOVED: {item['title']} ({item['amount']}, due {item['deadline']})"
        )

    for item in diff["changed"]:
        before = item["before"]
        after = item["after"]

        lines.append(f"~ CHANGED: {after['title']} ({', '.join(item['fields'])})")

        for field in item["fields"]:
            lines.append(f"    {field}: {before[field]} -> {after[field]}")

    return "\n".join(lines)
The formatted message now shows exactly which scholarships were added, removed, or modified, along with the changed fields.
Step 8: Send the alert
Now we can create an alert() function that prints to the terminal and sends the message to Slack so we can get remote notifications
def alert(subject, body):
    print(f"\n=== ALERT: {subject} ===")
    print(body)

    webhook_url = os.environ.get("SLACK_WEBHOOK_URL")

    if webhook_url:
        requests.post(
            webhook_url,
            json={"text": f"*{subject}*\n{body}"},
            timeout=30,
        ).raise_for_status()
The function posts the formatted alert directly into the configured Slack channel using the SLACK_WEBHOOK_URL we created earlier.
Slack receives the notification through a single request to the webhook URL. It is also practical for teams because anyone in the channel automatically receives alerts without extra notification rules or integrations.
Many monitoring tools usually reserve team-wide alert distribution and collaboration features for paid plans, so this is a cost effective way to do that.
Step 9: Run the full monitor
Finally, add the main logic at the bottom of watch.py:
load_env_file()

current = build_state(extract(fetch(URL)))

if not STATE.exists():
    STATE.write_text(json.dumps(current, indent=2))
    print(f"Baseline saved: {len(current['scholarships'])} listings.")
else:
    previous = json.loads(STATE.read_text())

    if current["hash"] == previous["hash"]:
        print("No change.")
        STATE.write_text(json.dumps(current, indent=2))
    else:
        diff = diff_states(previous, current)

        summary = (
            f"{len(diff['added'])} added, "
            f"{len(diff['removed'])} removed, "
            f"{len(diff['changed'])} changed"
        )

        alert(f"Page changed: {summary}", format_alert(diff))
        STATE.write_text(json.dumps(current, indent=2))
When you run the script, it saves the baseline on the first run:
python3 watch.py
Baseline saved: 142 listings.
Then run it again, if nothing changed, you should see:
No change.
When the listings change, the script prints the alert and posts it to Slack:
This is all the code we used in this guide:
import hashlib
import json
import os
from datetime import datetime, timezone
from pathlib import Path

import requests
from bs4 import BeautifulSoup
from scrapingbee import ScrapingBeeClient


URL = (
    "https://www.scholarships.com/financial-aid/college-scholarships/"
    "scholarship-directory/academic-major/actuarial-science"
)
STATE = Path("page_state.json")


def load_env_file(path=Path(".env")):
    if not path.exists():
        return

    for line in path.read_text().splitlines():
        line = line.strip()

        if line and not line.startswith("#") and "=" in line:
            key, _, value = line.partition("=")
            os.environ.setdefault(key.strip(), value.strip())


def fetch(url):
    client = ScrapingBeeClient(api_key=os.environ["SCRAPINGBEE_API_KEY"])

    response = client.get(
        url,
        params={
            "render_js": "false",
        },
        timeout=120,
    )

    response.raise_for_status()
    return response.text


def extract(html):
    soup = BeautifulSoup(html, "html.parser")
    table = soup.find("table", id="award-grid")

    if table is None:
        raise ValueError("Could not find the listing table.")

    scholarships = []

    for row in table.find_all("tr"):
        link = row.find("a", class_="blacklink")
        if link is None:
            continue

        cells = row.find_all("td")
        amount = cells[2].get_text(" ", strip=True).removeprefix("Amount:").strip()
        deadline = cells[3].get_text(" ", strip=True).removeprefix("Due Date:").strip()

        scholarships.append(
            {
                "title": link.get_text(strip=True),
                "link": "https://www.scholarships.com" + link["href"],
                "amount": amount,
                "deadline": deadline,
            }
        )

    return scholarships


def build_state(scholarships):
    serialized = json.dumps(scholarships, sort_keys=True)

    return {
        "fetched_at": datetime.now(timezone.utc).isoformat(timespec="seconds"),
        "url": URL,
        "hash": hashlib.sha256(serialized.encode()).hexdigest(),
        "scholarships": scholarships,
    }


def diff_states(previous, current):
    prev_by_link = {item["link"]: item for item in previous["scholarships"]}
    curr_by_link = {item["link"]: item for item in current["scholarships"]}

    added = [item for link, item in curr_by_link.items() if link not in prev_by_link]
    removed = [item for link, item in prev_by_link.items() if link not in curr_by_link]
    changed = []

    for link, curr_item in curr_by_link.items():
        prev_item = prev_by_link.get(link)

        if prev_item and prev_item != curr_item:
            fields = [key for key in curr_item if curr_item[key] != prev_item[key]]
            changed.append(
                {
                    "before": prev_item,
                    "after": curr_item,
                    "fields": fields,
                }
            )

    return {
        "added": added,
        "removed": removed,
        "changed": changed,
    }


def format_alert(diff):
    lines = [f"Change detected on {URL}", ""]

    for item in diff["added"]:
        lines.append(
            f"+ ADDED: {item['title']} ({item['amount']}, due {item['deadline']})"
        )
        lines.append(f"  {item['link']}")

    for item in diff["removed"]:
        lines.append(
            f"- REMOVED: {item['title']} ({item['amount']}, due {item['deadline']})"
        )

    for item in diff["changed"]:
        before = item["before"]
        after = item["after"]

        lines.append(f"~ CHANGED: {after['title']} ({', '.join(item['fields'])})")

        for field in item["fields"]:
            lines.append(f"    {field}: {before[field]} -> {after[field]}")

    return "\n".join(lines)


def alert(subject, body):
    print(f"\n=== ALERT: {subject} ===")
    print(body)

    webhook_url = os.environ.get("SLACK_WEBHOOK_URL")

    if webhook_url:
        requests.post(
            webhook_url,
            json={"text": f"*{subject}*\n{body}"},
            timeout=30,
        ).raise_for_status()


load_env_file()

current = build_state(extract(fetch(URL)))

if not STATE.exists():
    STATE.write_text(json.dumps(current, indent=2))
    print(f"Baseline saved: {len(current['scholarships'])} listings.")
else:
    previous = json.loads(STATE.read_text())

    if current["hash"] == previous["hash"]:
        print("No change.")
        STATE.write_text(json.dumps(current, indent=2))
    else:
        diff = diff_states(previous, current)

        summary = (
            f"{len(diff['added'])} added, "
            f"{len(diff['removed'])} removed, "
            f"{len(diff['changed'])} changed"
        )

        alert(f"Page changed: {summary}", format_alert(diff))
        STATE.write_text(json.dumps(current, indent=2))
And the .env file should look like this:
SCRAPINGBEE_API_KEY=YOUR_API_KEY
SLACK_WEBHOOK_URL=https://hooks.slack.com/services/YOUR/SLACK/WEBHOOK
That's it. You now have a working webpage change monitor.
Handle JavaScript-rendered pages and anti-bot blocking
Naive website change monitors usually fail in two places: they fetch the wrong content, or they get blocked.
On many modern pages the price, stock status, or listing is loaded by a script after the initial HTML. A plain requests.get() call only returns the HTML sent by the server. So if the value you care about appears only after browser-side JavaScript runs, it will not be in the response. Hence, your script can keep running and still miss the change.
The fix is to render the page before comparing it. With ScrapingBee, that means turning on javascript rendering by setting render_js to true:
from scrapingbee import ScrapingBeeClient

client = ScrapingBeeClient(api_key="SCRAPINGBEE_API_KEY")
response = client.get(
    URL,
    params={"render_js": "true"},
    timeout=180,
)
Blocking is the second failure mode. When a single IP sends frequent requests, anti-bot systems like Cloudflare or DataDome flag the traffic and serve a challenge page instead of the real content.
When that happens, your script may receive a challenge page instead of the page you meant to monitor. The fix is to route requests through residential proxies, which look like ordinary consumer IPs.
ScrapingBee provides "premium_proxy": "true" for general blocking, and a Stealth tier for pages with aggressive fingerprinting.
from scrapingbee import ScrapingBeeClient

client = ScrapingBeeClient(api_key="SCRAPINGBEE_API_KEY")
response = client.get(
    URL,
    params={
        "render_js": "true",
        "premium_proxy": "true",
    },
    timeout=180,
)
For pages that need clicks, scrolling, waits, or custom browser actions before the content appears, you can use JavaScript scenario instructions.
Credit costs scale with the rendering and proxy choices. At the time of writing, a standard request (Classic tier) with JavaScript rendering costs 5 credits. Adding premium proxies brings the cost to 25 credits. The Stealth tier, for the most aggressive anti-bot pages, costs 75 credits per request.
If you are dealing with Cloudflare challenges specifically, ScrapingBee also has a guide on getting past Cloudflare.
Monitor One Element Instead of the Whole Page
The best way to reduce false positives is to monitor the smallest useful piece of the page. For example, If you only care about a price, compare the price. If you only care about the first listing, compare the first listing.
ScrapingBee can handle this with extract_rules, which lets you send a CSS selector and receive clean JSON back:
from scrapingbee import ScrapingBeeClient


def fetch_first_amount(url):
    rules = {
        "first_amount": "#award-grid td:nth-child(3) span",
    }

    client = ScrapingBeeClient(api_key="SCRAPINGBEE_API_KEY")
    response = client.get(
        url,
        params={
            "render_js": "false",
            "extract_rules": rules,
        },
        timeout=120,
    )
    response.raise_for_status()
    return response.json()["first_amount"]


amount = fetch_first_amount(URL)
print(amount)  # "$750"
Instead of comparing all the HTML, you compare one string or number. This way, a change from say "$750" to "$500" is immediately clear.
This also makes condition-based alerts easier. For example, if you only want to alert when a price drops below a certain amount, compare the extracted number, not a full block of page text.
amount_text = fetch_first_amount(URL)
amount_value = int(amount_text.replace("$", "").replace(",", ""))

if amount_value < 1000:
    send_slack_alert(f"Scholarship amount dropped below $1,000: {amount_text}")
Now your monitor can compare scholarship price data from one run to the next instead of comparing the whole page.
Schedule recurring checks (cron and the ScrapingBee CLI)
This script is not a daemon, so it only runs when called. Once your Python script is ready, you need a scheduler that executes it on a regular interval. The simplest and most common scheduler on Unix systems is cron.
Edit your crontab:
crontab -e
To run your monitor every 30 minutes, add this line to your crontab
*/30 * * * * cd /path/to/project && .venv/bin/python watch.py >> monitor.log 2>&1
The five fields are minute, hour, day of month, month, and day of week; */30 means "every 30 minutes." The command changes to the project directory, activates the virtual environment's Python, runs the script, and appends output to a log file. See crontab format for more details.
The drawback here is that cron depends on the machine staying on, so a sleeping laptop stops the monitor. For a setup that runs even when your computer is off, consider a cloud VPS, or a cloud cron service like GitHub Actions.
Another option is to use the ScrapingBee CLI for recurring scrapes. The CLI can be scheduled with cron just like the Python script. For example, to fetch a page with JavaScript rendering and save the result:
scrapingbee scrape \
  --api-key $SCRAPINGBEE_API_KEY \
  --url "https://example.com/product-page" \
  --params '{"render_js": "true"}' \
  --output result.json
The CLI also supports batch input from a file, which lets you monitor website for changes across many URLs with one command.
Note: Choose the schedule based on the target. Stocks or news aggregators may need checks every 5 to 15 minutes. However, content pages, blogs and product listings are usually fine daily or twice daily.
Cut false positives so alerts stay useful
If your alerts contain a few too many false positives, people are likely to mute the channel so how do we prevent that from happening?
The first line of defense is monitoring one element instead of the whole page, as shown in the previous section. You can also remove volatile elements before diffing:
def clean_text(html):
    soup = BeautifulSoup(html, "html.parser")

    for element in soup.select(".ad, .banner, .cookie, .timestamp, script, style"):
        element.decompose()

    text = soup.get_text(" ", strip=True)
    return " ".join(text.split())
This helps strip noisy elements and normalizes whitespace so small formatting changes do not trigger alerts.
For condition-based monitoring, you can also use ScrapingBee's AI extraction with ai_query. With this, you can simply ask a natural-language question and compare the answer:
response = client.get(
    url,
    params={
        "render_js": "true",
        "ai_query": "What is the current scholarship deadline shown on this page?",
        "ai_selector": "#award-grid",
    },
    timeout=180,
)

answer = response.text.strip()
This is useful for semantic alerts like "tell me if the deadline changes." Note that ai_query adds 5 credits on top of the normal request cost.
Scale to many pages (and what it costs)
To track website changes across many URLs, loop over a list and run the same fetch-and-compare logic for each
URLS = [
    "https://example-listings.com/category/a",
    "https://example-listings.com/category/b",
    "https://example-listings.com/category/c",
]

def monitor_all(urls):
    client = ScrapingBeeClient(api_key="SCRAPINGBEE_API_KEY")
    results = {}

    for url in urls:
        response = client.get(
            url,
            params={
                "render_js": "true",
            },
            timeout=120,
        )
        response.raise_for_status()
        results[url] = response.text

    return results
You can also use the ScrapingBee CLI with an input file of URLs, then process the outputs separately.
When you scale, concurrency and rotating proxies keeps our bot from tripping rate limits or getting blocked. Thankfully, ScrapingBee already rotates IPs on every request by default, so each page fetch looks like a different visitor.
You also want to estimate usage before choosing a plan. ScrapingBee uses credit-based pricing, so the math is straightforward:
pages x checks per day x days per month x credits per check
For example, 100 JavaScript-rendered pages checked hourly would be:
100 pages x 24 checks/day x 30 days x 5 credits = 360,000 credits/month
A good way to know your estimate is to run a single page for a day to measure actual credit consumption, then multiply by your target volume.
Conclusion
You now have a complete webpage change monitor that can fetch a page reliably, extract the content that matters, and send a useful alert when it observes changes.
ScrapingBee reliably handles the heavy lifting under the hood so we never had to worry about javascript rendering, proxy rotation or getting blocked.
Sign up for ScrapingBee and get 1,000 free API credits to start building your first monitor in minutes.
Frequently Asked Questions
How do I monitor a webpage for changes?
You can monitor a webpage for changes with a no-code tool or with a script. A no-code tool is fastest but a custom script gives you more control.
How can I monitor a website for changes for free?
You can use free tiers from no-code monitoring tools, but they usually limit frequency, pages, or alert channels. You can also run your own Python script for free on your machine or server. ScrapingBee's free trial gives you 1,000 credits to set up in a few minutes.
Can I monitor a website for changes without code?
Yes. Visual monitoring tools, website change detection services, Google Alerts, and browser extensions can monitor pages without code. They are best for simple pages and low-frequency checks.
How often should I check a page for changes?
Ideally, you should match the schedule to the target. Fast-moving stock or price pages may need checks every 5 to 15 minutes, while news aggregators or public resource pages may only need a few checks a day.
How do I avoid false alerts when monitoring a webpage?
Watch the smallest useful piece of the page, e.g., price, status, title, etc., instead of comparing the entire page HTML. For condition-based monitoring, compare normalized values such as numbers, booleans, IDs, or structured JSON.
Does ScrapingBee send the webpage change alert for me?
No. ScrapingBee fetches the page, renders JavaScript when needed, and handles proxy rotation for you while your script decides what changed and sends the alert through Slack, email, or any channel of your choosing.
How do I see a webpage's history change?
Your script can keep its own history by saving every baseline and every detected change to a file or database. Some no-code tools may also keep before-and-after snapshots for changes they detect. For older versions, you can use the Wayback Machine, but remember that archived snapshots may be incomplete or unavailable.