Getting Started with Apache Nutch
Web crawling is often confused with web scraping, which is simply extracting specific data from web pages. A web crawler is an automated program that helps you find and catalog relevant data sources.
Typically, a crawler first makes requests to a list of known web addresses and, from their content, identifies other relevant links. It adds these new URLs to a queue, iteratively takes them out, and repeats the process until the queue is empty. The crawler stores the extracted data—like web page content, meta tags, and links—in a database.
Apache Nutch is an open source web crawler that lets you collect relevant data from web pages, store it, and create an index for easy searching and querying. Nutch also supports incremental crawling, which means it revisits previously crawled websites and looks for updates to ensure that your indexed data remains fresh. It's flexible and modular, and maintenance is easy—you can check for broken links and duplicates with simple commands.
In this tutorial, let's take a look at how to set up and use Nutch to operate a crawler and then integrate it with Apache Solr to analyze data.

Why Apache Nutch?
Apache Nutch is a feature-rich framework, and one of its most important features is its highly extensible architecture. Nutch uses a plugin-based architecture, which allows you to extend its base functionalities to better suit your use cases. You might benefit from integrating, say, custom content parsers, URL filters, data formats, metadata extractors, and storage solutions.
Nutch also uses Apache Hadoop to support distributed file processing and storage. This gives you the ability to efficiently process large data volumes across multiple machines.
While Nutch is primarily a crawler, it does include its own search engine. Once your crawler has collected and indexed web content, you can carry out basic keyword-based querying through the data. You can extend its search capability during indexing by configuring it to index specific metadata or content fields.
Its segment-based storage means you have flexible data storage options. Each segment is a collection of web pages fetched in a particular crawling operation, which makes it easier to handle large volumes of data. For those large-scale crawls, you can use Hadoop's Distributed File System (HDFS). Its native file system storage is more useful for smaller crawls. If you need to extend Nutch's data storage capabilities, you can make use of platforms like Apache Solr or Elasticsearch.
Getting Started with Apache Nutch
To demonstrate how Apache Nutch can be used to crawl websites, let's configure a crawler to fetch data from ScrapingBee. You'll analyze that data by integrating Nutch with Apache Solr to make queries.
Prerequisites
To get started, ensure that you have the following set up:
- Unix environment (WSL 2 on Windows)
- Java Development or Runtime Environment version 11
- A code editor like Visual Studio Code
Install Apache Nutch
Once you've got all the prerequisites set up, it's time to create a project directory using the mkdir <dir_name> command and navigate into it via your terminal. Then, run the command below to download and unzip Apache Nutch version 1.19:
wget https://dlcdn.apache.org/nutch/1.19/apache-nutch-1.19-bin.zip
unzip apache-nutch-1.19-bin.zip
Run the following command to change the directory into the unzipped folder and test your installation using the bin/nutch command:
cd apache-nutch-1.19
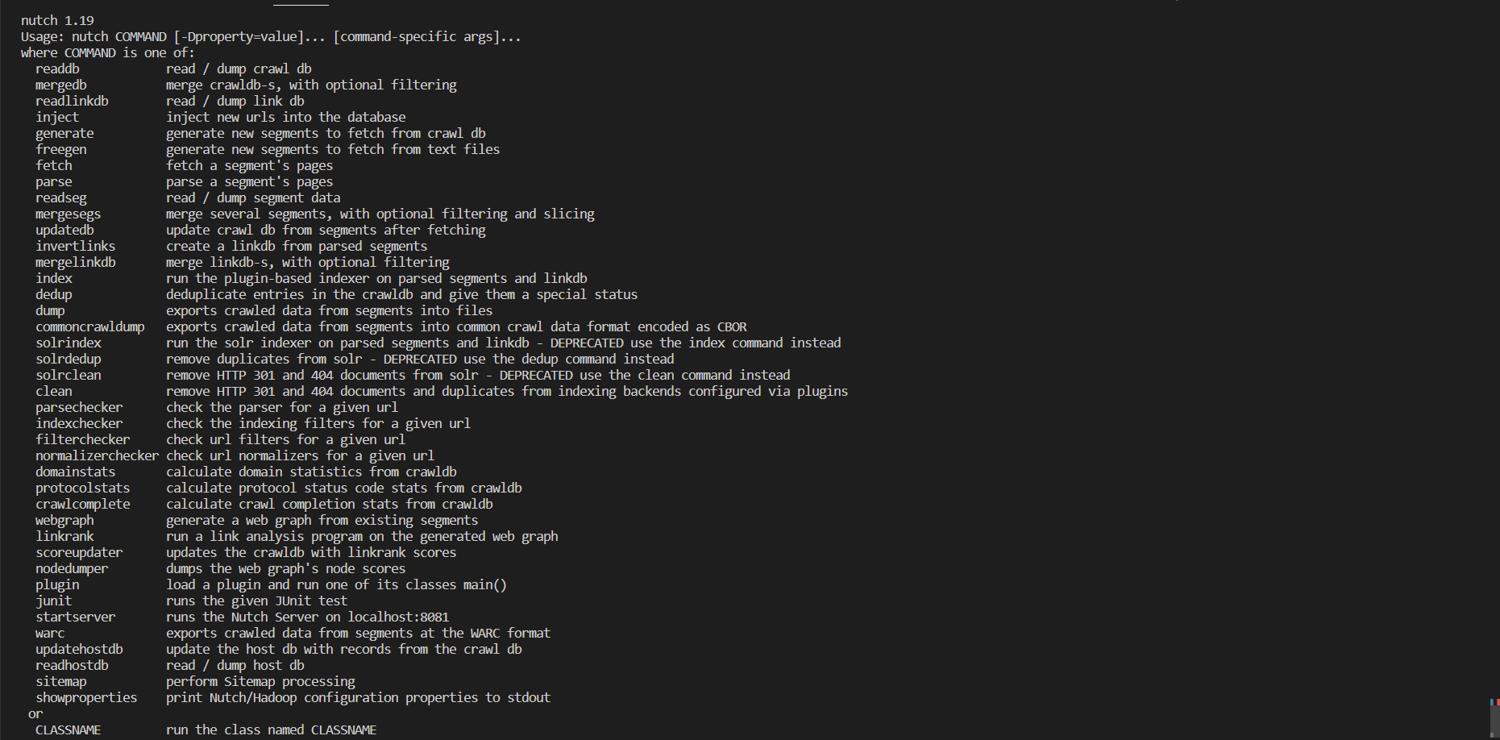
bin/nutch
This should show you the options available to use with the nutch command, as shown here:
If you get a JAVA_HOME is not set error, run the following command to set it for this terminal session:
export JAVA_HOME="/usr/lib/jvm/java-11-openjdk-amd64"
Configure Apache Nutch with Data Storage and Indexing Options
For this tutorial, you'll want to integrate Nutch with Apache Solr to store your indexed data and analyze it. To install Solr version 8.11.2, navigate back to the project directory and run:
wget https://dlcdn.apache.org/lucene/solr/8.11.2/solr-8.11.2.tgz
tar xzf solr-8.11.2.tgz
Change the directory to the solr-8.11.2/bin folder and start the Solr server:
cd solr-8.11.2/bin
./solr start
This opens a browser tab at http://localhost:8983/solr/#//. You'll use this server to analyze your crawled data later.
To create a core in Solr named nutch, which is essentially an index where your data will be stored, run the following:
./solr create -c nutch
This returns the following output:
Created new core 'nutch'
With Solr set up, it's time to integrate it with Apache Nutch. Open the apache-nutch-1.19/conf/nutch-site.xml file in your code editor.
In this file, enter the configuration property below between the <configuration> and </configuration> tags to specify that Solr will be used for indexing:
<property>
   <name>storage.data.store.class</name>
   <value>org.apache.gora.solr.store.SolrStore</value>
</property>
Enter the following property just below the previous one to specify the Solr server URL:
<property>
   <name>solr.server.url</name>
   <value>http://localhost:8983/solr/nutch</value>
</property>
Finally, enter the property below to set your crawler name to a specific value—in this case, MyNutchCrawler. This ensures that you obey any rules set by robots.txt files on the parts of a website that your crawler is allowed to access. With a default crawler name, you might unintentionally violate these directives.
<property>
    <name>http.agent.name</name>
    <value>MyNutchCrawler</value>
</property>
The complete nutch-site.xml file is displayed below:
<?xml version="1.0"?>
<?xml-stylesheet type="text/xsl" href="configuration.xsl"?>

<!-- Put site-specific property overrides in this file. -->

<configuration>
    <property>
        <name>storage.data.store.class</name>
        <value>org.apache.gora.solr.store.SolrStore</value>
    </property>
    <property>
        <name>solr.server.url</name>
        <value>http://localhost:8983/solr/nutch</value>
    </property>
    <property>
        <name>http.agent.name</name>
        <value>MyNutchCrawler</value>
    </property>
</configuration>
Set Up the Tool for Scraping
To get your scraping tool set up, you need to define the URL(s) that will be used as a starting point. These are called seed URLs.
Navigate back into the apache-nutch-1.19 directory and run the commands below to create a urls directory and a seed.txt file in it with a link to ScrapingBee:
mkdir -p urls
echo "https://www.scrapingbee.com" >> urls/seed.txt
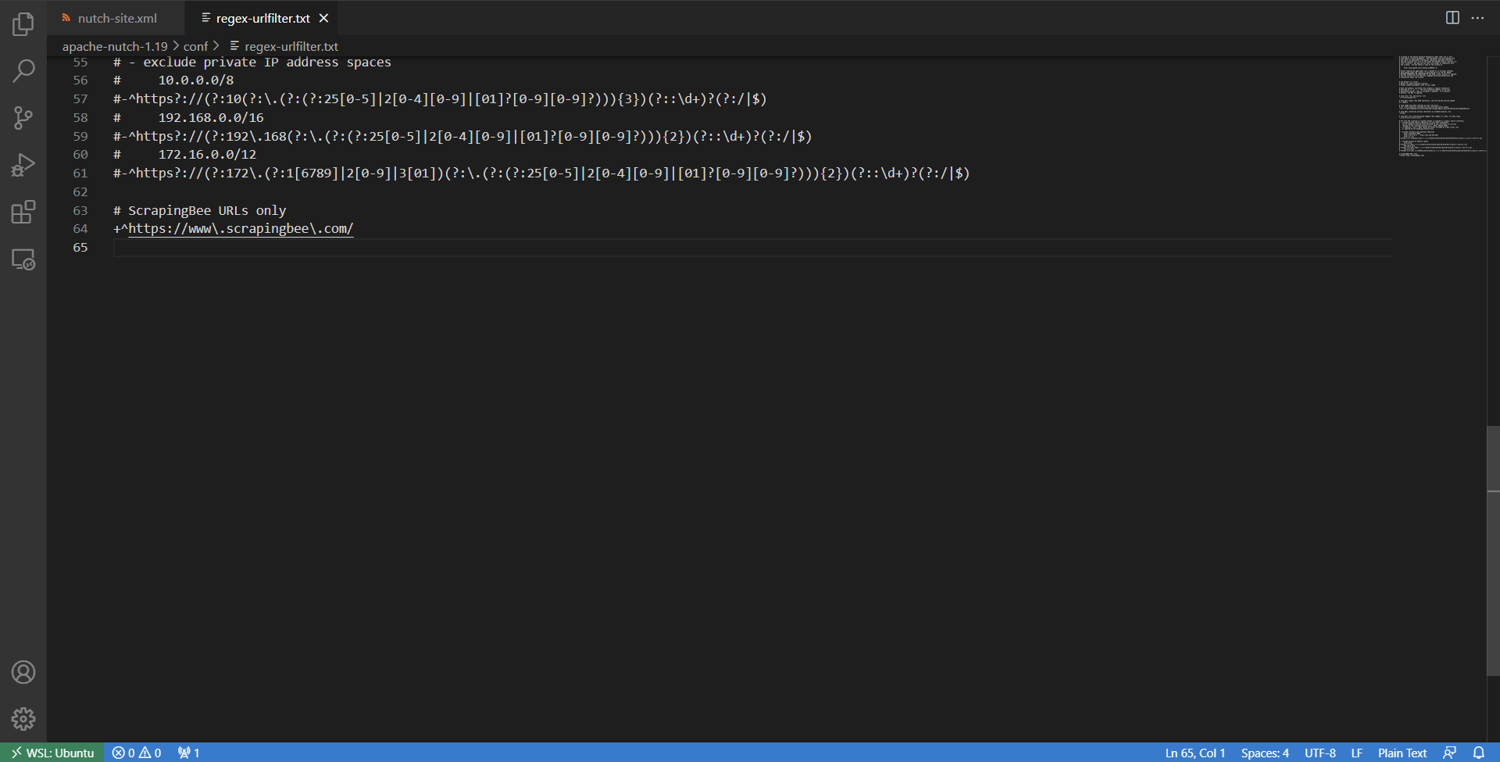
To ensure that you only include URLs that match ScrapingBee's domain, edit the conf/regex-urlfilter.txt file. Locate the following code, which accepts any URL that makes it through the other filters in the file:
# accept anything else
+.
Then replace the previous code with a regular expression matching the ScrapingBee domain only, as shown here:
# ScrapingBee URLs only
+^https://www\.scrapingbee\.com/
The edited portion is shown in the image below.
Scrape Data from ScrapingBee
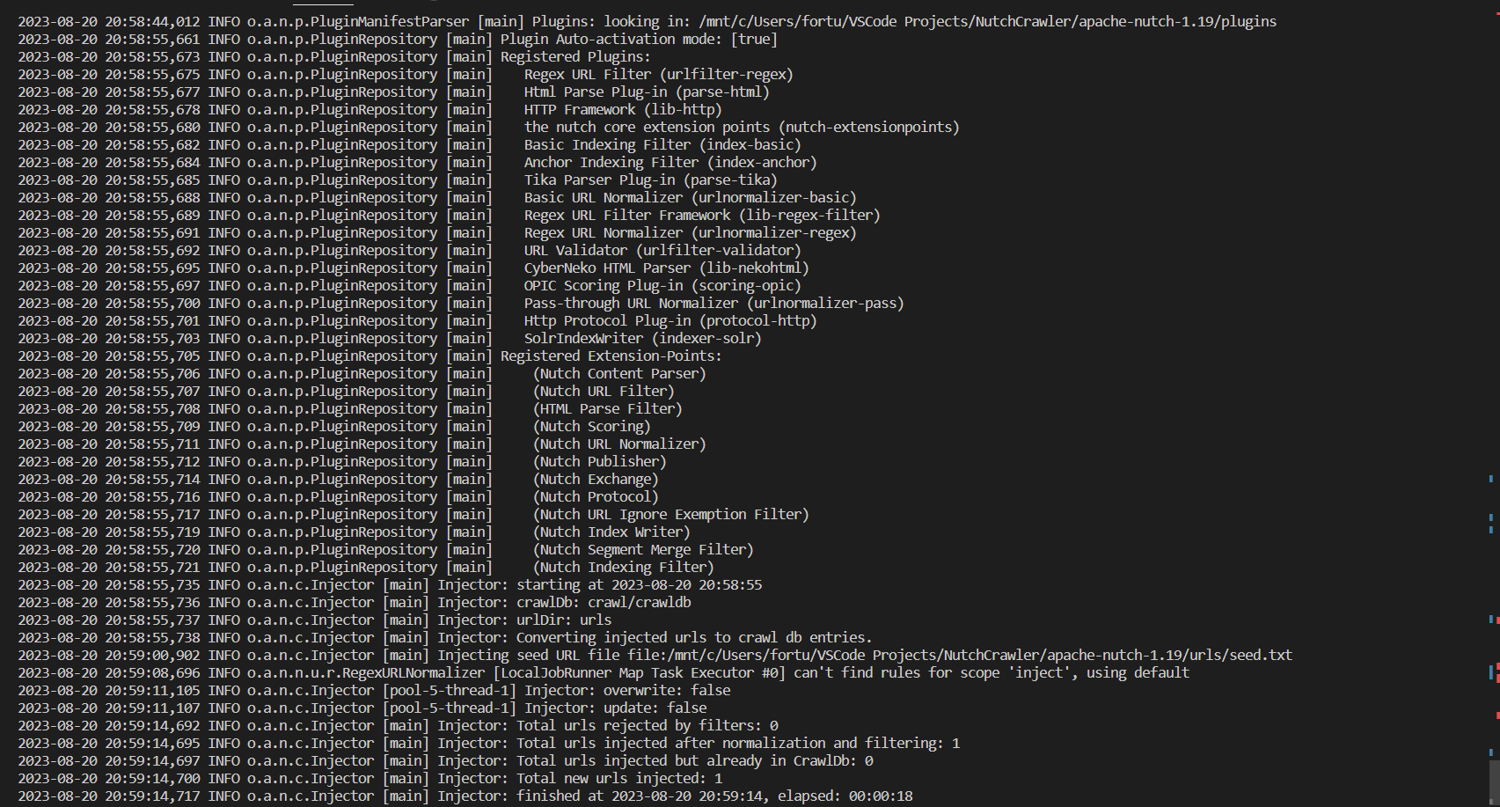
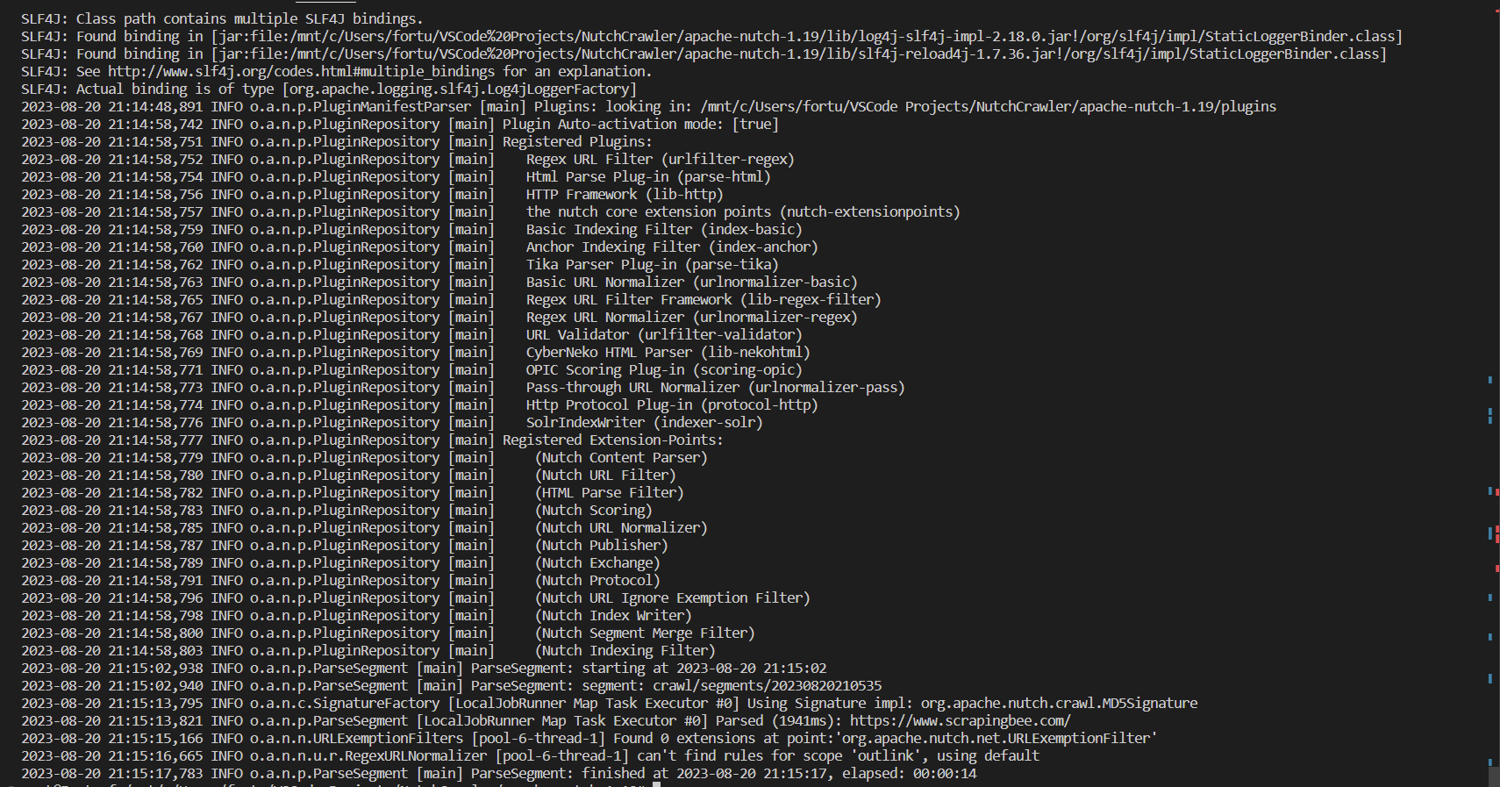
To set the stage for crawling, inject the seed URL(s) from the urls directory into Nutch's crawl database, crawldb, by running the following command:
bin/nutch inject crawl/crawldb urls
A portion of the terminal output is displayed below:
Run the following command to scan crawldb, select the next set of URLs that need to be crawled, and schedule them for fetching by creating a new segment in the crawl/segments directory:
bin/nutch generate crawl/crawldb crawl/segments
Save and display the name of the newly created segment in the shell variable s1 for easy reference later by running the following:
s1=$(ls -d crawl/segments/2* | tail -1)
echo $s1
You can fetch web pages in the $s1 segment of the Apache Nutch web crawler by running the following:
bin/nutch fetch $s1
A portion of the terminal output is displayed here:
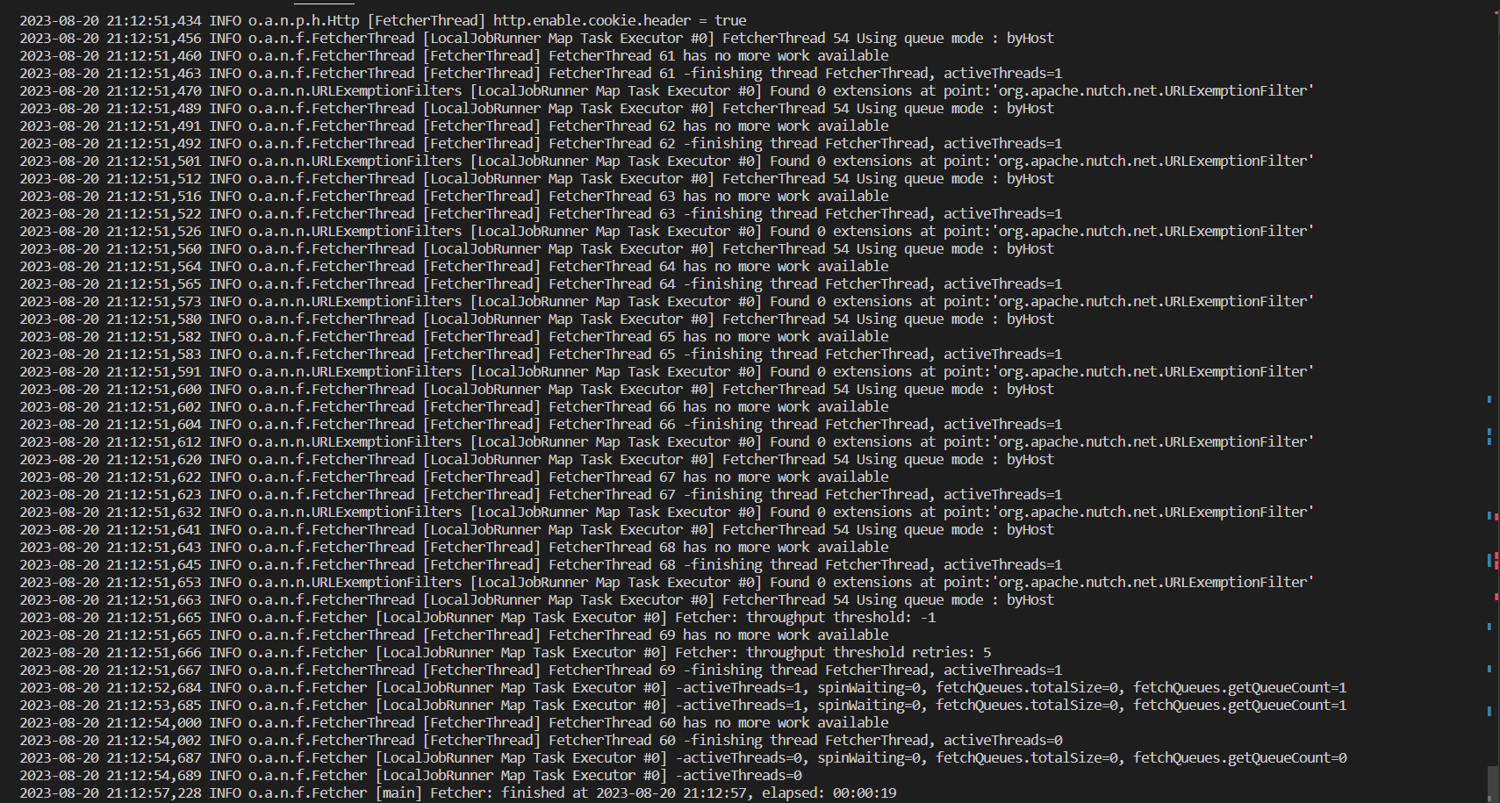
Run the following command to process and extract useful data from the fetched web pages in the $s1 segment of the crawler:
bin/nutch parse $s1
You should see the output below at the end of the operation:
Store the Scraped Data
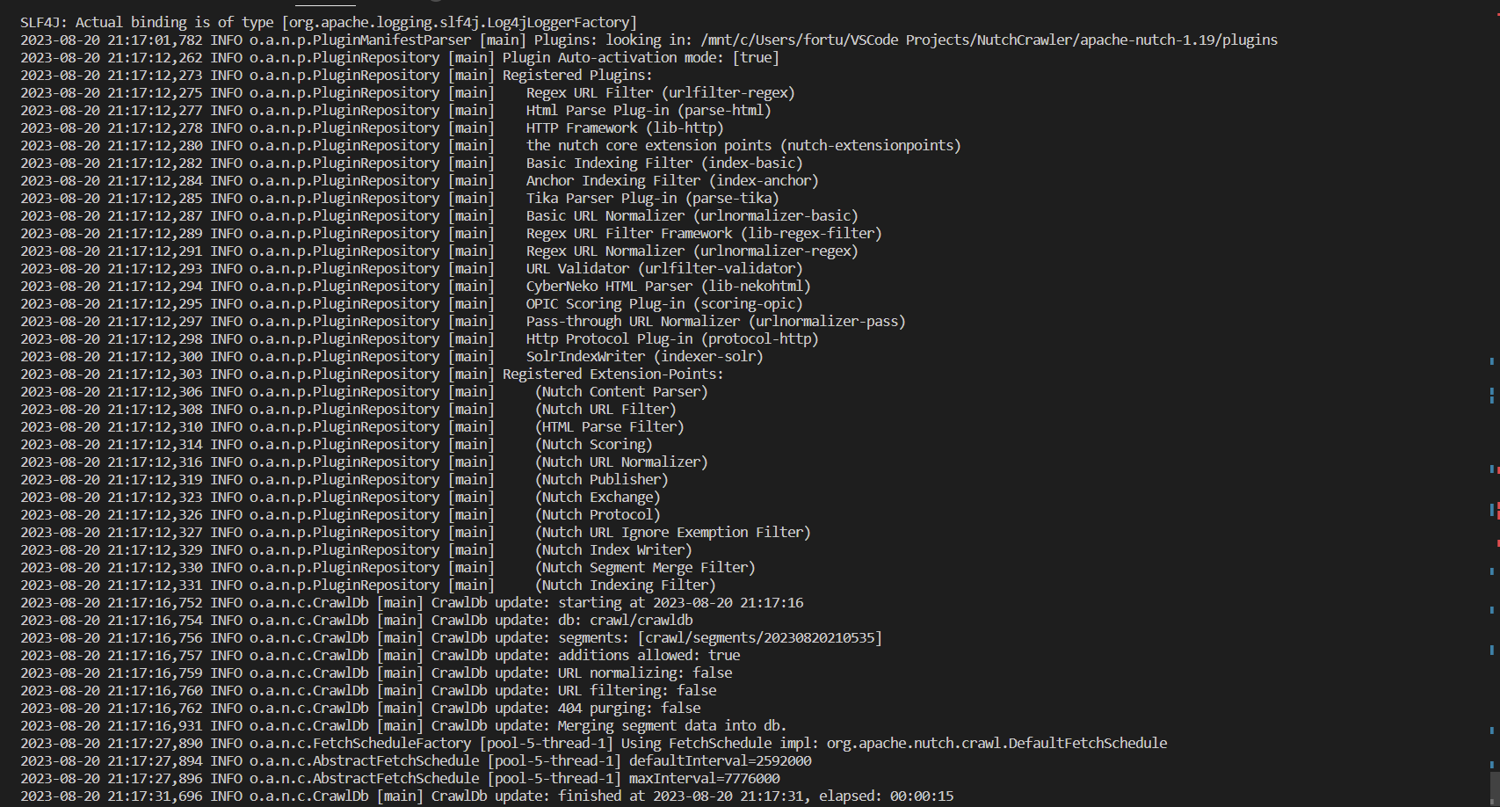
Now, you can update the central crawldb database with the result from the $s1 segment by running the following:
bin/nutch updatedb crawl/crawldb $s1
This generates the terminal output shown here:
Repeat the process for a new segment containing the top-scoring twenty pages by running the following:
bin/nutch generate crawl/crawldb crawl/segments -topN 20
s2=$(ls -d crawl/segments/2* | tail -1)

bin/nutch fetch $s2
bin/nutch parse $s2
Update the crawldb as before with the result from segment $s2 by running the following:
bin/nutch updatedb crawl/crawldb $s2
Your database now reflects the latest fetched and parsed results from both segments!
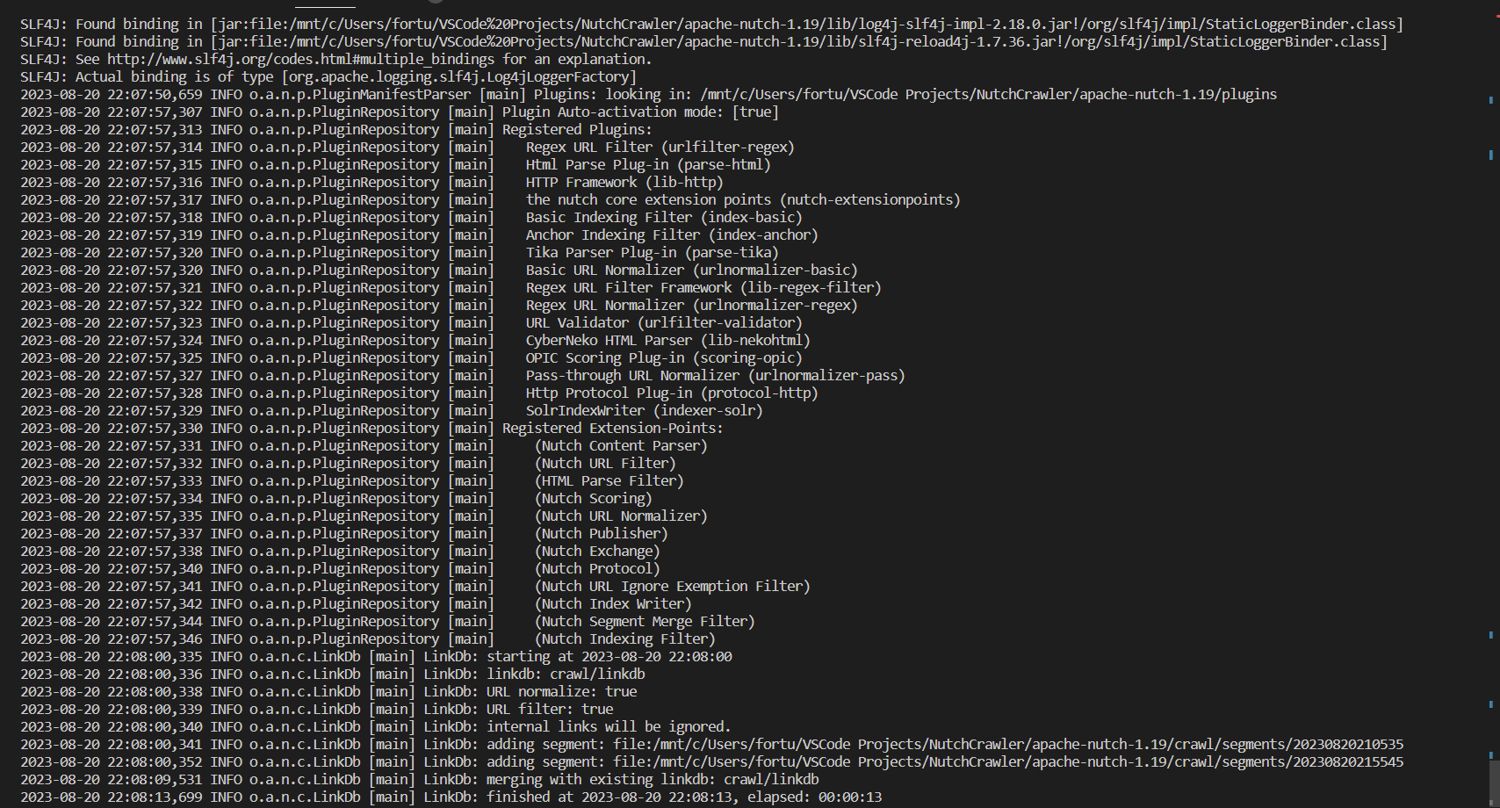
However, to prepare and store the data in a format that makes it efficient for search operations, you have to index it. Before doing that, run the following command to invert the links that have been crawled so far:
bin/nutch invertlinks crawl/linkdb -dir crawl/segments
This command converts outlinks, or links from one website to another, to inlinks, which link from one web page to another within the same site. This information is then saved to a link database, linkdb, and provides additional context about a web page's relevance and content.
Finally, index the data on the configured Apache Solr server by running the following:
bin/nutch index crawl/crawldb/ -linkdb crawl/linkdb/ -dir crawl/segments/ -filter -normalize -deleteGone
The command above includes the following:
- A
-filteroption to filter URLs based on already specified criteria - A
-normalizeoption to convert the URLs into a standard format - A
-deleteGoneoption to remove broken URLs from the index
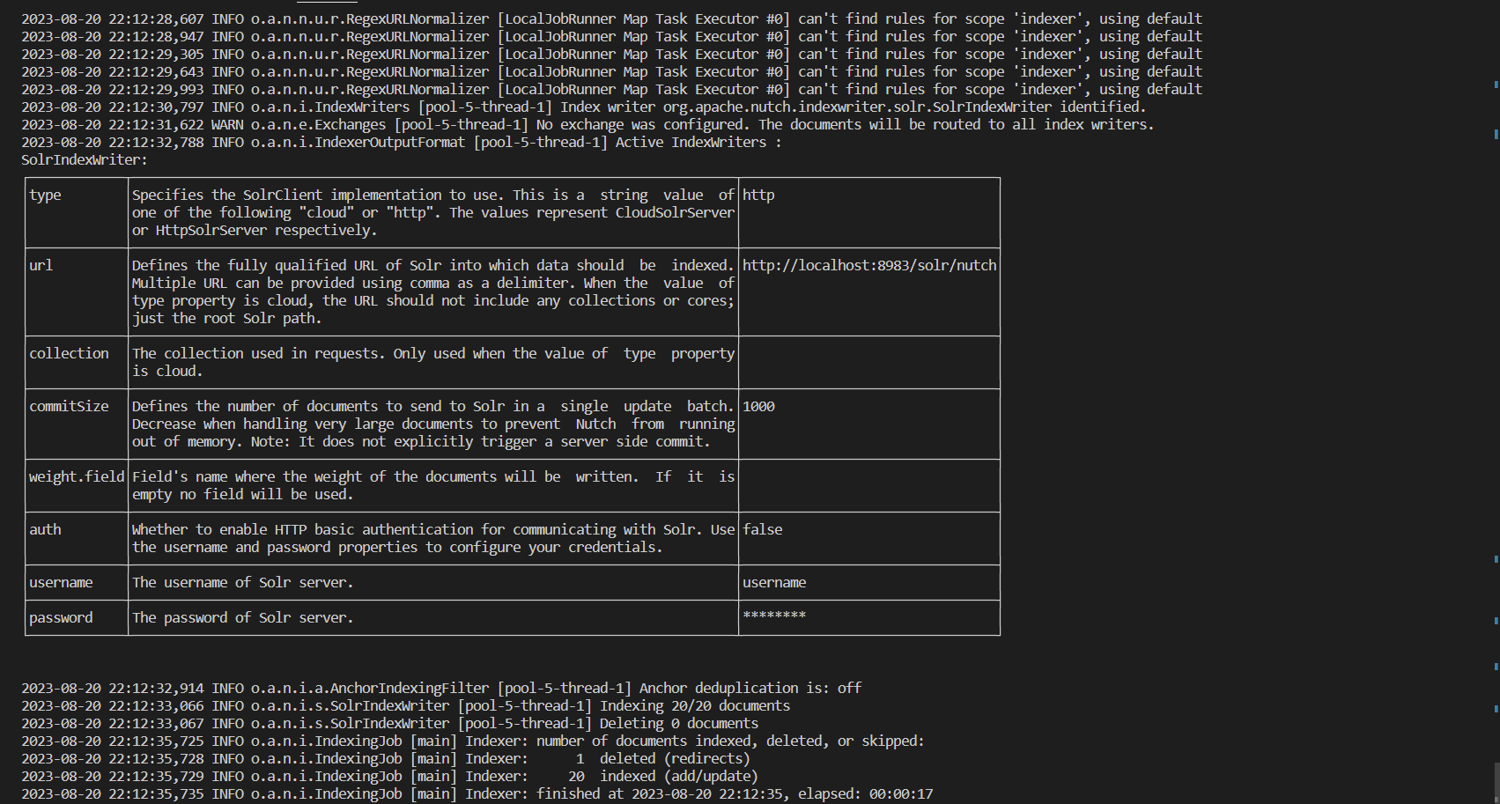
A portion of the terminal output is displayed in the image below. Note that on the penultimate line, it says that 20 documents are indexed.
Now that you understand these processes, you can use the crawl script to automate them.
Analyze the Indexed Data
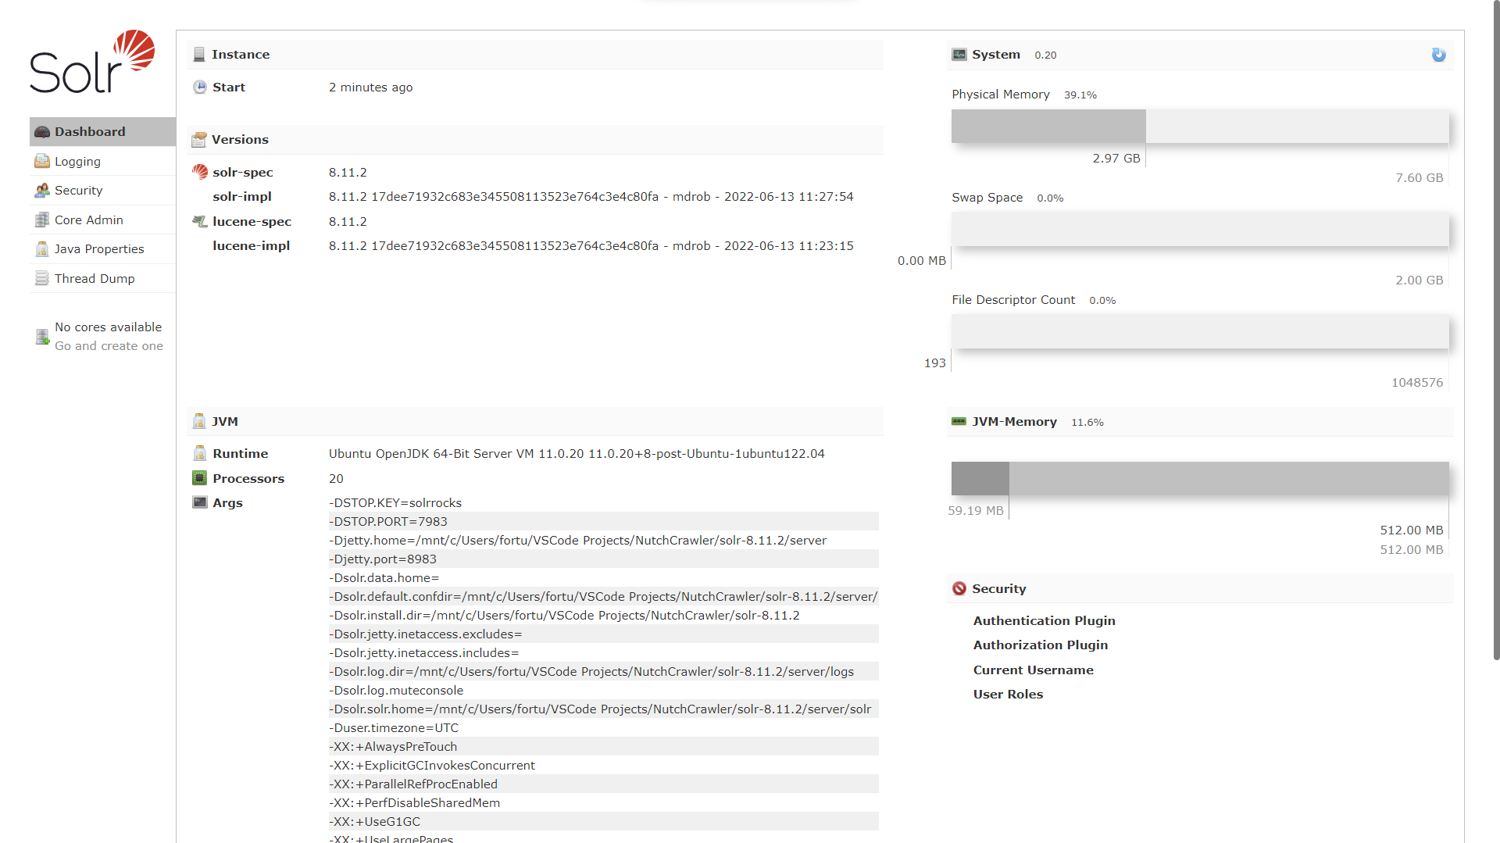
To analyze your indexed data, you'll use the running Solr server. Navigate to http://localhost:8983/solr/#/nutch/core-overview to view the nutch core created earlier, as shown in the image below.
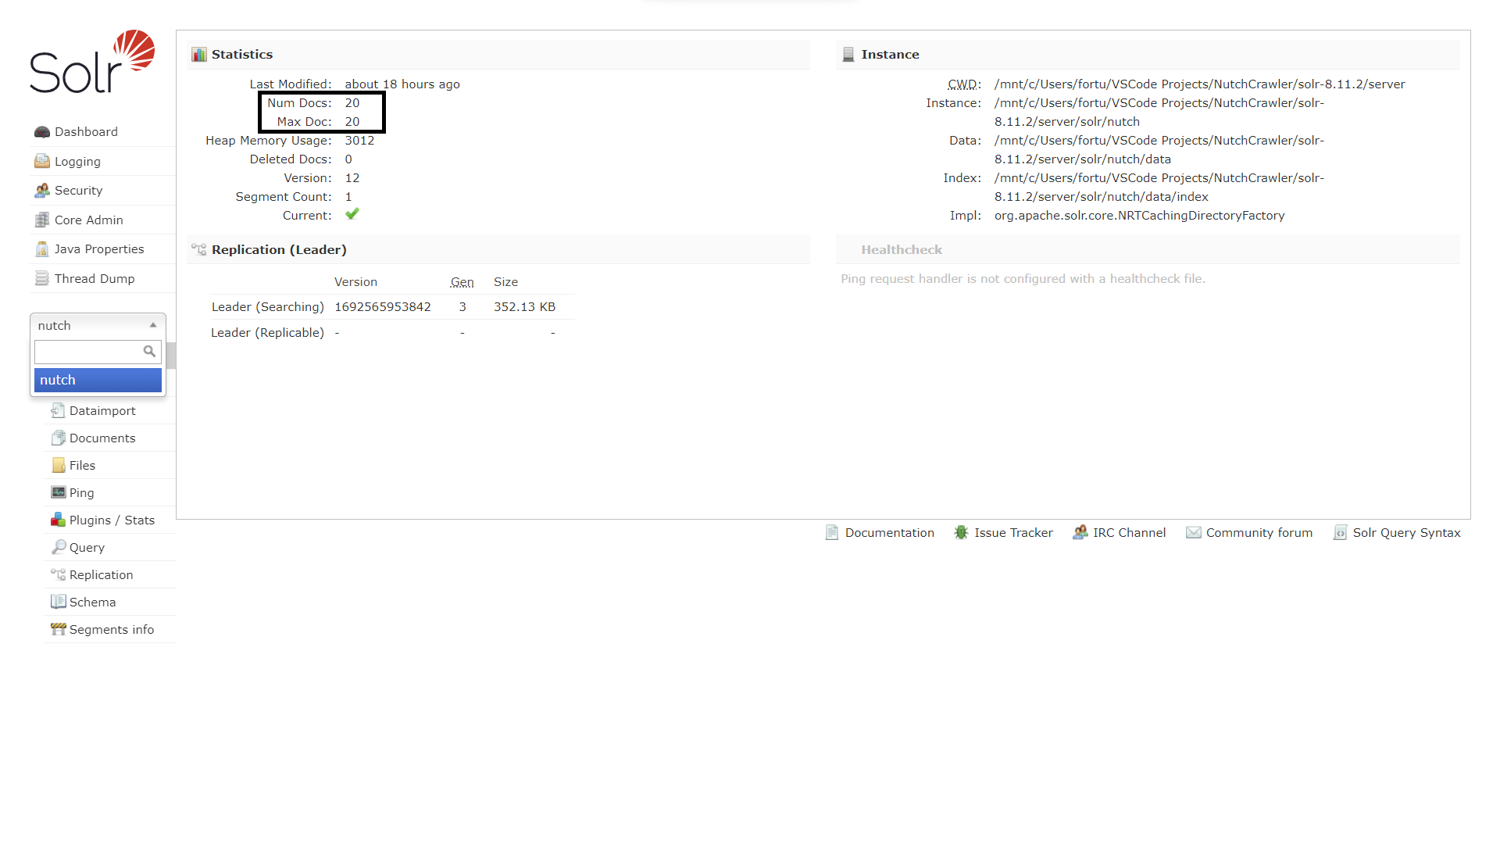
Note: The number of documents matches the terminal output.
To analyze the crawled data by making queries, click Query on the lower left. Enter title:amazon into the q (query) field to search for a scraped web page that has Amazon in its title.
Scroll down and click Execute Query to run the query.
The result is generated on the right-hand side, as shown in the image below. Notice the blog post that corresponds to the query with all its scraped data.

Next, replace the term in the q field with content:scraping to search for web pages with scraping in their content field. Click Execute Query.
Enter title:alternative into the fq (filter query) field to limit the results to those that have the word alternative in their title. The result is shown below:
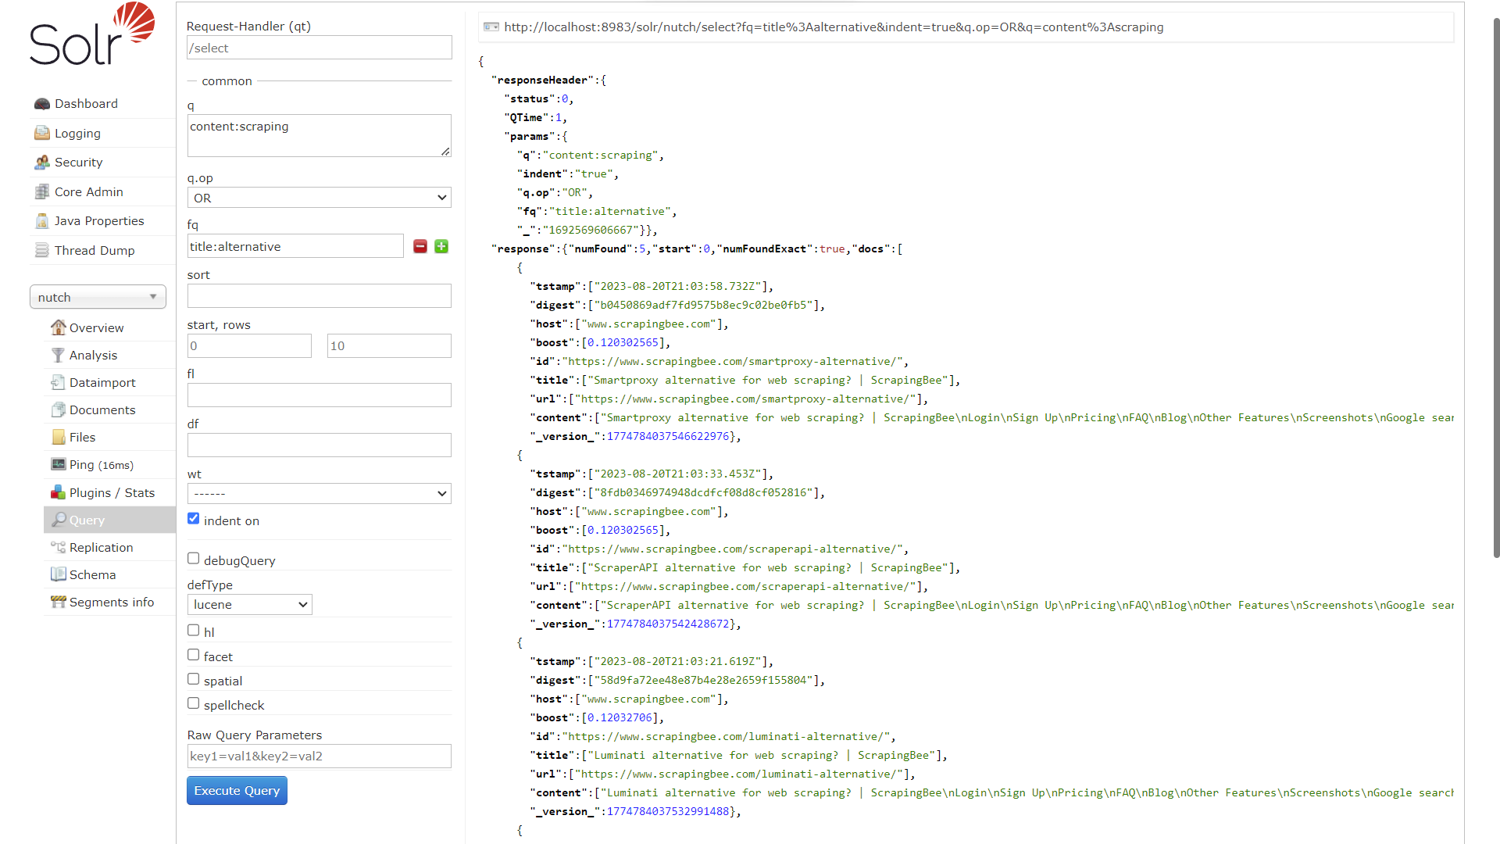
Note: Sure enough, the number of extracted content reduces from 15 to 5.
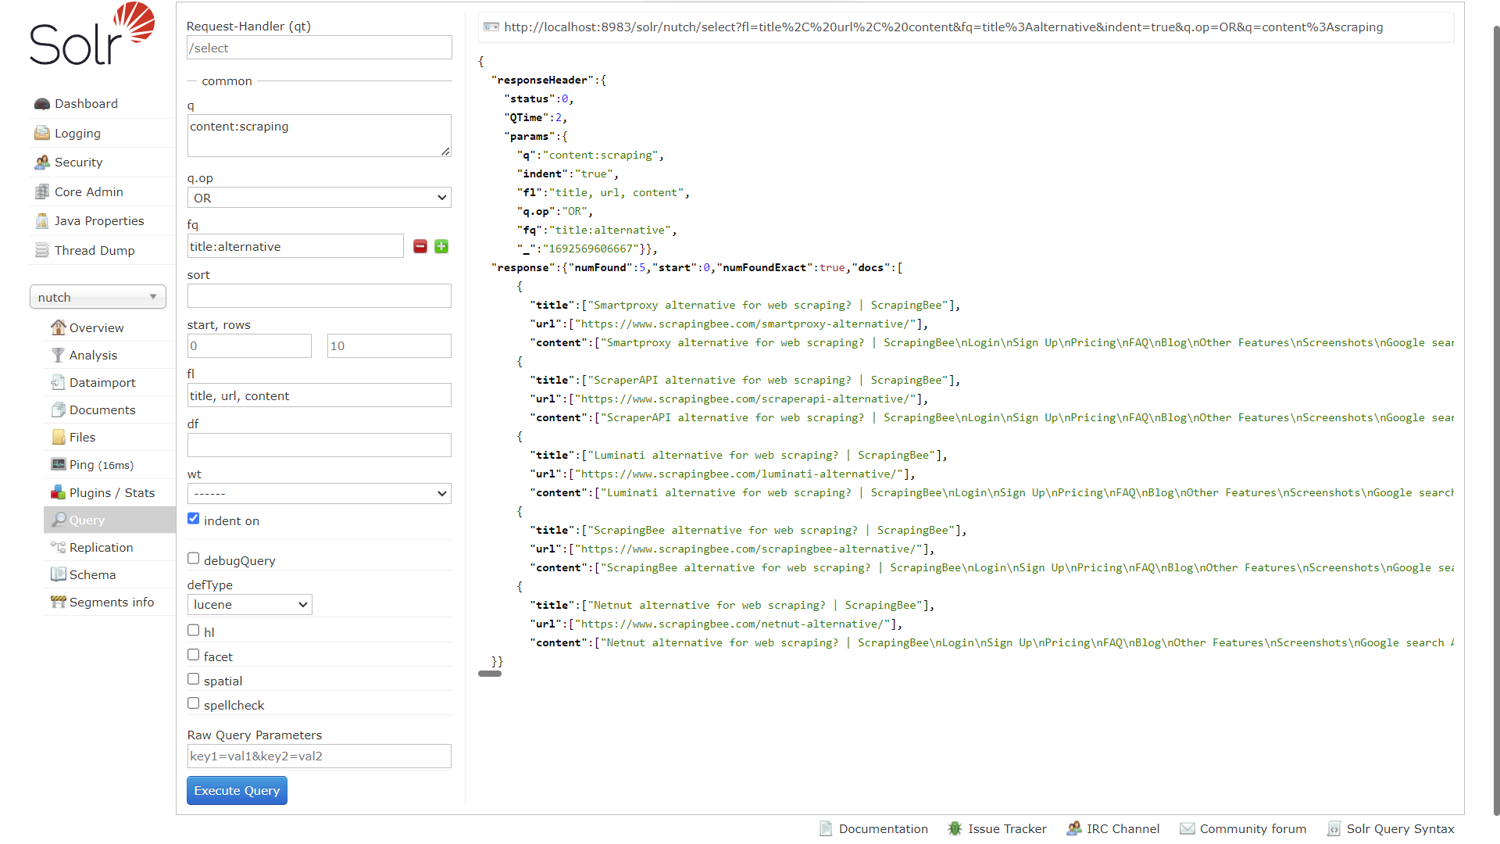
To select the fields that get displayed in the result, enter the field names in the fl (field list) field as a comma-separated list, like so: title, url, content.
Click Execute Query to see the generated result, as shown below.
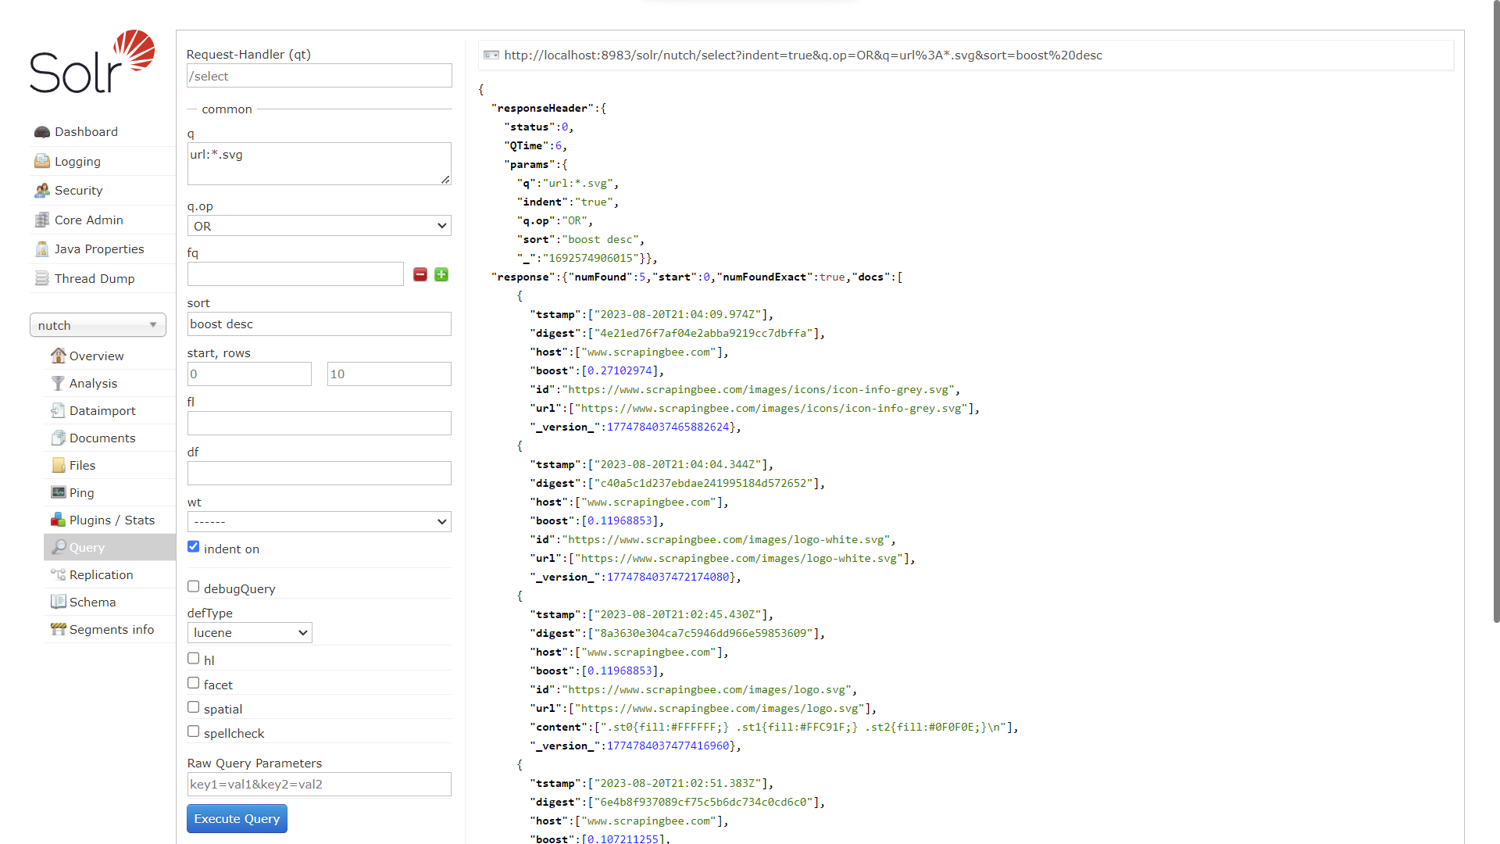
Finally, to search for the SVG images you scraped, clear all the fields and enter url:*.svg into the q (query) field. Sort the result from most relevant to least relevant by entering boost desc into the sort field.
Click Execute Query to see the generated result, as shown below:
You can also query the indexed data via HTTP requests in a language of your choice. Then, you can process it and perform a more nuanced analysis.
Note: You can find the configured Nutch crawler in this GitHub repository.
Conclusion
If you followed this tutorial, you should have a solid understanding of Apache Nutch as an open source web crawler as well as its key features. You also know how to configure and run an Apache Nutch crawler, how to index the crawled data, and how to analyze the indexed data using the search platform Apache Solr.
Want to make your web scraping tasks easier to implement and more stress-free? ScrapingBee is a web scraping API service that allows you to extract data from web pages without getting blocked. It can handle JavaScript rendering, avoid captchas, and customize requests with different query parameters.
If you prefer not to have to deal with rate limits, proxies, user agents, and browser fingerprints, check out ScrapingBee's no-code web scraping API today. Your first 1,000 API calls are free!

Pierre is a data engineer who worked in several high-growth startups before co-founding ScrapingBee. He is an expert in data processing and web scraping.