Have you ever manually copied data from a table on a website into an excel spreadsheet so you could analyze it? If you have, then you know how tedious of a process it can be. Fortunately, there's a tool that allows you to easily scrape data from web pages using Node.js. You can use Cheerio to collect data from just about any HTML. You can pull data out of HTML strings or crawl a website to collect product data.
In this article, you'll learn how to use Cheerio to scrape data from static HTML content. If you need to reference Cheerio’s documentation, you can find it here.

What Is Cheerio?
Cheerio is an implementation of jQuery that works on a virtual DOM. The DOM is built from an HTML string without running any JavaScript or applying CSS styles. Since it's not displaying anything, this makes it a great way to scrape data on a server, or if you're creating a service hosted by a cloud provider, you can run it in a serverless function.
💡 Since Cheerio doesn't run JavaScript or use CSS, it's really quick and will work in most cases. If you're trying to scrape a webpage that needs to run JavaScript, something like jsdom would work better.
Scraping Data with Cheerio
This article will guide you through a simple scraping project. You'll be collecting country population data from Wikipedia and saving it to a CSV.
💡 A copy of the final scraper can be found on GitHub here.
Getting Set Up
Before you get started, you'll need Node.js installed on your computer. Using nvm is recommended, but you can install Node.js directly, too. To do so, visit their website and follow the installation instructions for the Long-Term Service (LTS) version.
Now that you have Node.js installed, create a directory to store your project and initialize the project using npm:
mkdir country-population
cd country-population
npm init
You'll be prompted to answer several questions while npm gets your project set up; it's okay to just accept all of the defaults. Once your project is ready to go, add some dependencies to it:
npm install cheerio axios
npm install -D typescript esbuild esbuild-runner
You're installing axios to download the webpage content and cheerio to parse it. You've also installed typescript and esbuild-runner so that you can execute your project.
Finally, add a script to your package.json that will run your scraper:
"scripts": {
  "scrape": "esr ./src/index.ts"
}
Loading an HTML String
To get started with Cheerio, you need to provide it with some HTML data that it will use to build a DOM. The simplest way of doing that is by passing in a hard-coded string. Create a file in your project called src\index.ts to begin.
import cheerio from "cheerio";

const $ = cheerio.load('<div><h2 class="primary">First Header</h2><h2>Second Header</h2></div>');
As you can see, all you need to do is pass an HTML string into Cheerio's load method. Cheerio itself doesn't provide any functionality for getting the string. This means you can pass in a constant directly, load a local HTML file, or download content from the web using an HTTP request.
💡 When testing a scraping script, it can be helpful to download the content of a webpage and save it locally; that way, you don't have to worry about connectivity issues breaking your unit tests.
Using Selectors to Find Nodes
Once you have data parsed into Cheerio, you'll want to be able to pull data out of it. This is primarily done using jQuery selection expressions. For example, to select just the first header in the data that you loaded, you can use the following code:
const firstHeader = $('h2.primary');
console.info(firstHeader.text());
You can run the following command from the root of your project to test your scraper:
npm run scrape
You should see your script output "First Header," showing that it was able to parse the HTML string that was passed in and find the first h2 node with the primary class set.
Iterating over Nodes
You've seen how a basic selector works when you're only looking for a single node, but what about when you need to iterate over several nodes—for example, all of the h2 nodes in your HTML string?
To do this, you'll need to use the each method. This method provides an index of the current result and a reference to the element. To get the actual element, you'll need to pass the provided reference to Cheerio. The following example shows how you could find the text content of every h2 node in the example string:
$('h2').each((idx, ref) => {
    const elem = $(ref);
    console.info(elem.text());
});
If you add this to your existing code, you should see the following output added when you execute it:
First Header
Second Header
Scraping Population Data
Now that you have an understanding of how to use Cheerio, you can build an application that actually makes requests to a webpage, scrapes data, and saves the result to a useful format. In this article, you'll be scraping country population data from Wikipedia and saving the result to a CSV file.
Requesting the Data
You can use any library to request page content. Here, you'll be using Axios because of its simple interface. If you're unfamiliar with Axios, you can read more about it on its documentation site.
To start using Axios, add it to your project's dependencies by running npm i axios from the project's root directory. After installation, you can add an import statement to the top of your index.ts file:
import axios from "axios";
You're going to be creating the actual scraper now, so go ahead and delete everything in index.ts after the imports.
Next, you'll create a function that downloads the data and parses it into an array of objects. The first step is to download the data using Axios:
const getPopulationData = async (): Promise<Array<any>> => {
    // Get the data
    const targetUrl = "https://en.wikipedia.org/wiki/List_of_countries_and_dependencies_by_population";
    const pageResponse = await axios.get(targetUrl);
    // hold results
    // load content to cheerio
    // scrape the content
    // return results
}
Then you’ll need to add a couple of arrays to the function that will be used during the parsing process:
// hold results
const keys = [];
const result = [];
Everything is set up for parsing, so load the page into Cheerio:
// load content to cheerio
const $ = cheerio.load(pageResponse.data);
Finding the Right Nodes
This part is a little tricky, and you'll need to leave your IDE to work on it. First, open the list of countries and dependencies by population Wikipedia page in your browser. Once the page loads, scroll down to the table and right-click on it. In the menu that opens up, click on Inspect.
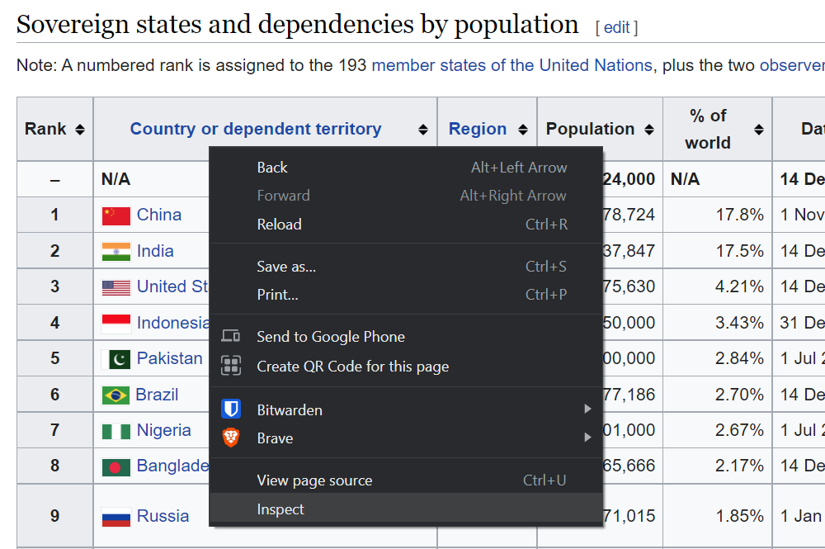
This will open your browser's developer tools with the element that you clicked inside of selected. Now, you'll have to play around with selection queries to see what will work in Cheerio. In Chrome-based browsers, you can press Ctrl+F in the developer tool's Elements view and then type a selector in the search box that opens.
In this example, search for the selector table.wikitable. You should see one result; that's exactly what you want. Now that you can select the table, how about getting the actual data rows? Just add a tr to the end of the selector to indicate that you want to select the rows that are descendants of that table. Change your query to table.wikitable tr, and you should see a little under 250 results.
💡 Cheerio uses jQuery selector syntax. To learn more about this syntax, see jQuery's selectors documentation.
Extracting Data
Now that you have a selector to get the table rows, it's time to actually extract the data. Picking back up in the function that you started, add the following to find the table and iterate over its rows:
// scrape the content
$("table.wikitable")
  .find("tr")
  .each((row, elem) => {});
Inside the callback for the each method, you'll need to iterate over the row's data cells. The first row will be the table header; you'll want to save those values to use for object keys for all of the other rows.
If you looked at the page in Chrome as described above, you might be wondering why you can't just use a selector like table.wikitable > thead > tr to find the table headers. The problem is that Cheerio doesn't run JavaScript on web pages, and if you download the page and open it in a text editor, you'll see that the thead element is dynamically created from the table body's first row.
if(row === 0) {
    $(elem).find('th').each((idx, elem) => {
        const key = $(elem).text().trim();

        console.info(`Key ${idx}`, key);
        keys.push(key);
    });
    return;
}
Now that you have all of the object keys, iterate over the remaining row's data cells to construct an object. Then, add that object to the list of results:
const nextCountry = {};
$(elem).find('td,th').each((idx, elem) => {
    const value = $(elem).text().trim();
    const key = keys[idx];

    nextCountry[key] = value;
});
result.push(nextCountry);
At the end of your getPopulationData method, you need to return the result variable:
           // return results
    return result;
};
Finally, you need to call your method from the root of the file:
getPopulationData().then((results) => console.info(`Found ${results.length} results`));
If you run the file now, you should see the output of every column name from the website:
Key 0 Rank
Key 1 Country or dependent territory
Key 2 Region
Key 3 Population
Key 4 % of world
Key 5 Date
Key 6 Source (official or from the United Nations)
Key 7 Notes
Found 242 results
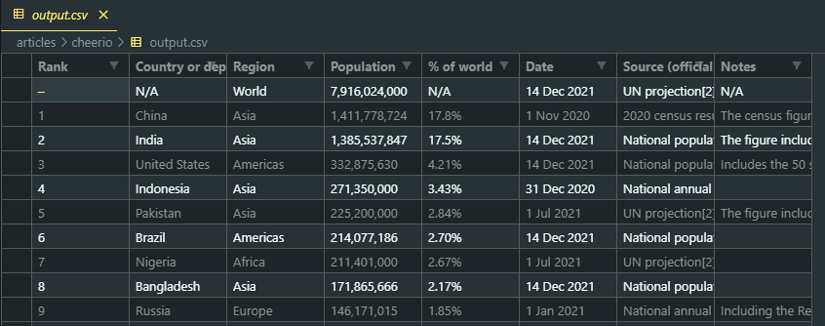
Saving the Result
So, now you have a Node.js application that downloads a Wikipedia page and parses the content of a table into a JSON object. The next step is to save that data into a CSV file so that you can analyze it. To do that, you'll use the json2csv package. Install it by running npm i json2csv, and then import it at the top of your source along with the promise-based fs package.
import json2csv from "json2csv";
import * as fsp from "fs/promises";
Then create a new async method that accepts the country data, converts it to CSV, and then saves it to a file:
const saveCsv = async (countries: Array<any>) => {
        console.info(`Saving ${countries.length} records`);

    const j2cp = new json2csv.Parser();
    const csv = j2cp.parse(countries);

    await fsp.writeFile("./output.csv", csv, {encoding: "utf-8"});
};
Finally, modify the line where you're calling getPopulationData so that it passes its results to the new saveCsv method:
getPopulationData().then(saveCsv);
Run the application again, and you'll see an output.csv file added to the current directory. Open it in your favorite CSV viewer, and you'll see all of the country population data that you just parsed.
Conclusion
Scraping data from a website can be a very tedious process. Fortunately, there are some great projects and tools out there to help automate the process. In this article, you were introduced to Cheerio. Using it, you saw how to load HTML, use selectors to find data, and how to iterate over selected elements, and extract data from them.
You also saw how to use Chrome Developer Tools to determine what selectors to use. Finally, you saw how to export the data that you extracted to a CSV file so that you can analyze it in Excel, Pandas, or your tool of choice.