AutoGPT lets you build AI agents by connecting workflow blocks in its visual Agent Builder. You can collect an input, make an API call, run an LLM, and return structured data without writing the full orchestration code from scratch.
However, AI agents still need a reliable way to access the internet, especially when dealing with dynamic rendering, IP blocks, or anti-bot systems. ScrapingBee gives your AutoGPT agent a simple way to access live web data without building and maintaining your own scraping infrastructure.
In this tutorial, we will install and set up AutoGPT locally, and build an AutoGPT agent that reads ESPN FC, uses an LLM to filter and rank content, and returns the most relevant World Cup stories using ScrapingBee.
TLDR: Key takeaways
- AutoGPT lets you build AI agents visually by connecting workflow blocks instead of writing the full orchestration logic yourself.
- In this tutorial, you will build a self-hosted agent that scans football news websites for World Cup stories and filters out unrelated news.
- ScrapingBee handles page rendering, proxies, and common anti-bot challenges, so the agent can access live website content more reliably.
- The LLM handles the judgment. It scores each story for World Cup relevance, drops anything below the threshold, removes duplicates, and returns clean, structured JSON.
- ScrapingBee's ai_extract_rules can further reduce token usage by extracting only the fields the LLM needs.
What is AutoGPT and how does its Agent Builder work?
AutoGPT is an open-source platform for building, deploying, and running autonomous AI agents. It was originally released by Toran Bruce Richards in March 2023, and it became popular as a command-line experiment for giving an AI system a goal and letting it break that goal into smaller tasks.
Today, AutoGPT is a platform for building, deploying, and managing autonomous AI agents. Its visual Agent Builder lets you create an AI agent workflow by connecting reusable blocks on a canvas.
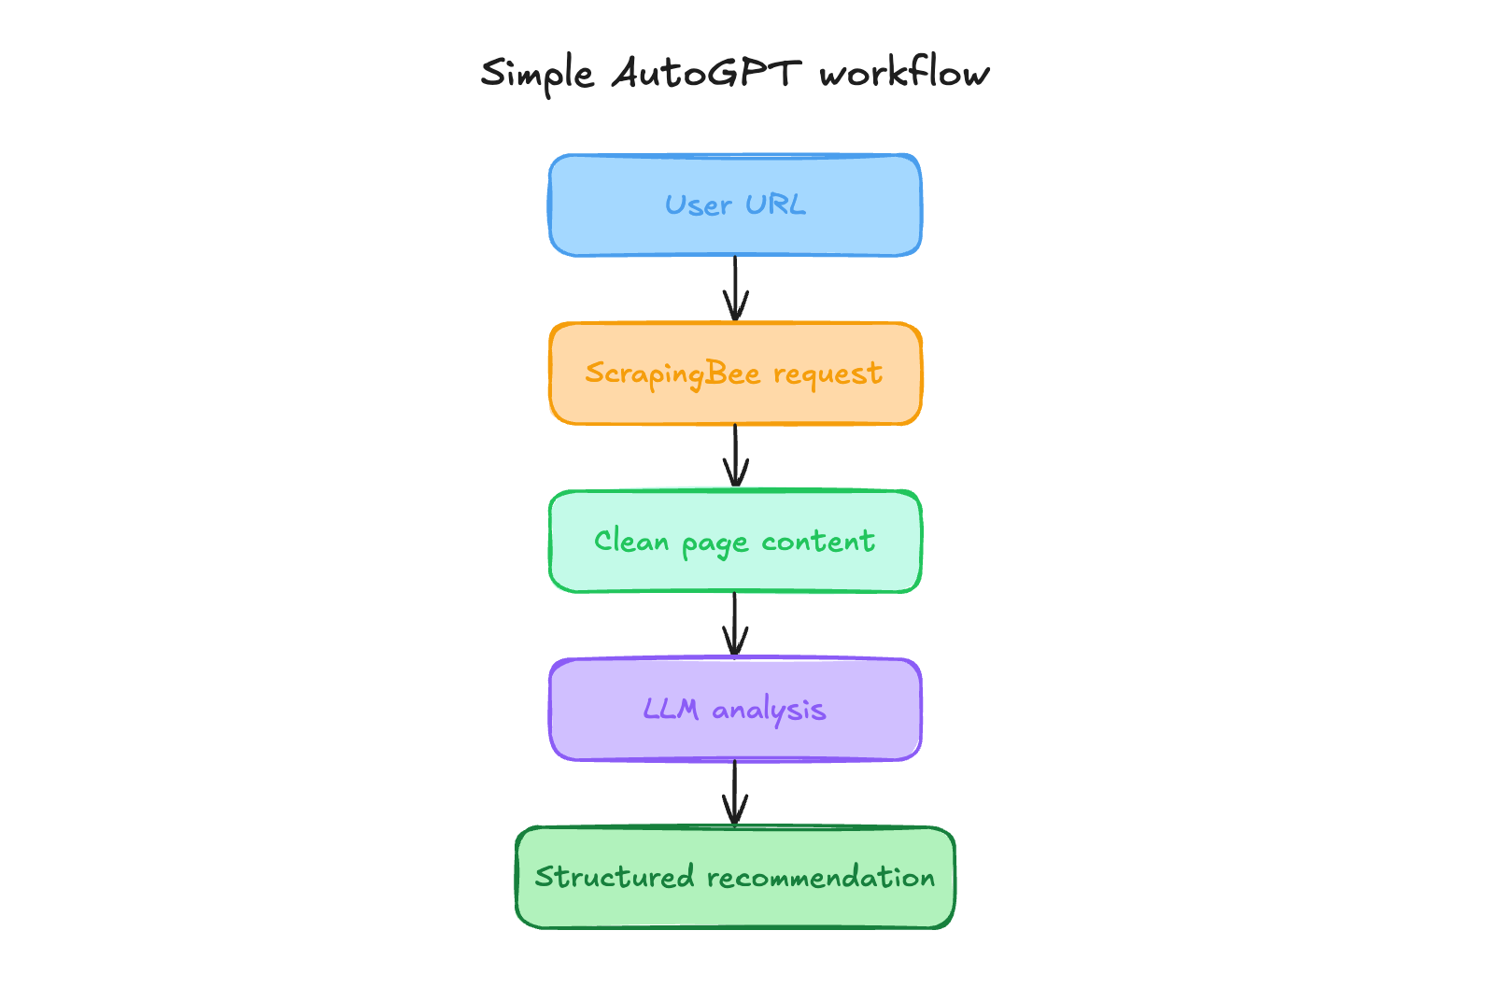
Each block does one job. Some blocks collect input, some call external APIs, some run an LLM, some transform data, and some return the final output.
It also supports several model providers and AI service integrations, including OpenAI, Anthropic, Groq, and Ollama for local models.
With AutoGPT, you can use the hosted cloud, which is easier but paid, or you can self-host the open-source platform, which is free but requires you to run the infrastructure yourself and bring your own model provider keys.
Why connect AutoGPT to ScrapingBee?
AutoGPT is a very capable tool, but it still needs a reliable way to access the live web. Without a scraping layer, an AutoGPT agent has to depend on plain HTTP requests or browser automation you manage yourself.
That creates a few common problems:
- JavaScript-heavy pages: Many websites render their real content in the browser, so a plain request may return an empty shell instead of the content the agent needs.
- Anti-bot systems: Some sites detect automated traffic, datacenter IPs, unusual headers, or repeated requests, then respond with blocks, throttling, or CAPTCHA pages.
- Geo-restricted content: News, e-commerce, and search pages can return different results depending on the request location.
Thankfully, ScrapingBee handles these scraping concerns through a single API endpoint. It can render JavaScript with a headless browser, route requests through proxies, use premium and stealth proxy pools for harder targets, target specific countries, and return the page as HTML or structured extracted data.
This API integration gives the agent live web access while keeping the scraping infrastructure outside the main AutoGPT workflow. AutoGPT also supports API integration with external services, allowing users to extend its functionality by connecting it to other APIs.
Prerequisites
In this AutoGPT guide, we will run the self-hosted AutoGPT Platform locally. We will also use ScrapingBee to access the football news page and GPT-OSS 120B through OpenRouter to filter and rank the World Cup stories.
Before building the workflow, make sure your computer meets the basic system requirements:
- Docker with Docker Compose
- Git
- Node.js and npm
- A ScrapingBee account
- OpenRouter API key
- Local access to ports 3000, 8006, and 8001
AutoGPT's self-hosting setup uses Docker and requires you to provide your own infrastructure and model API keys. The exact hardware resources you need will depend on your machine and what else you are running on your system.
GPT-OSS 120B does not require an OpenAI subscription or OpenAI API key in this setup. AutoGPT routes the model through OpenRouter, so you will need an OpenRouter API key with enough credit to cover the requests.
Also, make sure Docker is running before starting AutoGPT. If you need to install Python separately for related tooling, verify the version first.
Confirm that the main tools are available:
node -v
npm -v
docker -v
docker compose -v
git --version
Install AutoGPT locally
AutoGPT provides two local setup paths.
The first option is the official setup script. This is the quickest path if the goal is to get AutoGPT running locally without manually going through the repository setup.
On macOS or Linux, run:
curl -fsSL https://setup.agpt.co/install.sh -o install.sh && bash install.sh
On Windows, run this in PowerShell:
powershell -c "iwr https://setup.agpt.co/install.bat -o install.bat; ./install.bat"
The installer handles the local setup, pulls the required files, and starts the application. However, many people prefer the Docker Compose path, as it is often easier to follow. Start by cloning the AutoGPT repository:
git clone https://github.com/Significant-Gravitas/AutoGPT.git
cd AutoGPT/autogpt_platform
cp .env.default .env
These commands download the AutoGPT repository and prepare the environment file used by the local platform. Start the platform services with Docker Compose:
docker compose up -d --build
Check that the containers are running:
docker compose ps
When the stack is ready, open the AutoGPT builder in the browser:
http://localhost:3000
The REST API documentation is also available locally at:
http://localhost:8006/docs
By default, AutoGPT uses these local ports:
- 3000 for the frontend builder
- 8001 for the backend websocket server
- 8006 for the execution API REST server
If the frontend loads at localhost:3000, AutoGPT is ready for the workflow.
How to build the AutoGPT agent - tested workflow
Now that AutoGPT is installed locally, we can proceed to get our hands dirty. AutoGPT provides several blocks, each handling a specific action or task.

We will build an agent that can scrape a football news blog like ESPN FC for World Cup-related stories, filter out unrelated football news/transfer gossip, and rank the most relevant stories based on how closely they relate to the tournament.
Step 1: Start and open AutoGPT
Before building the workflow, make sure Docker is running on your machine. Open a terminal and move into the AutoGPT platform directory:
cd AutoGPT/autogpt_platform
Next, start the AutoGPT platform with:
docker compose up -d --build
This command builds and launches all the required frontend and backend services defined in the docker-compose.yml file. The -d flag runs the containers in detached mode, so they continue running in the background.
Once the services are up and running, open the AutoGPT builder in your browser:
http://localhost:3000
If the AutoGPT login page loads, the local platform is ready.
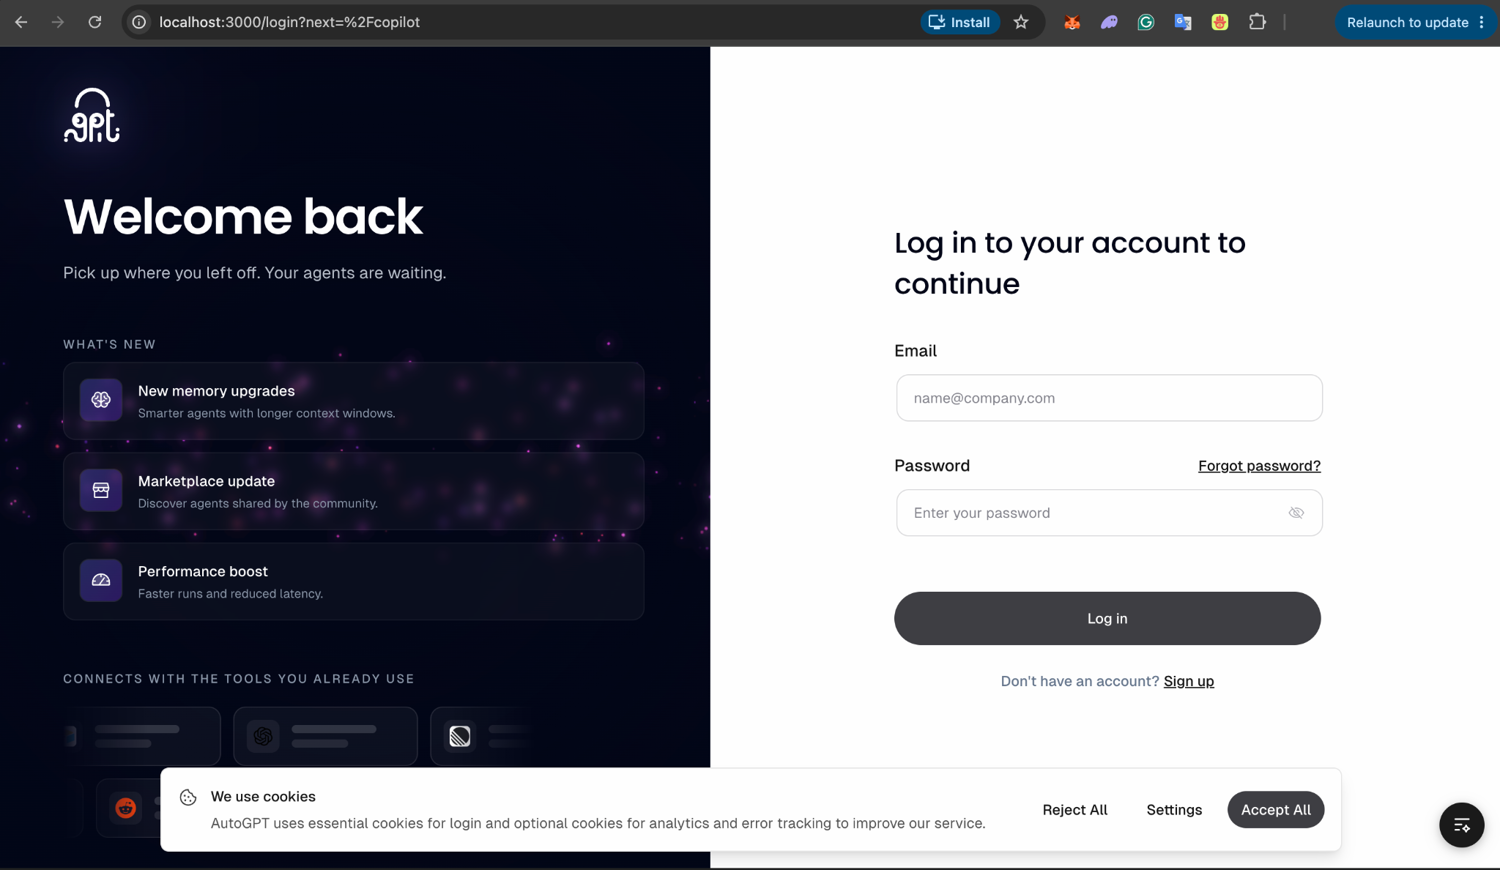
Note: Depending on the Docker configuration, http://localhost may work in some setups. However, the default AutoGPT frontend runs on port 3000.
Step 2: Sign up for an account
Create a local account and log in. AutoGPT stores this account on the local Supabase service that ships with the platform, so it does not leave the machine.
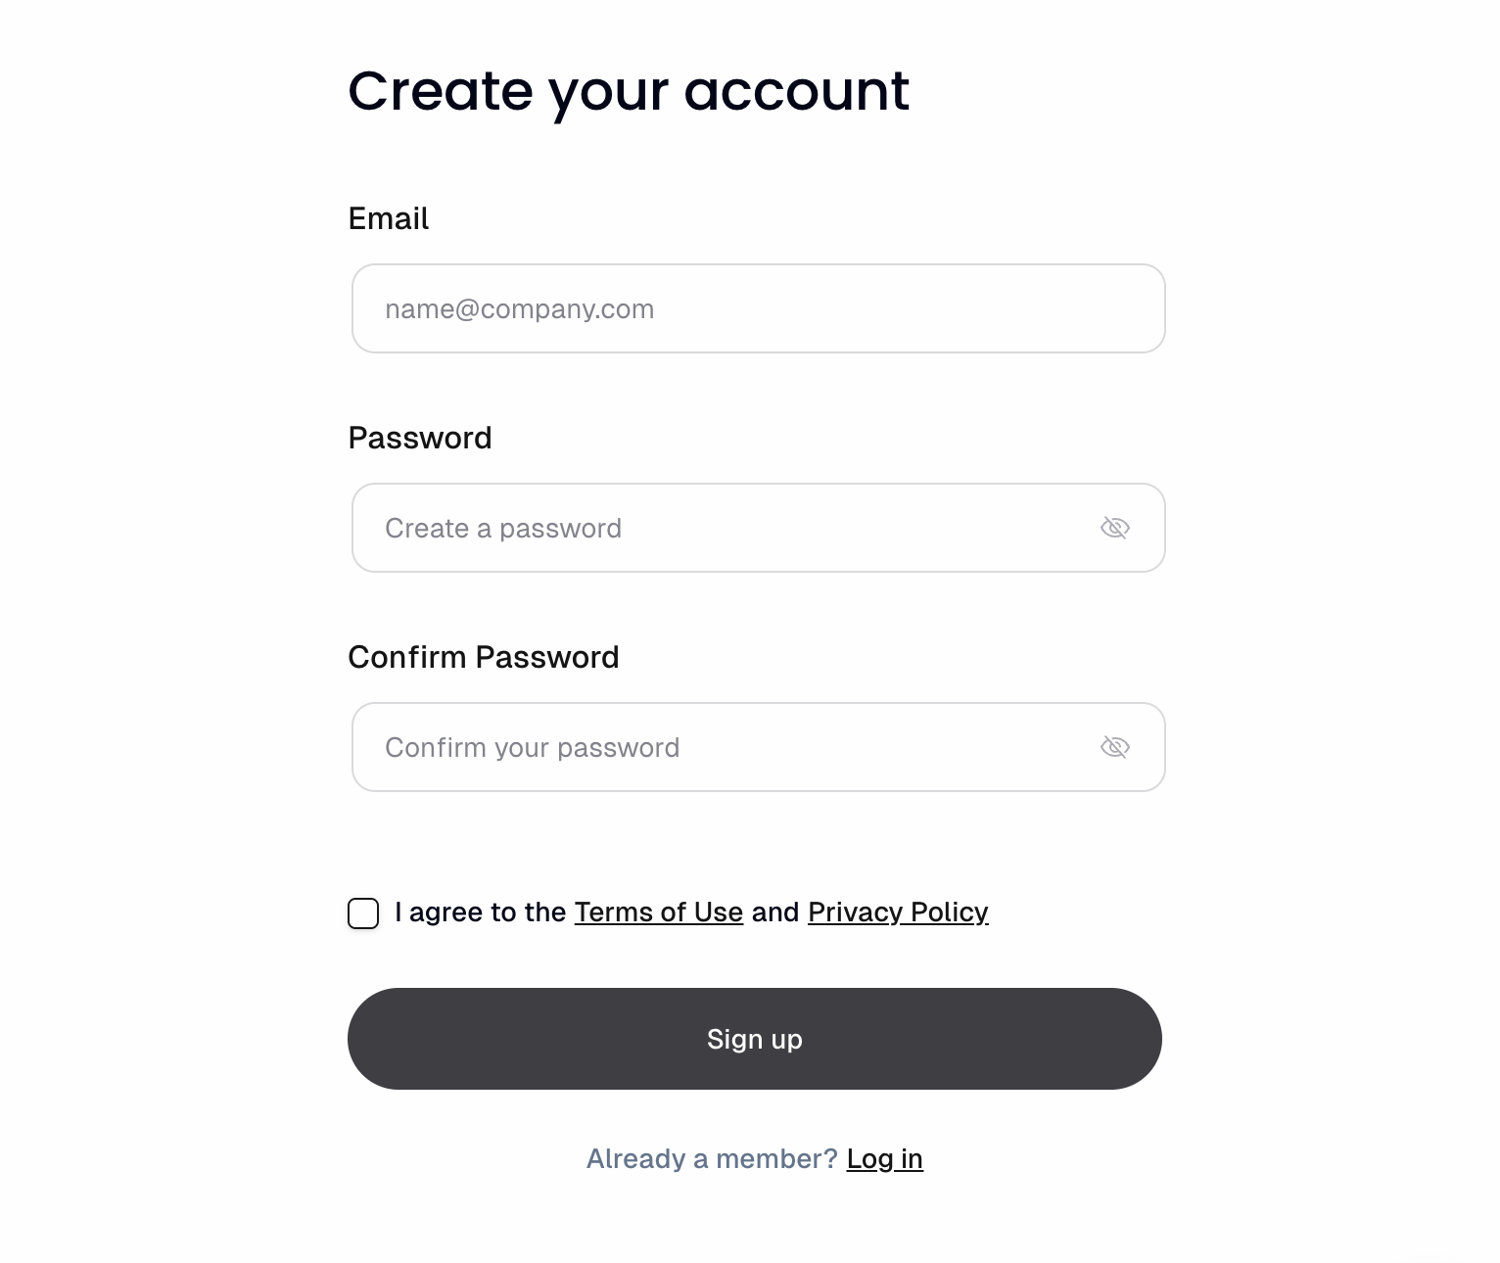
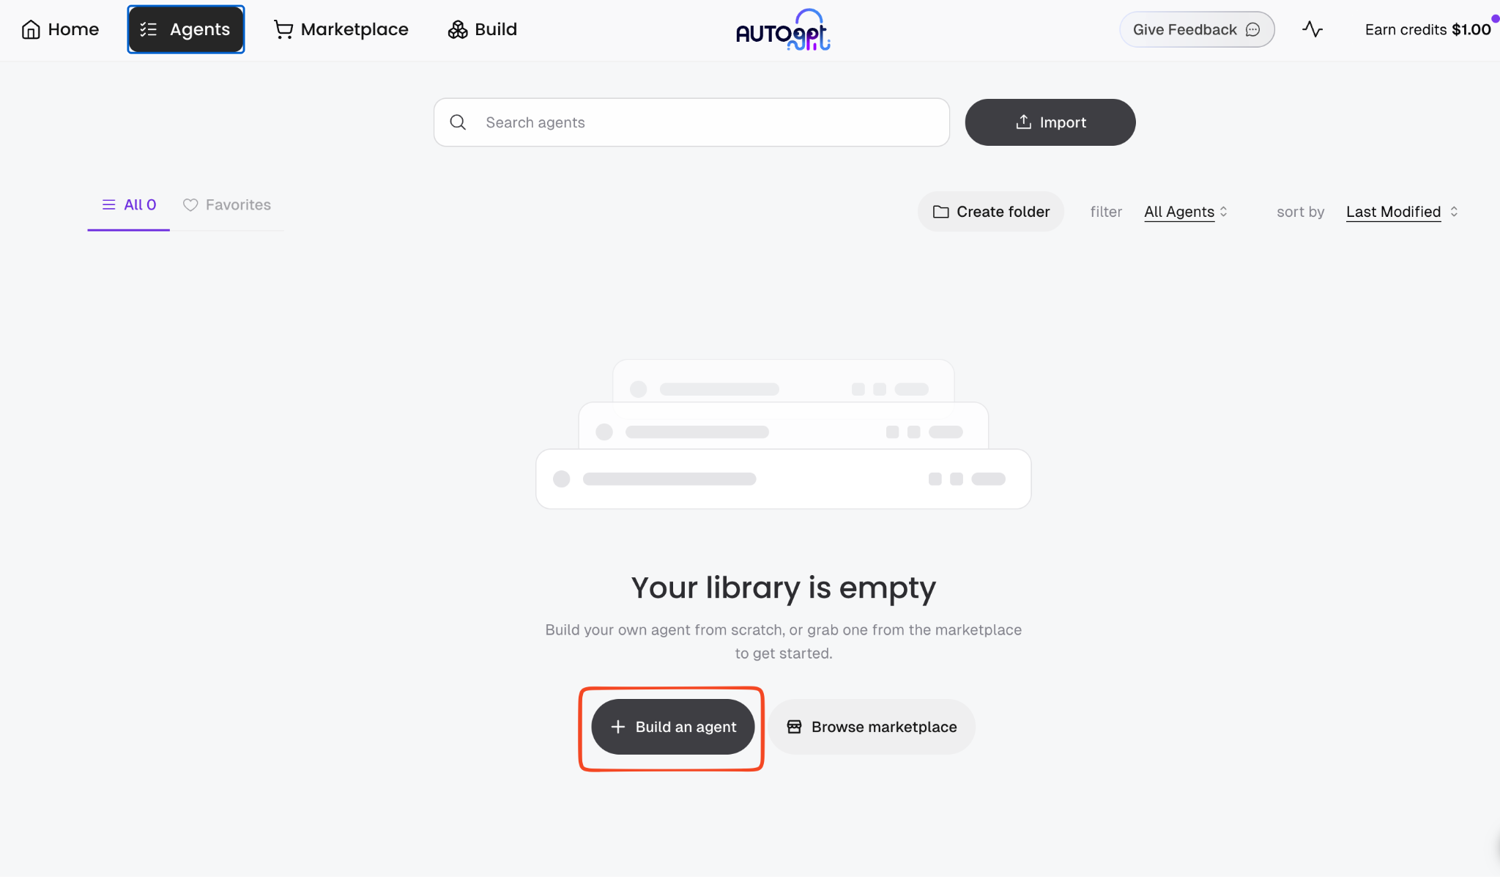
After signing up, log in and open the Agents page. Once you are in, open the Build tab. Then click Build an agent to open an empty canvas.
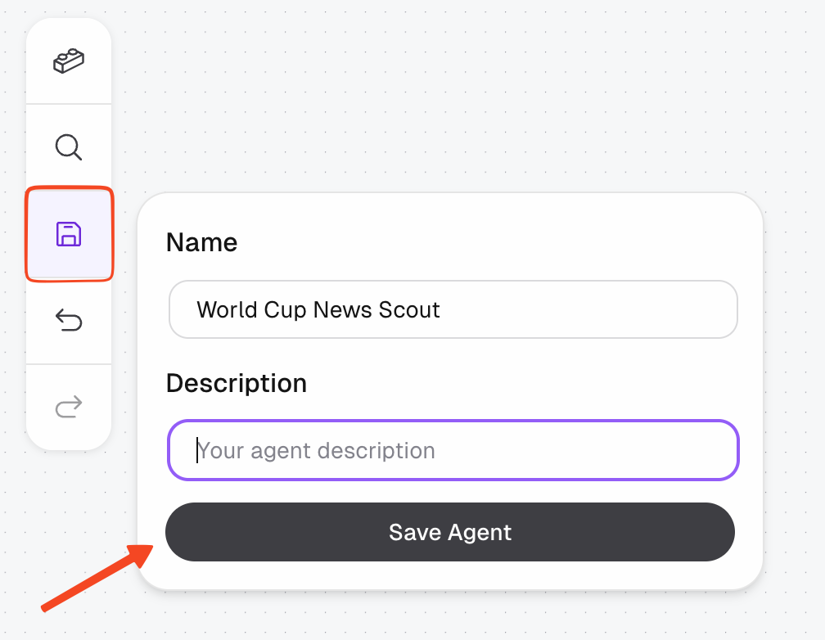
You can then save the new agent as "World Cup News Scout".
Once the agent is created, you can begin adding the workflow blocks.
Step 3: Add the Agent Input block
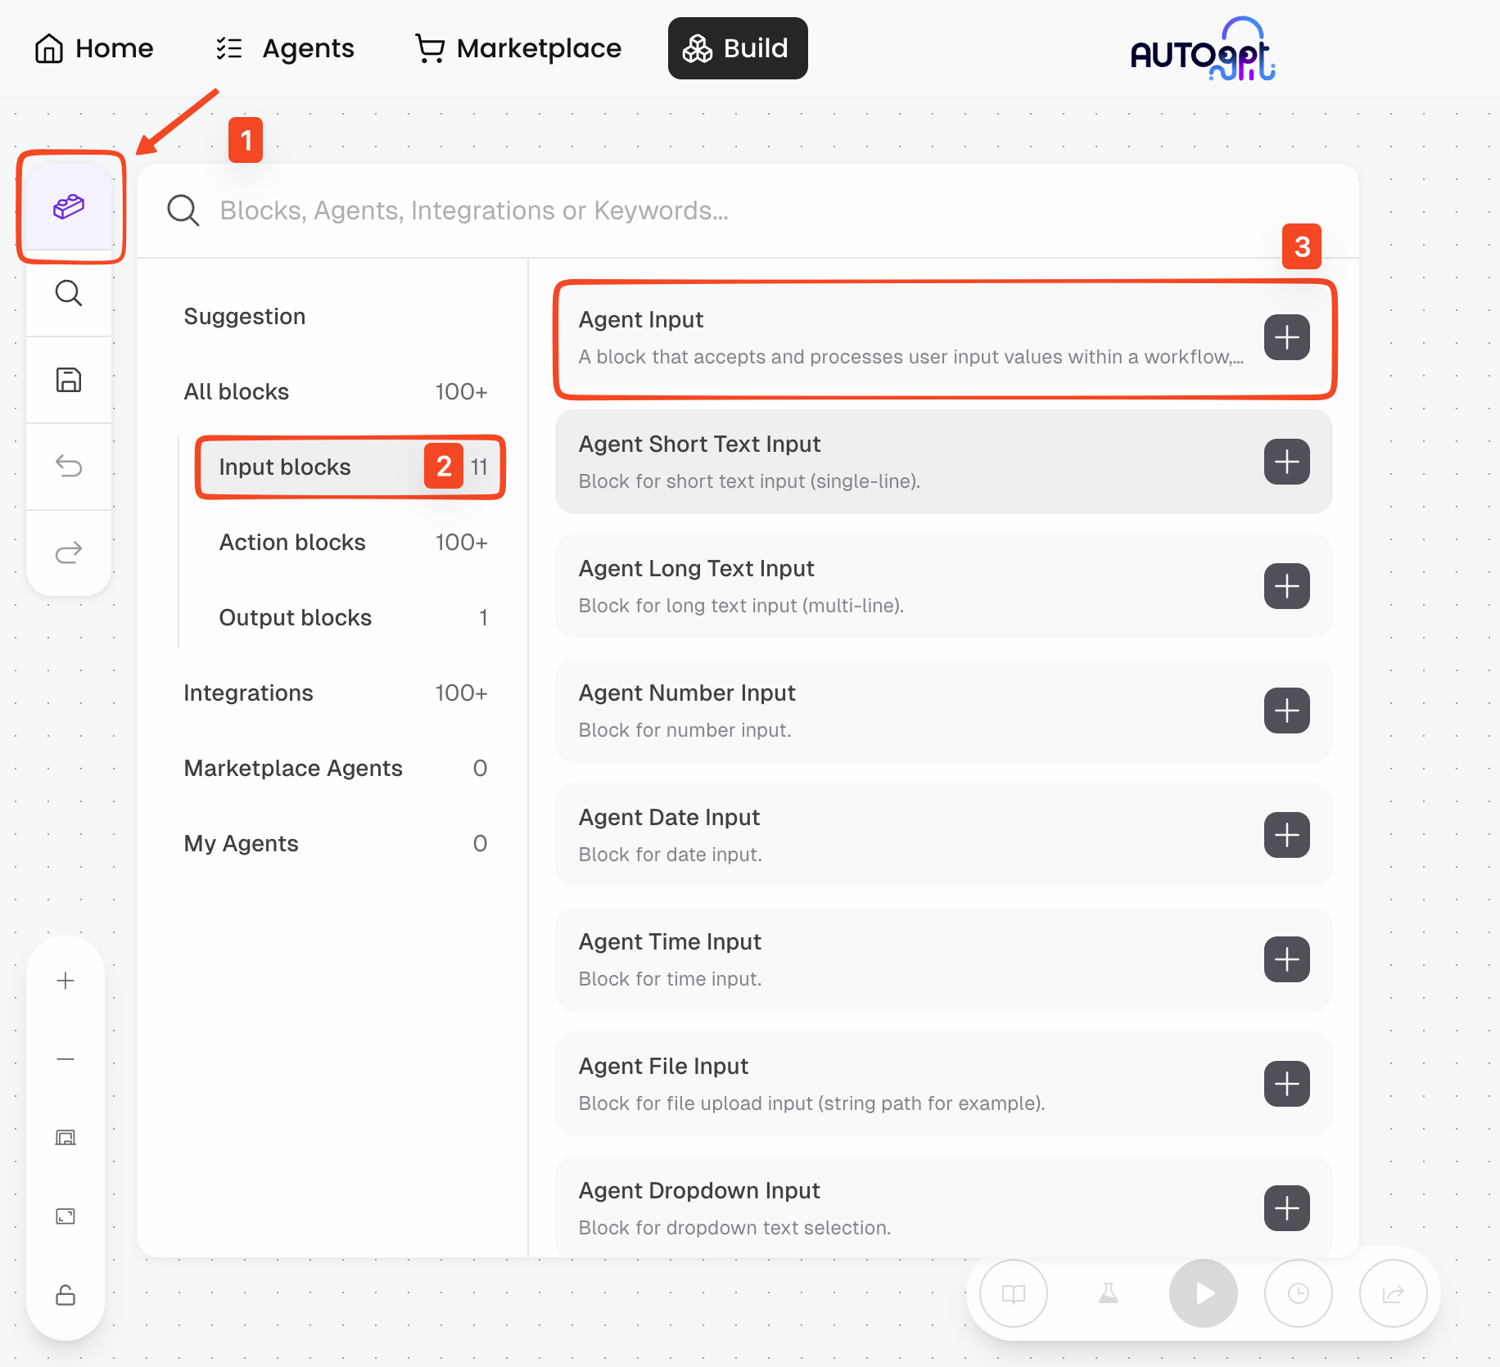
On the left sidebar, click the Blocks panel icon, open Input blocks, and add Agent Input. In some setups, AutoGPT also offers pre-built agents or templates, but here you're creating one from scratch.
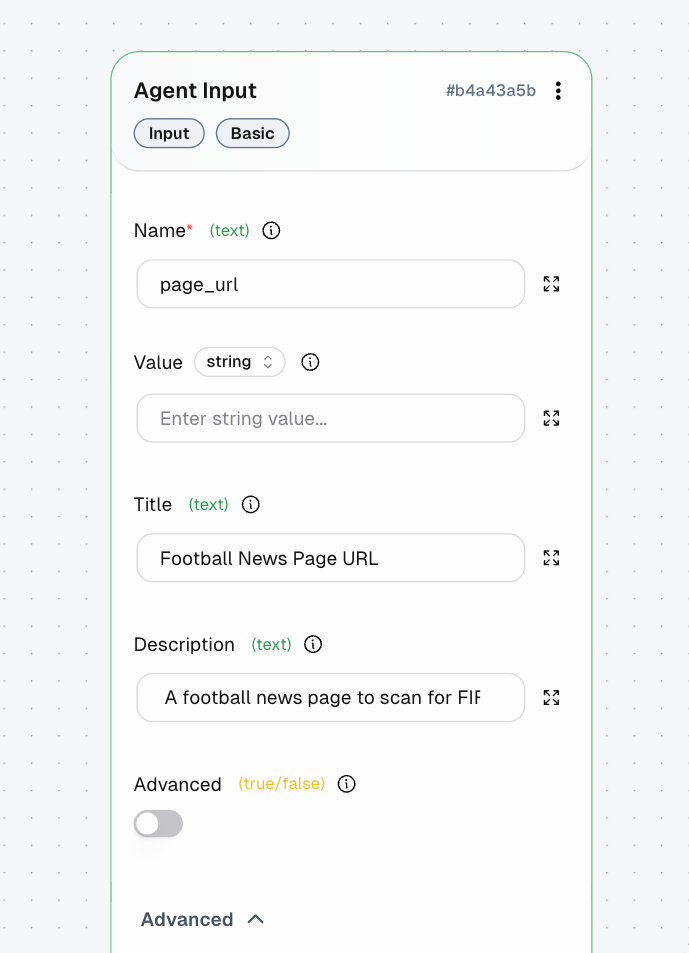
Configure it as follows:
- Name: page_url
- Title: Football News Page URL
- Description: A football news page to scan for FIFA World Cup stories
Leave the Value field empty. This is only an optional default value. You will enter the real URL in the input form when you click Run, and that input data stays with the agent on your local machine in this setup.
The Result pin at the bottom of the block represents the URL entered by the user.
Step 4: Build the ScrapingBee request URL
As outlined earlier, the AI agent relies on ScrapingBee to fetch the football news page. To connect to it, you need a ScrapingBee account and an API key.
New ScrapingBee accounts get 1,000 free API credits, with no credit card required. If you do not already have one, create a ScrapingBee account. Otherwise, log in and copy the API key from your dashboard.
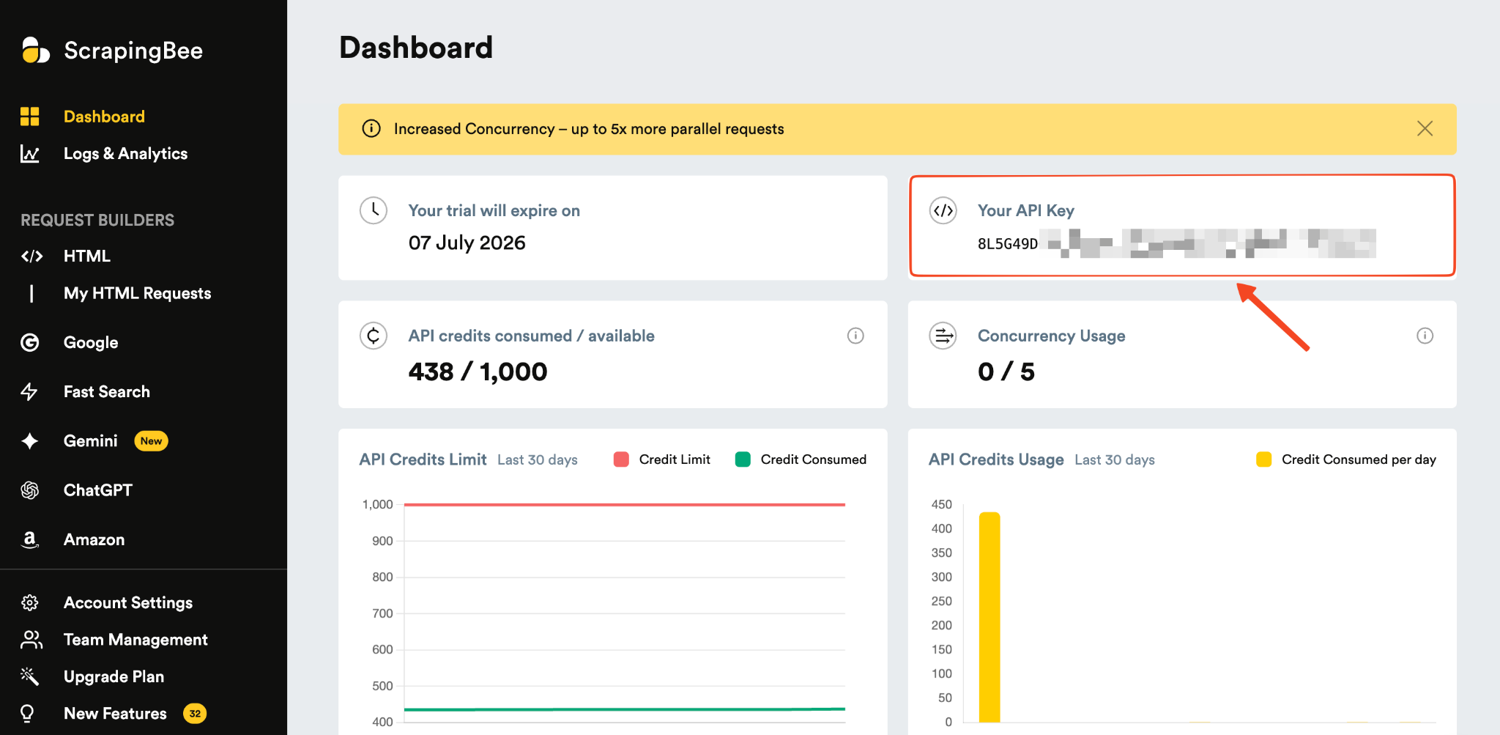
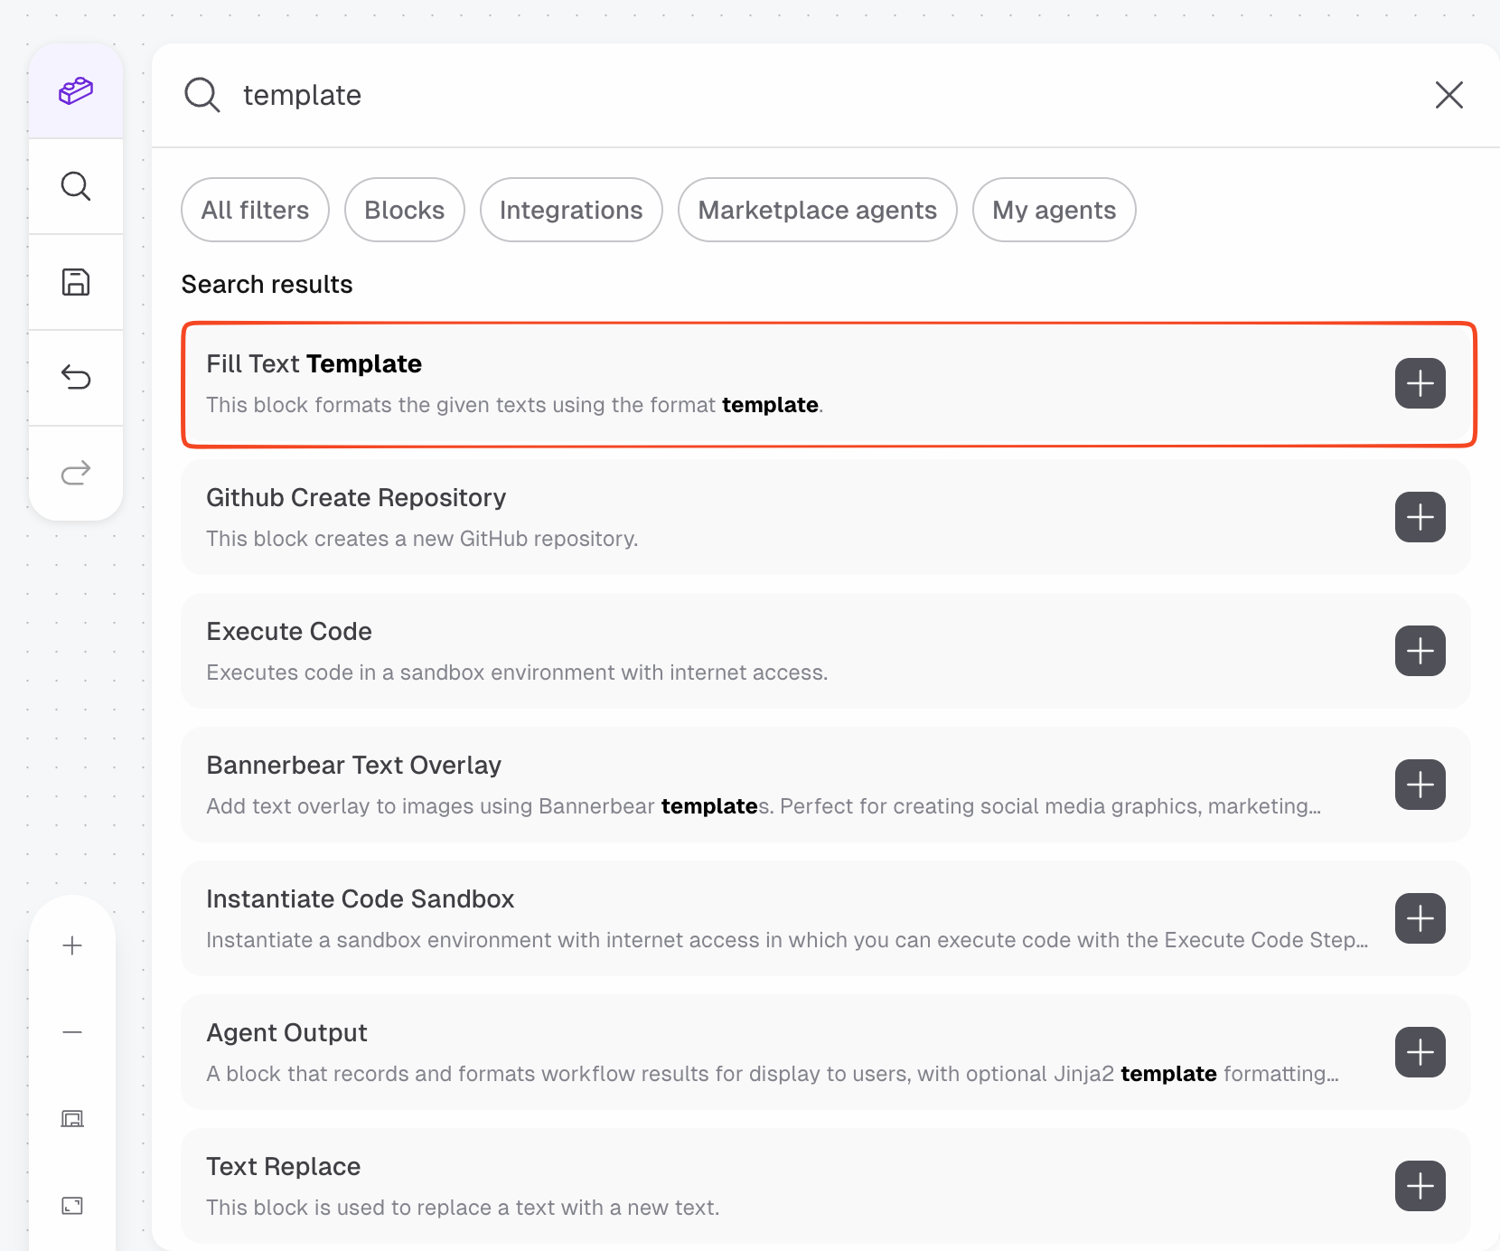
Back in the AutoGPT builder, search the Blocks panel for template and add Fill Text Template. This block builds the full ScrapingBee API URL out of the URL the agent receives at runtime.
In the block's Values field, click Add Item and name the key page_url. Leave the second box, New Value, empty. That value will come from the Agent Input block.
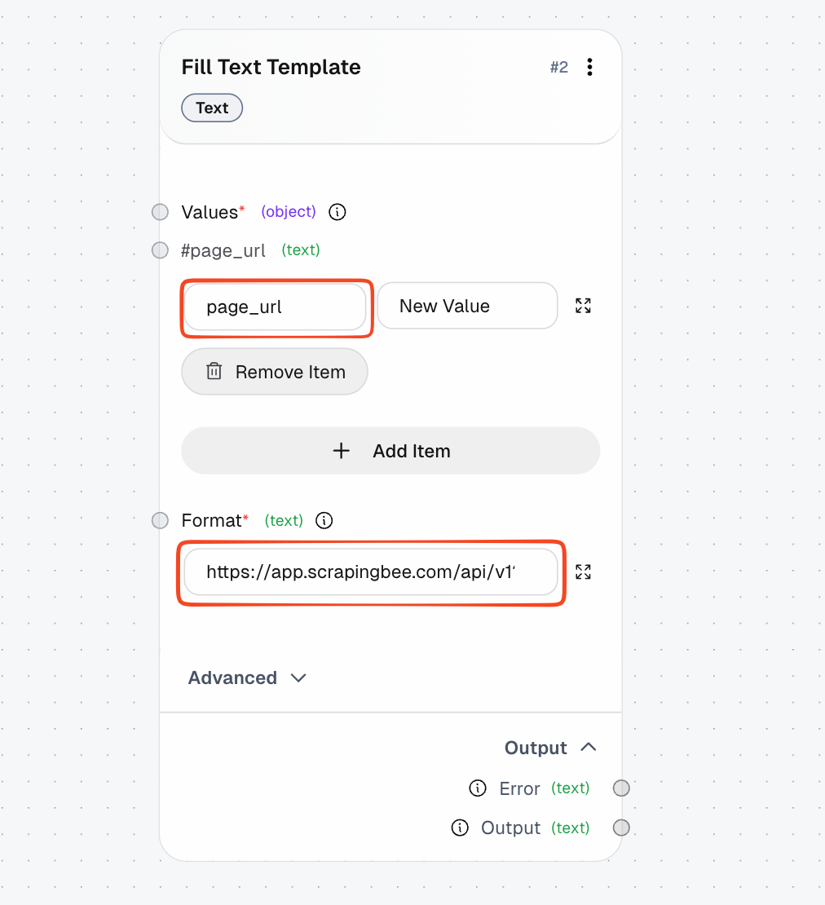
In the Format field, paste:
https://app.scrapingbee.com/api/v1?url={{ page_url | urlencode }}&render_js=true
The render_js=true parameter tells ScrapingBee to render the page before returning its content. This is super useful for football news websites, as most load parts of their homepage or story listings dynamically.
Notice that the ScrapingBee API key is not included in the URL. We will add it securely to the request as an Authorization header in the next step.
Step 5: Connect Agent Input to Fill Text Template
The Agent Input block has an output at the bottom, Result (any). There is a small circular dot beside it on the right.
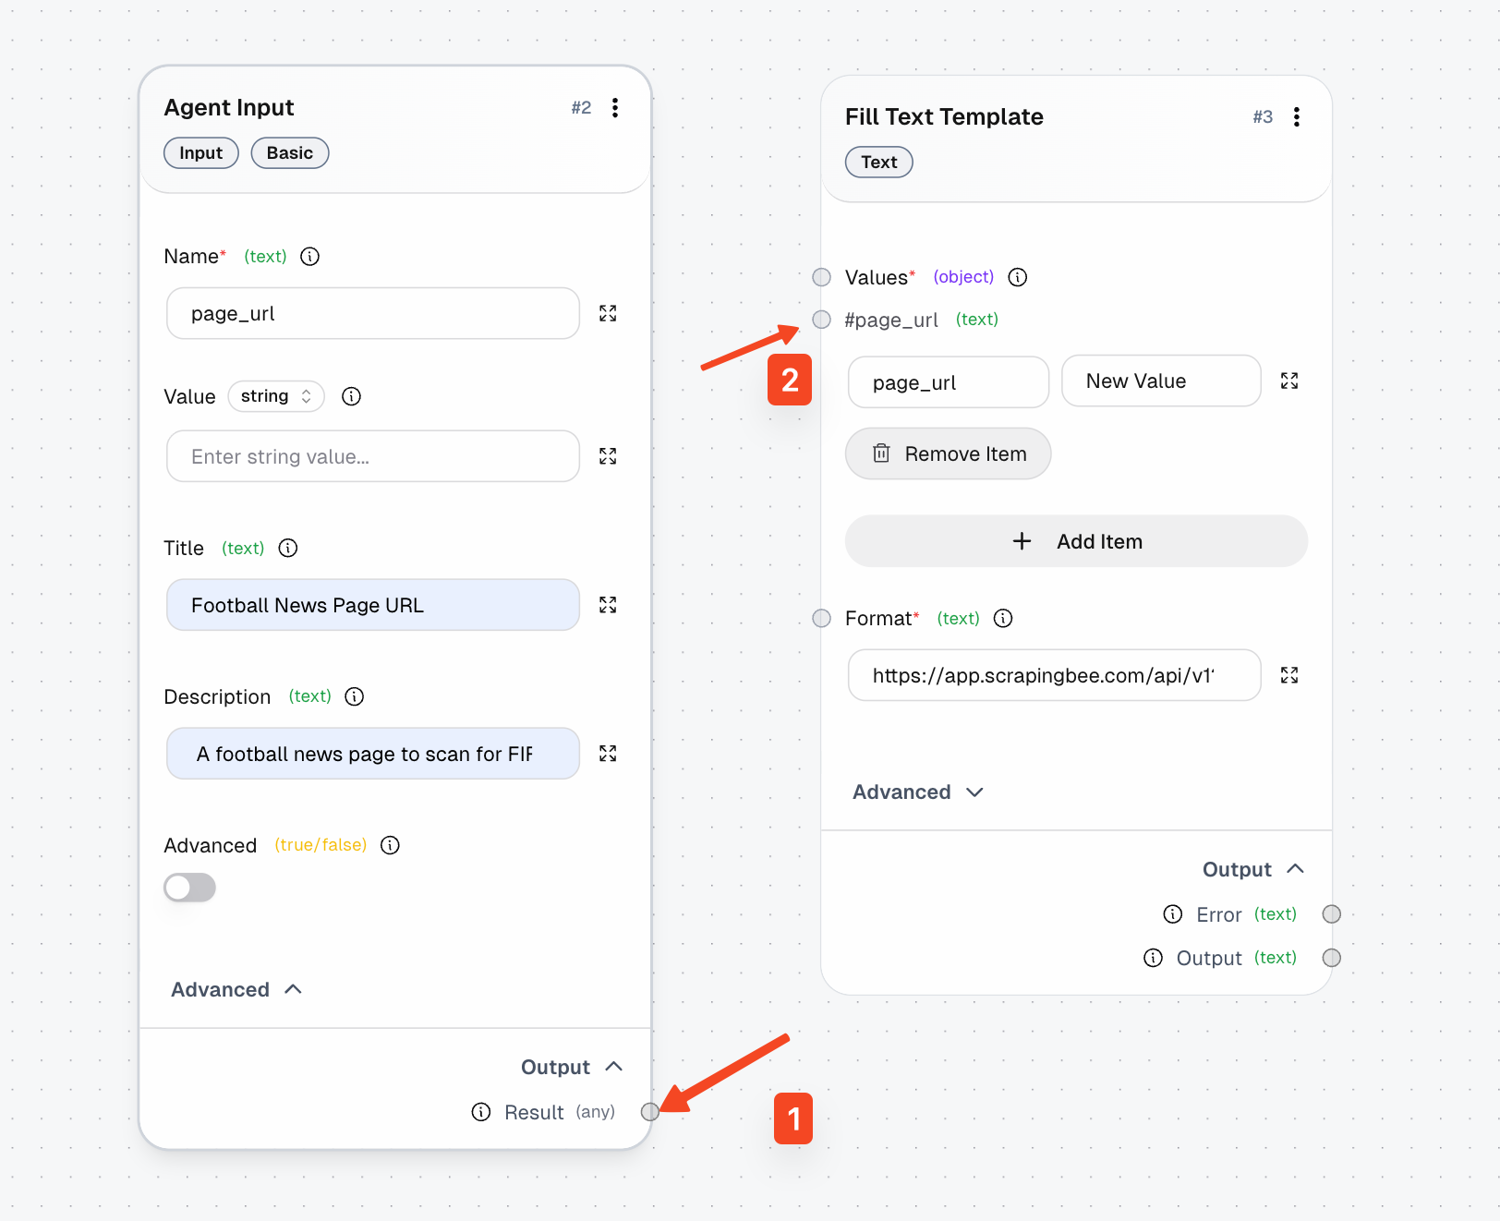
To connect:
- Click and hold the small dot beside Result on the Agent Input block
- Drag the line to the small dot beside the page_url value in the Fill Text Template block
- Release when it snaps
So the connection should be:
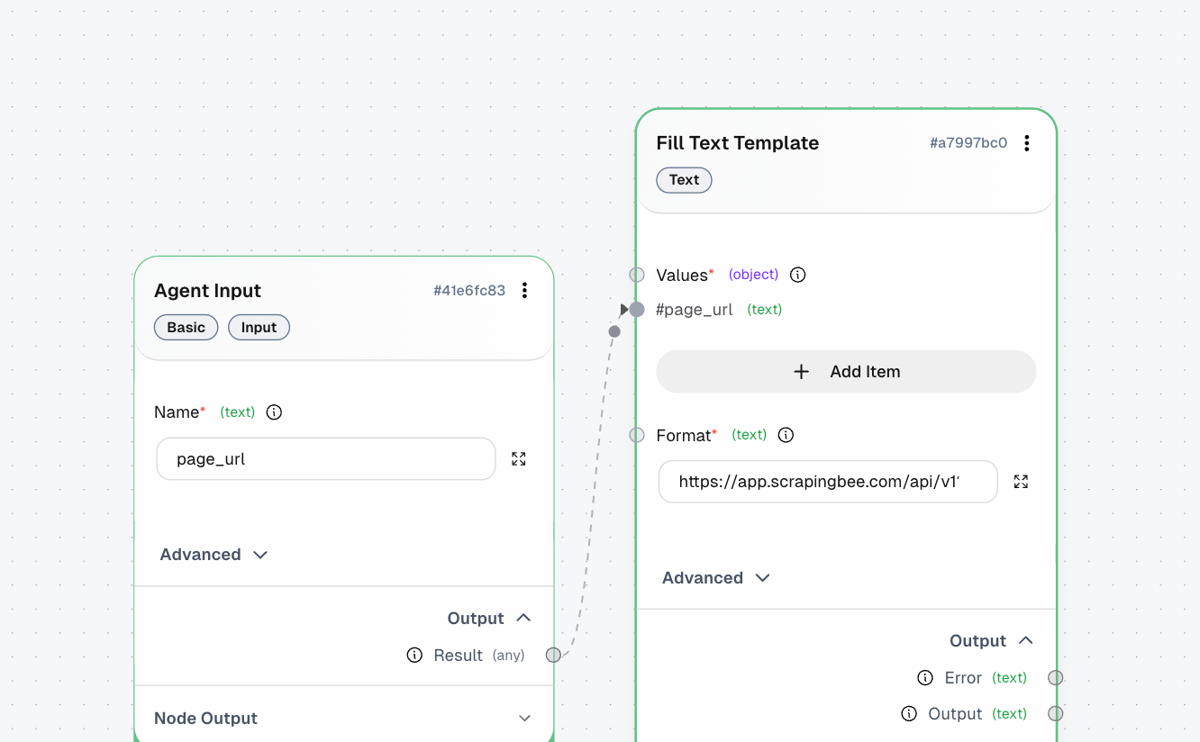
When the agent runs, the URL entered by the user will now be inserted into the ScrapingBee request template.
Step 6: Send the authenticated web request
You have the ScrapingBee request URL. Now you need a block that can call it and attach your API key securely.
Open the Blocks panel and search for Send Authenticated Web Request. Drag it onto the canvas to the right of Fill Text Template.
Connect the Output pin on Fill Text Template to the Url input on Send Authenticated Web Request.
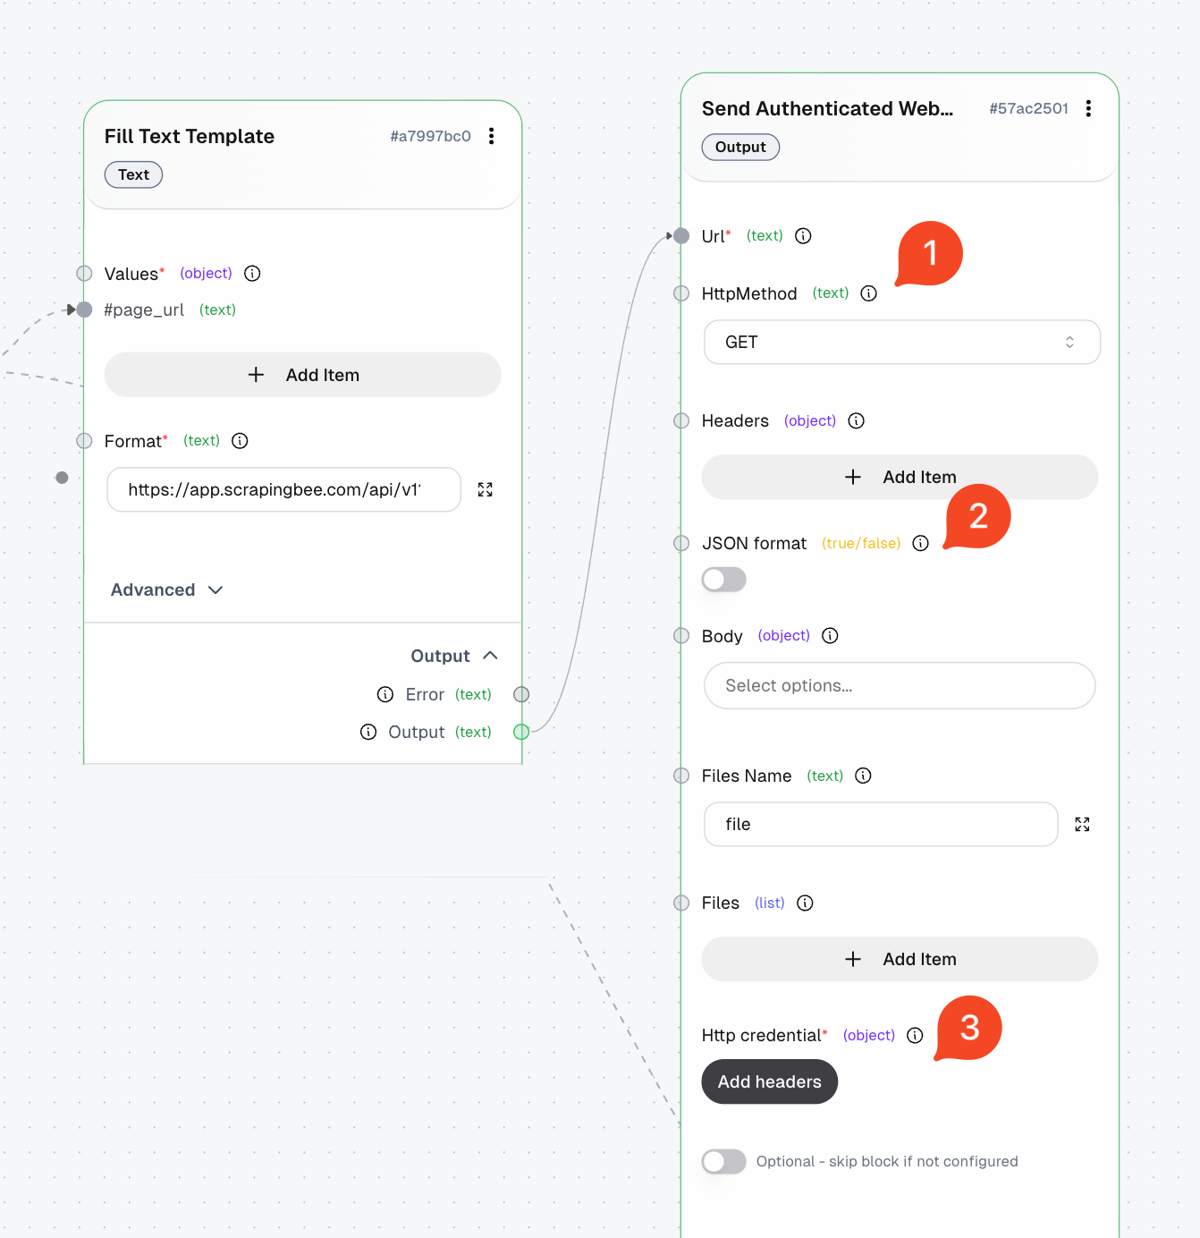
Then configure the block:
- Change HttpMethod from POST to GET.
- Turn JSON format off. At this stage, ScrapingBee returns rendered webpage content rather than JSON, so leaving this on will likely cause the block to throw an error.
- Leave Headers, Body, Files Name, and Files unchanged.
Next, scroll to Http credential and click Add headers. Create a credential for ScrapingBee and add "Authorization" as your header.
If AutoGPT asks for a host when creating the credential, use:
app.scrapingbee.com
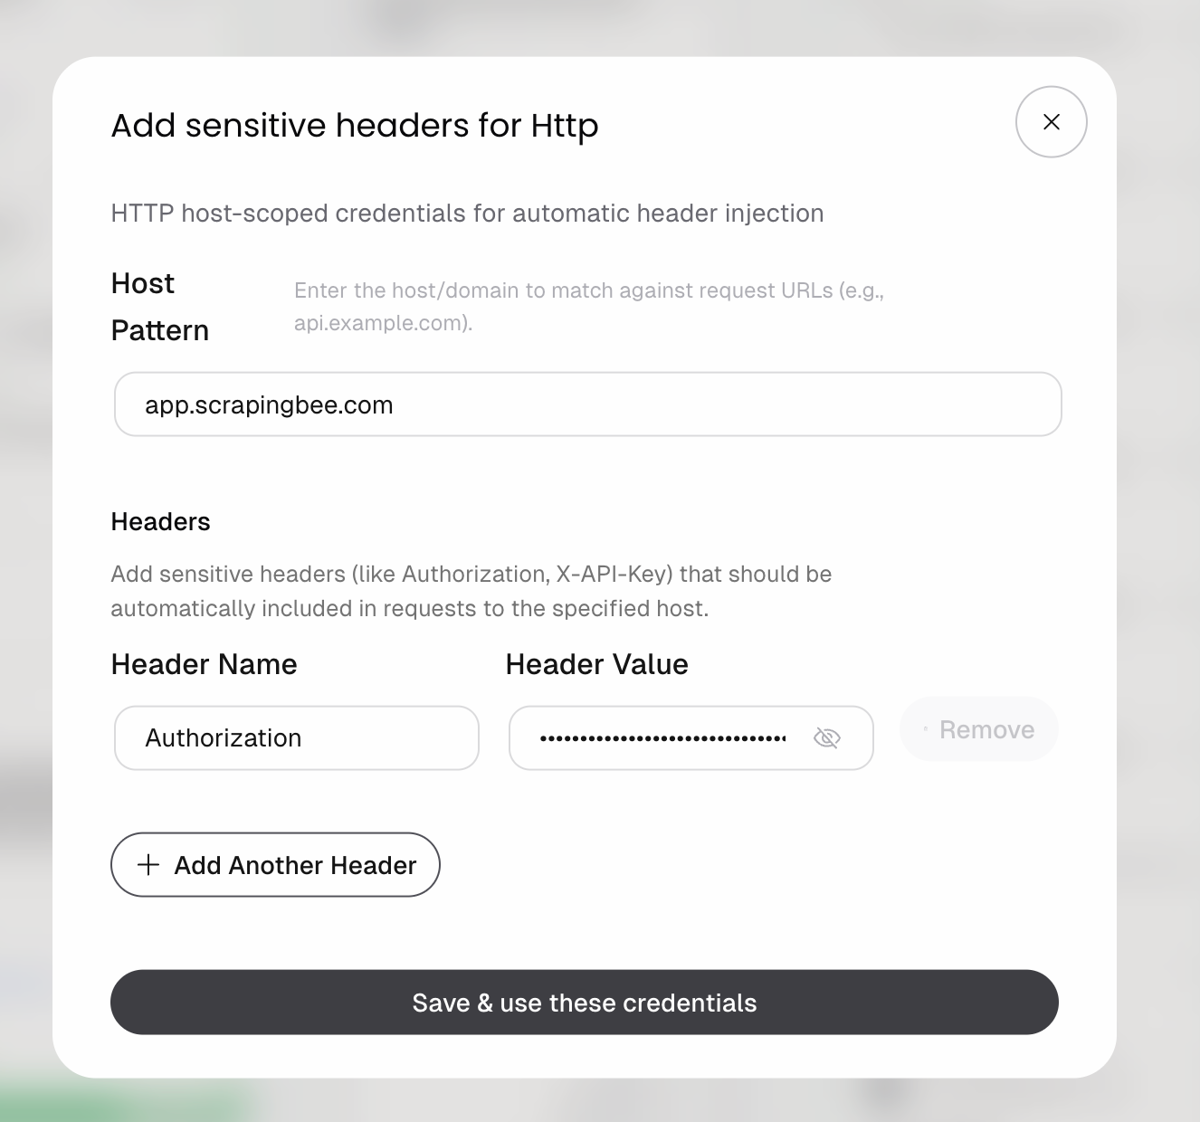
with the value:
Bearer YOUR_SCRAPINGBEE_API_KEY
Replace YOUR_SCRAPINGBEE_API_KEY with the API key from your ScrapingBee dashboard. Save the credential and make sure it is selected in the Http credential field.
Note: ScrapingBee recommends sending API keys as Bearer tokens in the Authorization header. The older api_key query parameter is deprecated and retained only for backward compatibility.
Step 7: Add the analysis block
Open the Blocks panel and search for AI Structured Response Generator. Drag it onto the canvas to the right of Send Authenticated Web Request.
This block will receive the football page content and use an LLM to identify only the stories that are strongly connected to the FIFA World Cup.
Next, scroll to Prompt Values and add two items but leave their value fields empty:
- page_url
- page_content.
Two new pins appear on the left edge of the block. Connect the Result pin on Agent Input to page_url, and the Response pin on Send Authenticated Web Request to page_content. The Agent Input pin now has two lines leaving it, which is fine. Send Authenticated Web Request is the API call that fetches the page content for the rest of the workflow.
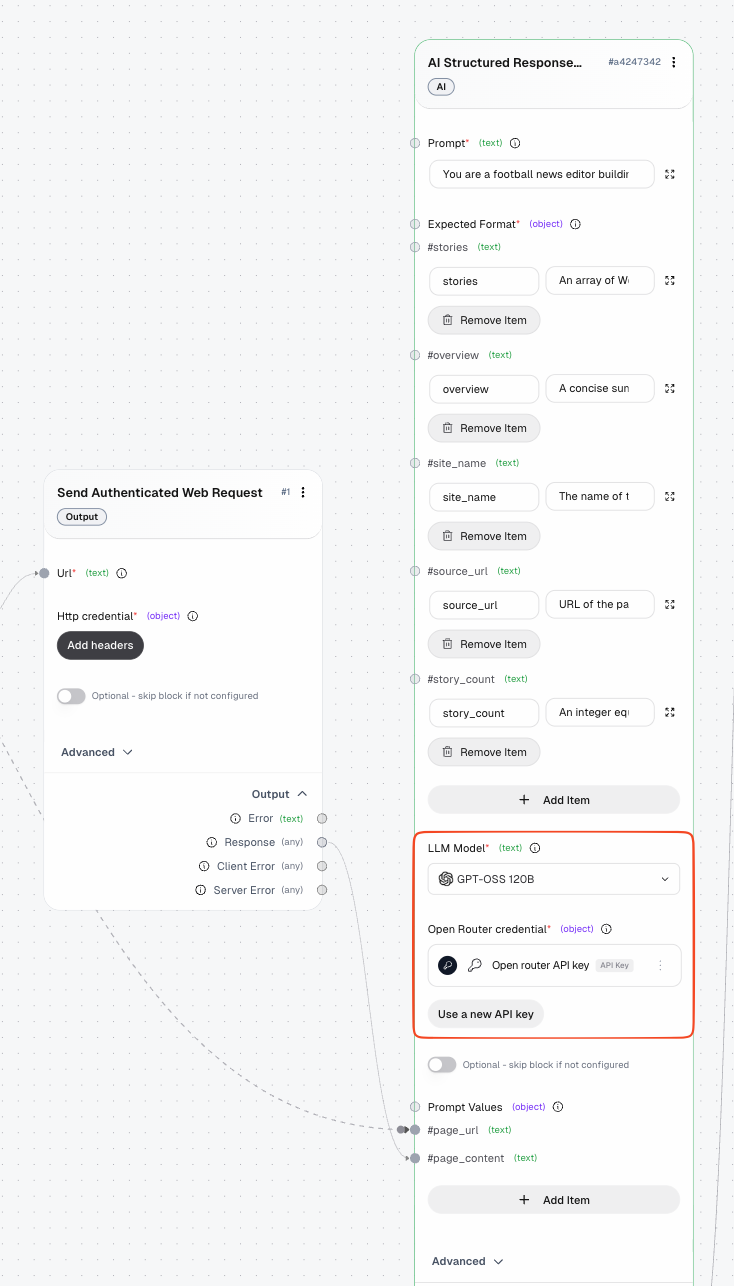
As for the model, open the LLM Model and select GPT-OSS 120B. The credential field below it follows the model you choose, so it will switch to an OpenRouter credential. Click Add API key and paste the key from your OpenRouter API Keys page.
If you prefer OpenAI instead, first create an OpenAI account, add a payment method if billing is required, and paste your OpenAI API key into the matching credential.
This tutorial uses GPT-OSS 120B through OpenRouter; however, this is not the only option. The AI block in AutoGPT supports several providers, including OpenAI, Anthropic, Groq, DeepSeek, and Ollama. If you already have a key with one of those, use it and swap the model.
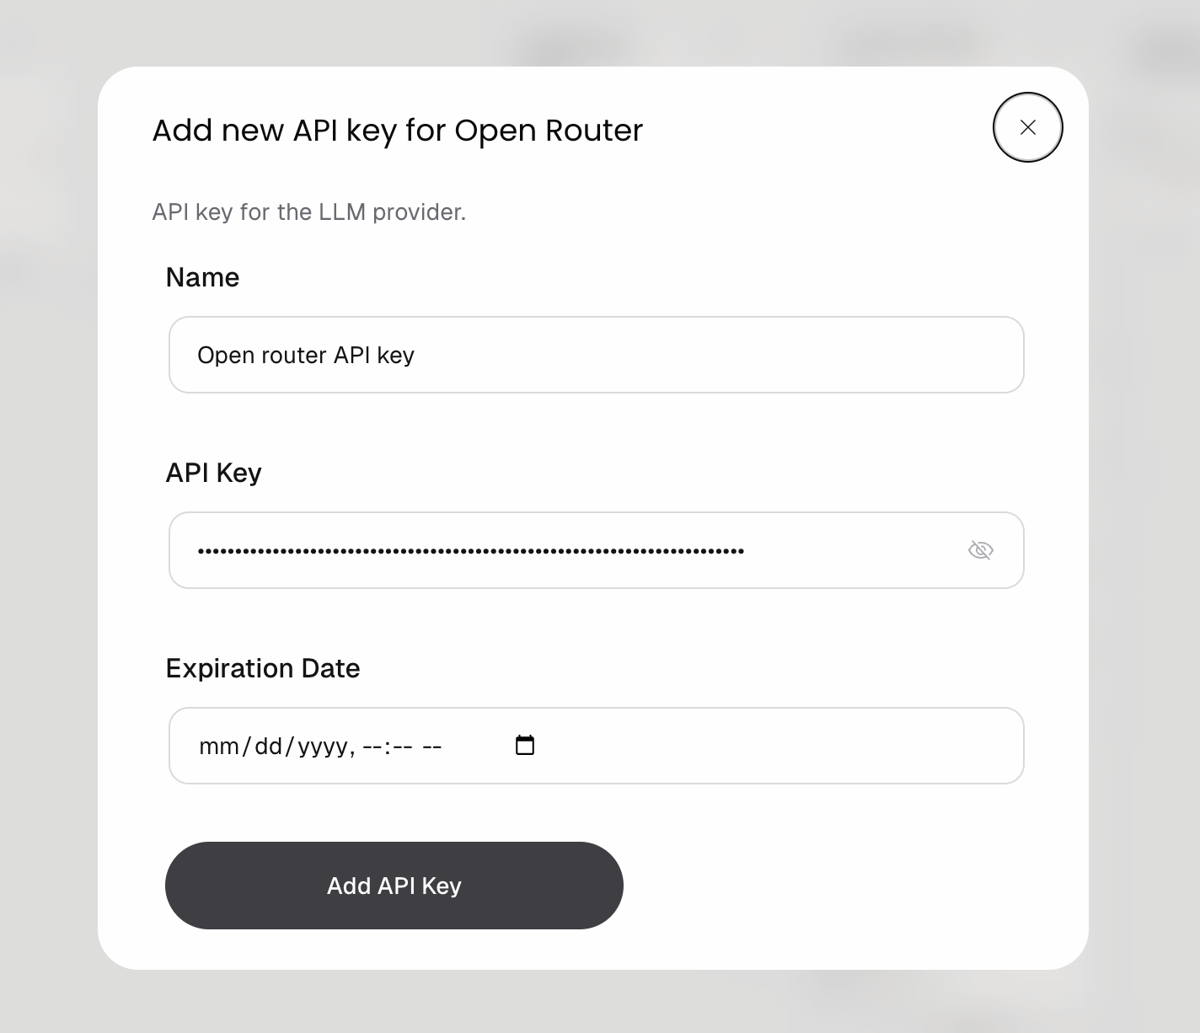
Paste the following into the block's Prompt field:
You are a football news editor building a World Cup news picker.

Analyze the supplied football webpage and return only stories clearly related to a FIFA World Cup.

Include stories about World Cup matches, fixtures, results, live updates, national teams, squads, injuries, qualification, hosting, scheduling, or tournament administration.

Exclude club transfers, domestic leagues, Champions League news, general football stories, and articles that mention the World Cup only briefly.

Give each story a World Cup relevance score from 0 to 100:
- 90 to 100: directly about the World Cup
- 75 to 89: strongly connected to preparation, qualification, squads, hosting, or administration
- Below 75: exclude

Return no more than 10 stories, sorted by relevance score. Remove duplicates.

Use only information found on the page. Do not invent headlines, summaries, dates, links, or reasons. Convert relative links to full URLs. Use an empty string when a summary or date is unavailable.

If no qualifying stories are found, return an empty stories array and explain why in the overview.

Source URL:
{{ page_url }}

Page content:
{{ page_content }}
This prompt gives the model more responsibility than regular extraction. It must distinguish World Cup coverage from general football news, reject unrelated stories, score each qualifying article, remove duplicates, and arrange the results by relevance.
Finally, fill in the Expected Format. Remove any placeholder fields and add these five, each as a key with a plain description as its value:
| Field | Description |
|---|---|
| source_url | The original football news webpage that was analyzed |
| site_name | The name of the football news website or publication |
| overview | A concise summary of the World Cup coverage found on the page |
| story_count | An integer equal to the number of qualifying World Cup stories returned |
| stories | An array of World Cup story objects. Each object must contain headline, summary, url, published_date, world_cup_relevance_score, and relevance_reason. Include only stories with a relevance score of 75 or higher. |
The block takes flat key and description pairs, so the model reads those descriptions and shapes its JSON to match.
Step 8: Add the Agent Output block
Open the Blocks panel, go to Output blocks, and add Agent Output. Drag it to the right of the AI Structured Response Generator.
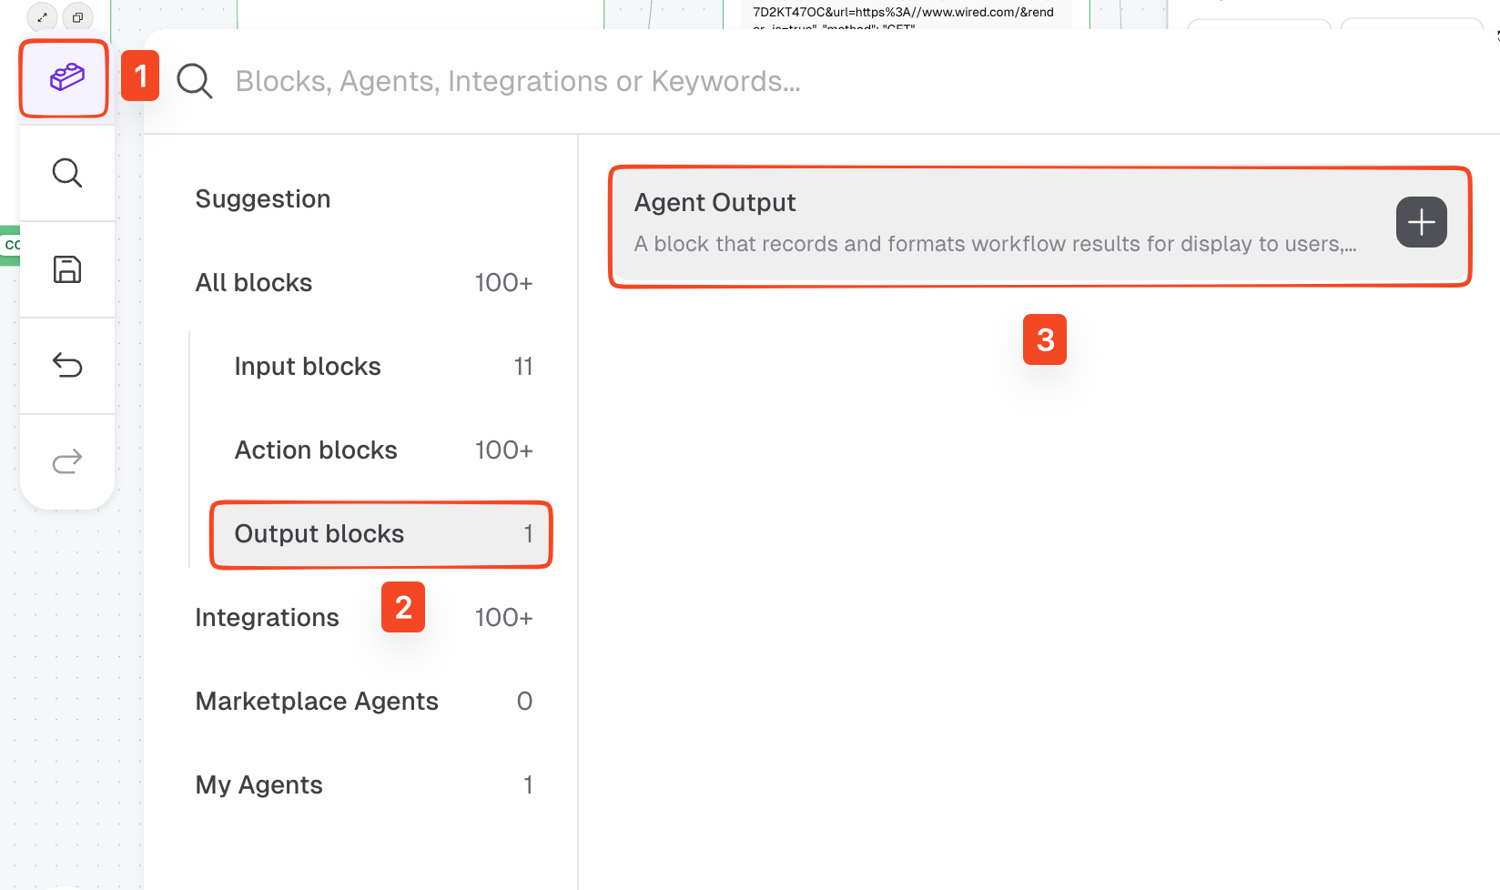
Set its Name to world_cup_news, then connect the Response pin on the AI Structured Response Generator to the Value pin on Agent Output.
The completed workflow should now look like:
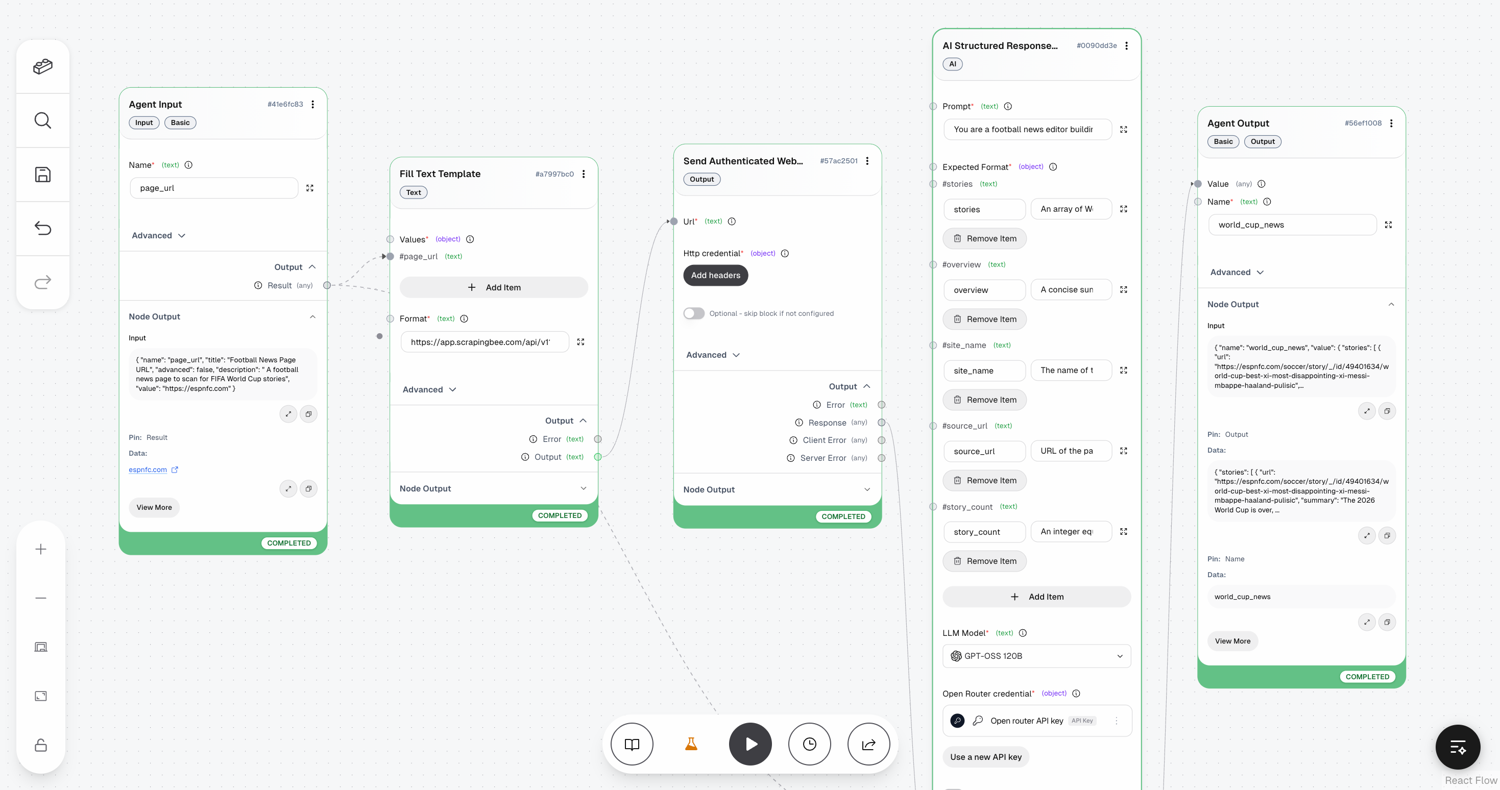
Save the agent again.
Step 9: Run the agent
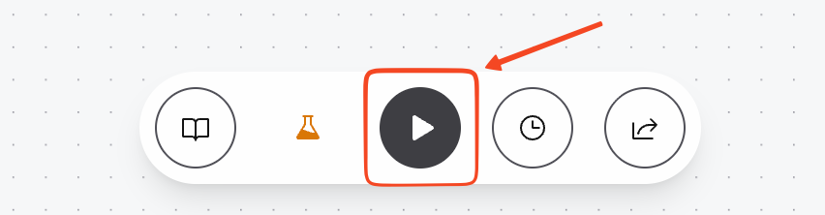
Click the Run button at the bottom of the builder. When AutoGPT asks for page_url, enter a football news page:
https://espnfc.com
Click the run button and wait for the blocks to complete.
Output
The exact stories will change as ESPN publishes new content, but a shortened example of a successful response looks like this:
{
  "source_url": "https://espnfc.com",
  "site_name": "ESPN FC",
  "overview": "The page contains several stories covering the latest FIFA World Cup matches, teams, and knockout-stage developments.",
  "story_count": 10,
  "stories": [
    {
      "headline": "Argentina survive again to book England semifinal",
      "summary": "Julian Alvarez's extra-time strike earned Argentina a place in the World Cup semifinals.",
      "url": "https://espnfc.com/football/story/_/id/49339687/argentina-switzerland-2026-world-cup-julian-alvarez-england",
      "published_date": "",
      "world_cup_relevance_score": 92,
      "relevance_reason": "Direct match report of a World Cup knockout-stage game determining a semifinalist."
    }
  ]
}
Note: The JSON is truncated here for readability.
The stories array may contain up to ten items as we defined in our prompt. Each item includes the article details, a World Cup relevance score, and a short explanation of why it qualified.
Open Agent Output and click View More to see the complete result.
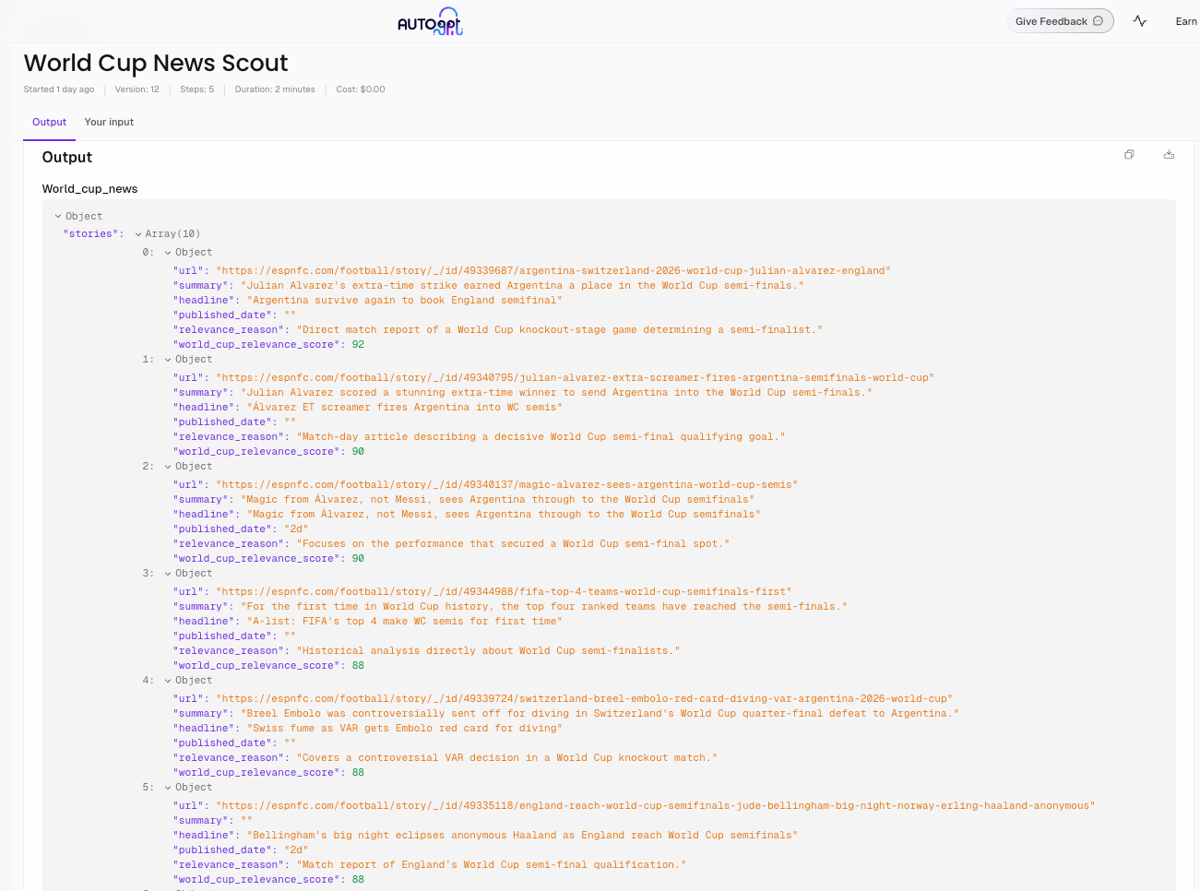
There you have it; you have successfully built your first AutoGPT agent with ScrapingBee!
Troubleshooting
If the workflow does not run as expected, check the issue against the following common fixes:
Docker does not start
Make sure Docker Desktop or Docker Engine is running, then confirm the daemon is available:
docker info
Once Docker is running, start AutoGPT again:
docker compose up -d --build
A required port is already in use
AutoGPT uses ports 3000, 8001, and 8006. On macOS or Linux, check the conflicting process with:
lsof -i :3000
On Windows, run:
netstat -ano | findstr :3000
Stop the process running on the port, or change the exposed host port in the Docker Compose file.
The AutoGPT page does not load
Check whether the containers are running:
docker compose ps
If a container stopped or failed to start, inspect the recent logs:
docker compose logs --tail=100
ScrapingBee returns an authentication error
Open the Send Authenticated Web Request block and confirm that the ScrapingBee credential is selected.
The credential should be configured for:
Host: app.scrapingbee.com
with the header:
Authorization: Bearer YOUR_SCRAPINGBEE_API_KEY
Make sure Bearer is followed by a space and the complete API key. Also check your ScrapingBee dashboard to make sure you still have API credits.
The AI block returns a "401" or "Missing Authentication" error
Make sure you entered the full OpenRouter key, including the "sk-or-v1-" prefix. If you're using a paid model, also ensure your API keys aren't expired and that you still have funds to pay for requests on your dashboard.
Improve the workflow with AI extraction
Right now, ScrapingBee returns the entire page, and the LLM has to read all of it. This simply means our agent is doing things the hard way, as it still has to sort through nav links, ads, unrelated stories, and other content before it can find the World Cup news.
If the page is big enough, the content you care about can fall outside the model's context window, and the agent will tell you it found nothing or hallucinate.
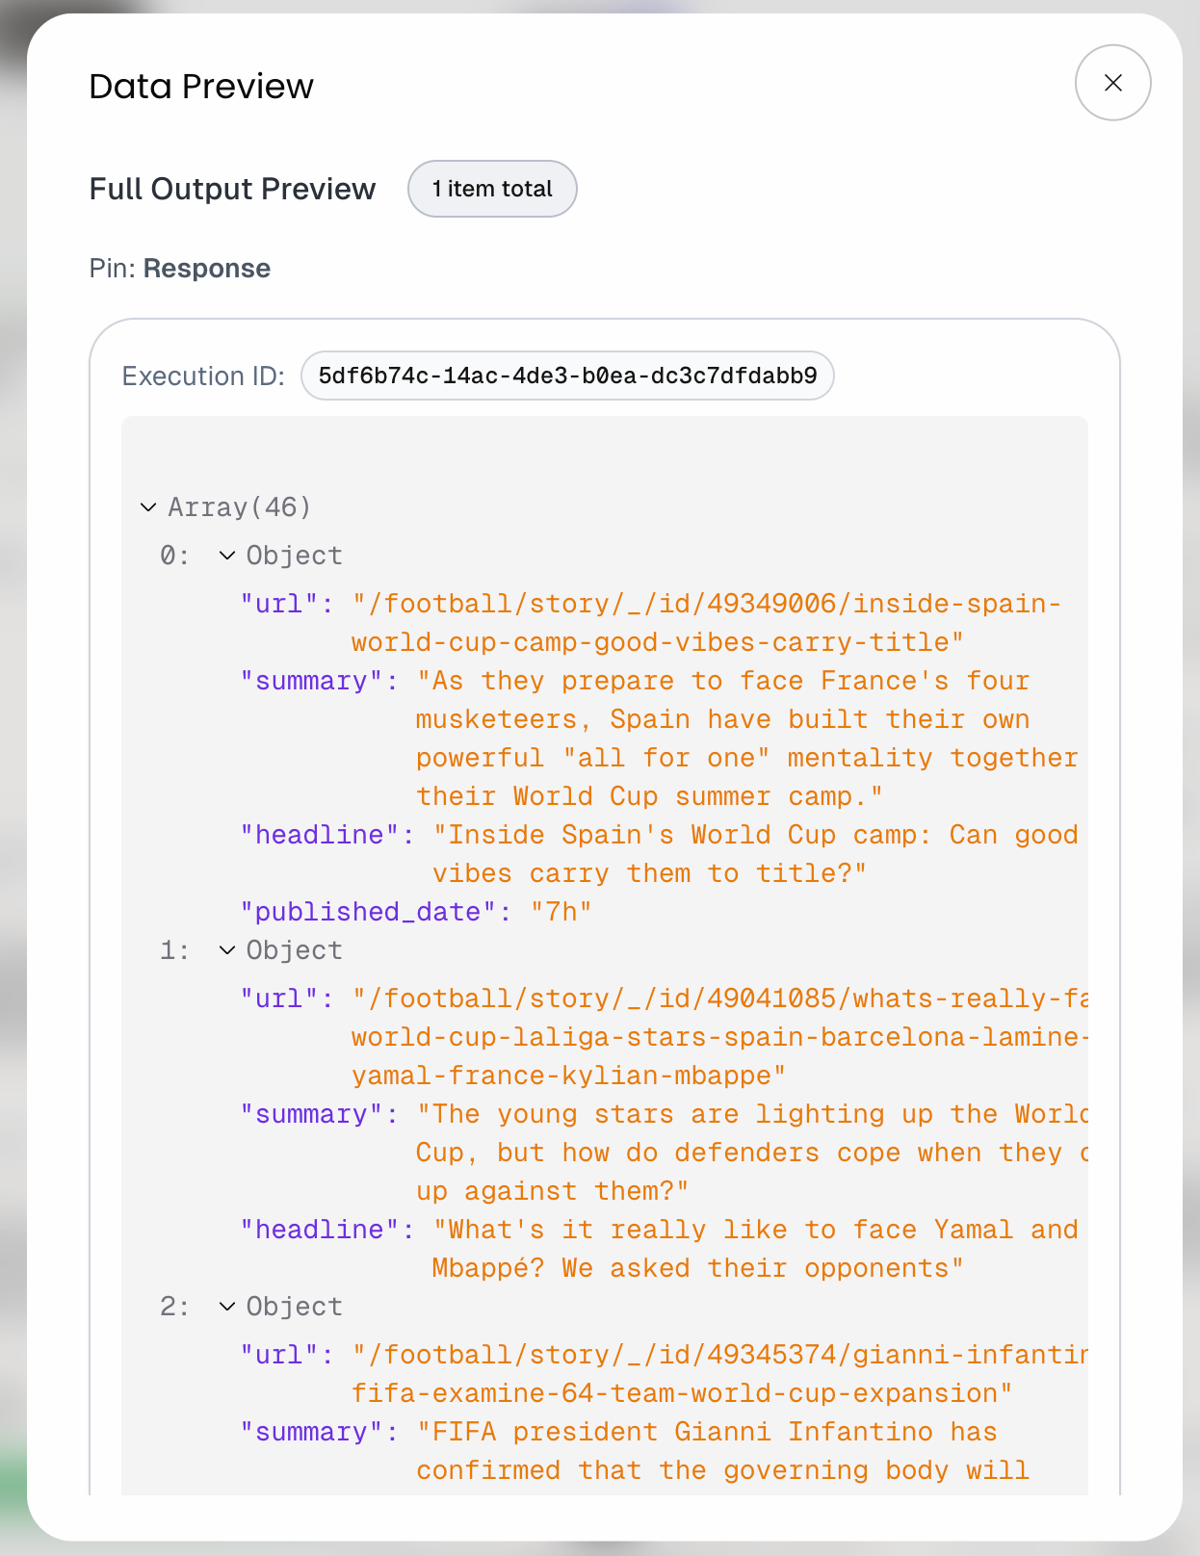
You can reduce that work by using ScrapingBee's ai extract_rules. It lets you describe the fields you want in plain English and returns the results as structured JSON.
That means you can ask for the story headlines and links directly in the request, and hand the LLM a short list instead of a full page.
AI extract_rules
In the Fill Text Template block, add another value named ai_rules and use:
{
  "stories": {
    "description": "All football news stories shown on the page",
    "type": "list",
    "output": {
      "headline": "The story headline",
      "summary": "The story summary or teaser",
      "url": "The link to the full story",
      "published_date": "The publication date when available"
    }
  }
}
Then update the request format to include the extraction rules:
https://app.scrapingbee.com/api/v1?url={{ page_url | urlencode }}&render_js=true&ai_extract_rules={{ ai_rules | urlencode }}
Since ScrapingBee now returns structured JSON instead of the full page HTML, turn JSON format back on in the Send Authenticated Web Request block.
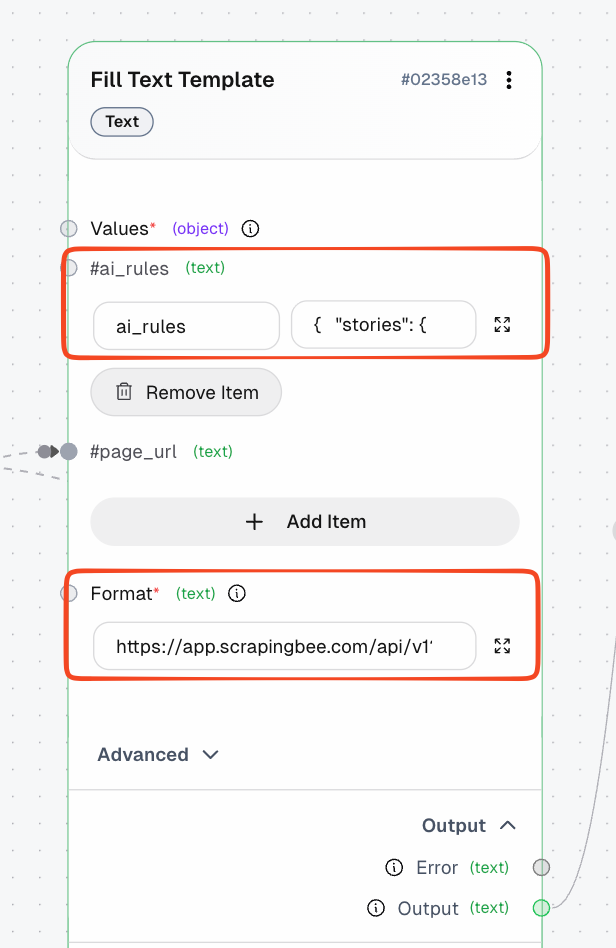
The rest of the workflow stays almost the same. The result is cleaner input, more predictable output, and fewer unnecessary tokens sent to the model.
Note: ScrapingBee's ai_extract_rules parameter adds five credits to the normal request cost, but it's worth it for larger pages.
How much can this reduce token usage?
The exact saving depends on the target page and how many items ScrapingBee extracts. In our run, the full rendered page was around 120,000 characters, while the extracted response contained 46 story objects.
At roughly 14,000 characters for the extracted JSON, and using the common estimate of about four characters per token, the difference looks like this:
| Input sent to the LLM | Size | Approximate tokens |
|---|---|---|
| Complete rendered HTML | 120,000 characters | 30,000 tokens |
| Extracted JSON | 14,000 characters | 3,500 tokens |
So if we do some quick math, we can find our token reduction rate:
Token reduction = (1 - 3,500 / 30,000) × 100
                ≈ 88%
In this run, that works out to roughly an 88% reduction in input tokens. The exact result will vary, but cutting the model input by around 85–90% can reduce LLM costs, lower the risk of context-window problems, and make the response more predictable.
There is a trade-off, though. ScrapingBee's ai_extract_rules adds five credits to the request, taking this JavaScript-rendered request from five credits to ten. Whether it ultimately lowers your total cost depends on the LLM's token pricing, the size of the page, and how often the workflow runs.
Use cases for ScrapingBee + AutoGPT with autonomous AI agents
The World Cup News Scout is only one example of what you can build with AutoGPT agents:
- News monitoring: Scan news websites for stories about a specific event, company, person, or industry, then rank the most relevant updates.
- Competitor tracking: Monitor competitor websites for pricing changes, product launches, new features, or changes in positioning.
- Product monitoring: Collect product names, prices, ratings, and availability from e-commerce pages, then flag important changes.
- Lead enrichment: Visit public company websites and extract useful details such as services, industries, locations, and contact information.
- Research assistants: Gather information from several public sources, summarize the findings, and compare claims.
Conclusion
In this tutorial, you have learned how to build a self-hosted AutoGPT agent that can scrape live websites without having to manage proxies, browser infrastructure, IP blocks, or anti-bot systems yourself.
You used the AutoGPT Agent Builder to connect an input, a ScrapingBee API call, an LLM, and a structured output into one reusable workflow.
From here, try pointing the agent at a different publication, or rewrite the prompt to track a different topic entirely. Many broader AutoGPT use cases also benefit from modular design, since it makes agents easier to debug and improve. You can also use ScrapingBee's extract_rules to cut your token usage and make it easier to scale your agent.
Ready to add web scraping to your agents? Sign up for ScrapingBee and start with 1000 free API credits, no credit card required.
Related reads
- Your Guide to Qwen-Agent: Build Powerful AI Agents with Tools & RAG
- AI Web Scraping with Python
- No-Code Web Scraping
Frequently asked questions
How do I build an AutoGPT agent?
You build an AutoGPT agent by adding blocks to the Agent Builder and connecting their input and output pins.
Is AutoGPT a no-code tool?
AutoGPT's Agent Builder provides a low-code visual interface for building agents. You can create many workflows without writing orchestration code, although self-hosting the platform and creating custom blocks still require some technical knowledge.
Can I self-host AutoGPT?
Yes. This tutorial self-hosts the AutoGPT Platform with Docker Compose and runs it as a local instance. You can also use AutoGPT's hosted platform instead.
Do I need an OpenAI API key to run AutoGPT?
No. This tutorial uses GPT-OSS 120B through OpenRouter. You can also select another model provider supported by the AI block and use the matching API key.
What is the AutoGPT Agent Builder?
The Agent Builder is AutoGPT's visual interface for creating AI agent workflows. It lets you connect reusable blocks for inputs, API calls, AI models, data processing, and outputs.
What is the Agent Protocol?
The Agent Protocol is a standard interface for communicating with compatible AI agents. You do not need to configure it manually for the visual workflow in this tutorial, but it can be useful when connecting agents to other applications.
Can I create my own custom blocks?
Yes. Developers can create custom blocks when the existing AutoGPT blocks do not provide the required functionality. For example, a custom ScrapingBee block could read an API key from an environment variable or contain custom parsing logic.
Can this workflow complete tasks other than news monitoring?
Yes. You can adapt the same workflow for competitor tracking, product monitoring, lead enrichment, content research, or other tasks that depend on current web data.